1C + offline maps on Android
Hello!
We continue our acquaintance with the FBA Toolkit framework and consider another example of developing an android client for 1C. Our application "Audit point of sale" will load the visit route from 1C and display it on the map. Offline maps are used based on the OpenStreetMap map service.
It is assumed that you have already installed and configured all the necessary developer tools. If this is not the case, see the previous section . The “FBA Toolkit” framework should be no lower than version 1.03, update the 1C configuration and the Android project ru_profi1c_fba from the SVN repository.
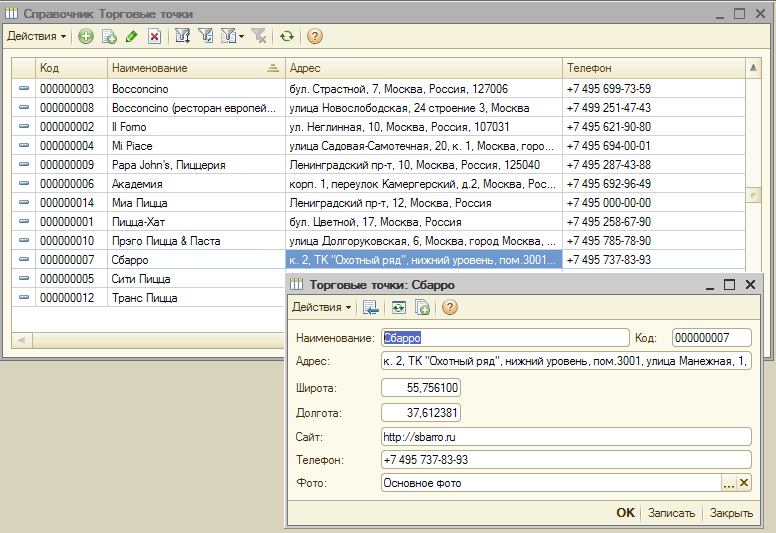
1. In the 1C information base we create 2 reference books that will act as a data source for an example.

')
Details of the reference "point of sale":
Details of the directory "Additional Information Store":
2. The exchange plan “Mobile Application Auditing Points” has also been added. It includes only these two directories, auto-registration of changes is enabled.
3. We fill out reference books with some test information, in this example they are pizzerias in the center of Moscow (data are taken from open sources).
For some points images are loaded. The code to save the value in the storage is standard for 1C:
The form of the element of the directory “Additional Information Store”, “FileName” contains the path to the downloaded image.
4. Create a mobile app “Audit of an outlet”. We add our reference books to the metadata tree.

Just for the sake of convenience, the names of details and objects from the Latin alphabet are translated into English.

The exchange scheme is configured in such a way as to unload only the objects changed in 1C:
where “Exchange Node” is a predefined parameter, at the time of the exchange it will contain the value of the installed node for the mobile employee (below we will show where it is installed).
5. We generate the Android mobile application template. The cost and procedure for purchasing a license are described here . How to enter the obtained license data in 1C is written here .
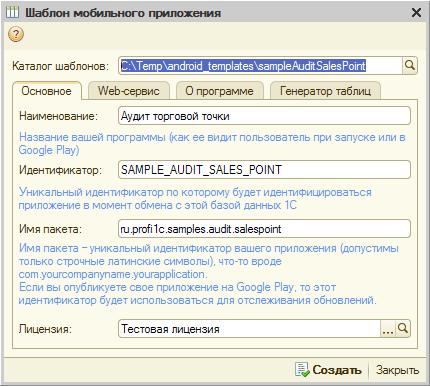
You can also use the test license:
client_id: TEST-CLIENT-000
client_name: test-client-name
client_pwd: 31qX9OqZ_V
lisence_id: f7a42162-e27f-4246-a89b-b69c02387740
Only in this case, it is not recommended to change the name of the mobile application package: ru.profi1c.samples.audit.salespoint .
6. In the directory “Mobile employees” add our application for the employee, which is used to test the exchange. Check out the “Exchange Hub” column, this is a new element of our exchange plan.

As a rule, for each employee creates its own exchange node. In this case, it turns out that changes in data in 1C will be automatically registered for all nodes (all mobile employees), and during the exchange each mobile client will “take away its portion of data”.
This parameter can be used in queries for data sampling, as in our case with the directory “Storage of additional information”.
It is also recommended for each mobile application to create a separate exchange plan, so as not to cause confusion.
The preparatory work in 1C has been completed, to test the exchange rules, you can use the “Test exchange with a mobile application” processing, more details here . In 1C, nothing more needs to be done, the FBA takes over all the routine work of organizing the exchange. The programmer can concentrate on developing a mobile application.
1. Create a new project based on the generated template. To do this in Eclipse, you must perform an import, as described in detail here .
2. Make a card. The FBA includes helper classes that make it easier for a beginner to work with Mapsforge offline maps. One of these classes is BaseRouteMapActivity, which is designed to display and navigate route points. We will use it.
2.1 Create your own class, the successor from BaseRouteMapActivity:
We will display the map of Moscow, which must be placed on the emulator in the mnt / sdcard / backup / <package name> directory. This directory will be created automatically when you first start the program. Where to get the map file or how to create it yourself, see the end of the article.
At launch, our map will be centered on the coordinates passed in the getMapCenterPoint () method. The showCurrentPosition () function should return true if you go to display a marker with your current position.
If the requestLocationUpdates () method turns on coordinate tracking, then the onLocationChanged handler will be called upon changing. Settings for the update frequency of coordinates are set by getLocationMinDistance () and getLocationMinTime (). By default, both providers are used (GPS and NETWORK) to get coordinates, you can change it in BaseMapActivity because the source code is open.
In the activity_route_map.xml layout we place the map element:
In principle, this is enough to display the map. The map also displays a marker with the current position and it is possible to handle the event when the coordinates change.
2.2 Adding a layer with route points is performed using the addRouteOverlay method, to which the list of List <RouteOverlayItem> elements is passed. T is an extra type. the data stored with the item, in your case, CatalogSalesPoint. Prepare a list of our outlets:
and add a call to this method in init ().
Here, all the elements of the Point of Sale directory are selected from the local database and added to the collection of displayed items. And for points that have coordinates set at 1C, the marker will be green. Points without coordinates are placed in the center of the map with a red marker. The user can move them around the map in order to clarify the coordinates.
2.3 Let's add a response to a click on a marker to the onRouteItemSelect handler:
Fields of the class and the method that displays additional information about the outlet:
To display the pop-up window, the map_popup.xml layout is used (the markup is partially given):
The layout displays information on a single outlet, the details of “Name”, “Address”, “Site” and “Phone” are automatically projected onto TextView-elements in mSalesPointView.build (...) .
To display the photo, use the subordinate object ovFotoStorage with a child ImageView. The photo is read from the base and projected onto the ImViewView in the mFotoStorageView.build method (...) .
And since the “Photo” requisite stores only a link to the “Additional information storage” reference book, it must first be considered the refresh method.
Initialization is added to the method in init ()
The layout of map_popup.xml can be set as custom for Toast, but in this example it is embedded in the main layout of activity_route_map.xml:
For visibility control methods are used:
The pop-up message is hidden by clicking on it, and is displayed when you click on the point marker.
The application is ready, run it on the emulator, configure the authorization parameters (as in 1C) and exchange with the database. Example of the application:
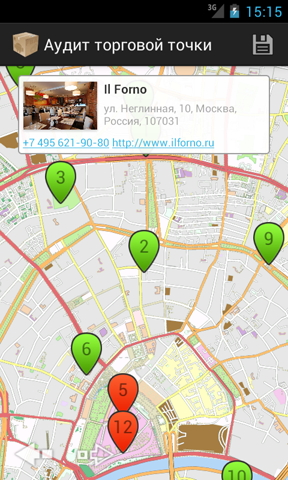
Clicking on the phone number will open the standard "dialer", and a click on the link will launch the browser. This behavior is achieved by simply setting the android: autoLink property for TextView.
The full sample code is available in the SVN repository . Additionally, it shows how to save the coordinates of the moved points and update the marker.
We plan to place some maps on our website , priority for cities (regions) uncovered with sufficient detail on Google Maps and maps prepared for FBA clients. Brief instructions for creating a map file are given there.
That's all, with other examples you can find on the site http://profi1c.ru .
I hope I managed to at least a little dispel the myth that the development of mobile business applications is "difficult, expensive and time consuming."
We continue our acquaintance with the FBA Toolkit framework and consider another example of developing an android client for 1C. Our application "Audit point of sale" will load the visit route from 1C and display it on the map. Offline maps are used based on the OpenStreetMap map service.
It is assumed that you have already installed and configured all the necessary developer tools. If this is not the case, see the previous section . The “FBA Toolkit” framework should be no lower than version 1.03, update the 1C configuration and the Android project ru_profi1c_fba from the SVN repository.
Server part (in 1C database)
1. In the 1C information base we create 2 reference books that will act as a data source for an example.
')
Details of the reference "point of sale":
- "Latitude" and "Longitude" contain the coordinates of this point, the number 10.6
- "Photo" link to the directory "Storage of additional information" - a link to the main image;
- all other details of the string type.
Details of the directory "Additional Information Store":
- The “object” of a composite type including contains the type “Directory Reference. Trading Point”, which determines the object to which the additional information belongs. In the mobile application is not used.
- “Storage”, “Value Storage” type, contains the image itself.
2. The exchange plan “Mobile Application Auditing Points” has also been added. It includes only these two directories, auto-registration of changes is enabled.
3. We fill out reference books with some test information, in this example they are pizzerias in the center of Moscow (data are taken from open sources).
For some points images are loaded. The code to save the value in the storage is standard for 1C:
= (); = (, (9)); The form of the element of the directory “Additional Information Store”, “FileName” contains the path to the downloaded image.
4. Create a mobile app “Audit of an outlet”. We add our reference books to the metadata tree.
Just for the sake of convenience, the names of details and objects from the Latin alphabet are translated into English.
The exchange scheme is configured in such a way as to unload only the objects changed in 1C:
- The flag for using the MobileApplement Points exchange plan is set.
- when changing any “Point of Sale” in 1C, it will be transferred to the mobile application;
- Additional filtering has been imposed on the “Storage of additional information” directory: transfer changed information only to outlets. This is done by a query:
. .. . = & .. . where “Exchange Node” is a predefined parameter, at the time of the exchange it will contain the value of the installed node for the mobile employee (below we will show where it is installed).
5. We generate the Android mobile application template. The cost and procedure for purchasing a license are described here . How to enter the obtained license data in 1C is written here .
You can also use the test license:
client_id: TEST-CLIENT-000
client_name: test-client-name
client_pwd: 31qX9OqZ_V
lisence_id: f7a42162-e27f-4246-a89b-b69c02387740
Only in this case, it is not recommended to change the name of the mobile application package: ru.profi1c.samples.audit.salespoint .
6. In the directory “Mobile employees” add our application for the employee, which is used to test the exchange. Check out the “Exchange Hub” column, this is a new element of our exchange plan.
As a rule, for each employee creates its own exchange node. In this case, it turns out that changes in data in 1C will be automatically registered for all nodes (all mobile employees), and during the exchange each mobile client will “take away its portion of data”.
This parameter can be used in queries for data sampling, as in our case with the directory “Storage of additional information”.
It is also recommended for each mobile application to create a separate exchange plan, so as not to cause confusion.
The preparatory work in 1C has been completed, to test the exchange rules, you can use the “Test exchange with a mobile application” processing, more details here . In 1C, nothing more needs to be done, the FBA takes over all the routine work of organizing the exchange. The programmer can concentrate on developing a mobile application.
Android mobile application
1. Create a new project based on the generated template. To do this in Eclipse, you must perform an import, as described in detail here .
2. Make a card. The FBA includes helper classes that make it easier for a beginner to work with Mapsforge offline maps. One of these classes is BaseRouteMapActivity, which is designed to display and navigate route points. We will use it.
2.1 Create your own class, the successor from BaseRouteMapActivity:
Show
public class MapsforgeRouteMap extends BaseRouteMapActivity { /* * ( ) * */ public static int DEF_LOCATION_MIN_DISTANCE = 500; /* * , , * . */ public static long DEF_LOCATION_MIN_TIME = 5000 * 60; //, private static final double DEFAULT_GEOPOINT_LAT = 55.755831; private static final double DEFAULT_GEOPOINT_LNG = 37.617673; // private static final String MAP_FILE = "ru_moscow.map"; private MapView mMapView; @Override protected void onCreate(Bundle savedInstanceState) { super.onCreate(savedInstanceState); setContentView(R.layout.activity_route_map); init(); } private void init() { mMapView = (MapView) findViewById(R.id.mapView); // onCreateMapView(mMapView); } @Override public File getMapFile() { return new File(getAppSettings().getBuckupDir(),MAP_FILE); } @Override public GeoPoint getMapCenterPoint() { return MapHelper.toGeoPoint(DEFAULT_GEOPOINT_LAT, DEFAULT_GEOPOINT_LNG); } @Override public int getLocationMinDistance() { return DEF_LOCATION_MIN_DISTANCE; } @Override public long getLocationMinTime() { return DEF_LOCATION_MIN_TIME; } @Override public boolean showCurrentPosition() { return true; } @Override public boolean requestLocationUpdates() { return true; } @Override protected void onRouteItemSelect(RouteOverlayItem<?> item) { } @Override public void onLocationChanged(Location location) { } } We will display the map of Moscow, which must be placed on the emulator in the mnt / sdcard / backup / <package name> directory. This directory will be created automatically when you first start the program. Where to get the map file or how to create it yourself, see the end of the article.
At launch, our map will be centered on the coordinates passed in the getMapCenterPoint () method. The showCurrentPosition () function should return true if you go to display a marker with your current position.
If the requestLocationUpdates () method turns on coordinate tracking, then the onLocationChanged handler will be called upon changing. Settings for the update frequency of coordinates are set by getLocationMinDistance () and getLocationMinTime (). By default, both providers are used (GPS and NETWORK) to get coordinates, you can change it in BaseMapActivity because the source code is open.
In the activity_route_map.xml layout we place the map element:
<org.mapsforge.android.maps.MapView android:id="@+id/mapView" android:layout_width="fill_parent" android:layout_height="fill_parent" > </org.mapsforge.android.maps.MapView> In principle, this is enough to display the map. The map also displays a marker with the current position and it is possible to handle the event when the coordinates change.
2.2 Adding a layer with route points is performed using the addRouteOverlay method, to which the list of List <RouteOverlayItem> elements is passed. T is an extra type. the data stored with the item, in your case, CatalogSalesPoint. Prepare a list of our outlets:
Show
private void initDummyRoute() throws SQLException { //DAO mStorageDao = new CatalogAddInfoStorageDao(getConnectionSource()); mSalesPointDao = new CatalogSalesPointDao(getConnectionSource()); // CatalogSalesPointDao salePointDao = new CatalogSalesPointDao(getConnectionSource()); List<CatalogSalesPoint> lst = salePointDao.select(); // routeItems = new ArrayList<RouteOverlayItem<CatalogSalesPoint>>(); // , final double lng = DEFAULT_GEOPOINT_LNG; double lat = DEFAULT_GEOPOINT_LAT; int count = lst.size(); for (int i = 0; i < count; i++) { CatalogSalesPoint salesPoint = lst.get(i); boolean movable = (salesPoint.lat == 0 || salesPoint.lng == 0); int resIdDrawable = R.drawable.fba_map_maker_green; GeoPoint geoPoint = new GeoPoint(salesPoint.lat, salesPoint.lng); if (movable) { resIdDrawable = R.drawable.fba_map_marker_red; lat -= 0.003f; geoPoint = new GeoPoint(lat, lng); } // Drawable marker = MapHelper.makeNumberedMarker(this, resIdDrawable,i + 1); RouteOverlayItem<CatalogSalesPoint> routePoint = new RouteOverlayItem<CatalogSalesPoint>( geoPoint, marker, salesPoint); routePoint.setMovable(movable); routePoint.setOrdinal(i + 1); routeItems.add(routePoint); } Drawable defaultMarker = getResources().getDrawable(R.drawable.fba_map_marker_orange); addRouteOverlay(mMapView, routeItems, defaultMarker); } and add a call to this method in init ().
Here, all the elements of the Point of Sale directory are selected from the local database and added to the collection of displayed items. And for points that have coordinates set at 1C, the marker will be green. Points without coordinates are placed in the center of the map with a red marker. The user can move them around the map in order to clarify the coordinates.
2.3 Let's add a response to a click on a marker to the onRouteItemSelect handler:
CatalogSalesPoint salesPoint = (CatalogSalesPoint) item.getData(); inflatePopup(salesPoint); Fields of the class and the method that displays additional information about the outlet:
Show
private ObjectView mSalesPointView, mFotoStorageView; /* * ( ) */ private static String[] fields = new String[] { CatalogSalesPoint.FIELD_NAME_DESCRIPTION, CatalogSalesPoint.FIELD_NAME_ADRESS, CatalogSalesPoint.FIELD_NAME_PHONE, CatalogSalesPoint.FIELD_NAME_SITE }; /* * view- */ private static int[] ids = new int[] { R.id.tvDescription, R.id.tvAdress, R.id.tvPhone, R.id.tvSite}; /* * */ private void inflatePopup(CatalogSalesPoint salesPoint) throws SQLException { if (CatalogSalesPoint.isEmpty(salesPoint.foto)) { mFotoStorageView.setVisibility(View.GONE); } else { // mStorageDao.refresh(salesPoint.foto); mFotoStorageView.build(salesPoint.foto, getHelper(), new String[] { CatalogAddInfoStorage.FIELD_NAME_STORAGE }, new int[] { R.id.ivFoto }); mFotoStorageView.setVisibility(View.VISIBLE); } mSalesPointView.build(salesPoint, getHelper(), fields, ids); } To display the pop-up window, the map_popup.xml layout is used (the markup is partially given):
<ru.profi1c.engine.widget.ObjectView android:id="@+id/ovSalesPoint"> <ru.profi1c.engine.widget.ObjectView android:id="@+id/ovFotoStorage" > <ImageView android:id="@+id/ivFoto"/> </ru.profi1c.engine.widget.ObjectView> <TextView android:id="@+id/tvDescription"/> <TextView android:id="@+id/tvAdress"/> <TextView android:id="@+id/tvSite" android:autoLink="web"/> <TextView android:id="@+id/tvPhone" android:autoLink="phone"/> </ru.profi1c.engine.widget.ObjectView> The layout displays information on a single outlet, the details of “Name”, “Address”, “Site” and “Phone” are automatically projected onto TextView-elements in mSalesPointView.build (...) .
To display the photo, use the subordinate object ovFotoStorage with a child ImageView. The photo is read from the base and projected onto the ImViewView in the mFotoStorageView.build method (...) .
And since the “Photo” requisite stores only a link to the “Additional information storage” reference book, it must first be considered the refresh method.
Initialization is added to the method in init ()
mSalesPointView = (ObjectView) findViewById(R.id.ovSalesPoint); mFotoStorageView = (ObjectView) findViewById(R.id.ovFotoStorage); The layout of map_popup.xml can be set as custom for Toast, but in this example it is embedded in the main layout of activity_route_map.xml:
Show
<FrameLayout xmlns:android="http://schemas.android.com/apk/res/android" android:layout_width="fill_parent" android:layout_height="fill_parent" > <org.mapsforge.android.maps.MapView android:id="@+id/mapView" android:layout_width="fill_parent" android:layout_height="fill_parent" > </org.mapsforge.android.maps.MapView> <include android:layout_width="wrap_content" android:layout_height="wrap_content" android:layout_marginLeft="20dp" android:layout_marginRight="20dp" android:layout_marginTop="10dp" layout="@layout/map_popup" android:visibility="gone" /> </FrameLayout> For visibility control methods are used:
Show
/* * */ private void closePopup(){ if(mSalesPointView.getVisibility() == View.VISIBLE){ mSalesPointView.setVisibility(View.GONE); } } /* * */ private void showPopup(){ if(mSalesPointView.getVisibility() != View.VISIBLE){ mSalesPointView.setVisibility(View.VISIBLE); } } The pop-up message is hidden by clicking on it, and is displayed when you click on the point marker.
The application is ready, run it on the emulator, configure the authorization parameters (as in 1C) and exchange with the database. Example of the application:
Clicking on the phone number will open the standard "dialer", and a click on the link will launch the browser. This behavior is achieved by simply setting the android: autoLink property for TextView.
The full sample code is available in the SVN repository . Additionally, it shows how to save the coordinates of the moved points and update the marker.
Where to get cards
We plan to place some maps on our website , priority for cities (regions) uncovered with sufficient detail on Google Maps and maps prepared for FBA clients. Brief instructions for creating a map file are given there.
That's all, with other examples you can find on the site http://profi1c.ru .
I hope I managed to at least a little dispel the myth that the development of mobile business applications is "difficult, expensive and time consuming."
Source: https://habr.com/ru/post/184978/
All Articles