Translating the D-Link DIR-320 into a 3G router
I am more than sure that many have seen such headlines more than once. But every time you read them, it turns out that you need to buy some of the world's most proven modem, and besides, luck should be favorable to you. But the most common problem is that there is no such modem that would not hang after a certain time. The longest interval that I saw is 8 (eight) hours. As a result, many people reject such an idea and give up, and if there is no way without a router, then an old PC is adapted for this purpose, and they also install Windows (as a rule, XP, well, or what will be at hand).
Since the PC, and especially Windows, is not an option for me and I didn’t have the “modem” at hand, I had to find a solution.
If continuation is interesting, I ask under "kat".
As it probably became clear to many from the preface, I was faced with the task of making a small and very stable 3G router.
What is required for this:
So, before you do something yourself, I began by analyzing numerous forums and communities. At each forum there were branches with a description of the very miracle of modems and an infinite number of related problems. Some were mega stable, but with an unacceptably low speed, others were pleased with the performance, but after 30 minutes they “hung” tightly. All this is very sad.
Before going to the “bins of the homeland” for an old PC, I decided to analyze the facts and independently investigate the problem.
For primary experiments, I decided to use a stationary PC with Linux. After setting up the 3G connection, using the available Huawei E173, I launched the ping + wget command at intervals of 10 minutes. The connection lasted about 4 (four) hours, after which the modem stopped responding to the PPP commands, while AT worked. I conducted the same experiment with AnyDATA ADU-500A (this is a modem from the list of "those"). Oddly enough, it ended all the same, only after 5 hours.
Any attempts to revive, did not bring the long-awaited result, only the complete de-energizing saved the situation.
Once again, I decided to reboot the modem and it dawned on me, and why not just put out the USB port. No sooner said than done:
The experiment showed that everything is fine restarts. And the connection can be established again. From this point on, it became extremely clear what to do.
')
Taking four firmware for the router: D-Link, Asus, OpenWRT, or DD-WRT, I began to repeat the experiment, but bad luck, surprisingly, none of the firmware had USB power management capability. At first, I thought it was a 2.4.x core problem. But the same problem with 2.6. Moreover, after rebooting the router, the modem remained initialized. The conclusion suggested itself, you need to disassemble the router.
Attentive inspection and “dialing” of the board showed that the “+ 5V” power leg is connected directly to the power supply. This does not suit me and needs to be done to upgrade the board and the power source.
The moment of choosing the distribution kit has come. This wonderful router has very little RAM and did not want any unnecessary services to consume it, be it httpd, FTP, SAMBA or anything else. It was decided to build a distribution based on OpenWRT independently, with a minimum of pre-installed packages and services.
But before proceeding with the assembly of the distribution kit and the upgrade of the router, work was underway to select the target modem / operator and external antenna.
After reviewing the coverage map of different operators, I came to the conclusion that the most suitable is MTS. In addition to the coverage map, I really liked the fact that they can make all the statistics and management from a fairly convenient WEB interface. Having bought their best modem, with the promised maximum of 14.7 Mbit / s and at least 3 Mbit / s, I began my adventure.
Perhaps someone will be interested:
After the purchase began trying to connect to this modem. And as always, a number of questions arose:
The dmesg analysis showed that the CD-ROM is mounted as SCSI, it suggested that it should be disabled exactly as SCSI, no usb_modeswitch does not work here, and in fact are not needed.
Of course, he immediately wrote his software, which did it. But the non-flowing thought, that someone already wrote this and most likely it already exists in the ports / portage or somewhere else, made it search. The first pass through the folder with man'ami showed that there is a wonderful package sdparm. Having established and checked, it became clear - this is what is needed.
Since now everything has fallen into place and there are no more questions left, you can get to work.
All steps are performed in the Linux console. Please note, the release of Backfire is chosen due to the fact that this is the latest release with the 2.4 kernel. This is very important, since the 2.6 kernel itself is very demanding on both processor performance and system resources.
After the firmware has been “flooded” and the router has rebooted, connect a modem to it and connect the router via Ethernet to your PC. Configure on the interface (in my case this is eth0) of your PC with the IP address by running the command:
Next, connect to the router via Telnet. To do this, run the following command from the console:
Login will be made automatically without a password request. This is fundamentally not true. To correct the situation, set the password by running the command in the console:
Execute the " exit " command to exit the telnet session.
Log in via ssh :
The next step is to verify that the modem has been recognized by the kernel by running the command in the console:
The result of this command is a string with the VID and PID of the modem. Otherwise, check what was not done according to the instructions.
To control the power of the USB port, you need a free processor foot. But since this is not an engineering board, but an end product, this option is not suitable. By luck, this router has a lot of LED indicators on the front panel. One of them we can fully adapt to our needs. In my case, the choice fell on an indicator with a printer icon, since it corresponded to the USB LED on proc-fs (/ proc / diag / led / usb).
Power management will be provided by an additional charge with the minimum required set of parts. Here is its scheme:
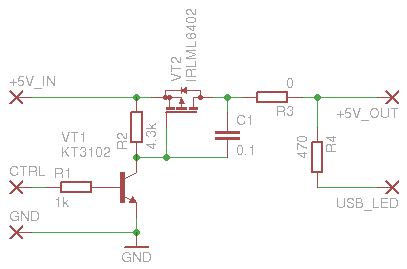
A couple of words about the scheme. Both transistors work as keys. When a logical unit is fed to the “CTRL” input, the VT1 transistor will open, which in turn will lead to the opening of the VT2 transistor and the supply voltage will be fed to the USB port. As such, the calculations were not made, therefore, the scheme can not be considered optimal. For example, the transistor VT1, just was the only NPN transistor in the field of reach, in fact, like the resistors.
There was neither time nor desire for the manufacture of a printed circuit board, so I managed a small piece of the circuit board. Here is the final version:
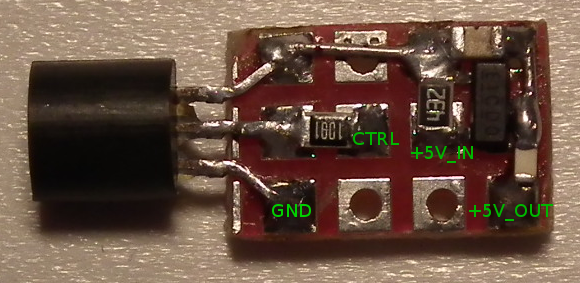
Green inscriptions mark ports of the same name on the schematic. Resistor R4, soldered directly to the leg of the LED.
Step-by-step modification instructions:
This is the last step on the path to "happiness." We will need to write a number of new scripts and make changes to existing ones. So, everything is in order.
Connect to the router via ssh, since all the following steps will be performed directly on it.
Navigate to the / etc / ppp folder. Many will be interested in why this particular folder was chosen as the target. The answer is simple, historically. I think / usr / local / sbin will be more suitable, but essentially it does not change
That's all, more changes will not be. I recommend restarting the router, although 3G should come to life in five minutes.
Home trials lasted 41 days. As a result, a single failure throughout the entire period. Expected stability achieved.
Before being sent to the “fields”, bandwidth tests were conducted in a Kiev apartment. The disappointment took by surprise, the maximum reached did not exceed 1 Mbit / s, while only on large files. The minimum ping was within 220ms. Deciding not to stop testing, I went out of town. The level was at the maximum, while the CDMA Rev.B indicator no longer burned. In fact, I was not warm at 14Mbps, but I expected to see at least 1Mbps already achieved. But the next disappointment was not long in coming, the maximum reached was already about 350 Kbps.
On this, all experiments with the modem from the MTS were discontinued. Return it failed. But the seller has exchanged the antenna for a model capable of working in conjunction with Intertelecom and PeopleNET modems. What I was extremely happy, and let the modem be in the collection, someday come in handy.
Since the PC, and especially Windows, is not an option for me and I didn’t have the “modem” at hand, I had to find a solution.
If continuation is interesting, I ask under "kat".
Introduction
As it probably became clear to many from the preface, I was faced with the task of making a small and very stable 3G router.
What is required for this:
- Router DIR-320 (was available)
- 3G modem
- External antenna
Research and goal setting
So, before you do something yourself, I began by analyzing numerous forums and communities. At each forum there were branches with a description of the very miracle of modems and an infinite number of related problems. Some were mega stable, but with an unacceptably low speed, others were pleased with the performance, but after 30 minutes they “hung” tightly. All this is very sad.
Before going to the “bins of the homeland” for an old PC, I decided to analyze the facts and independently investigate the problem.
For primary experiments, I decided to use a stationary PC with Linux. After setting up the 3G connection, using the available Huawei E173, I launched the ping + wget command at intervals of 10 minutes. The connection lasted about 4 (four) hours, after which the modem stopped responding to the PPP commands, while AT worked. I conducted the same experiment with AnyDATA ADU-500A (this is a modem from the list of "those"). Oddly enough, it ended all the same, only after 5 hours.
Any attempts to revive, did not bring the long-awaited result, only the complete de-energizing saved the situation.
Once again, I decided to reboot the modem and it dawned on me, and why not just put out the USB port. No sooner said than done:
- Find a modem from the list of all USB devices:
for f in `ls /sys/bus/usb/devices/*/product`; do echo -e "$f\t`cat $f`"; done - Turn off the port for 5 seconds and then turn it on:
echo “suspend” | sudo tee /sys/bus/usb/devices/1-1/power/level sleep 5 echo "on" | sudo tee /sys/bus/usb/devices/1-1/power/level
The experiment showed that everything is fine restarts. And the connection can be established again. From this point on, it became extremely clear what to do.
')
Taking four firmware for the router: D-Link, Asus, OpenWRT, or DD-WRT, I began to repeat the experiment, but bad luck, surprisingly, none of the firmware had USB power management capability. At first, I thought it was a 2.4.x core problem. But the same problem with 2.6. Moreover, after rebooting the router, the modem remained initialized. The conclusion suggested itself, you need to disassemble the router.
Attentive inspection and “dialing” of the board showed that the “+ 5V” power leg is connected directly to the power supply. This does not suit me and needs to be done to upgrade the board and the power source.
The moment of choosing the distribution kit has come. This wonderful router has very little RAM and did not want any unnecessary services to consume it, be it httpd, FTP, SAMBA or anything else. It was decided to build a distribution based on OpenWRT independently, with a minimum of pre-installed packages and services.
But before proceeding with the assembly of the distribution kit and the upgrade of the router, work was underway to select the target modem / operator and external antenna.
After reviewing the coverage map of different operators, I came to the conclusion that the most suitable is MTS. In addition to the coverage map, I really liked the fact that they can make all the statistics and management from a fairly convenient WEB interface. Having bought their best modem, with the promised maximum of 14.7 Mbit / s and at least 3 Mbit / s, I began my adventure.
Perhaps someone will be interested:
- 3G modem (was purchased by MTS WeTelecom WM-D300 )
- Directional antenna CDMA-450 (not bad, according to the seller, some unknown manufacturer )
After the purchase began trying to connect to this modem. And as always, a number of questions arose:
- It is aggressively displayed as a CD-ROM.
- No word on the Internet about this modem, the maximum that was found this mention of the previous model (WM-D200)
The dmesg analysis showed that the CD-ROM is mounted as SCSI, it suggested that it should be disabled exactly as SCSI, no usb_modeswitch does not work here, and in fact are not needed.
Of course, he immediately wrote his software, which did it. But the non-flowing thought, that someone already wrote this and most likely it already exists in the ports / portage or somewhere else, made it search. The first pass through the folder with man'ami showed that there is a wonderful package sdparm. Having established and checked, it became clear - this is what is needed.
Since now everything has fallen into place and there are no more questions left, you can get to work.
Build openwrt
All steps are performed in the Linux console. Please note, the release of Backfire is chosen due to the fact that this is the latest release with the 2.4 kernel. This is very important, since the 2.6 kernel itself is very demanding on both processor performance and system resources.
- Download the source OpenWRT:
svn co svn://svn.openwrt.org/openwrt/branches/backfire openwrt-backfire - Go to the folder with the source
cd openwrt-backfire - We update all packages
./scripts/feeds update -a - Add from sdparm packages
./scripts/feeds install sdparm - Open the setup menu
make menuconfig - Choose a platform of interest
Target System (Broadcom BCM947xx/953xx [2.4]) - We build packages of interest to us (by default they are not included even as modules)
<*> sdparm........................ Read or modify SCSI or USB disk parameters <*> chat................................. Establish conversation with a modem <*> comgt............................... Option/Vodafone 3G/GPRS control tool <*> kmod-scsi-generic........................ Kernel support for SCSI generic <*> kmod-usb-core............................................ Support for USB <*> kmod-usb-ohci............................... Support for OHCI controllers <*> kmod-usb-serial..................... Support for USB-to-Serial converters <*> kmod-usb-storage..................................... USB Storage support <*> kmod-usb2................................... Support for USB2 controllers - All other items are left unchanged.
- Exit the configurator menu with saving
- We collect tools
make tools/install -j`grep -c processor /proc/cpuinfo` make toolchain/install -j`grep -c processor /proc/cpuinfo` - Open the Linux kernel configuration menu
make kernel_menuconfig - Customize MTD
[*] Support 2-chip flash interleave - Exit the configurator menu with saving
- Putting OpenWRT
make -j`grep -c processor /proc/cpuinfo` - After the firmware is assembled, it needs to be flashed into the device. There are lots of instructions on this topic ( for example, on the DD-WRT website )
Firmware check
After the firmware has been “flooded” and the router has rebooted, connect a modem to it and connect the router via Ethernet to your PC. Configure on the interface (in my case this is eth0) of your PC with the IP address by running the command:
ifconfig eth0 inet 192.168.1.2/24 Next, connect to the router via Telnet. To do this, run the following command from the console:
telnet -l root 192.168.1.1 Login will be made automatically without a password request. This is fundamentally not true. To correct the situation, set the password by running the command in the console:
passwd Execute the " exit " command to exit the telnet session.
Log in via ssh :
ssh root@192.168.1.1 The next step is to verify that the modem has been recognized by the kernel by running the command in the console:
grep "^P\:.*22de.*6803" /proc/bus/usb/devices The result of this command is a string with the VID and PID of the modem. Otherwise, check what was not done according to the instructions.
Upgrading the router's hardware
To control the power of the USB port, you need a free processor foot. But since this is not an engineering board, but an end product, this option is not suitable. By luck, this router has a lot of LED indicators on the front panel. One of them we can fully adapt to our needs. In my case, the choice fell on an indicator with a printer icon, since it corresponded to the USB LED on proc-fs (/ proc / diag / led / usb).
Power management will be provided by an additional charge with the minimum required set of parts. Here is its scheme:
A couple of words about the scheme. Both transistors work as keys. When a logical unit is fed to the “CTRL” input, the VT1 transistor will open, which in turn will lead to the opening of the VT2 transistor and the supply voltage will be fed to the USB port. As such, the calculations were not made, therefore, the scheme can not be considered optimal. For example, the transistor VT1, just was the only NPN transistor in the field of reach, in fact, like the resistors.
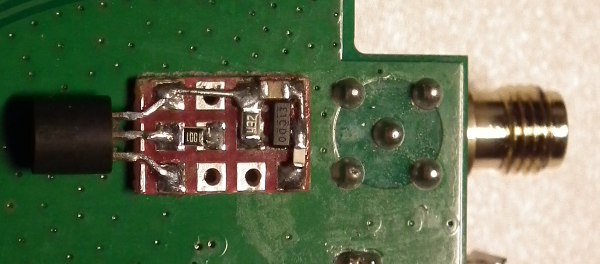
There was neither time nor desire for the manufacture of a printed circuit board, so I managed a small piece of the circuit board. Here is the final version:
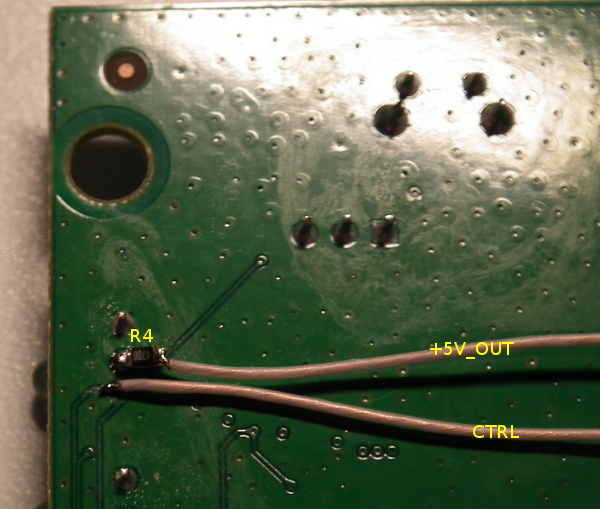
Green inscriptions mark ports of the same name on the schematic. Resistor R4, soldered directly to the leg of the LED.
Step-by-step modification instructions:
- De-energize the router and disassemble it.
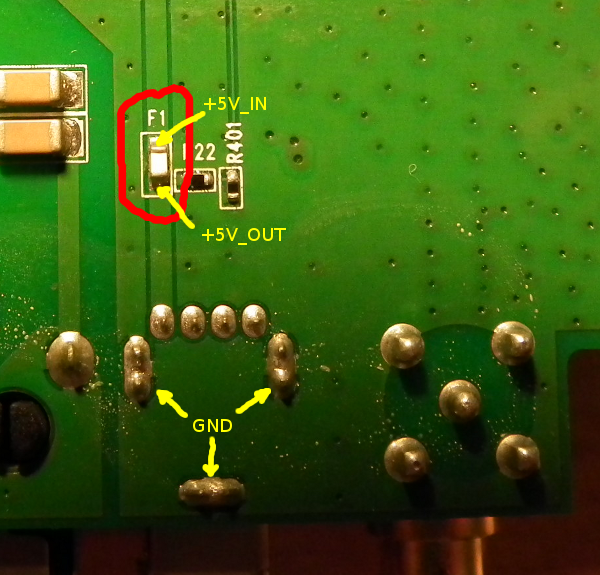
- Remove unnecessary R48 - this resistor connects the LED with the processor leg

- Remove the fuse F1 - this fuse should provide protection in case of a short circuit on the USB power lines. I do not know his face value, but I applied it in my scheme (R3). Please note that the yellow labels indicate the places where the control board is connected.
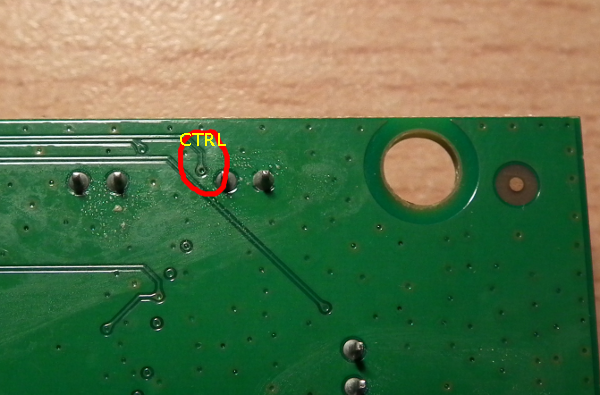
- Remove the protective coating from the conductor, leading the signal from the processor to the resistor R48. To this conductor, the control board's CTRL port must be soldered
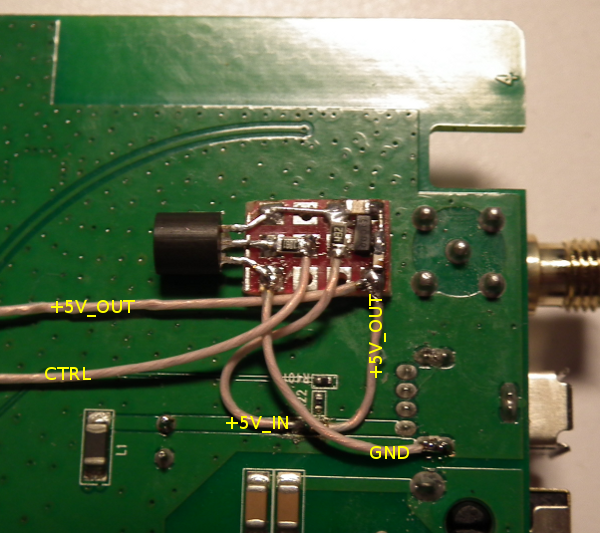
- Stick the control board to the place that is most convenient for you. It turned out that I liked the free area, just below the antenna jack. In this case, the length of the connecting wires will be the shortest
- Solder the resistor R4 directly to the anode of the LED, as indicated in the photo. Also pay attention to connecting connecting wires.
- Complete the installation of the connecting wires
- Final result
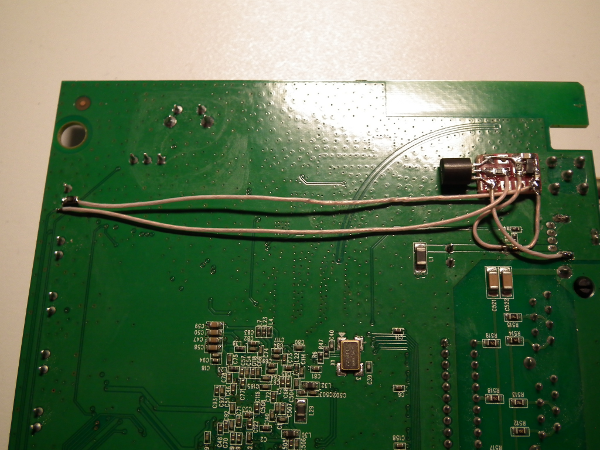
- Collect and turn on the router
Upgrade router software
This is the last step on the path to "happiness." We will need to write a number of new scripts and make changes to existing ones. So, everything is in order.
Connect to the router via ssh, since all the following steps will be performed directly on it.
Creation of utilities for USB management
Navigate to the / etc / ppp folder. Many will be interested in why this particular folder was chosen as the target. The answer is simple, historically. I think / usr / local / sbin will be more suitable, but essentially it does not change
cd /etc/ppp - Create usb-up.sh. This script will power up the USB port.
$ cat usb-up.sh #!/bin/sh logger -t "USB PwrCtrl" "Turn-on USB power" echo 1 > /proc/diag/led/usb - Create a script to reboot the USB port.
$ cat resetusb.sh #!/bin/sh logger -t "USB PwrCtrl" "Turn-off USB power" echo 0 > /proc/diag/led/usb # Sleep in 3 sec is an optional, but may be useful for some modem types #sleep 3 logger -t "USB PwrCtrl" "Turn-on USB power" echo 1 > /proc/diag/led/usb - Create a script to check for the existence of the pppd process.
#!/bin/sh if ps | grep -q /usr/sbin/pppd; then logger -t "PPP watcher" "PPP alive" else logger -t "PPP watcher" "No PPP daemon" /etc/ppp/resetusb.sh fi - Make the scripts executable
chmod a+x /etc/ppp/*.sh - Add the correct processing modem connection to USB. Note that in OpenWRT, by default, there is no udev, but hotplug “demon” is used instead.
$ cat /etc/hotplug.d/usb/11-modem #!/bin/sh # Copyright (C) 2013 Sergey Shcherbakov <shchers@gmail.com> case "$ACTION" in add) (grep -q "^P\:.*22de.*6803" /proc/bus/usb/devices) && { logger -t "WM-D300" "Detected ZeroCD of WM-D300 modem" # Checking ZeroCD status while [ "$(sdparm -q --command=ready /dev/scsi/host0/bus0/target0/lun0/generic)" != "Ready" ]; do logger -t "WM-D300" "ZeroCD yet not ready" # Workaround for bug with multiple calls of scripts (/usr/bin/lsusb | grep -q 22de:6801) && { logger -t "WM-D300" "Seems that script called twice and device already initialized" return 0 } sleep 2 done logger -t "WM-D300" "ZeroCD ready and will be ejected" /usr/bin/sdparm --command=eject /dev/scsi/host0/bus0/target0/lun0/generic } (grep -q "^P\:.*22de.*6801" /proc/bus/usb/devices) && [ ! -c /dev/usb/tts/0 ] && { logger -t "WM-D300" "Updating USB Serial driver with D200/D300 vendor and product ID" rmmod usbserial && insmod usbserial vendor=0x22de product=0x6801 } (grep -q "^P\:.*22de.*6801" /proc/bus/usb/devices) && [ -c /dev/usb/tts/2 ] && ! (ifconfig 3g-wan 1>/dev/null 2>/dev/null) && { logger -t "WM-D300" "All modem interfaces installed, turning on WAN" ifdown wan && ifup wan } ;; remove) ! (grep -q "^P\:.*22de.*6801" /proc/bus/usb/devices) && { logger -t "WM-D300" "Modem disconnected, turning off WAN interface" ifdown wan } ;; esac
Making changes to existing scripts
- Disable the default WAN interface by executing
sed -i 's/interface\ wan$/interface\ wan_dflt/' /etc/config/network - Add a new WAN interface descriptor with settings for 3G
$ cat /etc/config/network … config interface wan option ifname ppp0 option device /dev/usb/tts/0 option service evdo option proto 3g option username 'mobile' option password 'internet' option pppd_options 'noipdefault maxfail 3' option connect '/etc/ppp/usb-up.sh' option disconnect '/etc/ppp/resetusb.sh' option keepalive 20 - In order to add an automatic inclusion of the USB port when the router is initialized, you need to modify the standard /etc/init.d/usb script by adding the /etc/ppp/usb-up.sh script call at the end of the start () function
$ cat /etc/init.d/usb … start() { ... # Turn-on power on USB /etc/ppp/usb-up.sh } … - Additionally, you can modify, but not necessarily, the Chat script (/etc/chatscripts/evdo.chat). In fact, it should work even without changes, but I preferred to brush it a little. Here is my option:
ABORT BUSY ABORT 'NO CARRIER' ABORT ERROR ABORT 'NO DIAL TONE' ABORT 'NO DIALTONE' ABORT 'NO ANSWER' REPORT CONNECT TIMEOUT 10 '' AT OK ATDT#777 CONNECT '' - Add a task to Cron that will check for the presence of a pppd process every five minutes. To do this, call the command “crontab -e” and add the following line:
*/5 * * * * /etc/ppp/check.sh - Allow cron execution and run it
/etc/init.d/cron enable && /etc/init.d/cron start - I will not give you the WiFi setting, since it is fairly standard and well described on the official OpenWRT website
That's all, more changes will not be. I recommend restarting the router, although 3G should come to life in five minutes.
Instead of an epilogue
Home trials lasted 41 days. As a result, a single failure throughout the entire period. Expected stability achieved.
Before being sent to the “fields”, bandwidth tests were conducted in a Kiev apartment. The disappointment took by surprise, the maximum reached did not exceed 1 Mbit / s, while only on large files. The minimum ping was within 220ms. Deciding not to stop testing, I went out of town. The level was at the maximum, while the CDMA Rev.B indicator no longer burned. In fact, I was not warm at 14Mbps, but I expected to see at least 1Mbps already achieved. But the next disappointment was not long in coming, the maximum reached was already about 350 Kbps.
On this, all experiments with the modem from the MTS were discontinued. Return it failed. But the seller has exchanged the antenna for a model capable of working in conjunction with Intertelecom and PeopleNET modems. What I was extremely happy, and let the modem be in the collection, someday come in handy.
Source: https://habr.com/ru/post/184940/
All Articles