We work with relational data using Backend-as-a-Service
Hi habra people
Today we will launch a JavaScript application that writes out an invoice directly from the server using the interaction with the API of the BaaS platform. To develop the application, it was necessary to write 0 lines of code on the server side, despite the fact that the application has a remote (and full) data storage, the ability to register a user and support login. Source code is available on github.

')
Under the cut are the details showing the simplicity of the BaaS approach in working with complex objects using Backendless.
The framework for this application “The Editable Invoice” (hereinafter “editable invoice”) was developed by noBackend.org , which helps developers to learn about the benefits of the BaaS approach. Their vision is to provide examples of recommended implementations on various backends. This application has recently been ported to the Backendless platform. The source code of the project can be downloaded from github .
(Who missed the first post of the Russian-language review of all API of our platform, can find it here .)
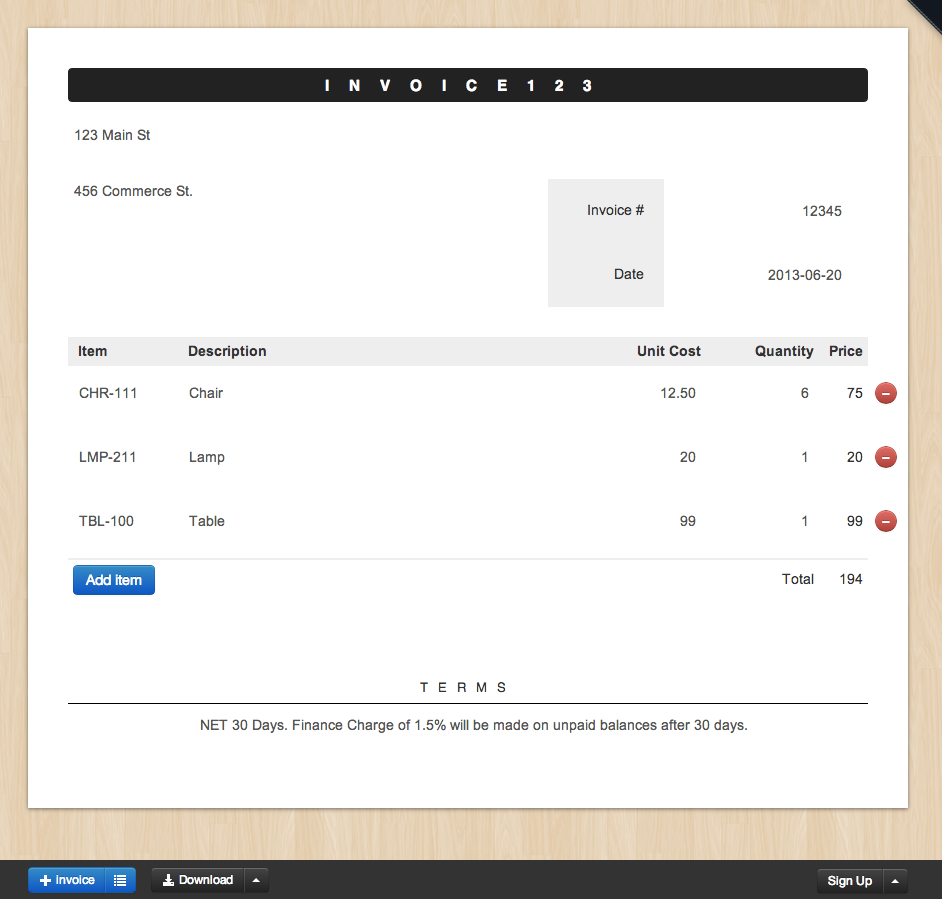
The application is an “editable invoice” that automatically saves data, including lists of items, the buyer's address, your own address, account number, etc. This is a good example that demonstrates how to work with relational data, which means that it is possible to save a hierarchy or objects containing other objects (the “Invoice” object containing the “Name Lists” collection). The application also demonstrates the functionality of the services for user registration and login, although we stopped at linking accounts with user accounts (in principle, it is fairly easy to add).
So, you need to perform the following steps to configure and see the application in action:
1. We register or go to the developer’s web console via FB authentication. The application is created during the registration process or you can create it later at any time.
2. After logging in to the console, select the application.
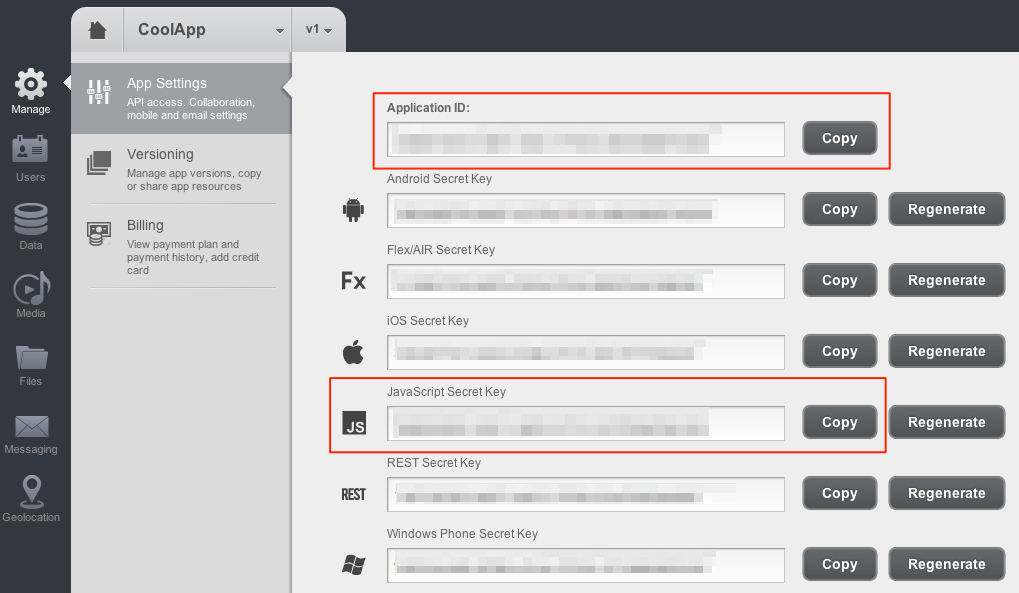
3. Click the “Manage” icon. The application settings window opens. The window contains many useful settings and properties, but for now only the Application ID and Secret Key for JavaScript clients will be needed.
4. Leave the browser window open (you will need to copy / paste the ID and Key from this window) and open /editable-invoice/backendless/applogic.js in a text editor.
5. Copy / paste the Application ID and Secret Key into the code in line 1:
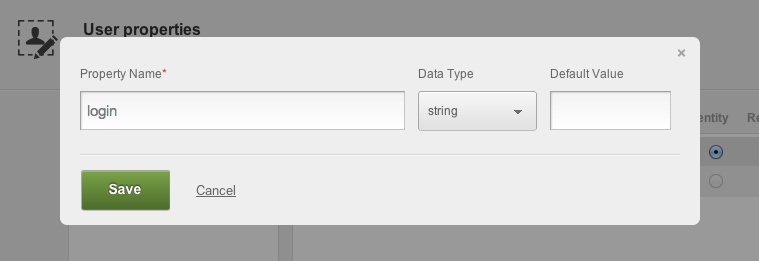
6. One additional configuration step is required before launching the application. Click the “Users” icon in the Backendless console. The “User Properties” opens by default. Using this window you can use the user properties to be used in the Editable Invoice application. Click the “Add Custom Property” button and add “login”.
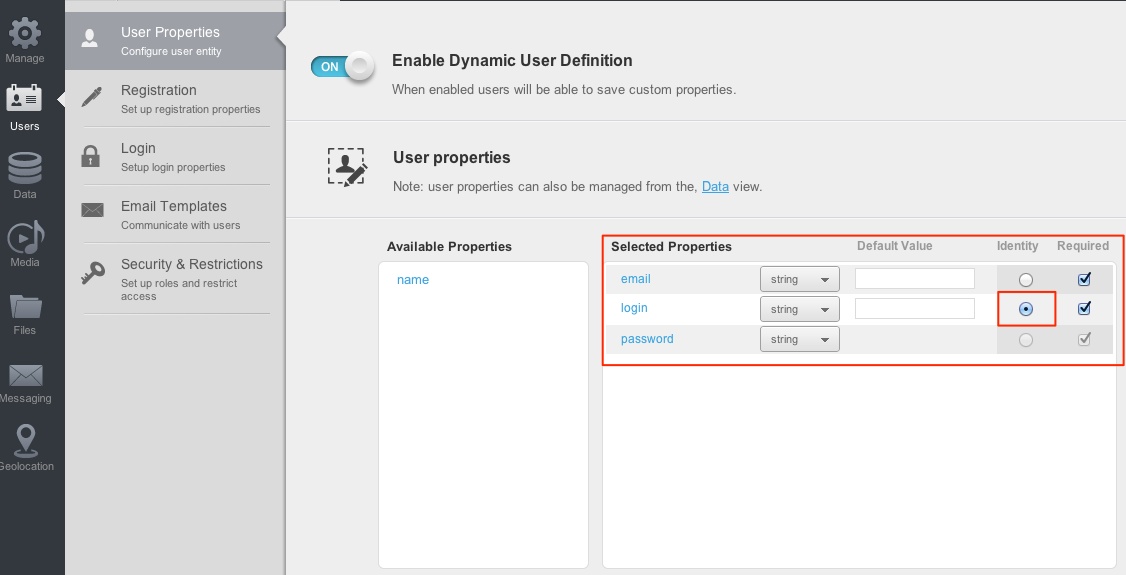
7. Click “Save”. Make sure to select the “login” property as “Identity” by selecting the radio button for this property. The “User Properties” window should look like the one below:
8. Run the example. You can open editable-invoice / index.html in the browser directly from the file system. Alternatively, you can launch the entire application on a web server and download editable-invoice / index.html via a URL.
Try the following actions after running the application:
Review Code
Below are some examples of using the Backendless API in an application:
Download all invoices when the application starts
(/backendless/applogic.js, lines 3-15)
Line 5 contains the “invoices” link to the saved data in Backendless. The returned object provides access to CRUD (Create, Retrieve, Update, Delete) operations for this table.
Line 8 (find) sends a request to load all previously saved invoice objects.
Lines 10–13 request that the invoice objects returned by the platform include references to the corresponding “items” objects (the invoice contains lower case names or simply “items”).
Save / Update Invoice
(/backendless/applogic.js, lines 39-62)
Lines 3-7: Verify that the invoice was previously saved. The parameter “condition” is used where the search by invoice is specified by the parameter “id”.
Lines 10-19: if an account is found (i.e., it has been previously saved), it iterates over the names and is assigned the “objectId” name. In this example, each item has an id, which is assigned on the client side (/shared/js/invoice.js, lines 14 and 28). On top of this, Backendless assigns a unique ID to each saved object. This ID is stored in the “objectId” parameters. It is important to maintain consistency between objects by verifying ID parameters. This code block performs this action for the save operation.
Line 22: As soon as IDs are assigned, the entire invoice (with all names) is saved.
Deleting Invoice
(/backendless/applogic.js, lines 64-68)
User Registration
(/backendless/applogic.js, lines 82-93)
Lines 2-5: A Backendless.User object is created that contains values for all user parameters defined in clause 7 above.
Lines 6-11: A request is sent to Backendless to register a user. The request is asynchronous with a Backendless.Async object that conducts callbacks for success and error functions.
User Login
(/backendless/applogic.js, lines 94-104)
Line 2: A login request is sent to Backendless. The first argument should be the value for the “Identity” parameter (see item 7 above).
The End. Thanks for attention.
Today we will launch a JavaScript application that writes out an invoice directly from the server using the interaction with the API of the BaaS platform. To develop the application, it was necessary to write 0 lines of code on the server side, despite the fact that the application has a remote (and full) data storage, the ability to register a user and support login. Source code is available on github.
')
Under the cut are the details showing the simplicity of the BaaS approach in working with complex objects using Backendless.
The framework for this application “The Editable Invoice” (hereinafter “editable invoice”) was developed by noBackend.org , which helps developers to learn about the benefits of the BaaS approach. Their vision is to provide examples of recommended implementations on various backends. This application has recently been ported to the Backendless platform. The source code of the project can be downloaded from github .
(Who missed the first post of the Russian-language review of all API of our platform, can find it here .)
The application is an “editable invoice” that automatically saves data, including lists of items, the buyer's address, your own address, account number, etc. This is a good example that demonstrates how to work with relational data, which means that it is possible to save a hierarchy or objects containing other objects (the “Invoice” object containing the “Name Lists” collection). The application also demonstrates the functionality of the services for user registration and login, although we stopped at linking accounts with user accounts (in principle, it is fairly easy to add).
Description Date of Service
Data Service API (relational data) - provides storage of user data. Applications can store, update, delete data and carry out search queries.
Explanation: it is possible to work with the service without having any knowledge about the databases. The platform allows you to create your own tables and links between them using the API. On the client, it is enough to create a data structure, when calling the KFK method, the server will create the necessary tables and link them together. Or it can be done using an intuitive user interface via the web console.
Additional information and the algorithm of the date of service can be found in the documentation .
So, you need to perform the following steps to configure and see the application in action:
1. We register or go to the developer’s web console via FB authentication. The application is created during the registration process or you can create it later at any time.
2. After logging in to the console, select the application.
3. Click the “Manage” icon. The application settings window opens. The window contains many useful settings and properties, but for now only the Application ID and Secret Key for JavaScript clients will be needed.
4. Leave the browser window open (you will need to copy / paste the ID and Key from this window) and open /editable-invoice/backendless/applogic.js in a text editor.
5. Copy / paste the Application ID and Secret Key into the code in line 1:
1 Backendless.initApp("PUT-YOUR-APP-ID-HERE", "PUT-YOUR-JS-SECRET-KEY-HERE", "v1"); 6. One additional configuration step is required before launching the application. Click the “Users” icon in the Backendless console. The “User Properties” opens by default. Using this window you can use the user properties to be used in the Editable Invoice application. Click the “Add Custom Property” button and add “login”.
7. Click “Save”. Make sure to select the “login” property as “Identity” by selecting the radio button for this property. The “User Properties” window should look like the one below:
8. Run the example. You can open editable-invoice / index.html in the browser directly from the file system. Alternatively, you can launch the entire application on a web server and download editable-invoice / index.html via a URL.
Try the following actions after running the application:
- Change the name of the account by changing the main title at the top.
- Change the “Your Address” field.
- Change the “Your client's address” field.
- Add a new name in the invoice - enter the article number, description, unit price and quantity. Click the “Add item” button.
- Reload the application - you should see an account with the changes you made.
- Check out the “Sign Up / Sign In” form.
- Login to the Backendless console and check the registered users in Data> Users, as well as the data saved by the application in the “invoice” and “item” tables - the tables will be created automatically as soon as you start using the example.
Review Code
Below are some examples of using the Backendless API in an application:
Download all invoices when the application starts
(/backendless/applogic.js, lines 3-15)
1 $('document').ready( function() 2 { 3 // bootstrap & render App 4 App.store = {}; 5 App.store.invoices = Backendless.Persistence.of(function invoice(){}); 6 try 7 { 8 renderApp(App.store.invoices.find( 9 { 10 options: 11 { 12 related: ["items"] 13 } 14 }).data ); 15 } 16 catch(e) 17 { 18 renderApp( [] ); 19 } 20 ... Line 5 contains the “invoices” link to the saved data in Backendless. The returned object provides access to CRUD (Create, Retrieve, Update, Delete) operations for this table.
Line 8 (find) sends a request to load all previously saved invoice objects.
Lines 10–13 request that the invoice objects returned by the platform include references to the corresponding “items” objects (the invoice contains lower case names or simply “items”).
Save / Update Invoice
(/backendless/applogic.js, lines 39-62)
1 var handleInvoiceSave = function(properties) { 2 try{ 3 var obj = App.store.invoices.find({ 4 options:{ 5 related: ["items"] 6 }, 7 condition: "id='" + properties.id +"'" 8 }).data[0]; 9 10 if(obj){ 11 properties.objectId = obj["__updated__objectId"] || obj.objectId; 12 for(var i = 0; i < obj.items.length; i++){ 13 for(var j = 0; j < properties.items.length; j++){ 14 if(properties.items[j].id == obj.items[i].id){ 15 properties.items[j].objectId = obj.items[i].objectId; 16 } 17 } 18 } 19 } 20 } catch(e){ 21 }finally{ 22 App.store.invoices.save(properties); 23 } 24 } Lines 3-7: Verify that the invoice was previously saved. The parameter “condition” is used where the search by invoice is specified by the parameter “id”.
Lines 10-19: if an account is found (i.e., it has been previously saved), it iterates over the names and is assigned the “objectId” name. In this example, each item has an id, which is assigned on the client side (/shared/js/invoice.js, lines 14 and 28). On top of this, Backendless assigns a unique ID to each saved object. This ID is stored in the “objectId” parameters. It is important to maintain consistency between objects by verifying ID parameters. This code block performs this action for the save operation.
Line 22: As soon as IDs are assigned, the entire invoice (with all names) is saved.
Deleting Invoice
(/backendless/applogic.js, lines 64-68)
1 var handleInvoiceDelete = function(properties) { 2 console.log("delete invoice"); 3 App.store.invoices.remove( properties, new Backendless.Async(function(){ 4 })); 5 } User Registration
(/backendless/applogic.js, lines 82-93)
1 var handleSignUp = function(inputs) { 2 var user = new Backendless.User(); 3 user.login = inputs.username; 4 user.email = inputs.email; 5 user.password = inputs.password; 6 Backendless.UserService.register( user, 7 new Backendless.Async( function(){ 8 App.hideModalForm() 9 }, function(data){ 10 App.renderModalFormError({error: data.message}); 11 })); 12 }; Lines 2-5: A Backendless.User object is created that contains values for all user parameters defined in clause 7 above.
Lines 6-11: A request is sent to Backendless to register a user. The request is asynchronous with a Backendless.Async object that conducts callbacks for success and error functions.
User Login
(/backendless/applogic.js, lines 94-104)
1 var handleSignIn = function(inputs) { 2 Backendless.UserService.login( inputs.username, inputs.password, 3 new Backendless.Async( function(data){ 4 App.user = new Backendless.User(data); 5 App.hideModalForm(); 6 App.renderUserSignedIn(data); 7 },function(data){ 8 App.renderUserAuthenticationError(); 9 App.renderModalFormError({error: data.message}); 10 }) ); 11 }; Line 2: A login request is sent to Backendless. The first argument should be the value for the “Identity” parameter (see item 7 above).
The End. Thanks for attention.
Source: https://habr.com/ru/post/184598/
All Articles