SQL Reporting services in the clouds. Part 3: Multi-tenant
So, the previous part was devoted to setting up the SQL Reporting service in Windows Azure. We considered two options for setting up report publishing services: as a service (SQL Reporting) and using a SQL Server virtual machine (SSRS). Now let's look at how SQL Reporting and SQL Server services can be configured to support multi-tenant scripts, when a single report service can be used for different data sources.
As mentioned earlier, both solutions use a mechanism for differentiating access rights to report directories based on roles. This authentication method is based on Windows authentication. Thus, each user who has a Windows account to access the SQL Server virtual machine can use SQL Server Reporting Services.
')
As you can see, both solutions provide the same features for the report building service. Normal SQL Server can also be used to connect to a database using Windows authentication mechanisms. SQL Azure and SQL Reporting services do not support this feature, however this is a known limitation of the Windows Azure cloud platform.
According to price comparisons, SQL Reporting is preferred for use in a solution where reports are generated infrequently and mostly available as static content. If your application or users can generate multiple reports over time, then SQL Server Reporting Services hosted on a separate virtual machine is the preferred option. As a bonus, you also get all the features of SQL Server.
However, the specific decision on which of the options for building a report service should be primarily analyzed from the point of view of costs and resources in each particular case.
Project publication
- Open the report project in SQL Server Business Intelligent Development Studio;
- In the context menu of the project, select “Properties”;
- We will separate the reports of one customer from another using different root directories. To do this, in the values of the fields with the prefix “Target ... Folder” specify the root directory with the name of the customer;

- Publish the draft report for different customers in the SQL Reporting service and / or SQL Server virtual machine.
Multi-tenant: SQL Reporting
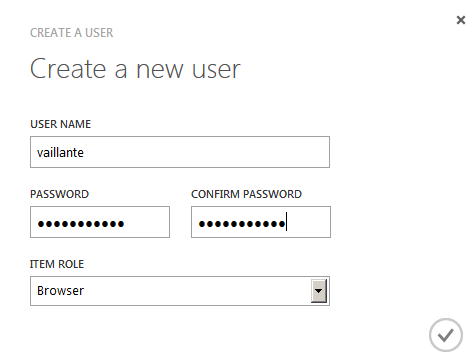
- Go to Windows Azure Management Portal, “SQL Reporting” section, “Users” tab;
- Create an account for each customer:

- Click on the “Items” tab;
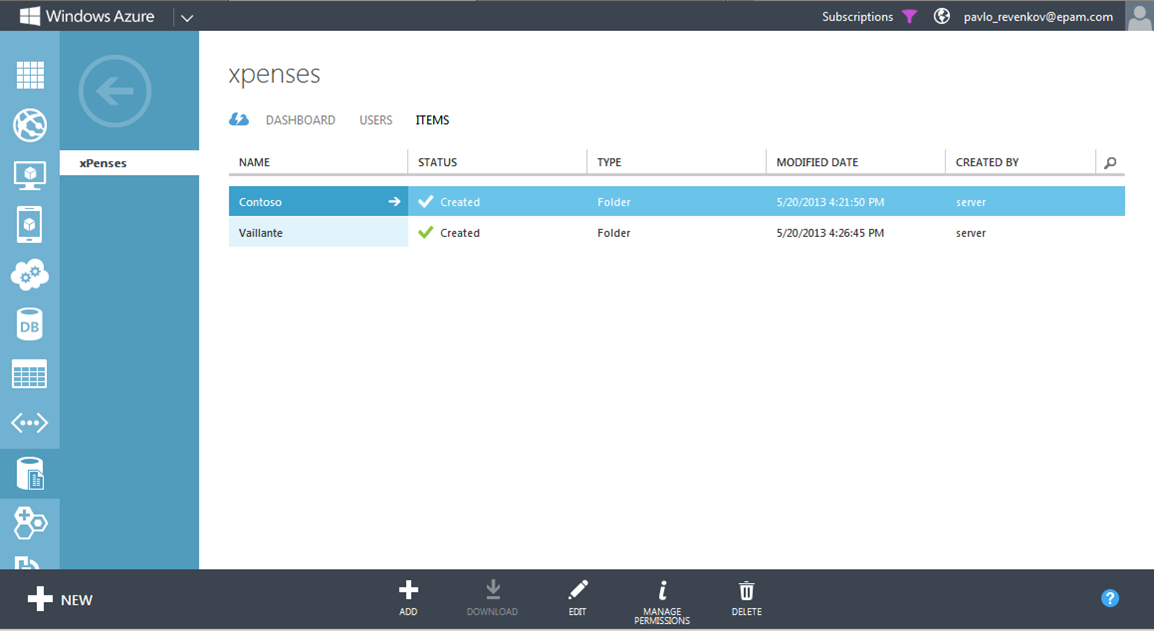
- Select the catalog with the customer's reports that you want to configure and click the “Manage Permissions” button;
- Select “Assign item-specific permissions” and leave in the list of users only those who will have access to this report catalog.

Multi-tenant: SQL Server Reporting Services
As mentioned earlier, both solutions use a mechanism for differentiating access rights to report directories based on roles. This authentication method is based on Windows authentication. Thus, each user who has a Windows account to access the SQL Server virtual machine can use SQL Server Reporting Services.
')
Creating a Windows Account
- Connect to the SQL Server virtual machine via RDP;
- Go to Windows Control Panel and select “Add or remove user accounts”;
- Select the “Create new account” link;
- Specify the name of the new user and its type;

- Click the “Create account” button;
- Select a new user and follow the link “Create a password”;
- Enter user password;

Report Manager Setup
- Navigate to the following URL: “http://YOUR_MACHINE_NAME.cloudapp.net/Reports” . To access, use the login and password of the administrator of the virtual machine;

- Select a customer report catalog. Then click the “Folder Settings” button;
- Go to the “Security” tab and click the “Edit Item Security” button;
- Then select “New Role Assignment”;
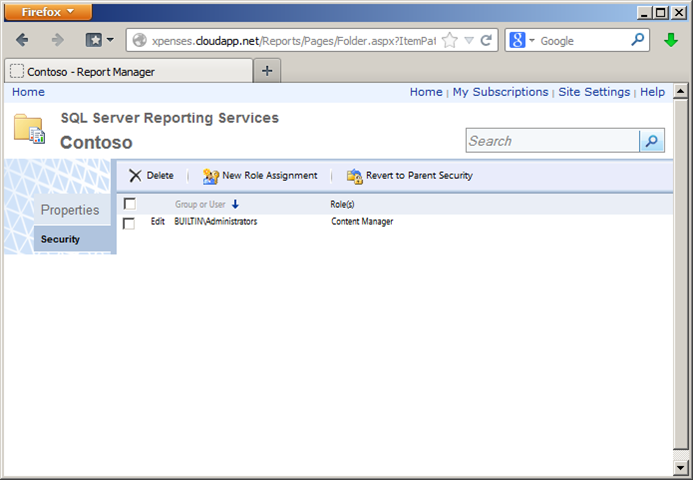
- Specify the username and roles that you want to assign to it.

- Setup is complete.
Conclusion
As you can see, both solutions provide the same features for the report building service. Normal SQL Server can also be used to connect to a database using Windows authentication mechanisms. SQL Azure and SQL Reporting services do not support this feature, however this is a known limitation of the Windows Azure cloud platform.
According to price comparisons, SQL Reporting is preferred for use in a solution where reports are generated infrequently and mostly available as static content. If your application or users can generate multiple reports over time, then SQL Server Reporting Services hosted on a separate virtual machine is the preferred option. As a bonus, you also get all the features of SQL Server.
However, the specific decision on which of the options for building a report service should be primarily analyzed from the point of view of costs and resources in each particular case.
Source: https://habr.com/ru/post/184548/
All Articles