Call center is simple and cheap

Recently, the customer contacted us asking for help in organizing a small Call Center for 10 operators. Of course, one of the main requirements is “cheaper”.
Several solutions were proposed, focusing on the following, based entirely on VoIP technology:
- 4 city analog lines are received by D-Link DVG-6004S voice gateway
- in the role of IP PBX and server with a CRM-system acts as a network drive D-Link DNS-325
- senior operator IP phone D-Link DPH-400S with a Plantronics HW111N headset
- the rest of the operators have a softphone CounterPath X-Lite with a Plantronics Blackwire C210 headset
- the network is served by a D-Link DES-1210-28 switch

Why analog lines and extra costs for the gateway, when can I accept telephones via VoIP SIP? Just the lines have already been bought, no one will return the money for their inclusion. Yes, and the leadership of the old school is more habitual to see the telephone wire harness, and not some virtual SIP lines. Therefore, a volition was made to buy the gateway. But we have stipulated that in the case of expanding the incoming, new lines will be submitted via SIP.
Why a network drive instead of a regular computer? Yes, in general, one of the selection criteria is price. A good computer will cost around $ 250, and the D-Link DNS-325 costs about $ 150. On the computer you need to install an OS, LAMP, Asterisk, vTigerCRM. And on the DNS-325 almost everything is already out of the box. It takes only a couple of minutes to install Add-Ons Asterisk and vTigerCRM. The installation procedure Add-Onov is the simplest, does not require any additional knowledge.
And so the setting. In general, the whole setup comes down mainly to configuring Asterisk. Thousands of manuals and instructions have been written on setting up Asterisk. Therefore, I will not describe all the features of Asterisk, I will briefly describe only what concerns our task.
First, install the Asterisk Add-Ons and vTigerCRM. You can take them on the website dlink.ua/dns . We take MicroPBX based on the Asterisk 1.6.2.24 system, unfortunately in the MicroPBX based on the Asterisk 1.8.15-cert1 system the Queues function is not implemented, which is needed for the Call Center. I will not describe the installation, the instruction is on the site service.d-link.ua/DNS-325-pbx . In the same image and likeness put Add-On vTigerCRM. CRM in general is not mandatory, but in many cases makes life easier and the work of operators. Rather detailed instructions on vTigerCRM dlink.vtverdohleb.org.ua/Add-On/vTigerCRM_manual_rus.pdf .
Detailed instructions for setting up MicroPBX Asterisk 1.6.2.24 service.d-link.ua/node/50 .
')
Create a Dial Plan.
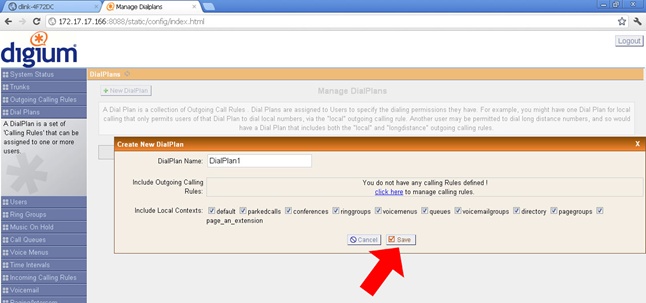
Do not forget to click the Apply Changes button after making changes.
To create internal numbers for operators, go to the “Users” section and click the “Create New User” button:

In this case, calls over the Internet are not assumed, so from the codecs I left only u-law & a-law. Do not forget to include the tick "Is Agent" for the participation of this subscriber in the queue.
To configure external outgoing calls you need to create "trunks" (directions). When working with local gateways, I do not use authorization, so Context Naming selects “Based on Provider Name”.

Hostname - DVG-6004S IP address.
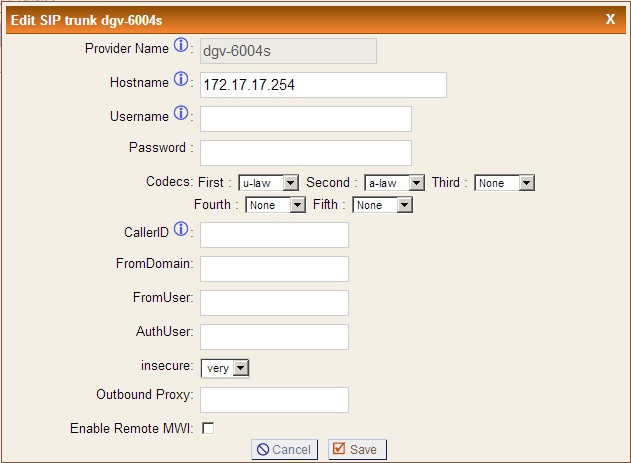
As in the case of users from codecs, I leave only u-law & a-law.
Go to the section "Outgoing Calling Rules" and make a rule for outgoing calls.
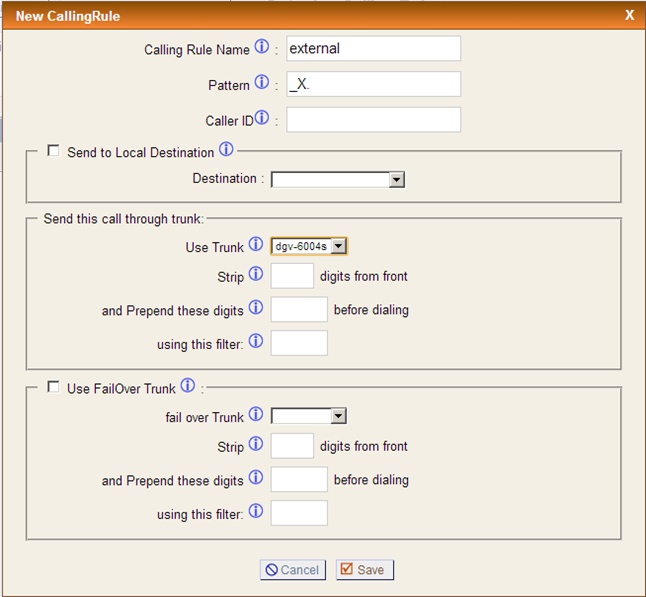
Since we have one way out, we have the DVG-6004S gateway, we indicate the universal “Pattern” suitable for all possible numbers - “_X.”.
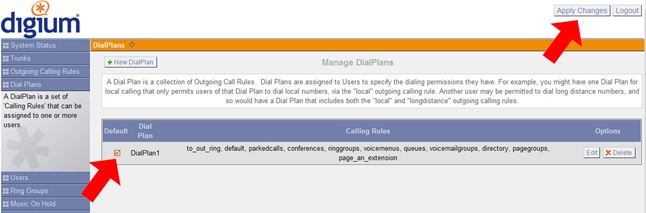
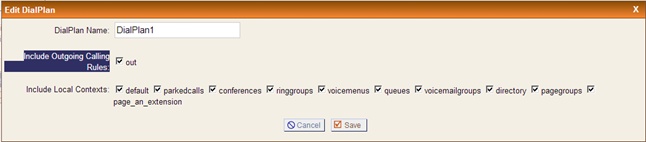
Now you need to allow users access to this area. To do this, go to the "Dial Plan" and put a daw on the outgoing rule, in this case, "out".
Now create a Queue in the “Call Queues” section.

In the subsection "Agents" we put daws on the operators' numbers. "Strategy" - the principle of processing incoming calls:
- ringall: all available participants are called until one of them answers the call (by default)
- roundrobin: each of the available participants is cyclically called. (Deprecated in version 1.4, use: rrmemory)
- leastrecent: The first free participant who is called least of all from this queue is called
- fewestcalls: The first free participant who called the least number of calls from this queue is called
- random: randomly invoked non-busy participant processing queue
- rrmemory: circular allocation with memory, remembers the last participant who answered the call
Now we will move to the “Incoming Calling Rules” section and indicate the direction of incoming calls to the Queue.
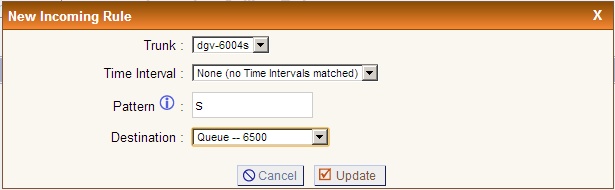
Specify the universal "Pattern", suitable for all possible incoming numbers - "s".
Do not forget to click the Apply Changes button, otherwise all changes will not be applied.
At this setting Asterisk'a completed. It remains to configure the redirection of incoming calls from DVG-6004S to Asterisk. In the “General Settings / Telephony Settings” section, we enable the “Hot Line” checkboxes and indicate the number, for example, “777”.

Go to the "General Settings / Phone Book" and prescribe "Gateway Number" = "777", "IP / Domain Name" = IP address DNS-325.

Setting up the phone D-Link DPH-400S:
- Server Name - DNS-325
- Server Address - DNS-325 IP Address
- Server Port - 5060
- Account Name - Your sip login
- Password - Your sip password
- Phone Number - your sip login
- Display Name (Display Name) - Your sip login
- Enable Register - check the box
- Click APPLY (Apply)
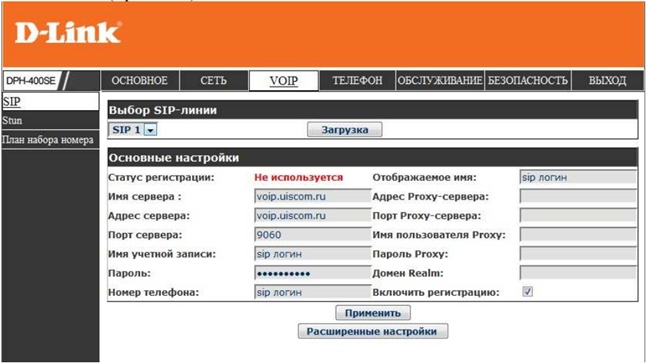
- Press Return and upon successful connection the Register Status will change to Registered (Registered)

In more detail, the phone setup is described for example here ftp.dlink.ru/pub/VoIP/DPH-400SE_E_F1/Data_sh/DPH-400SE_QIG_V1.00_RU.pdf .
I will not describe the X-Lite setup, there are quite a few such instructions on the Internet, for example, qubictele.com/faq/tune/x-lite.html .
On this, in general, and everything, our little Call-center is fully ready to work. I hope someone this article will be useful in the organization of office telephony.
Source: https://habr.com/ru/post/183888/
All Articles