Integration of mobile application design. Part 1: Android
I read this report at Dribbble Meetup 2013, which was held in Moscow on Cosmonautics Day. It describes my design integration process - that is, in what form to transfer the application from the designer to the developer of mobile applications. The choice of tools that I use in my work, and the process itself was formed by experience, through trial and error. I hope it will help save you some time and save at least part of the routine work. Since the presentation contains quite a large number of slides, I decided to split the material into two parts. The first part is the integration of design for the Android platform. The second is for iOS and Windows Phone, and I will also mention Samsung Bada. Next - a lot of pictures.
Problematics
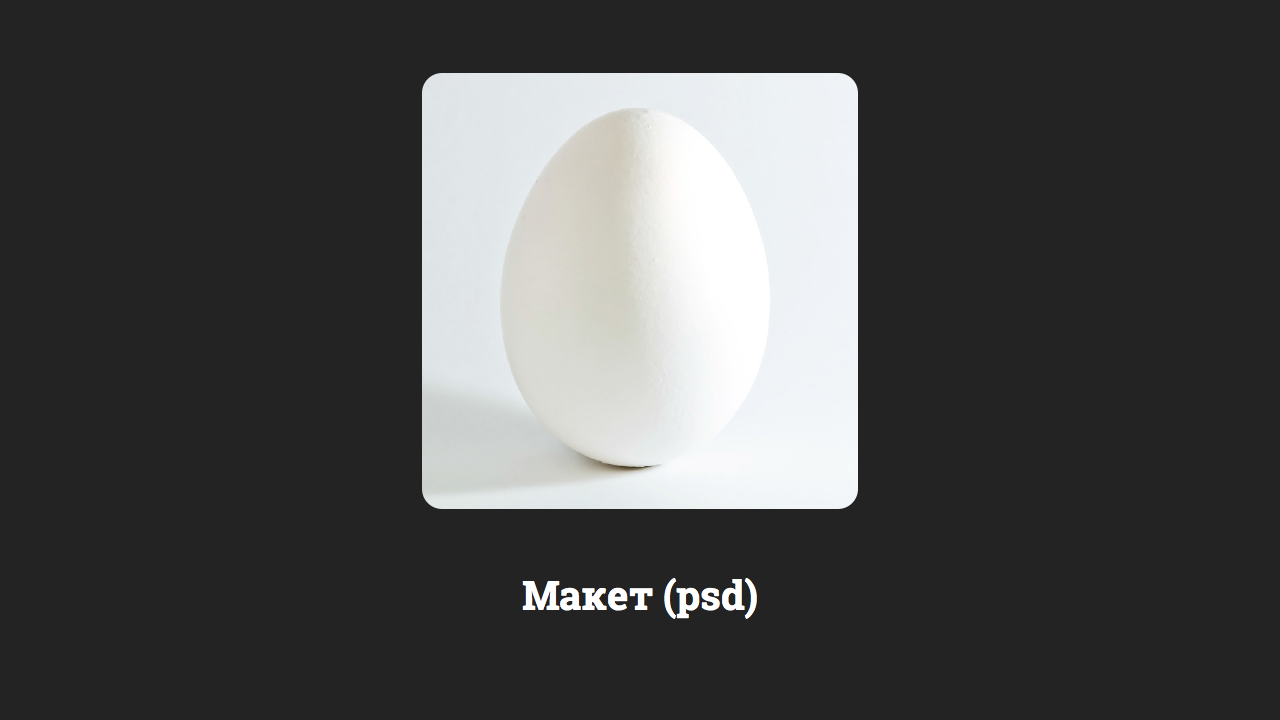
And I will begin my story from the moment when we have already drawn the layouts of our application. Everything looks perfect, everything is adjusted to the pixel.
')
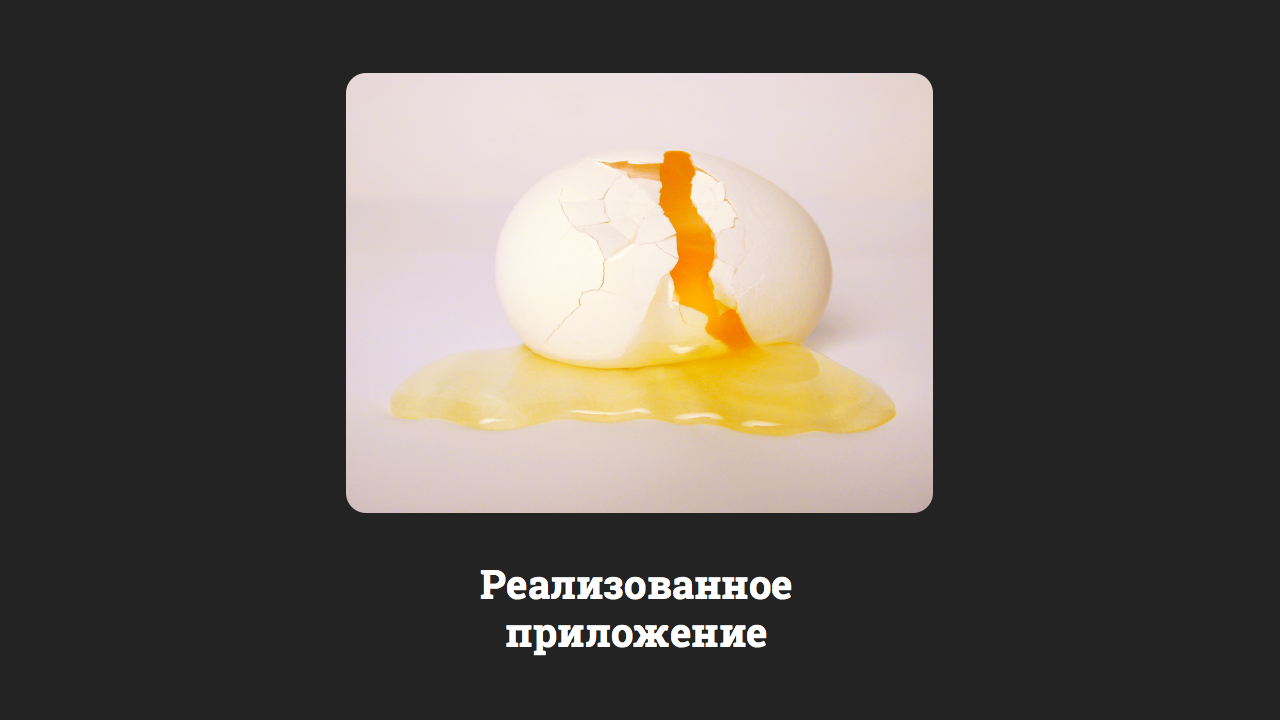
We give mockups to the development, and at the output we get IT.
Why?! The answer is obvious. Blame programmers who crooked everything crooked ... In fact, NO! Even before the programmers start working, the designer must pass on to them the design specification (TK), which the designer usually does carelessly, or worse, does not do it at all. Therefore, the programmer is forced to do everything at his discretion, since there is no clear instructions.
Design Specification (TK)
So, by design specification, I mean a set of files that the designer sends to programmers. In essence, their creation is the design integration process. Microsoft and Google call it blue, red, green lines. I have three folders: Metrics, Fonts, Res.
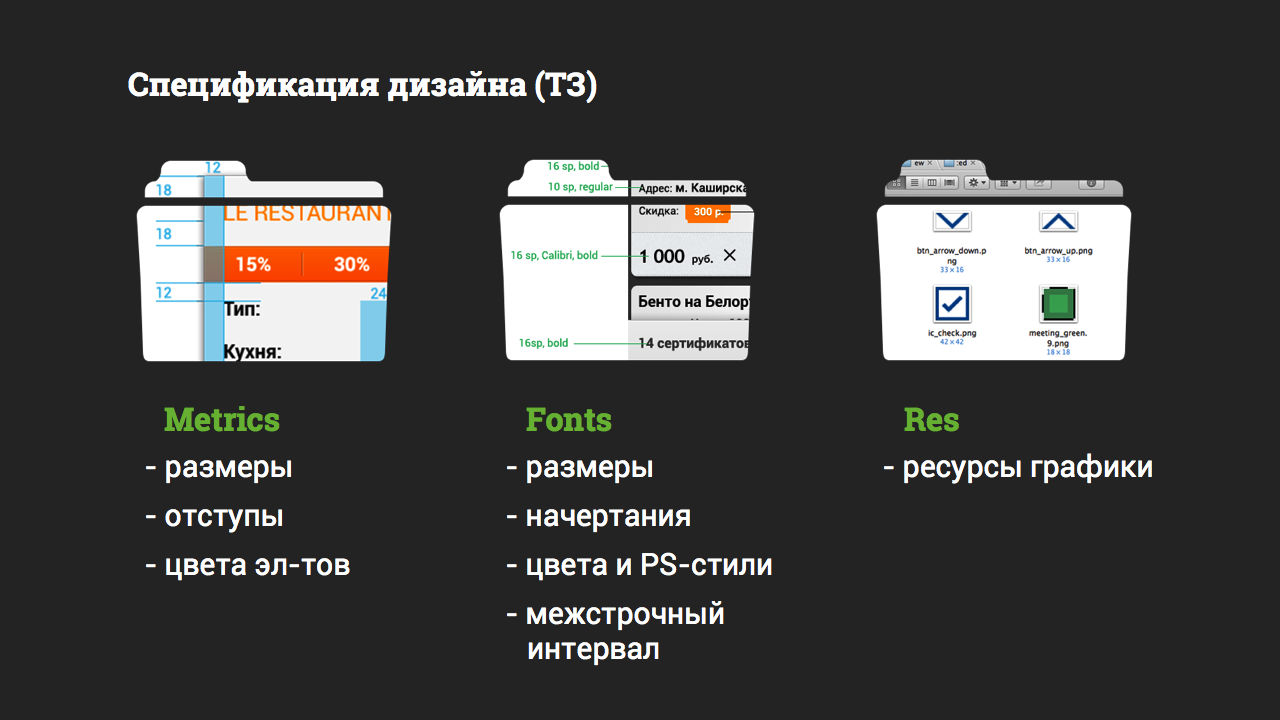
The preparation of TK should be given due attention, because this is what the end user of your product sees, not the designer’s mockups.
Android
Consider the integration of design on the example of 4 major mobile platforms in Russia. And I'll start with the hardest to understand ... Android
Brief theoretical part
A bit of theory to understand the process. It's no secret that phone screens have different resolutions and different diagonals, that is, the screens are characterized by different densities. It is measured in dots per inch. There are 4 main categories of screen density for Android devices: LDPI, MDPI, HDPI, XHDPI, XXHDPI (for the time being we do not take into account). Therefore, in order for the interface elements to have the same physical size on the screens of different devices, Google has introduced an abstract unit of measurement - DP.
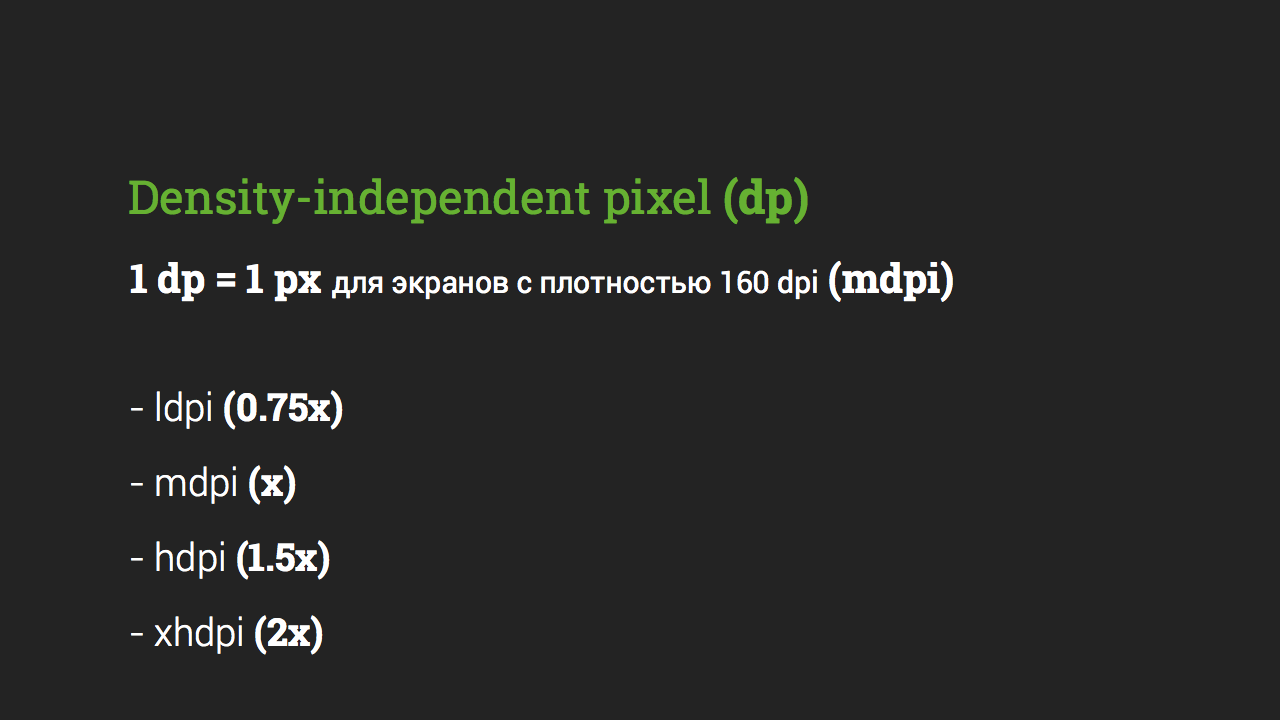
We will not go into details where these numbers appear from, but for ourselves, remember that one dp is equal to one physical pixel for screens with MDPI density. Accordingly, for XHDPI-screens, 1 dp will be equal to 2 px (such density, for example, Google Nexus 4).
Practical implementation
Now we start practical implementation. Next will be described my work process, which was formed by experience. I hope it will be useful to you.
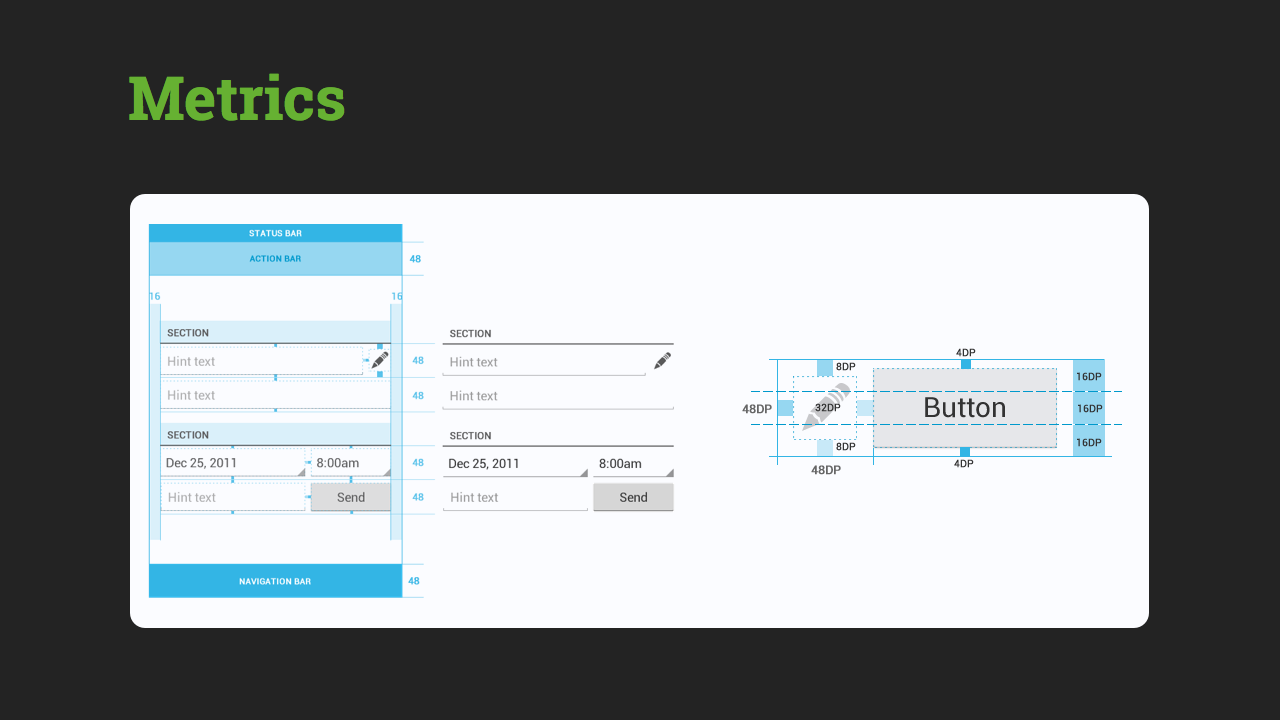
Metrics
So, the Metrics folder should contain files with the sizes of elements, indents between them and from the edge of the screen, the colors of monochrome elements - what is done programmatically (for example, separators).
All sizes for developers must be specified in DP.
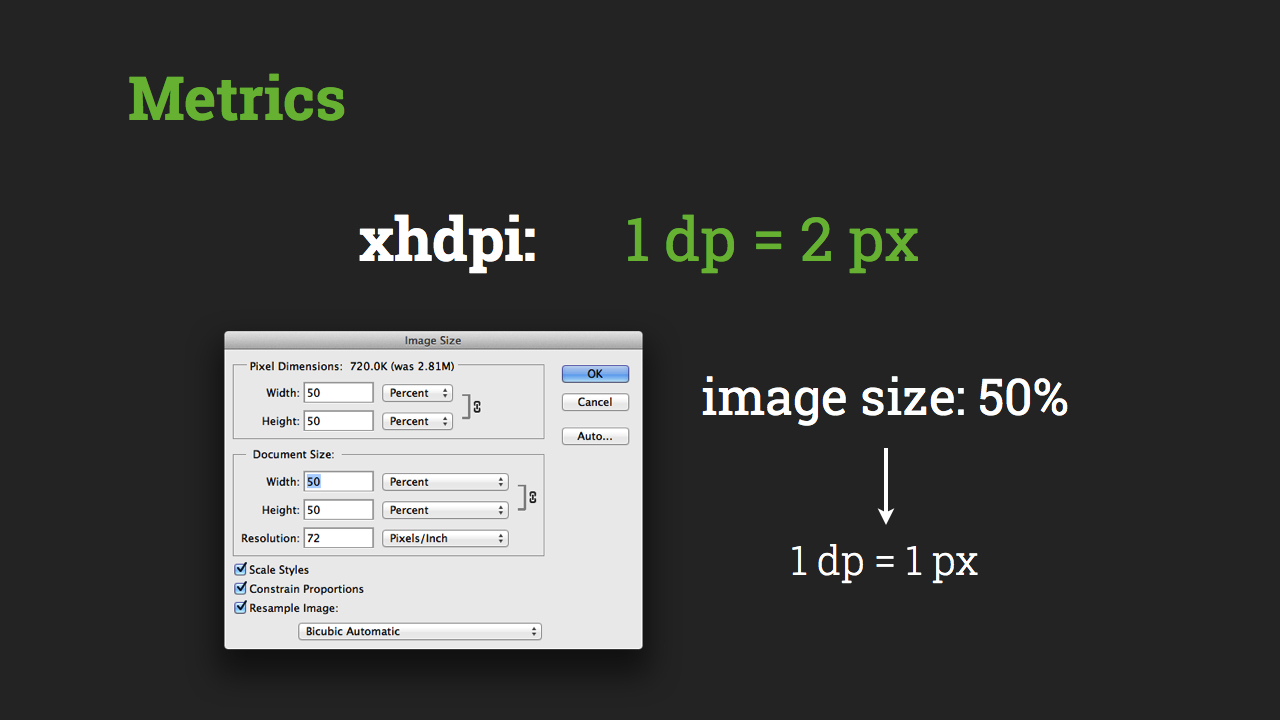
I make layouts for XHDPI screens (768x1280, Nexus 4). And as we remember, for XHDPI 1 dp = 2 px. But since Photoshop, of course, does not understand dp, but works with pixels, at first I make sure that 1 dp equals 1 px. Go to Image, click Image Size, and set the value to 50%. Done, now 1 dp = 1 px.
You can proceed, so to speak, to the “dimensioning” of the layout. It was very tiring to do this manually, and recently I came across a very useful extension for Photoshop.
PNG EXPRESS - paid expansion, costs 29 bucks. But it really is worth it. For Photoshop, starting with version CS5. It allows you to do a lot of useful things, but I use it, namely, for “dimensioning”.
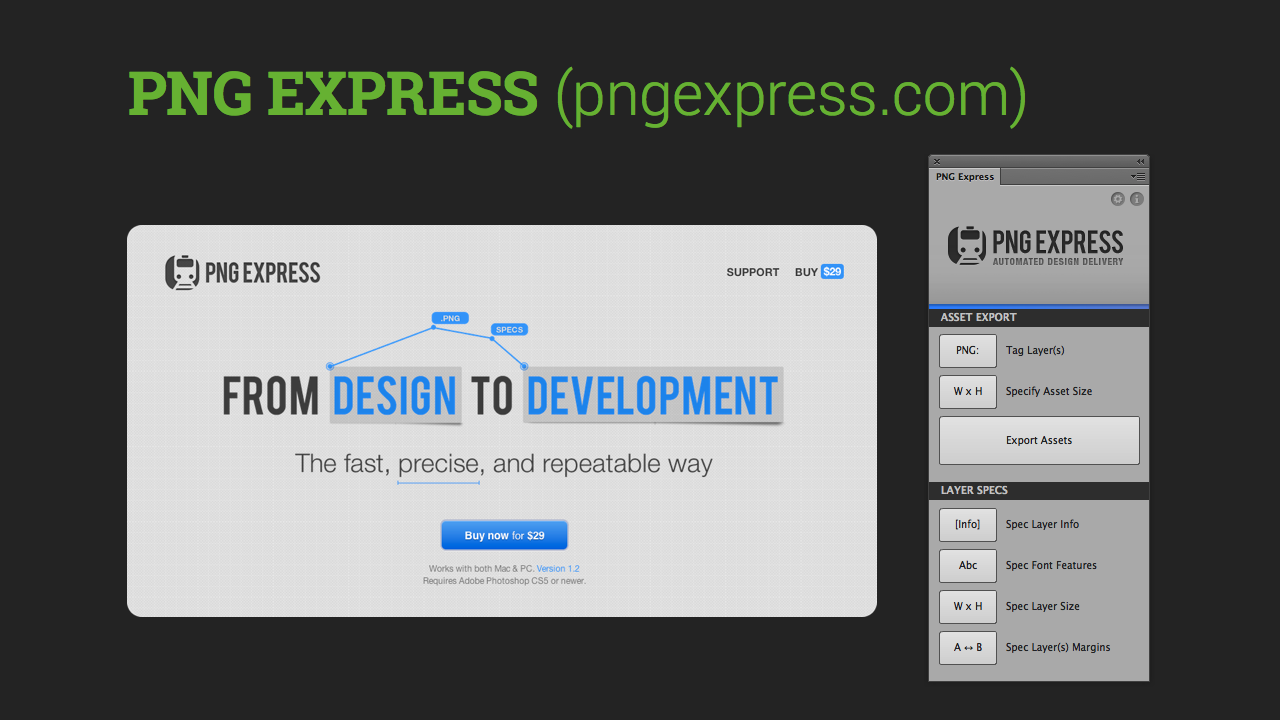
Example
Step 1. Suppose we need to specify the size between the X icon (delete) and the text Discard.
Step 2. Simply select these two layers in Photoshop and in PNG EXPRESS click Margins.
Step 3. The extension itself will draw the dimensions. If the size is wrong, our designer cant, edit it as a regular Photoshop text layer.
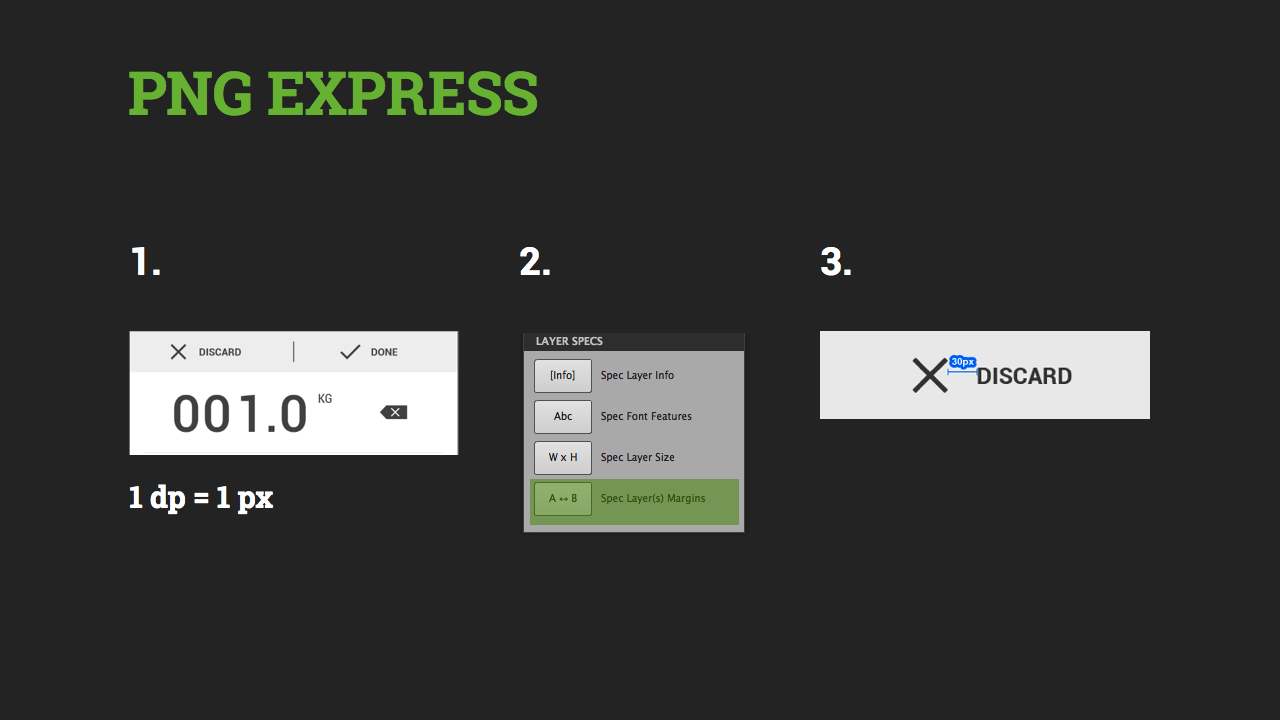
Although we get a not fully automated process, yet this extension saves a lot of time.
Fonts
The Fonts folder should contain files with everything related to fonts: size, color, style, Photoshop styles, etc. I took it apart from the size to make it easier for programmers to understand such a large abundance of callouts, thereby reducing the number of errors.
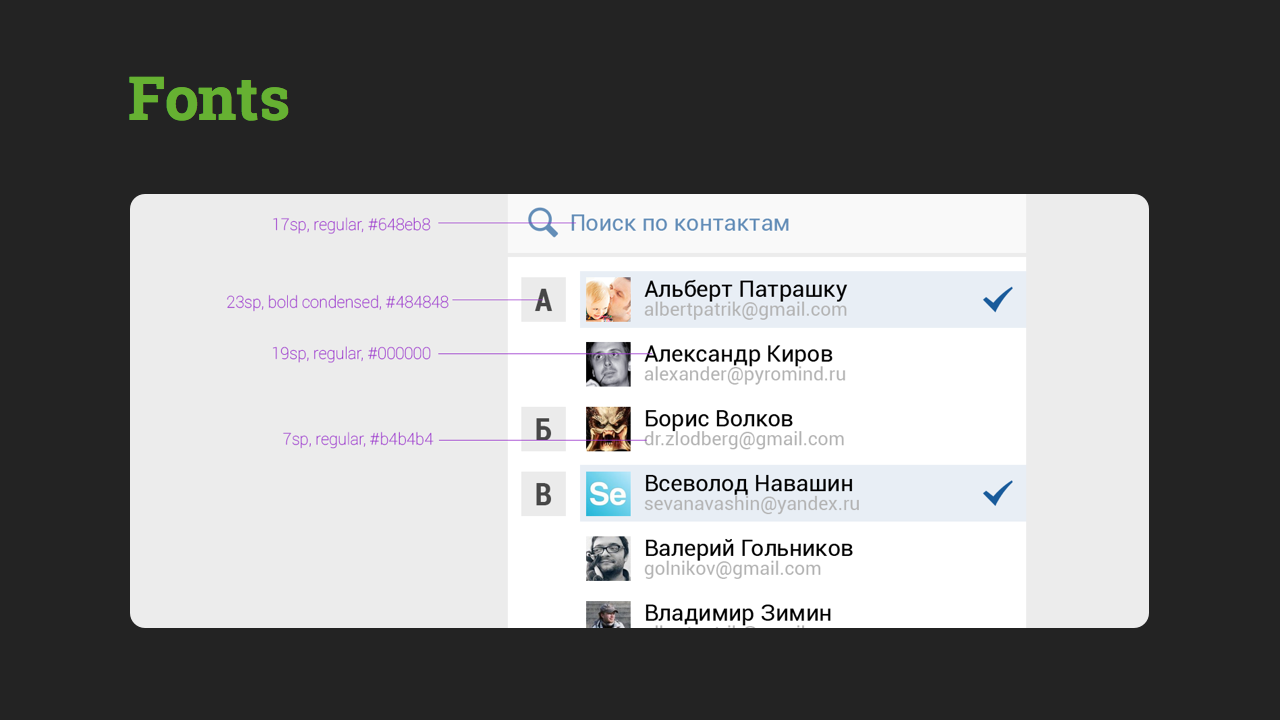
All font sizes must be specified in SP
1 SP = 1 DP, if in the settings the font size of the operating system is set by default. If the user has a vision problem, he can increase the font in the system settings. If you set the font size in SP, then your application will fit the user and also increase the font. If in other units, the font will remain unchanged.
Example
Step 1. If we need to specify the font for the Done button, then
Step 2. Select this layer in Photoshop and in PNG EXPRESS click Spec Font Features.
Step 3. Got a full description of the font.
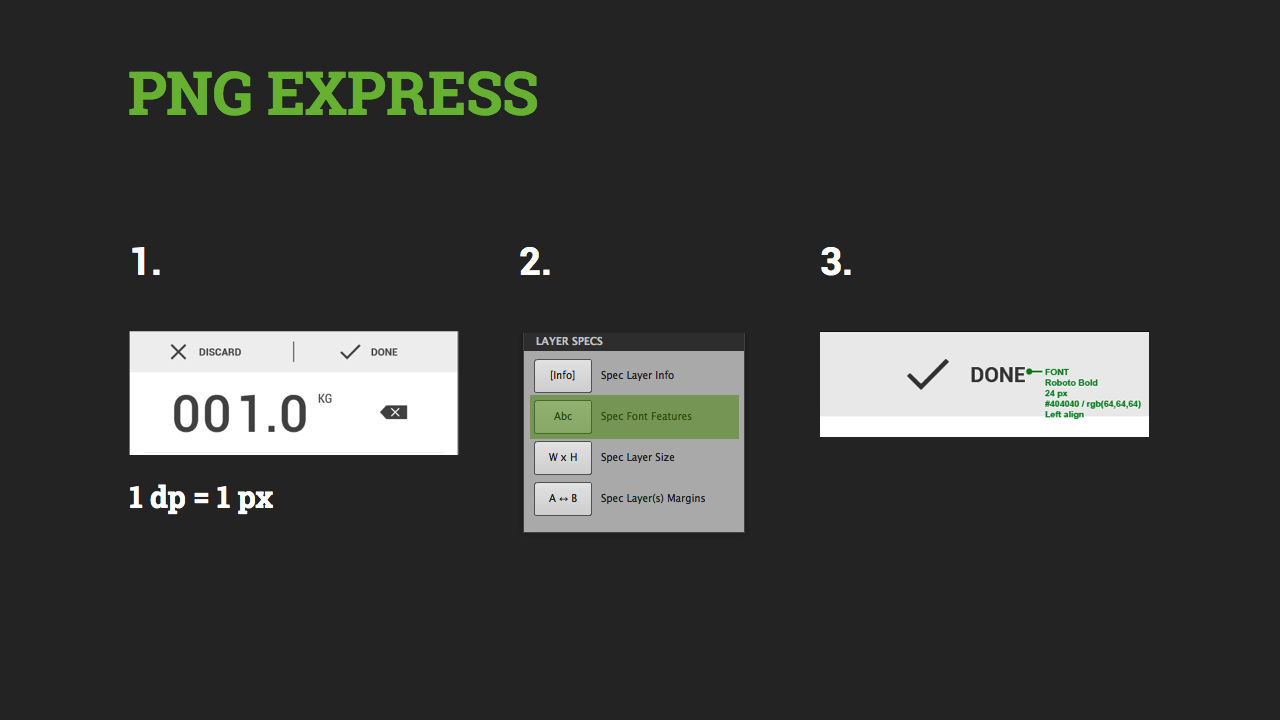
Again saved a lot of time.
Resources
The Res folder should contain graphics resources for your application. These are 4 subfolders for each screen density.

For this, I use another extension.
Cut & Slice me is a free Photoshop extension. Only for CS6. It allows you to do all this work in one click.

Initially, our PSD layout should be for XHDPI.
Example
Step 1. We need to cut icons for our application.
Step 2. Each icon is placed in the folder with @ at the end of its name. Thus, the script determines that this folder should be cut.
Step 3. Go to the Android tab, click Cut all assets.
Step 4. Expansion of the machine automatically cuts our icons for the 4 necessary screen densities and places them in the appropriate folders.

The remaining two buttons in Cut & Slice me for cutting from the selected subfolder and the currently selected layer.
Sometimes there is the problem of "soap" pixels, that is, when the icon does not fall into the pixel grid during resize. Therefore, we must go through the folders, see the quality of the work done by the script. If necessary, correct manually. Again saved a lot of time.
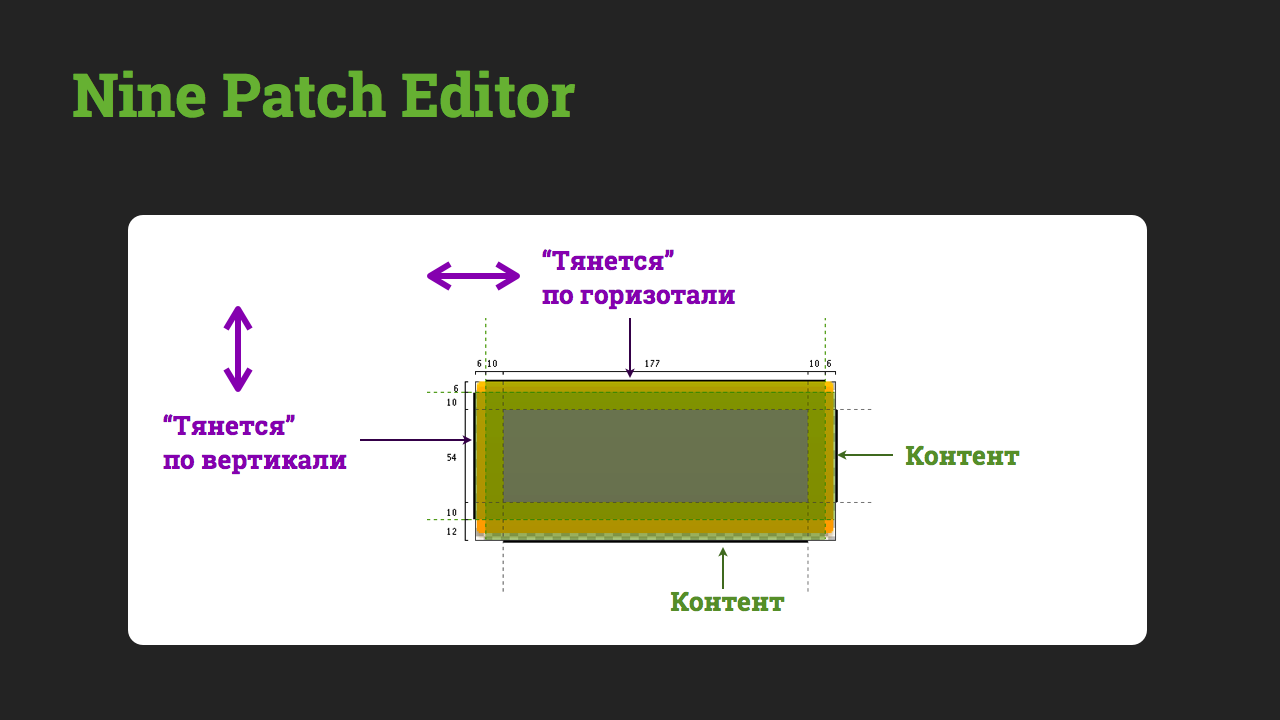
9.PNG
And about the schedule. All buttons and dies for Android are not cut to a fixed size, but are made "rubber."
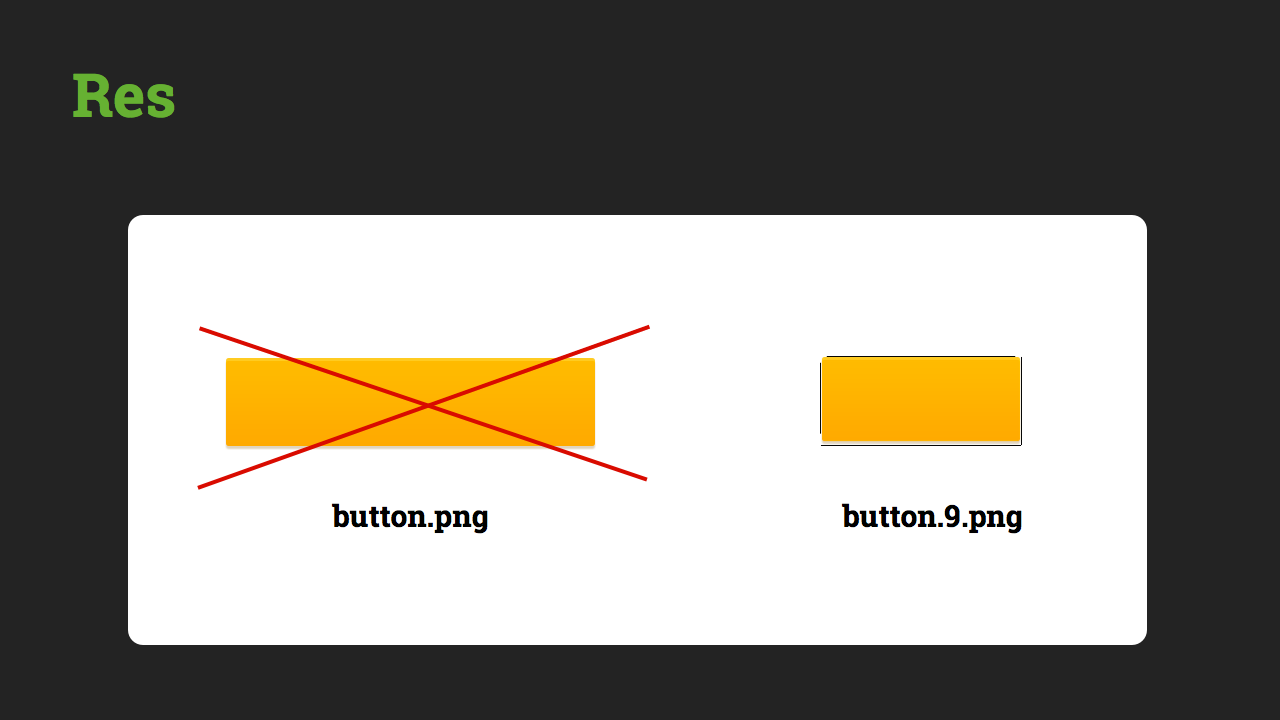
For this, the 9.png format is used. I make such files from ordinary png in NinePatchEditor. In fact, one more pixel is added to the original image on each side, filled with black color. The black pixel on the left is responsible for how your image will “stretch” vertically, from above - for the horizontal. Pixel on the right and below - for placing a pin inside the button.
Everything!

Continued: Integration of mobile application design. Part 2: iOS, Windows Phone
Source: https://habr.com/ru/post/183836/
All Articles