Study of the “working” diaphragm numbers of the lens on the example of Canon EF 1.8 / 50 II
Introduction
Often we ask ourselves questions: on which aperture it is better to shoot a portrait, a landscape, on which aperture the number of image distortions will be minimal; Which of the two lenses gives a sharper picture at equal apertures?
Roughly speaking, what we are talking about is what maximum relative aperture is considered “working”, i.e optimally suitable for some shooting in universal conditions (I note that the very formulation of the question implies a subjective assessment, then you will be convinced of this).
Study
Articles for familiarization with the theory of the question are under this spoiler
Such a study is easy to produce at home without any special equipment. We will need: a camera with a test lens, a tripod (in its absence it is enough to fix the camera from movement with improvised means, for example, a blue electrical tape), a trigger cable (again, needed to prevent the camera from moving, in its absence you need to press the trigger extremely gently and neatly).
')
Many authors, speaking about the image formed by the lens, give beautiful color pictures with cats, girls and the forest as examples. I believe that on such an image it is difficult to analyze something, and I suggest you take advantage of the traditional method - re-filming the worlds .
For testing was used the following world:
http://www.fotosav.ru/download.aspx?name=Mira600dpi
The essence of the test : we are re-printing the printed out to the world at different apertures under the same conditions and comparing the obtained images.
Tests were carried out on the cropped frame of the Canon EOS 1100d. Shooting worlds was carried out with a tripod; ISO sensitivity 100; natural light, the source on the right; 12.2 MP resolution, camera JPEG.
To analyze the data, the center of the frame was cropped and the visually worst edge of the frame was cropped, stitched in a GIF image with a resolution of 1000x600 pixels with the necessary explanations.
How to prepare images for analysis
Explained by the example of the script bash.
Having recaptured the world on all available apertures, I received 23 images. Visually analyzing the edges of the frame, I chose the worst in sharpness - it turned out to be the upper right edge of the frame.
Crop image I got using imagemagick .
Example:
Crop size 1000x600 pixels, at a distance of 3272 pixels horizontally and 0 pixels vertically from the upper left corner of the frame.
Similarly, we do crop center of the frame.
Now we need to put explanatory labels on each image. We will use such imagemagick tools as:
With the help of
In addition, we appropriately name the images and renumber them for subsequent merging into GIF.
The script will look like this (do not worry, half of the script is renumbered by the received images):
Now we have 23 images ready for stitching. Get a GIF with a delayed animation per second:
Having recaptured the world on all available apertures, I received 23 images. Visually analyzing the edges of the frame, I chose the worst in sharpness - it turned out to be the upper right edge of the frame.
Crop image I got using imagemagick .
Example:
convert -crop 1000x600+3272+0 IMG_0908.JPG .//1.jpgCrop size 1000x600 pixels, at a distance of 3272 pixels horizontally and 0 pixels vertically from the upper left corner of the frame.
IMG_0908.JPG - the original image, .//1.jpg - the path to the resulting image.Similarly, we do crop center of the frame.
Now we need to put explanatory labels on each image. We will use such imagemagick tools as:
-gravity - allows you to bind the label to one of the edges or corners of the image;-pointsize - sets the font size;-annotate - sets the binding in pixels and the text of the label.With the help of
exiv2 we get a f-number for each image.In addition, we appropriately name the images and renumber them for subsequent merging into GIF.
The script will look like this (do not worry, half of the script is renumbered by the received images):
#!/bin/bash nfiles=`ls -1A *.JPG | wc -l` len=${#nfiles} for i in *.JPG; do a=$(exiv2 $i | grep ": " | cut -f2 -d" ") ((p++)) leni=${#p} if [[ $leni < $len ]] # then let "delta = $len - $leni" # j=1 n_o=`while [ "$j" -le "$delta" ]; do echo -n "0"; ((j++)); done`; #echo $n_o # newname=`echo $n_o$p` # else newname=$p fi #echo $newname #convert -crop 1000x600+3272+0 $i .//"$newname"_"$a".jpg # convert -crop 1000x600+1636+1124 $i .//"$newname"_"$a".jpg # convert .//"$newname"_"$a".jpg -gravity SouthEast -pointsize 60 -annotate +50+50 "$a" -gravity SouthEast -pointsize 20 -annotate +50+0 "kedobear" -gravity SouthEast -pointsize 20 -annotate +50+17 "Canon EOS 1100d" -gravity SouthEast -pointsize 20 -annotate +50+34 "Canon EF 1.8/50 II" .//"$newname"_"$a".jpg a=0 #sleep 0.1 done Now we have 23 images ready for stitching. Get a GIF with a delayed animation per second:
convert -delay 100 -loop 0 *.jpg .gifGIF images are available at the following links (I recommend downloading images and using any image viewer for viewing not the browser):
Center frame (11.3 MB)
Frame Edge (10.7 MB)
In addition, we will analyze the images according to the content of information in the frame based on the size of the image. In this case, we will proceed from the assumption that various types of aberrations do not significantly affect the increase in image size.
Technique
Using the
The script for the formation of the source data is as follows:
du utility, we get the size of the image, enter the data into a spreadsheet processor (Calc), find the image, the amount of information in which is maximum, and we express the size of the remaining images relative to this image. Based on the data obtained, we construct a graph of image size versus aperture.The script for the formation of the source data is as follows:
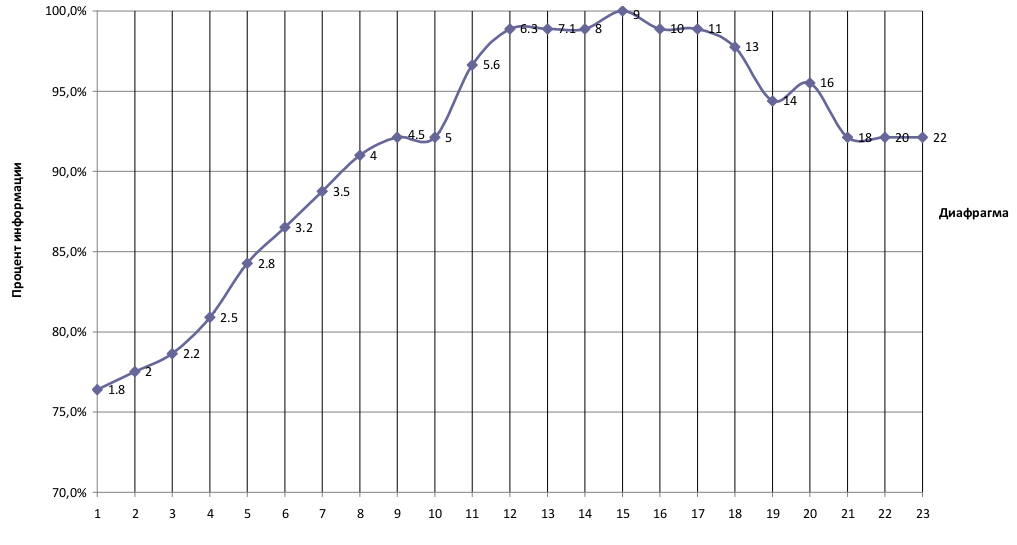
rm ./size for i in *.jpg; do a=$(du $i | cut -f1) echo $a b=$(exiv2 $i | grep ": " | cut -f2 -d" ") echo $b $a >> ./size #sleep 0.5 done UPDATE: The abscissa scale is the test number, the aperture values are indicated on the curve.
Graph of the amount of information from the aperture across the field
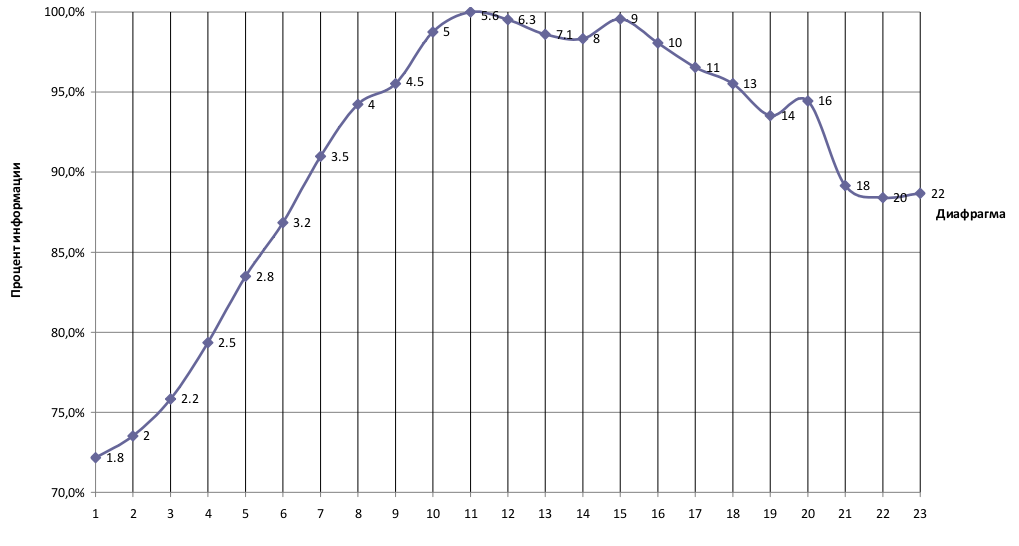
Graph of information volume versus aperture at the center of the frame

Graph of information volume versus aperture along the frame edge
In addition, according to this method, it is easy to compare two different lenses. We use Zenitar-M 1.7 / 50 as an opponent. For example, we only compare the result at the open aperture in the center and edge of the frame (the frame from Zenitar was made under slightly different lighting).
Frame center
Frame edge
findings
Let us dwell on what conclusions can be drawn from this study.
First of all, remember: any test is only a subjective test of a specific lens instance in specific conditions and does not pretend to objectivity and universality. Perhaps another instance will be worse or better than this.
In my opinion, the acceptable sharp image in the center of the frame becomes, starting with aperture 3.2. The maximum information in the center of the frame is observed on aperture 5.0.
At the edge of the frame, the image becomes acceptably sharp, starting with aperture 5.6. Maximum information at the edge of the frame is observed at aperture 9.0. Remember: I am talking about the edge of the frame on the cropped 1.6. On the full frame, the result will be worse.
Maximum information when analyzing the entire image is observed on the aperture 5.6.
A rough estimate of these results will be the following: it makes sense to shoot a portrait with blurring the background and preserving the detail of the face starting with the aperture 3.2. The optimal aperture for shooting, including the landscape, will be 5.6. Images on diaphragms above 3.2 are frankly soapy (although this can be used). To shoot on diaphragms below 9, if conditions permit, it does not make sense.
When comparing with the non-autofocus Zenitar-M 1.7 / 50, it becomes clear that this Canon 1.8 / 50 II is simply extremely open.
Using this technique, you can easily determine the “working” diaphragms of your lens, which will allow you to approach the choice of conditions and shooting parameters more intelligently, and, maybe, just decide which lens to use.
Thanks for attention.
Source: https://habr.com/ru/post/183636/
All Articles