SQL Reporting services in the clouds. Part 2: Setup
Last time, we compared prices using report services that are available as a service in Windows Azure (SQL Reporting) with the option of deploying a regular SQL Server virtual machine (SSRS).
Again, I do not presume to say that one service is better or worse. In most cases, the decision on which of the services to use in the application should be made according to the tasks that the application faces and the financial requirements of the customer. I just want to show that there are two ways to build a solution using report services.
Let's assume that our application works in Windows Azure and is implemented as a Cloud Service (PaaS). It uses the Azure SQL database as a data source. You need to configure report building services for use in the application. As already discussed earlier, reporting services for a Windows Azure application can be built in two ways:
Let's now look at the detailed process of setting up both services. However, before we begin, I assume that the SQL Azure database is already configured and hosted in Windows Azure.
')
After all the actions have been completed, SQL Server Reporting Services will be available at the URL specified when creating the virtual machine:
http: // <vm_name> .cloudapp.net/ ReportServer
Use this URL as the value of the “TargetServerURL” property when publishing a report project through SQL Server Business Intelligent Development Studio.
Again, I do not presume to say that one service is better or worse. In most cases, the decision on which of the services to use in the application should be made according to the tasks that the application faces and the financial requirements of the customer. I just want to show that there are two ways to build a solution using report services.
Use cases
Let's assume that our application works in Windows Azure and is implemented as a Cloud Service (PaaS). It uses the Azure SQL database as a data source. You need to configure report building services for use in the application. As already discussed earlier, reporting services for a Windows Azure application can be built in two ways:
- PaaS: SQL Azure + SQL Reporting;
SQL Azure will be used as a service;
SQL Reporting will be used as a service. - Hybrid solution: SQL Azure + SQL Server Reporting Services;
SQL Azure will be used as a service;
SQL Reporting Services must be configured on a separate SQL Server virtual machine (IaaS).
Let's now look at the detailed process of setting up both services. However, before we begin, I assume that the SQL Azure database is already configured and hosted in Windows Azure.
PaaS Option: SQL Azure + SQL Reporting
Configure SQL Reporting Service
- Go to Windows Azure Management Portal;
- Go to the “Reporting” section and click “Create a reporting service”;
- Select the subscription and region to be used by the SQL Reporting service. After that, enter the username with full service access rights and password.
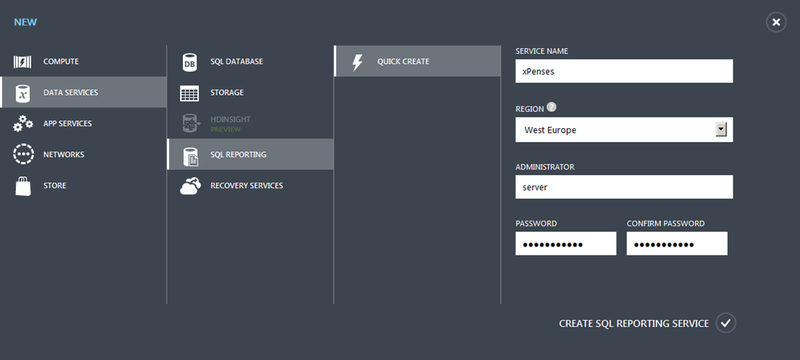
- After that select “Create SQL reporting service”.
Report Project Settings
- Open your reporting project in SQL Server Business Intelligent Development Studio;
You can use Visual Studio 2012 to work with report projects (.rptproj). To do this, you must install Microsoft SQL Server Data Tools . - Right-click on “Shared Data Sources” in the Solution Explorer window and select “Add New Data Source”;
- Enter the name of the new data source and set its type to “Type” in “Microsoft SQL Azure”. Then click “Edit”;
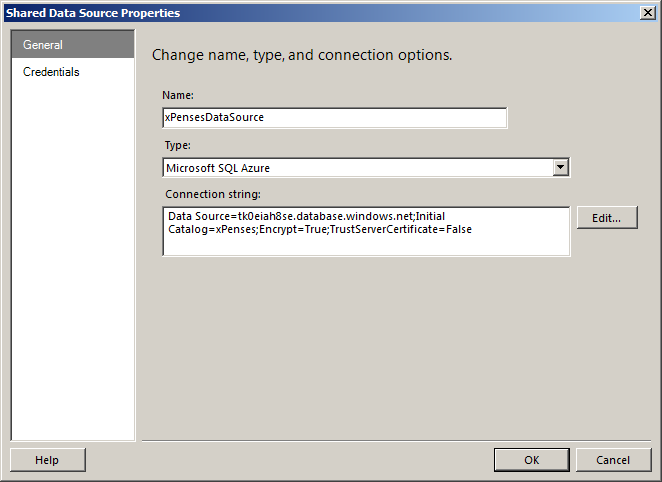
- Enter the URL to access the SQL Azure database;
- Select “Use SQL Server Authentication” and enter the data to access the SQL Azure database ;
- Enter the SQL Azure database name in the “Select or enter database name” field;
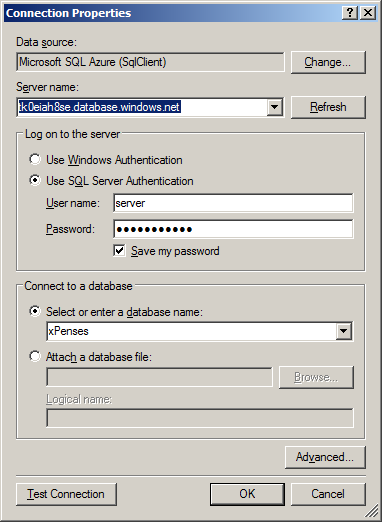
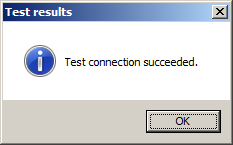
- Click “Test Connection”. OK
- Next, go to the “Credentials” tab and select “Use this user name and password”;
- Enter the data to access the Azure SQL database . OK

- In the context menu of the project, select “Properties”;

- In Windows Azure Management Portal, go to the SQL Reporting section. Select your reporting service and go to the “Dashboard” tab;
- Copy the value of the “Web Service URL” field;

- Paste the copied value in the “TargetServerURL” field in the SQL Server Business Intelligent Development Studio report project settings.
Hybrid Solution: SQL Azure + SQL Server Reporting Services
Create a virtual machine
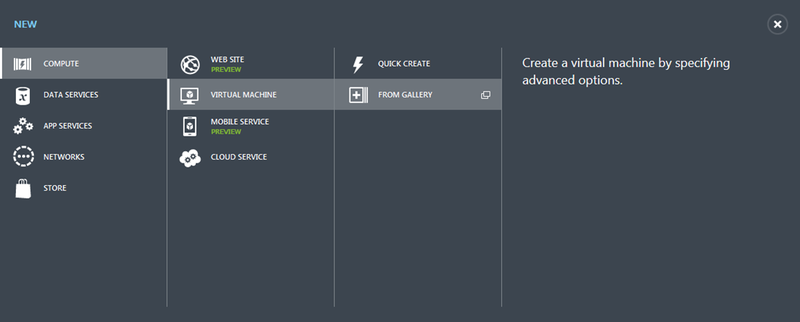
- Go to the Windows Azure Management Portal;
- Click the “New” button. Select “Compute”, then “Virtual Machine”, then “From Gallery”;
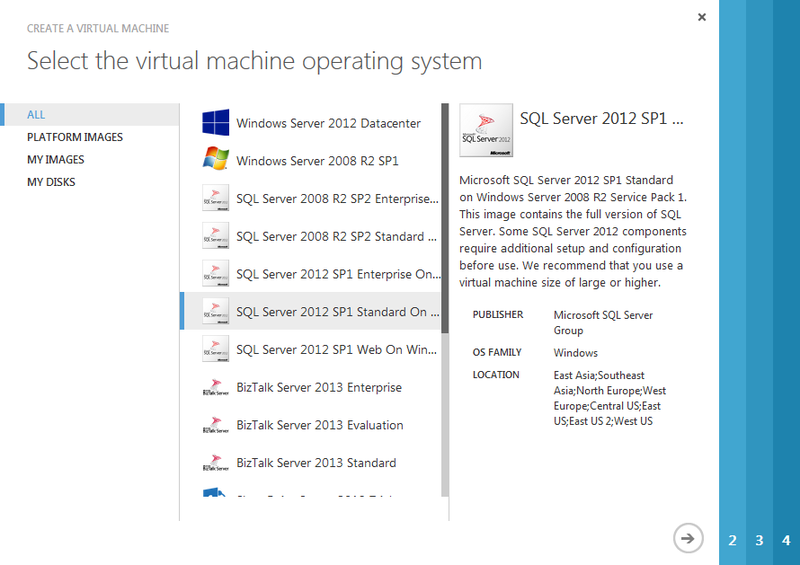
- Select the image “SQL Server 2012 SP1 Standard on Windows Server 2008 R2 SP1”;
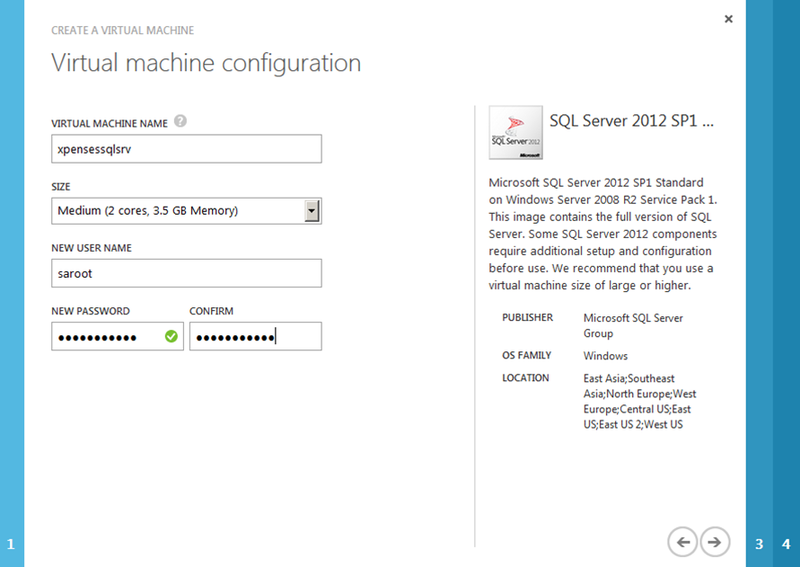
- Enter the name of the new virtual machine “Virtual Machine Name”, the size of “Size” and the data to access it: “New User Name” and “New Password”;
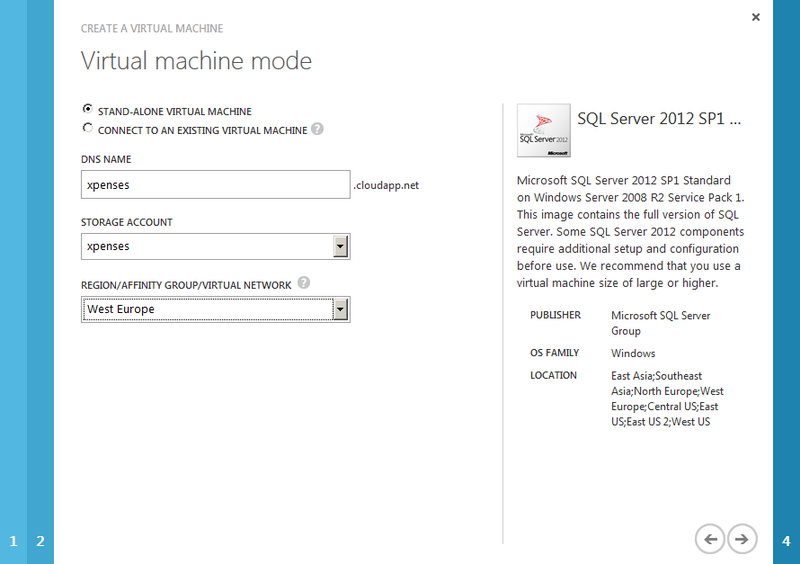
- Enter the DNS name for the new virtual machine, then specify the storage account and the region that will be used for this virtual machine;
- In the next step, leave all the defaults;
- Complete the creation of the virtual machine.
SQL Server Setup
- Connect to the created virtual machine via RDP;
- Launch the “SQL Server Management Studio”;
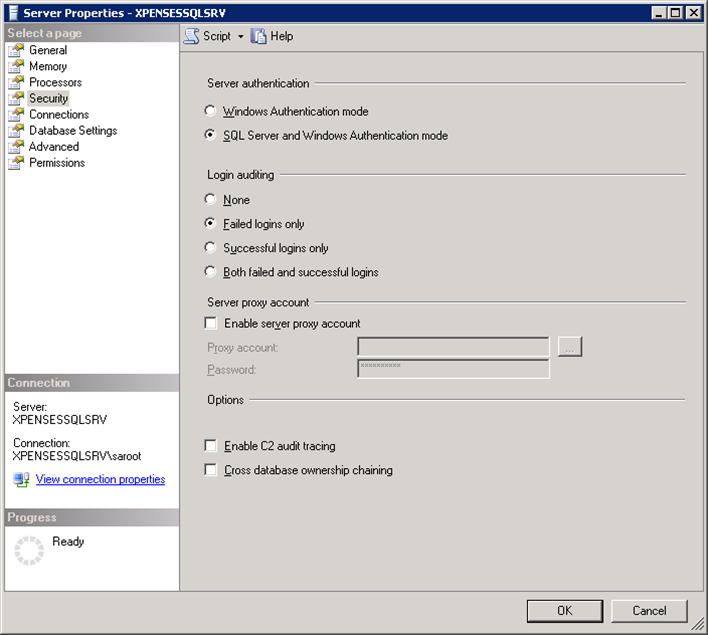
- In the “Object explorer” window, right-click on the server name and select “Properies”;
- Go to the “Security” tab and check “Server authentication” in the “SQL Server and Windows Authentication mode”;
- Return to the “Object Explorer” window and select the “Security”, “Logins” folder;
- Right click on the “sa” login and select “Properties”;
- Enter the password of the user “sa”;

- On the “Status” tab, set the value of the “Login” property to “Enabled”;

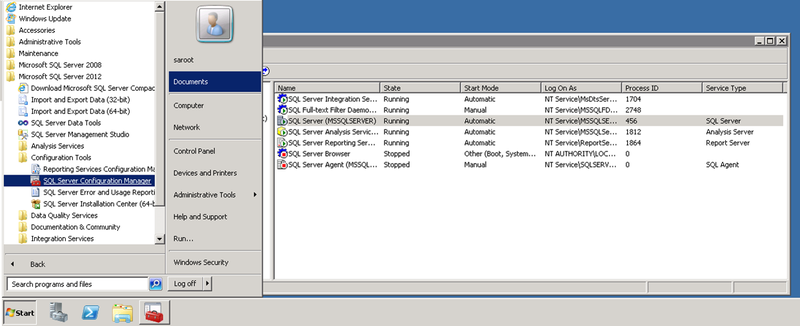
- Now restart SQL Server using “SQL Server Configuration Manager”.
- The last thing you need to do is open the ports in the Windows Firewall for the virtual machine. As administrator, execute the following two commands:
netsh advfirewall firewall add rule name="SQL Server 1433" dir=in action=allow protocol=TCP localport=1433 netsh advfirewall firewall add rule name="HTTP 80" dir=in action=allow protocol=TCP localport=80
')
Reporting Services Setup
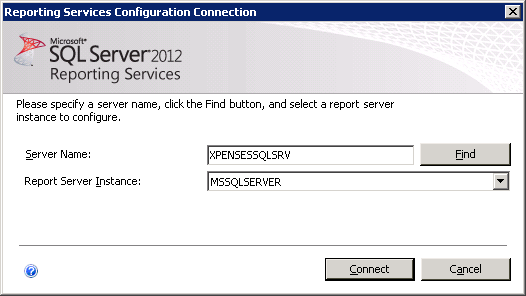
- Launch “Reporting Services Configuration Manager” from the Start menu;
- When the initial screen appears, click the “Connect” button;
- Go to the “Web Service URL” section and click the “Apply” button;

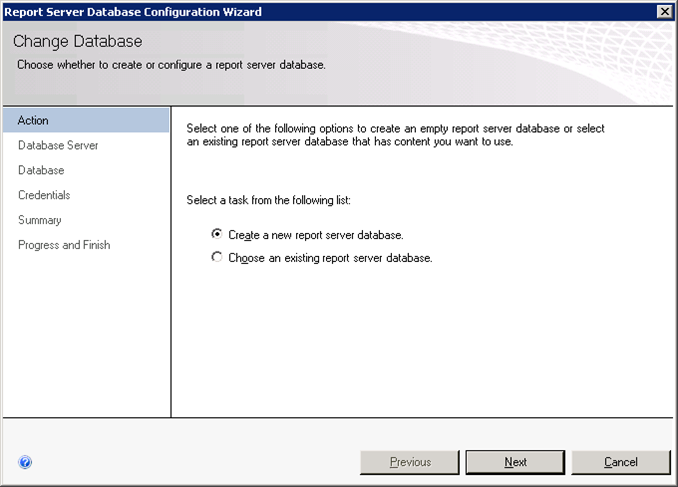
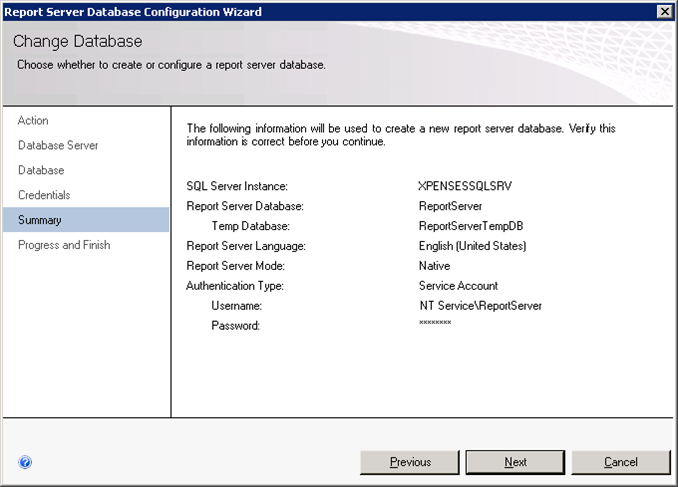
- Go to the “Database” section and click the “Change database” button. The following window will appear. Click “Next”.
- Complete the server setup, leaving all the default settings;

- Go to the “Report Manager URL” section and click the “Apply” button.
Configure Windows Azure Firewall
- Go to the Windows Azure Management Portal;
- Select the SQL Server virtual machine;
- Click on the “Endpoints” tab;
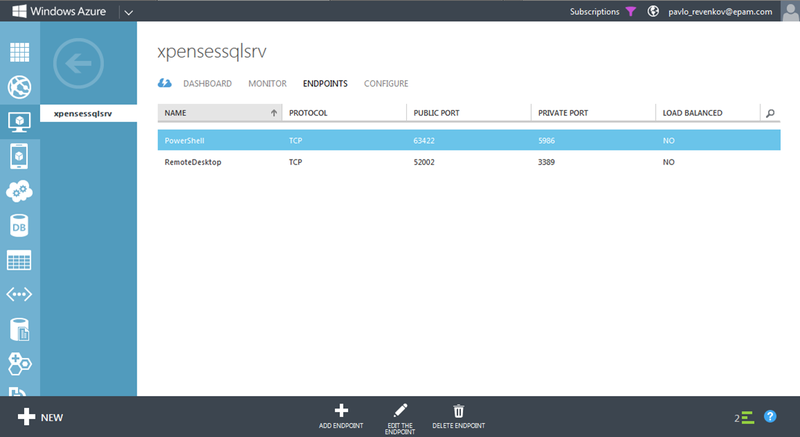
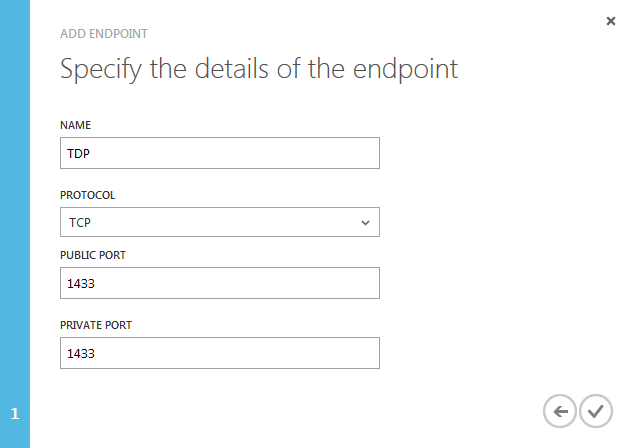
- Click the “Add Endpoint” button and enter the following settings:
- Repeat step 4 for the following settings:
Conclusion
After all the actions have been completed, SQL Server Reporting Services will be available at the URL specified when creating the virtual machine:
http: // <vm_name> .cloudapp.net/ ReportServer
Use this URL as the value of the “TargetServerURL” property when publishing a report project through SQL Server Business Intelligent Development Studio.
Source: https://habr.com/ru/post/183566/
All Articles