Forwarding a video card in KVM from under ubuntu
Prehistory
About two years ago I decided to switch completely to Linux, but the need for a Vend did not fall, so I always kept 2 operating systems. About a month ago I tried to install VirtualBox and install Windows on it, in general I liked working with 2 operating systems, but there was one problem, I program only computer graphics and I needed support for OpenGL 3.3 and higher, unfortunately VirtualBox did not provide me such opportunities. Googling stumbled upon such a thing as Xen, tried for a long time to do something on it, in the end nothing came of it, most likely because of the main video card, nVidia GeForce 580 GTX, the hypervisor simply did not want to run even ubuntu, let alone Windows. I started looking for other hypervisors, and came across KVM, I had to tinker with it, but in the end it all worked.
Configuration
So, we will need:
- Processor with support for virtualization (in Intel - this is VT-d, in AMD - AMD-Vi). Important: the chipset must also support this technology.
- Motherboard with I / O Memory Control Unit (IOMMU)
- Two video cards, for guest OS it is desirable to use an AMD video card, since with her problems should not be. NVidia video cards do not work.
My configuration:
- AMD Phenom II x4 Processor
- ASUS M5A99X EVO R2.0 motherboard
- Video Card for Ubuntu: NVidia GeForce 580 GTX
- Guest OS Video Card: AMD Radeon HD 5800
Training
First you need to reboot into the BIOS and enable IOMMU. To check if IOMMU for AMD is working:
dmesg | grep -iE "(IOMMU|AMD-Vi)"or for Intel:
')
dmesg | grep -iE "(IOMMU|VT-d)"Now you need to enable iommu in grub. Open / etc / default / grub, look for GRUB_CMDLINE_LINUX, bring it to the form:
GRUB_CMDLINE_LINUX="max_loop=64 iommu=pt iommu=1 amd_iommu=fullflush"Thus, we are increasing the number of LOOP devices, including IOMMU support for AMD. If everything has become flattened when you boot the operating system (usually this is because of 2x video cards), add the nomodeset to the previous line, we get:
GRUB_CMDLINE_LINUX="nomodeset max_loop=64 iommu=pt iommu=1 amd_iommu=fullflush"Also, to reduce glitches, you can prohibit downloading drivers from AMD (if you have both graphics cards from AMD, then you should not do this) by adding them to the blacklist. Open /etc/modprobe.d/blacklist.conf and add the following:
blacklist fglrxblacklist radeonNow you need to prepare a video card for forwarding, disconnecting it from the driver on the host and connecting it to the pci-stub. To select our map, enter lspci and look for our map:
02:00.0 VGA compatible controller: Advanced Micro Devices [AMD] nee ATI Cypress PRO [Radeon HD 5850]02:00.1 Audio device: Advanced Micro Devices [AMD] nee ATI Cypress HDMI Audio [Radeon HD 5800 Series]in my case, this is 02: 00.0 and 02: 00.1. 02: 00.1 is the sound chip. The video card is visible as video and audio, so they should be transferred together.
Then, we need vendor id and device id. you can see it by running lspci with the key -n
02:00.0 0300: 1002:689902:00.1 0403: 1002:aa50Now let's connect our devices to the pci-stub. Video card:
echo "1002 6899" > /sys/bus/pci/drivers/pci-stub/new_idecho "0000:02:00.0" > /sys/bus/pci/devices/0000\:02\:00.0/driver/unbindecho "0000:02:00.0" > /sys/bus/pci/drivers/pci-stub/bindPlease note that there is no colon in between VendorID and DeviceID.
Sound card:
echo "1002 aa50" > /sys/bus/pci/drivers/pci-stub/new_idecho "0000:02:00.1" > /sys/bus/pci/devices/0000\:02\:00.1/driver/unbindecho "0000:02:00.1" > /sys/bus/pci/drivers/pci-stub/bindfor convenience, you can write a script and add it to autorun.
Show script
#!/bin/bash hostgr="0000:02:00.0" hostau="0000:02:00.1" grid="1002 6899" auid="1002 aa50" # echo $grid > "/sys/bus/pci/drivers/pci-stub/new_id" echo $hostgr > "/sys/bus/pci/devices/$hostgr/driver/unbind" echo $hostgr > "/sys/bus/pci/drivers/pci-stub/bind" echo $auid > "/sys/bus/pci/drivers/pci-stub/new_id" echo $hostau > "/sys/bus/pci/devices/$hostau/driver/unbind" echo $hostau > "/sys/bus/pci/drivers/pci-stub/bind" Installation
First you need to install several packages:
sudo apt-get install qemu-kvm libvirt-bin ubuntu-vm-builder bridge-utilsThis is an installation on a server without gui; for convenient work with kvm, we also install virt-manager:
sudo apt-get install virt-managerAfter this, the menu item “Virtual Machine Manager” should appear in the menu.
Next we pass the option allow_unsafe_assigned_interrupts = 1 to the kvm module. Create a file in /etc/modprobe.d/kvm.conf with the contents and reload the module.
options kvm allow_unsafe_assigned_interrupts=1Next, run the virt-manager, a window will appear:
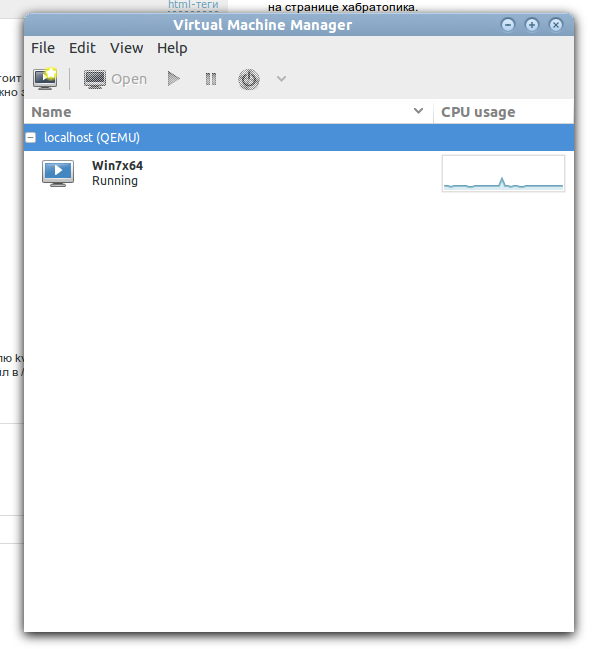
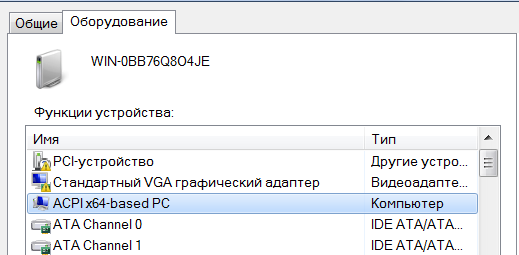
Right-click on localhost and select New or click on the monitor on the left in the panel. Then follow the instructions to create a virtual machine. After installing the system, we can forward the devices we need. Enter the View-> Details menu. A window like this should appear:

Click on the Add hardware button, select the PCI Host Device, and look for our video card. The same should be done with the sound chip from the video card. In the same way, you can forward USB hosts to make them work, you should indicate in the Controller USB in the field Model: USB2.
When launching, our adapter should appear in the computer’s devices:
The next thing we need to do is download the driver. Download from the manufacturer’s website and install it into the system. When I tried to install the driver, the system desperately went to BSOD, I decided to fix this problem by installing a newer Windows. You can also try installing the driver through the device manager, but with me it just hung.
To finish, turn off the virtual machine and restart the computer, if this is not done, the system can go back to BSOD when it is restarted.
At the moment, kvm, when restarting a guest with a forwarding video card, hangs the entire system, so if you turn off the virtual machine, you will also have to restart the entire computer.
Total
Now, after starting, the virtual machine console will turn off after loading the video card driver, in the case of Windows 7, the “Starting Windows” picture remains there, but the image itself should already be output to the forwarded video card. Although the image will not be displayed at the console, nevertheless it will transfer data from input devices and it will be possible to control the guest from the keyboard and mouse like a regular virtual machine.
We cling the second monitor to the pro-forward video card, and we admire the work done.
Lastly, a screenshot of the system performance evaluation:

Sources
help.ubuntu.com/community/KVM
www.linux.org.ru/wiki/en/Pro_Video_Card_in_Virtual_Machine
Source: https://habr.com/ru/post/183468/
All Articles