RFID implantation - results after 7 months
Traffic! Blood in places!

I have been dealing with all kinds of RFID readers for many years and I consider this technology very convenient. Gone are the days when contactless readers were indecently expensive, and they began to meet at every turn. It remained a mystery, especially against the background of the visible miniaturization of RFID tags, why have they not yet implemented implantable RFID tags?
')
The specified article was great news for me, but many questions remained. Additional study of the question added doubts, because, despite the demand and interest of people in this topic, I did not find reports on successful implantation, experience of use, pros and cons in large numbers. Even at the moment, there are dozens of posts on dangerousthings.com/forums/.
I ordered an implantable tag 125KHz EM4200 / EM410 + set for implantation. While waiting for the Russian post office to deliver an order, I continued to collect information on this topic, weighing the pros and cons.
Many questions removed the how-to manual from Amal enclosed in the package, now available by reference .
At that time I remember that there was some uncertainty about whether the whole kit should be autoclaved before use, but then it was confirmed that the label and the applicator are supplied sterile.
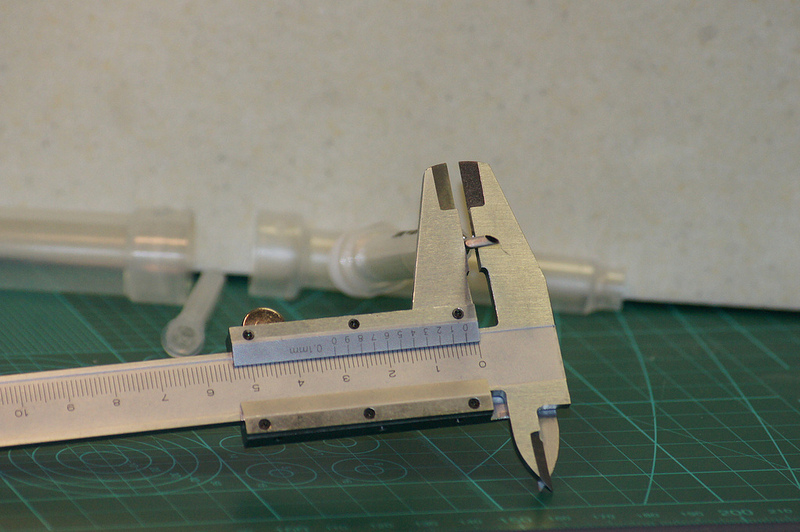
The next problem is to prepare yourself morally, since looking at the pictures in the browser is one thing, and having a set for implantation with a real needle with a diameter of 2.5 mm. Is quite another. I caught myself reflexively stretching my intended implant site, looking at the set.
Immediately dismissed the idea of self-implantation - well, not Gregory House, I, that running ahead, was the right decision. Began to search for a medical organization or a person who agrees to perform implantation.
I thought there would be no problem with this, my wife finished a medical college, an experienced dentist, not a surgeon, but the scalpel knows which side to keep, many familiar medical doctors, including surgeons. The option with reference to the organizations that provide services for piercing, etc.
The wife and her friends refused instantly - “why are you doing this”, “we are afraid”, “what if ...”, etc. all are in fact given an oath to Hippocrates. Other medical friends reported very similarly. The salons rounded the voice and the eyes, saying that there were no price lists, no specialists, and the moon was not in that position.
Someone may have exceptions, but I highly recommend that those who will do this - first find someone who agrees to implant, at our latitudes this is a bit problematic.
I was incredibly lucky in the face of my good friend Alexander, a man without medical education, but with a cold head and sewn with stern threads and in the right places with his hands.
Varning 1: Everything you write in this article, if you wish to repeat in whole or in part, you do at your own risk, the author of the article and the resource where it is posted are not responsible for your actions and any consequences of these actions.
Implantation was performed in the kitchen, on the table, without anesthesia.
The implantation kit includes (all sterile):
I recommend in a pharmacy to buy normal surgical gloves, it is better to have two pairs, to practice on one, how to put them on, since it is convenient to wear the bundled clothing, but it is terrible to work and they stick strongly to the skin treated with iodine.
It is highly recommended to have another person on the side to help the “implantologist” to file something, hold it, etc.
Please take into account - I decided to do it at home, not the worst option. On the one hand, there is nothing complicated, but on the other - the procedure is not run-in, the “implantologist” is absolutely without experience, there are all kinds of risks.
The sequence of implantation recommended by me based on the experience gained:
Warning 2:
We check that your equipment with which you intend to use the resulting label reads it confidently from distances of 10-15 mm. (do not open the package!), this also verifies the principal operability of the label, otherwise you can not continue further.
We are convinced of the tightness of the package with a label, a set for implantation, disinfection means (if that can be replaced with local counterparts).
Accordingly, we remove everything, ensure the cleanliness of the room, the table, close the vents, balconies, wipe the working surface with vodka / alcohol, hands on the elbow, everything used in the process. From now on, the patient and the implantologist hold idle hands up and do not touch anything sterile / not sterilized. Everything sterilized / sterilized does not leave the work area.
Note on clause 12.13:
In the video, from the original article "RFID Chip Implantation":
where the implantologist is wearing black gloves, the process takes only a few seconds, judging by the hands, with virtually no tension, but another type of applicator is used.
In my video and in the video indicated by the author in the comments:
it is clear that the process requires more effort, requires more control and takes much longer. Pay attention to the whitened knuckles of the finger implantologists, and the amount of stretching of the punctured skin fold. Personal feelings - they pressed on how much force.
One gets the impression of the staged essence of the first video, the absence of a label in the applicator, or the special skill and secret knowledge of the first implantologist.
Postoperative period:
The napkin can be removed after a couple of hours; after that, the implant site must be decontaminated a couple of times a day with alcohol or chlorhexidine. To wash, avoiding hit of water to the place of implantation.
At first, there may be a slight swelling and bruise in the area of implantation - due to damage by the needle of the applicator tissue, which must pass within a few days. In the first weeks after implantation, slight unusual sensations under the skin are possible, then the label will completely stop bothering you, and you will completely cease to notice it.
Warning 3: If the swelling is very large, does not subside, there is a temperature, deterioration of health, skin color, loss of sensitivity of the hand or fingers - immediately visit a doctor.
Results:
In my case, the implantation was no problem, the second puncture of the skin was not planned, but it is a trifle. After 7 months, I can confidently say that it does not cause any inconvenience, there is practically no trace left.
I confirm that it is impossible for me to destroy the mark inadvertently in ordinary life without total destruction of the arm into which it is implanted. We tried to break the remaining animal tag with our fingers, because of the size, shape and material we didn’t manage, the more so under the skin it’s not real.
Painfully? It is painful, but tolerable, for people with a low pain threshold, local anesthesia is possible, in the online store at the moment
There are sets of anesthesia.
The best option would be to consult with specialized physicians at the expense of local analogues for a brief local anesthesia, taking into account the individual characteristics of your body and personal intolerance to drugs.
The first time weaned itself from the habit, going to the door, climb behind the card in the back pocket. The hand itself climbs another month at least on the machine. Convenience is not transferable, it is not necessary to constantly monitor the presence of a card with you, it is impossible to forget it at home, or to get into a situation where you are at work alone, and you left the office without a card. Approaching the door with busy hands, it is much easier to open the door, than to engage in juggling in an attempt not to drop the burden, fishing and putting the card.
A huge positive charge when opening the doors with “bare hands”, people do not fully believe that it is available, even quite advanced, until they touch it.
Very interesting options using to disable the car immobilizer, quick access to weapons, etc.
Another application not considered is the unambiguous identification of the body in extreme cases. Yes, with reservations, but at the moment beyond the edge, and this must be very much aware of.
During this time, the following readers were tested:
1. PARSEC NR-EH09 - reading at a distance of 0-10 mm, no problem.
2. BOLID C2000-PROXY - reads after 15 seconds of twisting and twisting by hand on it, the rays of hatred, we remember Warning No. 2, it’s good that I don’t have them in my current job.
3. 3 more types of unidentifiable PROXIMITY readers - reading at a distance of 0-10 mm, no problem.
Photo \ Video:
Video of the process, filmed "vskidku" son:
PS Many thanks to Alexander, for adventurism and courage, to Vlad vvzvlad for the original article and mystic with invites, Amal (amal.net) for promoting the topic and sets for implantation, the Habrahabr resource itself.
Based on the article “American Freak offers kits for implanting a RFID chip under the skin”
I have been dealing with all kinds of RFID readers for many years and I consider this technology very convenient. Gone are the days when contactless readers were indecently expensive, and they began to meet at every turn. It remained a mystery, especially against the background of the visible miniaturization of RFID tags, why have they not yet implemented implantable RFID tags?
')
The specified article was great news for me, but many questions remained. Additional study of the question added doubts, because, despite the demand and interest of people in this topic, I did not find reports on successful implantation, experience of use, pros and cons in large numbers. Even at the moment, there are dozens of posts on dangerousthings.com/forums/.
I ordered an implantable tag 125KHz EM4200 / EM410 + set for implantation. While waiting for the Russian post office to deliver an order, I continued to collect information on this topic, weighing the pros and cons.
Many questions removed the how-to manual from Amal enclosed in the package, now available by reference .
At that time I remember that there was some uncertainty about whether the whole kit should be autoclaved before use, but then it was confirmed that the label and the applicator are supplied sterile.
The next problem is to prepare yourself morally, since looking at the pictures in the browser is one thing, and having a set for implantation with a real needle with a diameter of 2.5 mm. Is quite another. I caught myself reflexively stretching my intended implant site, looking at the set.
Immediately dismissed the idea of self-implantation - well, not Gregory House, I, that running ahead, was the right decision. Began to search for a medical organization or a person who agrees to perform implantation.
I thought there would be no problem with this, my wife finished a medical college, an experienced dentist, not a surgeon, but the scalpel knows which side to keep, many familiar medical doctors, including surgeons. The option with reference to the organizations that provide services for piercing, etc.
The wife and her friends refused instantly - “why are you doing this”, “we are afraid”, “what if ...”, etc. all are in fact given an oath to Hippocrates. Other medical friends reported very similarly. The salons rounded the voice and the eyes, saying that there were no price lists, no specialists, and the moon was not in that position.
Someone may have exceptions, but I highly recommend that those who will do this - first find someone who agrees to implant, at our latitudes this is a bit problematic.
I was incredibly lucky in the face of my good friend Alexander, a man without medical education, but with a cold head and sewn with stern threads and in the right places with his hands.
Varning 1: Everything you write in this article, if you wish to repeat in whole or in part, you do at your own risk, the author of the article and the resource where it is posted are not responsible for your actions and any consequences of these actions.
Implantation was performed in the kitchen, on the table, without anesthesia.
The implantation kit includes (all sterile):
- Medical gloves.
- Cotton swab, probably soaked with iodine solution.
- Two sterile wipes.
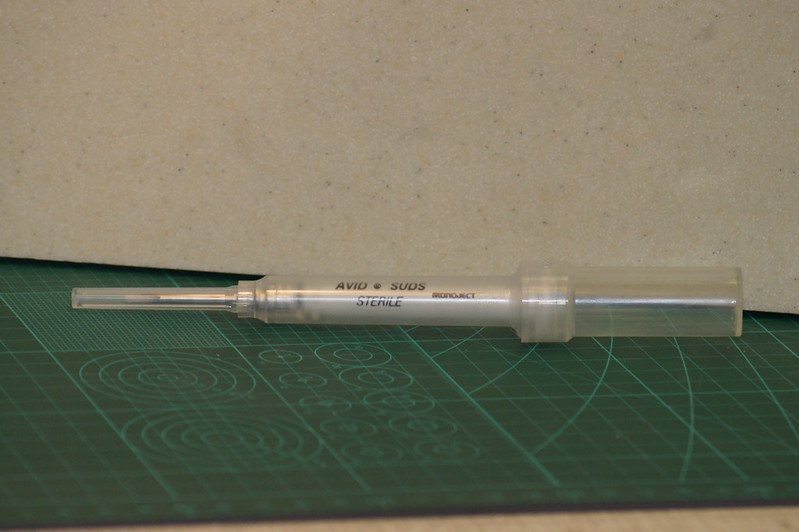
- Set for the implantation of radio tags for animals, consisting of an applicator, with an RFID special already embedded. tagged (not suitable for humans, as the mark is with a special coating, to which body tissues are attached over time and cannot be easily removed if desired).
- Actually RFID tag.
- Scissors for opening sterile packaging.
- Vatu, bandage.
- Disinfectants - alcohol, vodka, chlorhexidine, analogues.
- Permanent marker for marking the place and direction.
- Light as much as possible.
I recommend in a pharmacy to buy normal surgical gloves, it is better to have two pairs, to practice on one, how to put them on, since it is convenient to wear the bundled clothing, but it is terrible to work and they stick strongly to the skin treated with iodine.
It is highly recommended to have another person on the side to help the “implantologist” to file something, hold it, etc.
Please take into account - I decided to do it at home, not the worst option. On the one hand, there is nothing complicated, but on the other - the procedure is not run-in, the “implantologist” is absolutely without experience, there are all kinds of risks.
The sequence of implantation recommended by me based on the experience gained:
Warning 2:
We check that your equipment with which you intend to use the resulting label reads it confidently from distances of 10-15 mm. (do not open the package!), this also verifies the principal operability of the label, otherwise you can not continue further.
We are convinced of the tightness of the package with a label, a set for implantation, disinfection means (if that can be replaced with local counterparts).
Accordingly, we remove everything, ensure the cleanliness of the room, the table, close the vents, balconies, wipe the working surface with vodka / alcohol, hands on the elbow, everything used in the process. From now on, the patient and the implantologist hold idle hands up and do not touch anything sterile / not sterilized. Everything sterilized / sterilized does not leave the work area.
- We make markup with a permanent marker according to the manual from Amal.
- The implantologist puts on sterile gloves, unpacks a sterile napkin, spreads it in front of him, then all the actions and layout do on it.
- The implantologist unpacks the tampon with iodine, processes the implantation zone with a margin, according to the instructions, wait a couple of minutes.
- A package with a “human” RFID tag is opened, an open edge is folded to prevent it from rolling, and is put on the table.
- The package of the implantation set for animals is opened, the applicator goes.
- Mark the position of the piston of the applicator.
- We ask the assistant to take, or in the direction (not to be confused), we extract the animal label by pressing the applicator piston.
- We return the applicator piston to the previous level.
- We take an open bag with a “human” tag, and preferably without getting it out of the bag, holding it through the package, we place the mark in the applicator needle, the moment is heavy, uncomfortable, small, the gloves stick (a remark from Alexander is a very difficult moment).
- Open the bag with a sterile cloth, put in front of you.
- The implantologist places his fingers along the markup, pulls the skin away so that the entry point becomes in the center of the skin fold.
- The implantologist pierces the skin at the marked point and inserts the applicator needle to the length of the RFID tag, ensuring that the applicator needle is parallel to the plane of the patient’s hand, and the needle tip does not pierce the skin on the other side of the fold. Attention, considerable efforts may be required, make sure that the applicator does not slip out of your hands, causing serious injury to the patient - watch the video.
- By pressing the applicator plunger, the implantologist begins to insert the label, as the label emerges from the applicator needle, the implantologist pulls the needle out from under the skin. It is important to track the moment when the stock reaches its extreme position. Attention, considerable efforts may be required, make sure that the applicator does not slip out of your hands, causing serious injury to the patient - watch the video.
- Before the needle goes out from under the skin, the implantologist takes it with her free hand and puts it on top of the needle.
- The implantologist completely removes the applicator needle from under the skin, through the tissue and the skin, controlling the position of the mark under the skin and holding it in place.
- The patient puts the finger of the other ruga on the hold point and pinches this place for at least 5 minutes through the napkin.
- Napkin is fixed by available means.
Note on clause 12.13:
In the video, from the original article "RFID Chip Implantation":
where the implantologist is wearing black gloves, the process takes only a few seconds, judging by the hands, with virtually no tension, but another type of applicator is used.
In my video and in the video indicated by the author in the comments:
it is clear that the process requires more effort, requires more control and takes much longer. Pay attention to the whitened knuckles of the finger implantologists, and the amount of stretching of the punctured skin fold. Personal feelings - they pressed on how much force.
One gets the impression of the staged essence of the first video, the absence of a label in the applicator, or the special skill and secret knowledge of the first implantologist.
Postoperative period:
The napkin can be removed after a couple of hours; after that, the implant site must be decontaminated a couple of times a day with alcohol or chlorhexidine. To wash, avoiding hit of water to the place of implantation.
At first, there may be a slight swelling and bruise in the area of implantation - due to damage by the needle of the applicator tissue, which must pass within a few days. In the first weeks after implantation, slight unusual sensations under the skin are possible, then the label will completely stop bothering you, and you will completely cease to notice it.
Warning 3: If the swelling is very large, does not subside, there is a temperature, deterioration of health, skin color, loss of sensitivity of the hand or fingers - immediately visit a doctor.
Results:
In my case, the implantation was no problem, the second puncture of the skin was not planned, but it is a trifle. After 7 months, I can confidently say that it does not cause any inconvenience, there is practically no trace left.
I confirm that it is impossible for me to destroy the mark inadvertently in ordinary life without total destruction of the arm into which it is implanted. We tried to break the remaining animal tag with our fingers, because of the size, shape and material we didn’t manage, the more so under the skin it’s not real.
Painfully? It is painful, but tolerable, for people with a low pain threshold, local anesthesia is possible, in the online store at the moment
There are sets of anesthesia.
The best option would be to consult with specialized physicians at the expense of local analogues for a brief local anesthesia, taking into account the individual characteristics of your body and personal intolerance to drugs.
The first time weaned itself from the habit, going to the door, climb behind the card in the back pocket. The hand itself climbs another month at least on the machine. Convenience is not transferable, it is not necessary to constantly monitor the presence of a card with you, it is impossible to forget it at home, or to get into a situation where you are at work alone, and you left the office without a card. Approaching the door with busy hands, it is much easier to open the door, than to engage in juggling in an attempt not to drop the burden, fishing and putting the card.
A huge positive charge when opening the doors with “bare hands”, people do not fully believe that it is available, even quite advanced, until they touch it.
Very interesting options using to disable the car immobilizer, quick access to weapons, etc.
Another application not considered is the unambiguous identification of the body in extreme cases. Yes, with reservations, but at the moment beyond the edge, and this must be very much aware of.
During this time, the following readers were tested:
1. PARSEC NR-EH09 - reading at a distance of 0-10 mm, no problem.
2. BOLID C2000-PROXY - reads after 15 seconds of twisting and twisting by hand on it, the rays of hatred, we remember Warning No. 2, it’s good that I don’t have them in my current job.
3. 3 more types of unidentifiable PROXIMITY readers - reading at a distance of 0-10 mm, no problem.
Photo \ Video:
- Applicator Sizes
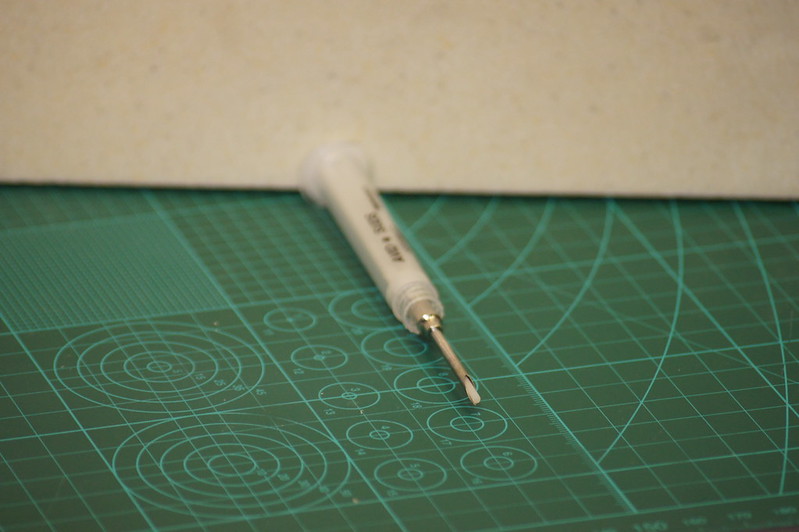
- Applicator piston
- Packed Applicator
- Packaging label, it is clear that sterilization (change the color of the marker)

- Immediately after surgery

- In one day
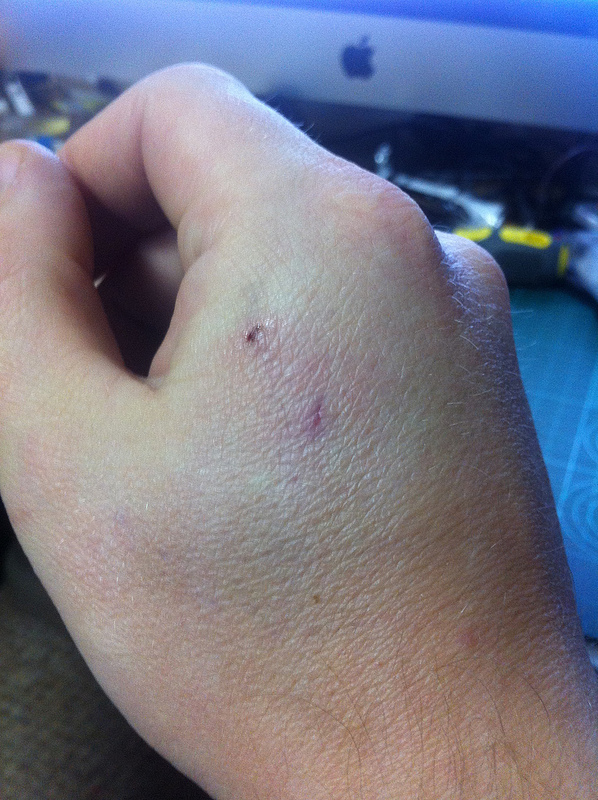
- A week later

- 3 months later

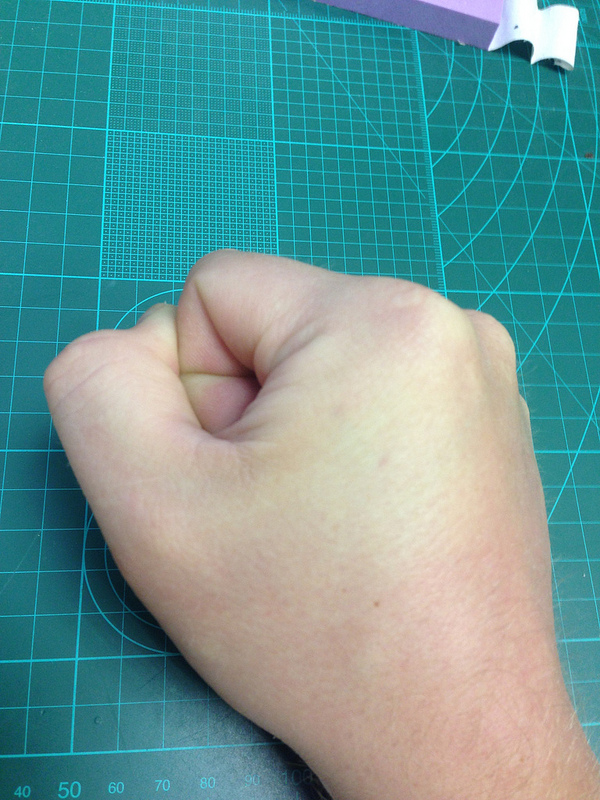
- At the moment (7 months)

- If you make a tight fist
Video of the process, filmed "vskidku" son:
PS Many thanks to Alexander, for adventurism and courage, to Vlad vvzvlad for the original article and mystic with invites, Amal (amal.net) for promoting the topic and sets for implantation, the Habrahabr resource itself.
Source: https://habr.com/ru/post/182846/
All Articles