Installing SSD on Apple iMac 27 '' (Mid 2011)
Hello!
The iMac MC813RS / A purchased in 2012 (I remind you, this is a model of the mid 2011 model year, with 12 GB of installed RAM ) has recently begun to godlessly slow down and lag, especially with a cold boot. Since I do not like to leave the computer turned on in sleep mode (well, you never know what else the power engineers will decide), then turning on the system “from scratch” was accompanied by insane system brakes at boot.
Control sweep was not successful; caches, permits, start-up demons - nothing helped. Moreover, in the process of work, I switched on Safari, then the computer was turned off without a mood.
The system may have become cluttered, especially since the Mountain Lion, now living on the iMac, was installed on top of the previous Leo - and I know from experience that a clean installation of any system is better than a cumulative one.
')
But it’s just so easy to take and install a new system, restore the settings and programs - it’s just lazy, but the reason was drawn quickly.
Macbook Air (late 2012), bought as a companion to the big Mac , despite its size and weight, gave very excellent performance results - largely due to the disk subsystem based on the standard 128 GB SSD.
The advantages and differences of SSD compared to traditional disk drives are already described by millions of laudatory phrases, so I wisely refrain from doing so.
But if choosing a SSD drive did not seem difficult (even with the range of local computer firms), then the installation procedure seemed to be more difficult.
In addition to the actual analysis of the inside of the aluminum 27-inch mastodon, the case was complicated by the non-standard internal connection of SATA drives - instead of the traditional power connector in the iMac (well, also in macbooks) its compact version (power connector compact) is used:

For example, replacing a regular DVD drive with an SSD (as I originally planned) will fail, because the onboard connector on the optical drive is compact. In such cases, they usually buy an Optibay adapter container into which the SSD is embedded, and the box is simply installed instead of the DVD drive.
But, despite the fact that I use the optical drive every six months (well, maybe more often), it is still sometimes necessary to read / write something optical. In addition, these Optibay do not provide full compatibility compared with the old school path “motherboard - SATA-cable - drive”.
An alternative way is to replace a regular hard drive (I remind you that I have 1 TB installed from the factory). But it’s like drinking is fraught with the fact that the smart Mac reads the temperature of the hard disk from the sensor glued to it and depending on this picks up the rotational speed of the cooling fan, so it’s just not possible to replace it - the system will turn the fans to maximum. (According to some information, thermal sensors are mounted directly into hard disks on a tip-off from Apple’s tricky ones.) In addition, there are situations when an additional large hard disk is still required in the system — a bootcamp partition, heavy service files and Mac OS programs, IPA- iTunes - it makes no sense to store it on the SSD, as well as there is no sense in overpaying for its volume (on Eyre from the available 120 GB is free 90).
Also, do not forget about my file and media server , which stores all the data, so the SSD in my case is exclusively for the system and the daily-basic set of programs. Secondary programs (such as games) will be stored on the hard disk, and media files and documents, as before - on the server.
According to the above arguments, the only correct way is to install the SSD with a third disk device, the benefit of the SATA and power connectors on the iMac motherboard is also three. But there is no way to get away from the compatibility problem of connectors, so the task was posed to find the right cable.
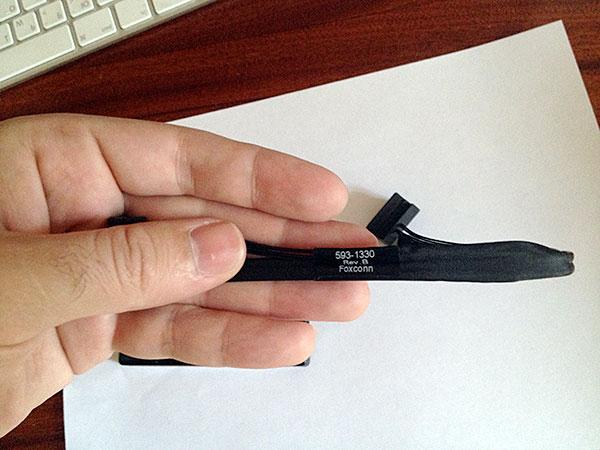
A simple analysis of the Internet has shown that it is enough to find a simple cable such as SATA 7 + 15 Pin to SATA 7 Pin + 2 Pin, and this will be quite enough for Aymak's SSD. But I decided to bother with compromise solutions, and the desired OEM Foxconn OEM cable was installed from my beloved Amazon and installed on Epplow computers:
I also had to pick up the drive selection, and if I more or less decided on the volume, it’s 120 ... 128 GB (I don’t need more, see above), then it was more difficult with the make and model.
The most important factor is availability in local computer stores. The most recent and up-to-date models of equipment (and this is not necessarily a computer package) never rush to come to my region, and ordering on the Internet (be it from the States, be it in Russia) such a fragile thing is still wary, especially if out of service drive, I can fly classically with a guarantee.
Of all the large list of brands and reviews on the sites, I immediately caught on OCZ, because: Intel is expensive, Samsung products do not allow me to use karma, Corsair and Kingston have too few reviews, etc., etc.
In general, OCZ. At some point in the search, I sincerely imbued with the Vertex 4 model (reviews of which are easy to google), but the consultant from one site (deliberately not mentioning its name) strongly recommended Vector as a newer and more modern model. I would be happy to take it, but taking into account the peculiarities of local retail, in the end, I took and bought Vertex 4 128 Gb - it is already excellent:

Out of habit, I wanted to immediately flash the drive with the latest firmware version (there was 1.5 on the drive, the most current one was 1.5.1), but the SSD refused to accept it ... well, and I scored by inertia on it.
Armed with a first-class tool and double-sided tape, I set to work.
The 21-page installation guide for the iMac set of two hard drives was printed from ifixit.com, and the process started.

Sorry, pasted SSD with double-sided tape
Without going into details, the SSD was installed under the DVD-drive (for this, I had to cut a window for cables in the plastic wall, which I subsequently sealed with paper tape to avoid breaking the boundaries of the heat zones: Apple dock in such cases!):
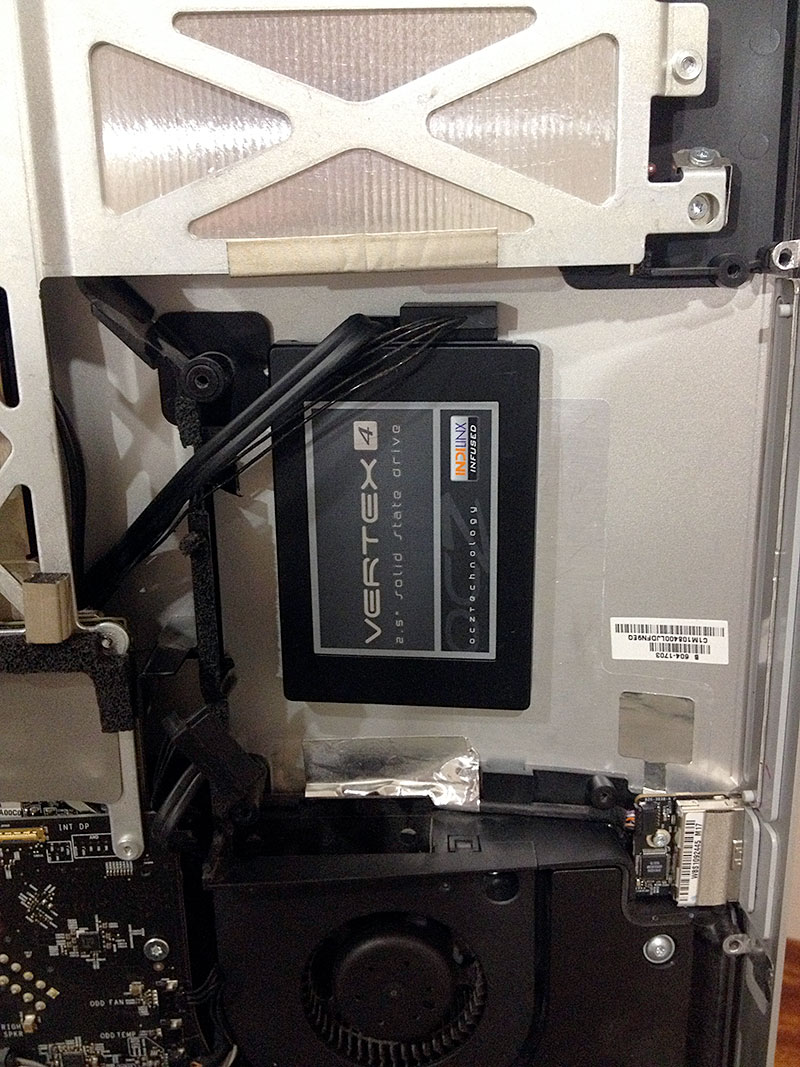
Pay attention to the torn wall with a hole for the wires - later this place will be caulked with a piece of tape made of paper.
At the same time, poking the failed contact in the luxurious LG matrix, which caused the screen to flicker at low brightness , I assembled the device back - and oddly enough! - iMac wound up with a half-kick and brightly beamed about a new disk drive. By running Disk Utility, I successfully created a GUID partition:

The rest is a matter of technology: I installed the system on a fresh SSD from the previously downloaded Mountain Lion DMG image:

As it was agreed, this will be a “clean” installation, all programs will be configured from scratch.
Also, with the help of the utility Trim Enabler , the TRIM mode was activated, for some reason it did not immediately turn on:

So, the sensations after the upgrade are the most positive!
The system is loaded for 15 seconds from the moment the button is pressed.
Heavy applications like Photoshop - literal seconds (re-opening the application - share!).
Benchmark satisfied:

I also shot a video of a “cold” boot of the upgraded aluminum computer:
I summarize - for a long time it was necessary so!
I will note the features of computer disassembly:
The iMac MC813RS / A purchased in 2012 (I remind you, this is a model of the mid 2011 model year, with 12 GB of installed RAM ) has recently begun to godlessly slow down and lag, especially with a cold boot. Since I do not like to leave the computer turned on in sleep mode (well, you never know what else the power engineers will decide), then turning on the system “from scratch” was accompanied by insane system brakes at boot.
Control sweep was not successful; caches, permits, start-up demons - nothing helped. Moreover, in the process of work, I switched on Safari, then the computer was turned off without a mood.
The system may have become cluttered, especially since the Mountain Lion, now living on the iMac, was installed on top of the previous Leo - and I know from experience that a clean installation of any system is better than a cumulative one.
')
But it’s just so easy to take and install a new system, restore the settings and programs - it’s just lazy, but the reason was drawn quickly.
Macbook Air (late 2012), bought as a companion to the big Mac , despite its size and weight, gave very excellent performance results - largely due to the disk subsystem based on the standard 128 GB SSD.
The advantages and differences of SSD compared to traditional disk drives are already described by millions of laudatory phrases, so I wisely refrain from doing so.
But if choosing a SSD drive did not seem difficult (even with the range of local computer firms), then the installation procedure seemed to be more difficult.
How to install it?
In addition to the actual analysis of the inside of the aluminum 27-inch mastodon, the case was complicated by the non-standard internal connection of SATA drives - instead of the traditional power connector in the iMac (well, also in macbooks) its compact version (power connector compact) is used:
For example, replacing a regular DVD drive with an SSD (as I originally planned) will fail, because the onboard connector on the optical drive is compact. In such cases, they usually buy an Optibay adapter container into which the SSD is embedded, and the box is simply installed instead of the DVD drive.
But, despite the fact that I use the optical drive every six months (well, maybe more often), it is still sometimes necessary to read / write something optical. In addition, these Optibay do not provide full compatibility compared with the old school path “motherboard - SATA-cable - drive”.
An alternative way is to replace a regular hard drive (I remind you that I have 1 TB installed from the factory). But it’s like drinking is fraught with the fact that the smart Mac reads the temperature of the hard disk from the sensor glued to it and depending on this picks up the rotational speed of the cooling fan, so it’s just not possible to replace it - the system will turn the fans to maximum. (According to some information, thermal sensors are mounted directly into hard disks on a tip-off from Apple’s tricky ones.) In addition, there are situations when an additional large hard disk is still required in the system — a bootcamp partition, heavy service files and Mac OS programs, IPA- iTunes - it makes no sense to store it on the SSD, as well as there is no sense in overpaying for its volume (on Eyre from the available 120 GB is free 90).
Also, do not forget about my file and media server , which stores all the data, so the SSD in my case is exclusively for the system and the daily-basic set of programs. Secondary programs (such as games) will be stored on the hard disk, and media files and documents, as before - on the server.
According to the above arguments, the only correct way is to install the SSD with a third disk device, the benefit of the SATA and power connectors on the iMac motherboard is also three. But there is no way to get away from the compatibility problem of connectors, so the task was posed to find the right cable.
A simple analysis of the Internet has shown that it is enough to find a simple cable such as SATA 7 + 15 Pin to SATA 7 Pin + 2 Pin, and this will be quite enough for Aymak's SSD. But I decided to bother with compromise solutions, and the desired OEM Foxconn OEM cable was installed from my beloved Amazon and installed on Epplow computers:
SSD selection
I also had to pick up the drive selection, and if I more or less decided on the volume, it’s 120 ... 128 GB (I don’t need more, see above), then it was more difficult with the make and model.
The most important factor is availability in local computer stores. The most recent and up-to-date models of equipment (and this is not necessarily a computer package) never rush to come to my region, and ordering on the Internet (be it from the States, be it in Russia) such a fragile thing is still wary, especially if out of service drive, I can fly classically with a guarantee.
Of all the large list of brands and reviews on the sites, I immediately caught on OCZ, because: Intel is expensive, Samsung products do not allow me to use karma, Corsair and Kingston have too few reviews, etc., etc.
In general, OCZ. At some point in the search, I sincerely imbued with the Vertex 4 model (reviews of which are easy to google), but the consultant from one site (deliberately not mentioning its name) strongly recommended Vector as a newer and more modern model. I would be happy to take it, but taking into account the peculiarities of local retail, in the end, I took and bought Vertex 4 128 Gb - it is already excellent:
Out of habit, I wanted to immediately flash the drive with the latest firmware version (there was 1.5 on the drive, the most current one was 1.5.1), but the SSD refused to accept it ... well, and I scored by inertia on it.
Opening and installation
Armed with a first-class tool and double-sided tape, I set to work.
The 21-page installation guide for the iMac set of two hard drives was printed from ifixit.com, and the process started.
Sorry, pasted SSD with double-sided tape
Without going into details, the SSD was installed under the DVD-drive (for this, I had to cut a window for cables in the plastic wall, which I subsequently sealed with paper tape to avoid breaking the boundaries of the heat zones: Apple dock in such cases!):
Pay attention to the torn wall with a hole for the wires - later this place will be caulked with a piece of tape made of paper.
At the same time, poking the failed contact in the luxurious LG matrix, which caused the screen to flicker at low brightness , I assembled the device back - and oddly enough! - iMac wound up with a half-kick and brightly beamed about a new disk drive. By running Disk Utility, I successfully created a GUID partition:
Once again, I never cease to admire Apple: perhaps, only her computers have the same charm and appeal, even when they are in negligee! Circuit design and engineering are simply exemplary.
The rest is a matter of technology: I installed the system on a fresh SSD from the previously downloaded Mountain Lion DMG image:
As it was agreed, this will be a “clean” installation, all programs will be configured from scratch.
Also, with the help of the utility Trim Enabler , the TRIM mode was activated, for some reason it did not immediately turn on:
SSD impressions
So, the sensations after the upgrade are the most positive!
The system is loaded for 15 seconds from the moment the button is pressed.
Heavy applications like Photoshop - literal seconds (re-opening the application - share!).
Benchmark satisfied:
I also shot a video of a “cold” boot of the upgraded aluminum computer:
I summarize - for a long time it was necessary so!
UPGRADE
I will note the features of computer disassembly:
- Instead of suckers used to “tear off” the glass screen from the matrix, I used my fingers: with their tips, I carefully picked up the glass and carefully separated it from the holding magnets. Keep in mind that they are very powerful, despite their compact size.
- It is also recommended to remove the glass and the matrix temporarily enclosed in the original packaging bag, which the computer itself was originally wrapped in to avoid dust and scratches.
Source: https://habr.com/ru/post/182680/
All Articles