Translucency, video editing and working with mosaics in PaintCAD 4Windows 1.2.1
At least once in each life, each of us wants to create a drawing with translucency, assemble an animation from simple drawn frames, tear out some frame from an AVI film and create a mosaic map, subsequently writing a two-dimensional game in which the hero runs along this loadable map.
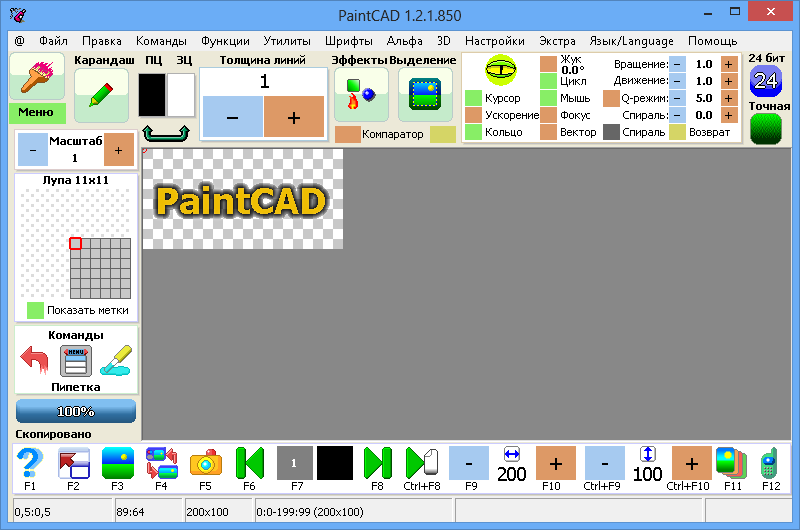
Oddly enough, but in PaintCAD 4Windows free graphic editor with version 1.2.1 it became possible:
How to do all this? And how was it developed?
')
It so happened that there are no layers in paintkade. Here drawing is a “piece of paper” with a picture. Therefore, there was never a question “what is behind the picture?”. Behind the picture is a background color (it’s the same as the background color, it’s also WZ). All operations for cutting or shifting the pixels knew that they had to leave the empty places of the LC.

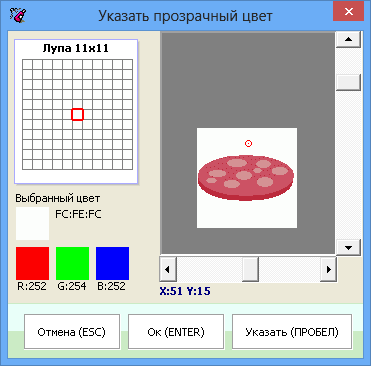
When the ancient Java mobile version of the paintkad was developed in the distant 200s, then, apart from the Insert , which inserted a copied rectangular fragment, the special insert appeared. It was necessary to insert one picture onto another, while indicating the paintpad “transparent color”, which was not inserted into the picture. This all further moved to the windows for windows:
The transparent color was removed, the object was inserted, everyone was happy.


And so that they were even happier, it was possible to indicate with what transparency in percent to insert the remaining non-transparent piece of the picture:


But after all these operations, the background image still remained opaque.
In version 1.2.1 a PNG format was added to the command for opening any known paintkad file types (Ctrl + O, "??? - file"). And if the worktation feels that there is an alpha channel of transparency inside the file, then it will ask you:

In order to load both the drawing and the alpha channel, you need to select the third item “Picture on drawing, alpha to buffer” .
Then here is a drawing on a transparent background:

will be decomposed in a paintkad into a picture (which will be in the picture) and an alpha channel (which will be in the internal paintkad buffer), on which the white pixels are completely opaque, the black pixels are completely transparent, the gray ones are intermediate gradations of transparency:


And if then, when saving, you specify that we want to save “PNG”, then the paintcd will ask you once again about transparency:
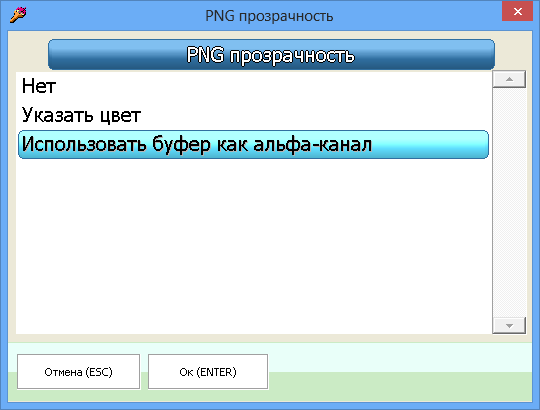
And when selecting “Use buffer as alpha channel”, the PNG will be saved back along with its alpha channel.
Accordingly, in order to create a drawing with translucency from scratch, you need to copy your drawing to the buffer (Ctrl + C) and bring it up there in the buffer to the alpha channel condition . Therefore, it was necessary to quickly switch between the buffer and the pattern.
Previously, such commands have already been added to the paintpad, this is the “Picture <-> Buffer” in the command menu by Ctrl + Right, and this is an exchange of the picture and buffer in the 3D stereo drawing mode. But here it was necessary to duplicate this command once again, to make it accessible, easily started from the keyboard at any time, and to make it clear that it is “to switch between the picture and the alpha channel”.
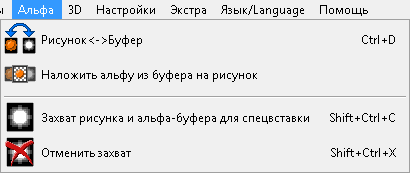
Therefore, in the main menu (which is turned on when you press the "Menu" button in the upper left corner of the window or by pressing "0" on the keyboard) a whole new submenu "Alpha" was added . The first command in it appeared "Figure <-> Buffer" ( Ctrl + D) and now, using this keyboard shortcut, you can switch between the image and its alpha channel.
In the process of drawing I want to see "how my drawing will look on a transparent background." Therefore, in the Preview (F3) , the Alpha Overlay (D) button was added, available for pressing when the buffer is not empty.
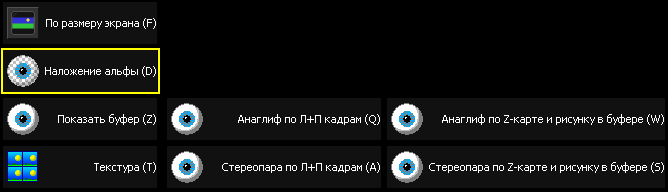
By clicking on this button or on the “D” key, you can preview not only a simple drawing, but a drawing superimposed with alpha on a black background, white background or a mesh background (which clearly shows how the transparency unfolds over a regular texture).
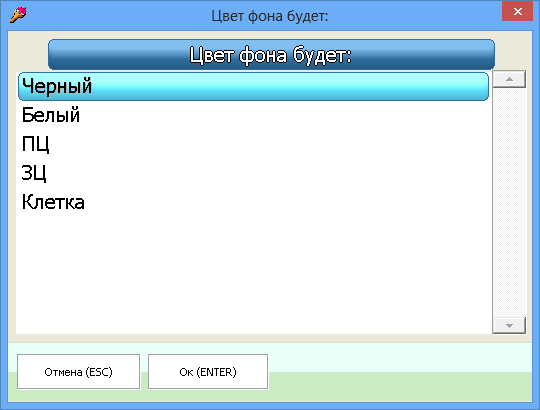
Also, the user may want to impose this pattern with alpha on a specific background - for this, there is a second command in the Alpha menu: “Overlay alpha from the buffer on the drawing” , which will offer you options that have backgrounds in addition to Black, White and Mesh backgrounds HRC and WZ:
But such an overlay option is rarely used, more often the user may want to take such a PNG with an alpha channel, load it, and then apply it to some other drawing.
Since there is only one drawing and one buffer in the paintkad, then if our PNG and its alpha channel are stored in them, then where should we put the drawing on which we want to paste the whole thing?
To do this, in the menu "Alpha" are the last two commands.
“Capturing an image and alpha buffer for a special insert” (Ctrl + Shift + C) - places the alpha channel in a special slot. After that, the image is copied to the buffer. And now the inserted image is in the buffer, its alpha channel is in the special slot. The current picture is empty. Open the picture, which will insert. And we use a special insert (in the Selections and Clipboard menu, available via Alt + ".") - after Capture, she knows that she does not need to ask anything about transparency, you just need to use an alpha channel from a special slot.
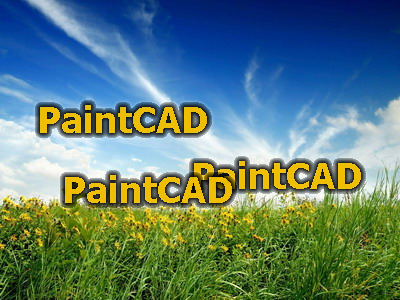
Thus, we put our PNG with alpha channel on any other image:
As soon as we’ve finished inserting a picture with an alpha channel, we need to cancel the capture so that the Special Ensemble starts working as usual again, for this we call the “Cancel Capture” command in the Alpha menu (Ctrl + Shift + X) .
Thus, in PaintCAD 4Windows, you can draw pictures with translucency, load them from PNG, save to PNG and paste them into other pictures.
Earlier, in the mobile version of the paintkad, the packer of animated GIFs was written. And so the concept of "Video" in the paintkad did not exist, there was only GIF-animation. It was possible to collect animations from GIF frames and parse them into GIF frames.
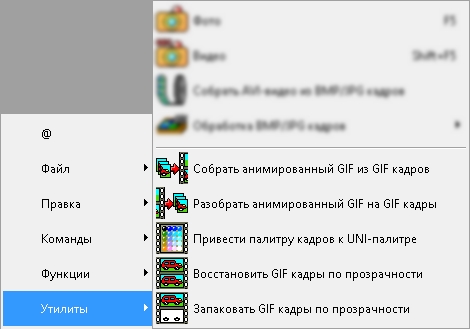
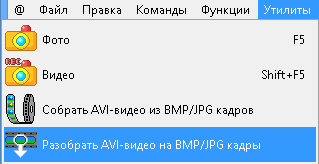
All this work with GIFs was also transferred to the paintpad for windows and was always in the Utilities menu:
Animated GIFs have a feature: each frame can have any delay. There is no concept of "FPS" or "Number of frames per second":
(frames for video and animations are stored in separate files in the paintpad, for example, there are 1000 GIF frames in a folder - and you can collect one GIF animation from them)
When rewriting a paintkad under windows, the ability to build AVI video files from BMP / JPG frames was added. And here the problem was designated - you cannot just take and hold one of the frames of the AVI file .
In addition, the frames in paintkad are named simply 1.bmp, 2.bmp, 3.bmp .... 9.bmp, 10.bmp ... 99.bmp, 100.bmp, etc., and for example , hold the third frame in AVI for a second at a playback speed of 24 frames per second - you need to duplicate it from 3.bmp to 26.bmp, and for all frames that were ahead - increase the names in the file names by 24.
Therefore, a video editing tool was very necessary to process long sequences of frames. And in version 1.2.1 it appeared.
And because of it even the whole structured menu “Utilities” appeared - “Processing BMP / JPG frames” .

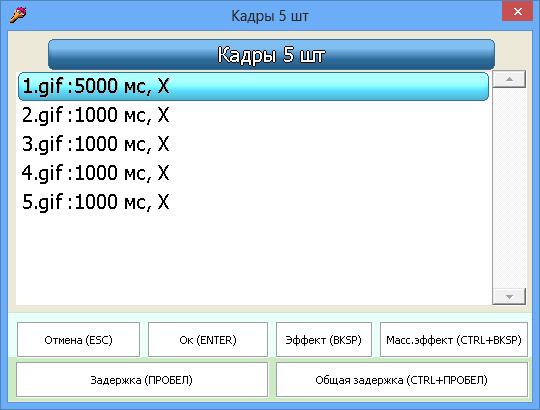
The first item in this menu is “View Queue (Ctrl + J)” - and there is a call to the video editing utility. After calling this item and selecting one of the BMP / JPG files-frames of your sequence, the window for viewing and editing the frame sequence will appear:

From left to right in the bottom of the window is the queue itself. On each frame is written his name and the time of his show. If you hold down Shift , then instead of the time on each frame its mini-image will be displayed.
The image at the top left of the window is scaled to fit this preview area.
The top right of the window shows the information: the file name of the frame, the frame size in pixels, the current playback speed in frames per second, the length of the current selection (the beginning-end of the selection), a segment of the sequence of frames copied to the buffer.
The user can easily run through the frame by cursor (just run 1 frame, hold Q - 10 frames, A - 100 frames, Z - 1000 frames, W - 10,000 frames per step), select part of the frame queue, copy or move it, take a freeze-frame (tighten one frame), insert an empty gap (by moving the remaining frames in front) and much more (for more details, see the assignment of buttons below) . At the end after editing the sequence, you can play the selected section and the entire sequence as a whole. And then collect it in AVI and run it on the default player to play AVI on your system.
The remaining menu items “Processing BMP / JPG frames” are intended for additional tasks, such as converting GIF frames to BMP / JPG frames and vice versa, carrying out batch processing of frames with effects like Brightness, Contrast, multiple image enlarger Extender (with the possibility of using different algorithms like advMame2x , advMame3x, simple zoom, etc.), Frame cropping, Resizing frames, Renaming third-party frames to 1.bmp, 2.bmp format and back.
The same video editing interface, but with reduced capabilities (because it is impossible to move frames in avi as easily as frame files can be moved on the hard drive), is shown to the user if you call “Disassemble AVI video into BMP / JPG frames” :
Then the frame queue shows just the frame numbers (and not the files), you can also navigate through them, play them, import a specific frame into a paintkad, merge a selected frame range onto a hard disk. In this case, the information panel shows the total number of frames in the AVI file, the speed (FPS) of the open video, the frame size in the video.

On average, a normal one and a half- (two-) hour film at 24 frames per second is about 130-170 thousand frames. Therefore, moving along it (for example, holding the above W - 10 thousand frames per step) is quite easy.
Thus, you can pull out the necessary frames from AVI, then use the menu “Processing BMP / JPG frames” to cut them, make them in the required size, convert them into GIFs and make,
In the "Utilities" menu there is another interesting menu - "Mosaic Editor" :
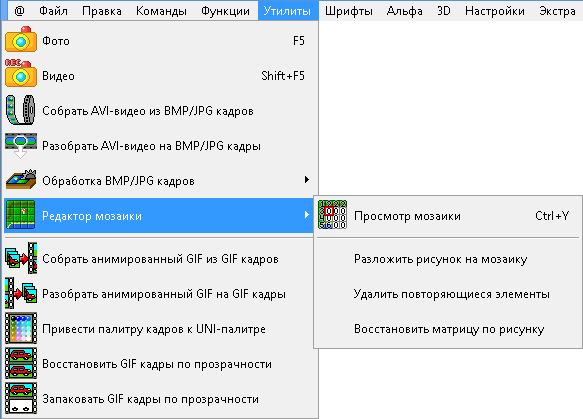
The first item on this menu is “Mosaic View (Ctrl + Y)” , it requests one of the mosaic tile files (described below) and then shows the editor window:
A mosaic is a set of two-dimensional square or rectangular elements (tiles) of the same size ("tile set") that can be connected to each other into a single image, drawing in this way, for example, a map for playing with roads, rivers and lakes, forests and seas. sands and lava. You can also draw beautiful borders for tables that you later use on web pages.
It is difficult to draw tiles as separate pictures, because it is necessary to keep in mind in which place the tile elements are connected to form a single picture. This helps the mosaic editor.
In the mosaic editor, by default, a 3x3 matrix is created, you can change the matrix size. The user moves the cursor within the matrix and sets the number of elements in each of the cells of the selected matrix fragment with the keys (Z, X) , or, using the Effects menu (E) , fills the areas of the matrix with a certain element number, copies and inserts the matrix fragments in different places, by creating a layout of elements. After that, you can save the layout (so that tomorrow they will not be arranged again while continuing to draw the mosaic, but simply load it into the editor). You can edit each element of the mosaic individually or in the environment of other elements in order to draw high-quality joints with them (and then save this element separately, see below for more details. “Appointment of buttons in the mosaic editor window” - “Import matrix (CTRL + ENTER)” ) . After saving the corrected element, we return to the mosaic editor and once again check that everything is fine with it. And so on with all the elements.
In the "Utilities" - "Mosaic Editor" menu there are three more items that allow you to extract mosaic elements from a single image, optimize their order and number, and even restore the original layout.
Lay out a drawing on a mosaic - lays out an image opened in a paintkad on mosaic elements. For example, open a 13-by-13 map of Battle City in the paintkad game.

The function “Spread a mosaic” lays out a map in such a mosaic, where each next element is another piece of the map (here elements are only 16x16 pixels, therefore the displayed numbers do not fit into the cells. On the left is shown the mosaic editor with the Details turned on, on the right - with turned off)
Before calling this function, it is recommended to select one of the mosaic elements in the figure, and then the default sizes of the elements will immediately be equal to the size of the selection.
Remove duplicate elements - sorts the elements obtained using the previous function, deleting those that are repeated. As a result, only 11 different elements are obtained:
Restore the matrix by drawing- when we have mosaic elements sorted using the previous function, we can read their location from the map by restoring the matrix (layout of elements) for the mosaic editor. To do this: 1) load a map into the pinkcard; 2) call this function and specify one of the sorted mosaic elements (it is possible to work with unsorted elements, but it will be longer, because there are more of them). As a result, at the end of the function, a mosaic editor is opened in which the recognized matrix is visible (layout of elements):
The resulting layout can be saved and used along with the elements themselves, for example, in their own game about tanks. Although of course it is better to draw your own elements, to plagiarize is not good. Yes, and in the game about tanks, in fact (most likely), the card consists of much smaller pieces (8x8 pixels or a quarter of our 16x16 received, although in the map editor in tanks there are 16x16 elements used - they crumble the tank ammunition not entirely, but bit by bit, bricks generally crumble into small pieces). So you can try to do the same with this card with an emphasis on 8x8 elements.
Now you know how to create your translucent PNG drawing in PaintCAD 4Windows, collect and edit your AVI animation from BMP / JPG frames, pull frames from any AVI file and even draw your own mosaic and create a map layout for your game.
For those who first learned about PaintCAD 4Windows graphics editor: at the moment it weighs 10879 KBytes and lies at blackstrip.ru/pcw.rar
Oddly enough, but in PaintCAD 4Windows free graphic editor with version 1.2.1 it became possible:
- create / load images with a translucent background from PNG files and save them as PNG
- It is convenient to edit BMP / JPG frame sequences in a special interface “Frame Queue”, apply various effects to them and collect AVI video files from them
- parse already existing AVI into frames, extract frames from them one by one or immediately in a certain range
- create mosaic maps for games or table design, drawing mosaic elements (tiles) individually or in the environment of neighboring elements, check the joints between them, create layouts from tiles, save and load layouts
How to do all this? And how was it developed?
')
Using alpha channel in PaintCAD 4Windows
It so happened that there are no layers in paintkade. Here drawing is a “piece of paper” with a picture. Therefore, there was never a question “what is behind the picture?”. Behind the picture is a background color (it’s the same as the background color, it’s also WZ). All operations for cutting or shifting the pixels knew that they had to leave the empty places of the LC.
When the ancient Java mobile version of the paintkad was developed in the distant 200s, then, apart from the Insert , which inserted a copied rectangular fragment, the special insert appeared. It was necessary to insert one picture onto another, while indicating the paintpad “transparent color”, which was not inserted into the picture. This all further moved to the windows for windows:
The transparent color was removed, the object was inserted, everyone was happy.
And so that they were even happier, it was possible to indicate with what transparency in percent to insert the remaining non-transparent piece of the picture:
But after all these operations, the background image still remained opaque.
In version 1.2.1 a PNG format was added to the command for opening any known paintkad file types (Ctrl + O, "??? - file"). And if the worktation feels that there is an alpha channel of transparency inside the file, then it will ask you:
In order to load both the drawing and the alpha channel, you need to select the third item “Picture on drawing, alpha to buffer” .
Then here is a drawing on a transparent background:
will be decomposed in a paintkad into a picture (which will be in the picture) and an alpha channel (which will be in the internal paintkad buffer), on which the white pixels are completely opaque, the black pixels are completely transparent, the gray ones are intermediate gradations of transparency:
And if then, when saving, you specify that we want to save “PNG”, then the paintcd will ask you once again about transparency:
And when selecting “Use buffer as alpha channel”, the PNG will be saved back along with its alpha channel.
Accordingly, in order to create a drawing with translucency from scratch, you need to copy your drawing to the buffer (Ctrl + C) and bring it up there in the buffer to the alpha channel condition . Therefore, it was necessary to quickly switch between the buffer and the pattern.
Previously, such commands have already been added to the paintpad, this is the “Picture <-> Buffer” in the command menu by Ctrl + Right, and this is an exchange of the picture and buffer in the 3D stereo drawing mode. But here it was necessary to duplicate this command once again, to make it accessible, easily started from the keyboard at any time, and to make it clear that it is “to switch between the picture and the alpha channel”.
Therefore, in the main menu (which is turned on when you press the "Menu" button in the upper left corner of the window or by pressing "0" on the keyboard) a whole new submenu "Alpha" was added . The first command in it appeared "Figure <-> Buffer" ( Ctrl + D) and now, using this keyboard shortcut, you can switch between the image and its alpha channel.
In the process of drawing I want to see "how my drawing will look on a transparent background." Therefore, in the Preview (F3) , the Alpha Overlay (D) button was added, available for pressing when the buffer is not empty.
By clicking on this button or on the “D” key, you can preview not only a simple drawing, but a drawing superimposed with alpha on a black background, white background or a mesh background (which clearly shows how the transparency unfolds over a regular texture).
Also, the user may want to impose this pattern with alpha on a specific background - for this, there is a second command in the Alpha menu: “Overlay alpha from the buffer on the drawing” , which will offer you options that have backgrounds in addition to Black, White and Mesh backgrounds HRC and WZ:
But such an overlay option is rarely used, more often the user may want to take such a PNG with an alpha channel, load it, and then apply it to some other drawing.
Since there is only one drawing and one buffer in the paintkad, then if our PNG and its alpha channel are stored in them, then where should we put the drawing on which we want to paste the whole thing?
To do this, in the menu "Alpha" are the last two commands.
“Capturing an image and alpha buffer for a special insert” (Ctrl + Shift + C) - places the alpha channel in a special slot. After that, the image is copied to the buffer. And now the inserted image is in the buffer, its alpha channel is in the special slot. The current picture is empty. Open the picture, which will insert. And we use a special insert (in the Selections and Clipboard menu, available via Alt + ".") - after Capture, she knows that she does not need to ask anything about transparency, you just need to use an alpha channel from a special slot.
Thus, we put our PNG with alpha channel on any other image:
As soon as we’ve finished inserting a picture with an alpha channel, we need to cancel the capture so that the Special Ensemble starts working as usual again, for this we call the “Cancel Capture” command in the Alpha menu (Ctrl + Shift + X) .
Thus, in PaintCAD 4Windows, you can draw pictures with translucency, load them from PNG, save to PNG and paste them into other pictures.
Video editing in PaintCAD 4Windows
Earlier, in the mobile version of the paintkad, the packer of animated GIFs was written. And so the concept of "Video" in the paintkad did not exist, there was only GIF-animation. It was possible to collect animations from GIF frames and parse them into GIF frames.
All this work with GIFs was also transferred to the paintpad for windows and was always in the Utilities menu:
Animated GIFs have a feature: each frame can have any delay. There is no concept of "FPS" or "Number of frames per second":
(frames for video and animations are stored in separate files in the paintpad, for example, there are 1000 GIF frames in a folder - and you can collect one GIF animation from them)
When rewriting a paintkad under windows, the ability to build AVI video files from BMP / JPG frames was added. And here the problem was designated - you cannot just take and hold one of the frames of the AVI file .
In addition, the frames in paintkad are named simply 1.bmp, 2.bmp, 3.bmp .... 9.bmp, 10.bmp ... 99.bmp, 100.bmp, etc., and for example , hold the third frame in AVI for a second at a playback speed of 24 frames per second - you need to duplicate it from 3.bmp to 26.bmp, and for all frames that were ahead - increase the names in the file names by 24.
Therefore, a video editing tool was very necessary to process long sequences of frames. And in version 1.2.1 it appeared.
And because of it even the whole structured menu “Utilities” appeared - “Processing BMP / JPG frames” .
The first item in this menu is “View Queue (Ctrl + J)” - and there is a call to the video editing utility. After calling this item and selecting one of the BMP / JPG files-frames of your sequence, the window for viewing and editing the frame sequence will appear:
From left to right in the bottom of the window is the queue itself. On each frame is written his name and the time of his show. If you hold down Shift , then instead of the time on each frame its mini-image will be displayed.
The image at the top left of the window is scaled to fit this preview area.
The top right of the window shows the information: the file name of the frame, the frame size in pixels, the current playback speed in frames per second, the length of the current selection (the beginning-end of the selection), a segment of the sequence of frames copied to the buffer.
The user can easily run through the frame by cursor (just run 1 frame, hold Q - 10 frames, A - 100 frames, Z - 1000 frames, W - 10,000 frames per step), select part of the frame queue, copy or move it, take a freeze-frame (tighten one frame), insert an empty gap (by moving the remaining frames in front) and much more (for more details, see the assignment of buttons below) . At the end after editing the sequence, you can play the selected section and the entire sequence as a whole. And then collect it in AVI and run it on the default player to play AVI on your system.
Purpose of buttons in the video editing window
F2 - stretches the window to full screen to be better visible.
C / C (F) - calls the window for setting the number of frames per second for future animation (from 1 to 30 fps).
Previous (LEFT) and Next (RIGHT) - moves the cursor through the sequence frames.
Go (G) - brings up the menu of choosing the place of transitions. You can go to the nearest sequence break backward or forward, to the end of the animation backward or forward or to a specific frame (then you need to enter the frame number).
Edit (ENTER) - opens the frame, on which the cursor is, in the paintkad through “Open ???”.
Selection (SPACE) - starts / finishes selecting a segment of a sequence. If you apply twice on one frame - the selection is reset and it is considered that it is in the current position of the cursor and is 1 frame long (moves with the cursor movement).
Copy (Ctrl + C) - remembers the selected segment of the sequence
Paste (Ctrl + V) - transfers a copy of the previously copied “Copy (Ctrl + C)” segment of the sequence to a new location, the first frame of the segment is placed where the cursor is.
Move (Ctrl + B) - transfers a copy of the sequence cut by the “Copy (Ctrl + C)” function to a new place; the first frame of the segment is placed where the cursor is. The old location of the segment is cleared of frames (that is, frames are transferred to the new location).
Delete (Ctrl + X) - the selected segment of the sequence is cleared from the frames after the user confirms the operation.
Lose (P) - starts playback of a sequence of frames with the set "K / S (F)" speed. If a segment of a sequence is selected, then there is an endless looped playback of this segment.
Load queue (L) - launches a file open dialog to select an editable sequence. In this way, you can switch to editing a different frame sequence in another folder.
Effects (E) - brings up the menu for selecting effects for the selected frame segment. The following effects are available:
Make AVI (R) - causes the assembly of AVI-video from a sequence of frames. For successful assembly, it is necessary that at least the first frame be (1.bmp / 1.jpg).
Show AVI (S) - opens the last compiled AVI in your video player (installed on the system by default for playing AVI files).
Exit (ESC) - closes the frame queue view window. When you next call the window - it will immediately open with the display of the selected previous frame queue. To change the frame queue to another - use the Load queue button (L).
C / C (F) - calls the window for setting the number of frames per second for future animation (from 1 to 30 fps).
Previous (LEFT) and Next (RIGHT) - moves the cursor through the sequence frames.
Go (G) - brings up the menu of choosing the place of transitions. You can go to the nearest sequence break backward or forward, to the end of the animation backward or forward or to a specific frame (then you need to enter the frame number).
Edit (ENTER) - opens the frame, on which the cursor is, in the paintkad through “Open ???”.
Selection (SPACE) - starts / finishes selecting a segment of a sequence. If you apply twice on one frame - the selection is reset and it is considered that it is in the current position of the cursor and is 1 frame long (moves with the cursor movement).
Copy (Ctrl + C) - remembers the selected segment of the sequence
Paste (Ctrl + V) - transfers a copy of the previously copied “Copy (Ctrl + C)” segment of the sequence to a new location, the first frame of the segment is placed where the cursor is.
Move (Ctrl + B) - transfers a copy of the sequence cut by the “Copy (Ctrl + C)” function to a new place; the first frame of the segment is placed where the cursor is. The old location of the segment is cleared of frames (that is, frames are transferred to the new location).
Delete (Ctrl + X) - the selected segment of the sequence is cleared from the frames after the user confirms the operation.
Lose (P) - starts playback of a sequence of frames with the set "K / S (F)" speed. If a segment of a sequence is selected, then there is an endless looped playback of this segment.
Load queue (L) - launches a file open dialog to select an editable sequence. In this way, you can switch to editing a different frame sequence in another folder.
Effects (E) - brings up the menu for selecting effects for the selected frame segment. The following effects are available:
- Shift / copy - shift or copy selected sequence of frames.
- Freeze frame - if one frame is selected, it requests the length of the freeze frame and stretches this frame to the selected length (erasing everything that gets in its path), and if a segment of the sequence is selected, it spreads the first frame of the selected segment throughout the sequence.
- Multistop frame - smears each Nth frame over the remaining (N-1) frames ahead of itself; the output is a “slowing down” video, in which frames rarely change.
- Reverse - changes the location of frames of the selected segment to the opposite (the first frame of the selection will be the last).
- Repeat - repeats the selected segment of the sequence the selected number of times.
- Random blend - randomly shuffles frames in a selected segment of a sequence.
- Speed up / slow down - stretches / compresses the selected segment of the sequence to the specified length (in frames).
- Insert empty gap - inserts the selected number of empty frames into the current cursor position, shifting the entire part of the animation that is ahead.
Make AVI (R) - causes the assembly of AVI-video from a sequence of frames. For successful assembly, it is necessary that at least the first frame be (1.bmp / 1.jpg).
Show AVI (S) - opens the last compiled AVI in your video player (installed on the system by default for playing AVI files).
Exit (ESC) - closes the frame queue view window. When you next call the window - it will immediately open with the display of the selected previous frame queue. To change the frame queue to another - use the Load queue button (L).
The remaining menu items “Processing BMP / JPG frames” are intended for additional tasks, such as converting GIF frames to BMP / JPG frames and vice versa, carrying out batch processing of frames with effects like Brightness, Contrast, multiple image enlarger Extender (with the possibility of using different algorithms like advMame2x , advMame3x, simple zoom, etc.), Frame cropping, Resizing frames, Renaming third-party frames to 1.bmp, 2.bmp format and back.
Functions of the menu items Processing BMP / JPG frames
Batch processing - applies to all frames (from the first frame 1.bmp / jpg to the nearest gap or end of the sequence if there is nothing behind the gap) of the selected sequence one of the effects:
Conversion - turns BMP / JPG frames into 256-color GIFs using the chosen method (simple and accurate UNI-palette, hyper-palette), and vice versa.
The frame queue - frame shift / copying and freeze frame with indication of application boundaries in the form of numbers (in the View Queue window - the same thing, but there the boundaries are indicated visually using the selection and position of the cursor).
Third-party frames - rename frame files to the Paintkadov format and back:
- 1. Color, Contrast, Brightness, Color, Gamma - parameters are selected by the user and apply to all frames;
- 2. Expander - any of the variants of this effect of increasing the size of the image in all frames;
- 3. Fragment - cuts all frames of the sequence on the current selection. To apply this processing, first open one of the frames and select its necessary fragment, and only then call processing;
- 4. Raster size - scales all frames to the size selected by the user.
Conversion - turns BMP / JPG frames into 256-color GIFs using the chosen method (simple and accurate UNI-palette, hyper-palette), and vice versa.
The frame queue - frame shift / copying and freeze frame with indication of application boundaries in the form of numbers (in the View Queue window - the same thing, but there the boundaries are indicated visually using the selection and position of the cursor).
Third-party frames - rename frame files to the Paintkadov format and back:
- “Rename to N.xxx” - rename frames with the names image001.jpg, image002.jpg or DSC_0053.jpg, DSC_0054.jpg into the usual for paintkad name format 1.jpg, 2.jpg. At the same time, rename.rnl is created in the frame folder, in which old and new file names are written.
- “Return names by RNL-list” - using the rename.rnl file created earlier, frame files are renamed back to their old names.
Video editing: parsing AVI on frames
The same video editing interface, but with reduced capabilities (because it is impossible to move frames in avi as easily as frame files can be moved on the hard drive), is shown to the user if you call “Disassemble AVI video into BMP / JPG frames” :
Then the frame queue shows just the frame numbers (and not the files), you can also navigate through them, play them, import a specific frame into a paintkad, merge a selected frame range onto a hard disk. In this case, the information panel shows the total number of frames in the AVI file, the speed (FPS) of the open video, the frame size in the video.
On average, a normal one and a half- (two-) hour film at 24 frames per second is about 130-170 thousand frames. Therefore, moving along it (for example, holding the above W - 10 thousand frames per step) is quite easy.
Thus, you can pull out the necessary frames from AVI, then use the menu “Processing BMP / JPG frames” to cut them, make them in the required size, convert them into GIFs and make,
for example, an animated avatar:
PaintCAD 4Windows Mosaic Editor
In the "Utilities" menu there is another interesting menu - "Mosaic Editor" :
The first item on this menu is “Mosaic View (Ctrl + Y)” , it requests one of the mosaic tile files (described below) and then shows the editor window:
A mosaic is a set of two-dimensional square or rectangular elements (tiles) of the same size ("tile set") that can be connected to each other into a single image, drawing in this way, for example, a map for playing with roads, rivers and lakes, forests and seas. sands and lava. You can also draw beautiful borders for tables that you later use on web pages.
It is difficult to draw tiles as separate pictures, because it is necessary to keep in mind in which place the tile elements are connected to form a single picture. This helps the mosaic editor.
Preparation for drawing a mosaic
1a If a mosaic is being created from scratch: create a new pattern the size of a single mosaic element in the paintkad, save it under the name "1.bmp" into an empty folder.
1b. If you already have ready-made BMP mosaic elements with scary names, then rename them to the paintkad format (1.bmp, 2.bmp, 3.bmp) using the "Utilities" command - "Processing BMP / JPG frames" - "Third-party frames" - "Rename in N.xxx. "
1c. If you already have ready-made BMP tiles with normal names like 1.bmp, 2.bmp, 3.bmp, just skip to step 2.
2. Call in the main menu "Utilities" - "Mosaic Editor" - "View Mosaic" (or press Ctrl + Y). When the open file dialog box appears, select the “1.bmp” mosaic element file.
3. The mosaic editor window will appear on the screen.
In the mosaic editor, by default, a 3x3 matrix is created, you can change the matrix size. The user moves the cursor within the matrix and sets the number of elements in each of the cells of the selected matrix fragment with the keys (Z, X) , or, using the Effects menu (E) , fills the areas of the matrix with a certain element number, copies and inserts the matrix fragments in different places, by creating a layout of elements. After that, you can save the layout (so that tomorrow they will not be arranged again while continuing to draw the mosaic, but simply load it into the editor). You can edit each element of the mosaic individually or in the environment of other elements in order to draw high-quality joints with them (and then save this element separately, see below for more details. “Appointment of buttons in the mosaic editor window” - “Import matrix (CTRL + ENTER)” ) . After saving the corrected element, we return to the mosaic editor and once again check that everything is fine with it. And so on with all the elements.
Purpose of buttons in the mosaic editor window
Left, Right, Up, Down - moves the cursor around the matrix, allowing you to select an editable cell
() — / . — . .
(Z), (X) — / . .
(D) — / . .
(M) — .
(E) — . :
(L) — .
(O) — TLO .
(S) — TLO. TLO : , : , , . .
(ENTER) — , , « ???». — 1.bmp, BMP.
(CTRL+ENTER) — . , , . . «» (Ctrl+), BMP Ctrl+S ( ). (Ctrl+Y) .
(ESC) — . — . — (L).
() — / . — . .
(Z), (X) — / . .
(D) — / . .
(M) — .
(E) — . :
- 1. — .
- 2. — .
- 3. — , ( ).
- 4. — .
- 5. — .
- 6. — . , , .
(L) — .
(O) — TLO .
(S) — TLO. TLO : , : , , . .
(ENTER) — , , « ???». — 1.bmp, BMP.
(CTRL+ENTER) — . , , . . «» (Ctrl+), BMP Ctrl+S ( ). (Ctrl+Y) .
(ESC) — . — . — (L).
Restoration of the layout of the mosaic of the picture from the game
In the "Utilities" - "Mosaic Editor" menu there are three more items that allow you to extract mosaic elements from a single image, optimize their order and number, and even restore the original layout.
Lay out a drawing on a mosaic - lays out an image opened in a paintkad on mosaic elements. For example, open a 13-by-13 map of Battle City in the paintkad game.
The function “Spread a mosaic” lays out a map in such a mosaic, where each next element is another piece of the map (here elements are only 16x16 pixels, therefore the displayed numbers do not fit into the cells. On the left is shown the mosaic editor with the Details turned on, on the right - with turned off)
Before calling this function, it is recommended to select one of the mosaic elements in the figure, and then the default sizes of the elements will immediately be equal to the size of the selection.
Remove duplicate elements - sorts the elements obtained using the previous function, deleting those that are repeated. As a result, only 11 different elements are obtained:
Restore the matrix by drawing- when we have mosaic elements sorted using the previous function, we can read their location from the map by restoring the matrix (layout of elements) for the mosaic editor. To do this: 1) load a map into the pinkcard; 2) call this function and specify one of the sorted mosaic elements (it is possible to work with unsorted elements, but it will be longer, because there are more of them). As a result, at the end of the function, a mosaic editor is opened in which the recognized matrix is visible (layout of elements):
The resulting layout can be saved and used along with the elements themselves, for example, in their own game about tanks. Although of course it is better to draw your own elements, to plagiarize is not good. Yes, and in the game about tanks, in fact (most likely), the card consists of much smaller pieces (8x8 pixels or a quarter of our 16x16 received, although in the map editor in tanks there are 16x16 elements used - they crumble the tank ammunition not entirely, but bit by bit, bricks generally crumble into small pieces). So you can try to do the same with this card with an emphasis on 8x8 elements.
Epilogue
Now you know how to create your translucent PNG drawing in PaintCAD 4Windows, collect and edit your AVI animation from BMP / JPG frames, pull frames from any AVI file and even draw your own mosaic and create a map layout for your game.
For those who first learned about PaintCAD 4Windows graphics editor: at the moment it weighs 10879 KBytes and lies at blackstrip.ru/pcw.rar
Source: https://habr.com/ru/post/182654/
All Articles