Xamarin + PCL + MVVM - how to facilitate writing mobile applications for different platforms
Somehow, the Xamarin 2.0 platform was completely undeservedly deprived of attention, and I would like to start describing all of its remarkable properties.
Xamarin is a commercial product based on the open-source project Mono, which allows using the .Net framework, including the C # language, for cross-platform development.
Basic properties:
In this example, I will use the MVVM model, for those who are not familiar with it, then in short a quote from Wikipedia:
For cross-platform implementation of this template, the best library (besides open source) is MvvmCross. Its developer remarkably supports it and almost instantly responds to any question.
')
For example, we will create a simple tip-counting application. Depending on our generosity and the amount of the bill, she will calculate the amount of tips we want to leave.
First of all, we need to register and install Xamarin Studio. The step itself is pretty simple, I did not notice any problems. Java, ADT, plugin for Visual Studio and Mono libraries will be installed automatically.
Almost any application will contain multiple projects.
Create a New Project in Visual Studio, select Visual C #, Windows, Portable Class Library.
Create a TipCalc.Core project and a TipCalc solution. Select the option Windows Phone 7.5 and higher.
I want to note that so far only the .Net 4.0 version is supported, but this should change literally this month.
We delete Class1.cs, nobody needs it.
Add the MvvmCross library via NuGet. For example, we will select the Hot Tuna Start Pack, which includes several initial files.
It is important to make sure that the latest version of NuGet Package Manager is installed, at least 2.5
After a successful installation, we will see two new files: App.cs, which is the initial initialization of MvvmCross, and the FirstViewModel.cs file in the ViewModels folder. From the point of view of proper programming, I have to rename the name of the FirstViewModel class to TipViewModel, but to simplify the example let's leave it.
FirstViewModel class inherits from MvxViewModel, this is the class of the MvvmCross library and allows us to send UI messages later when the data has changed. This class implements INotifyPropertyChanged and its analogy in WPF is BaseViewModel.
Add in this class 3 properties: SubTotal (amount of the bill), Generosity (generosity) and Tip (tips that we leave). And recalculate tip, depending on them:
Compile, hooray, the 'core' library is ready.
Now we want to see our logic on the live screen / phone / tablet. This is how its sketch will look like:

In the same solution we will add a new project, but its type will be Android -> Android Application. Call it TipCalc.UI.Droid
If everything is set up normally, we will see such a picture:
Remove Activity1.cs and Main.axml from the project.
Add exactly the same way, through NuGet, the same MvvmCross package - Hot Tuna Starter Pack. We will see new files in the project:
Add TipCalc.Core.csproj project to reference
Now we draw the controls ourselves.
To do this, open FirstView.axml and edit it either in the graphical editor or in the xml editor. We will add there LinearLayout, TextView, EditText, SeekBar.
Through MvxBind, we associate the control properties with the property of our ViewModel.
This picture should be like this:
If we write this code:
It is important to note how we do the binding properties of controls. The Text property of the TextView element is bound (two-way) with the Tip property of our FirstViewModel class using the local: MvxBind = "Text Tip" line inside the control description itself. In all other respects, the axml file is absolutely identical to any layout in Android.
Save, compile and run. Voila, we change the amount of the invoice or our generosity and tips automatically change.
Xamarin
MvvmCross project
MvvmCross tutorial
MvvmCross tutorial video
First of all, what is Xamarin?
Xamarin is a commercial product based on the open-source project Mono, which allows using the .Net framework, including the C # language, for cross-platform development.
Basic properties:
- C # for writing Android, iOs and Windows8 applications. LINQ and async / task support
- Native UI, Native Peformance - the code is compiled for a specific platform and uses native UI controls
- Visual Studio and all its plugins, including ReSharper, NUnit testing ...
- Xamarin Studio, which is similar to Visual Studio, but is also available for Mac.
- Using .Net libraries
- Using other off-the-shelf native components wrapped in C #
- Graphic editor for Android
MvvmCross
In this example, I will use the MVVM model, for those who are not familiar with it, then in short a quote from Wikipedia:
Model-View-ViewModel Template
The MVVM pattern is divided into three parts:
Model (Model), as in the classic MVC, Model is the fundamental data necessary for the application to work.
View / View is a graphical interface, that is, a window, buttons, etc. The View is a subscriber to the event of changing the values of the properties or commands provided by the View Model. If a property has changed in the View Model, it notifies all subscribers of this, and the View in turn requests the updated value of the property from the View Model. In case the user acts on any element of the interface, the View invokes the corresponding command provided by the View Model.
A view model (ViewModel, which means “Model of View” [1]) is, on the one hand, a view abstraction, and on the other hand, provides a data wrapper from the Model that is to be linked. That is, it contains a Model that is converted to a View, and also contains commands that the View can use to influence the Model.
For cross-platform implementation of this template, the best library (besides open source) is MvvmCross. Its developer remarkably supports it and almost instantly responds to any question.
')
Let's start
For example, we will create a simple tip-counting application. Depending on our generosity and the amount of the bill, she will calculate the amount of tips we want to leave.
Installation
First of all, we need to register and install Xamarin Studio. The step itself is pretty simple, I did not notice any problems. Java, ADT, plugin for Visual Studio and Mono libraries will be installed automatically.
Project creation
Almost any application will contain multiple projects.
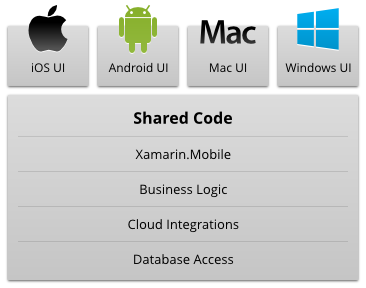
- One of them will be 'core', which will be cross-platform and contain as much code as possible: view models, communication with the server, protocols, date objects, etc.
- UI project for each platform. This code cannot be shared because it uses platform-specific components.
Create a New Project in Visual Studio, select Visual C #, Windows, Portable Class Library.
Create a TipCalc.Core project and a TipCalc solution. Select the option Windows Phone 7.5 and higher.
I want to note that so far only the .Net 4.0 version is supported, but this should change literally this month.
Pictures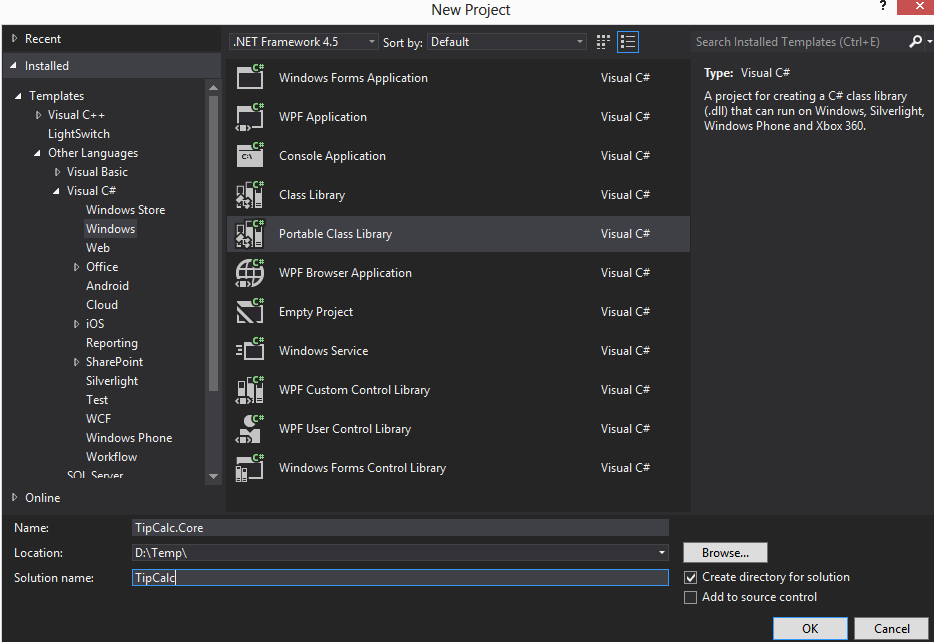

We delete Class1.cs, nobody needs it.
Add the MvvmCross library via NuGet. For example, we will select the Hot Tuna Start Pack, which includes several initial files.
It is important to make sure that the latest version of NuGet Package Manager is installed, at least 2.5
Picture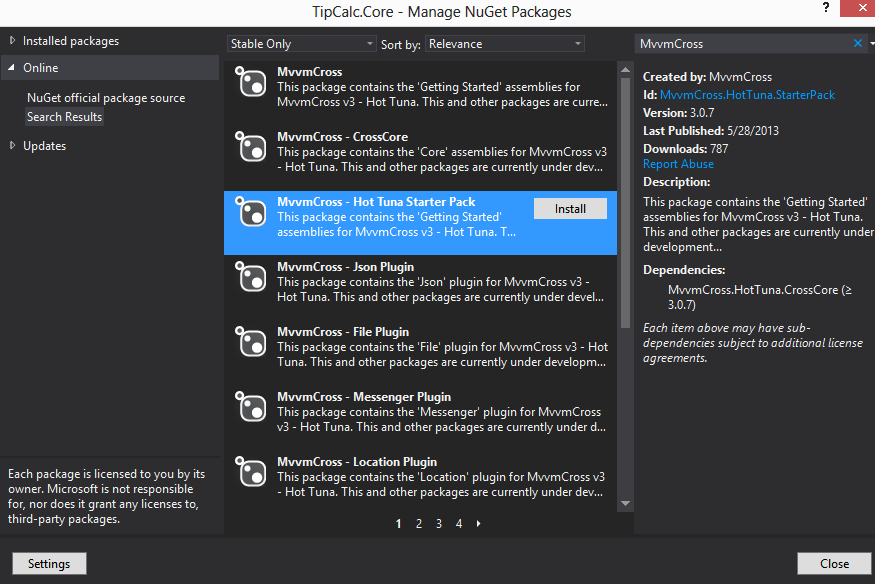
After a successful installation, we will see two new files: App.cs, which is the initial initialization of MvvmCross, and the FirstViewModel.cs file in the ViewModels folder. From the point of view of proper programming, I have to rename the name of the FirstViewModel class to TipViewModel, but to simplify the example let's leave it.
FirstViewModel class inherits from MvxViewModel, this is the class of the MvvmCross library and allows us to send UI messages later when the data has changed. This class implements INotifyPropertyChanged and its analogy in WPF is BaseViewModel.
Add in this class 3 properties: SubTotal (amount of the bill), Generosity (generosity) and Tip (tips that we leave). And recalculate tip, depending on them:
Class code
using Cirrious.MvvmCross.ViewModels; namespace TipCalc.Core.ViewModels { public class FirstViewModel : MvxViewModel { public FirstViewModel() { } public override void Start() { _subTotal = 100; _generosity = 10; Recalcuate(); base.Start(); } private double _subTotal; public double SubTotal { get { return _subTotal; } set { _subTotal = value; RaisePropertyChanged(() => SubTotal); Recalcuate(); } } private int _generosity; public int Generosity { get { return _generosity; } set { _generosity = value; RaisePropertyChanged(() => Generosity); Recalcuate(); } } private double _tip; public double Tip { get { return _tip; } set { _tip = value; RaisePropertyChanged(() => Tip);} } private void Recalcuate() { Tip = SubTotal * ((double)Generosity) / 100.0; } } } Compile, hooray, the 'core' library is ready.
Client on Android
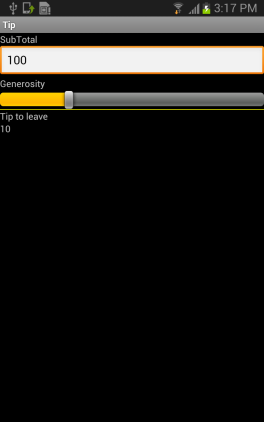
Now we want to see our logic on the live screen / phone / tablet. This is how its sketch will look like:
In the same solution we will add a new project, but its type will be Android -> Android Application. Call it TipCalc.UI.Droid
If everything is set up normally, we will see such a picture:
Picture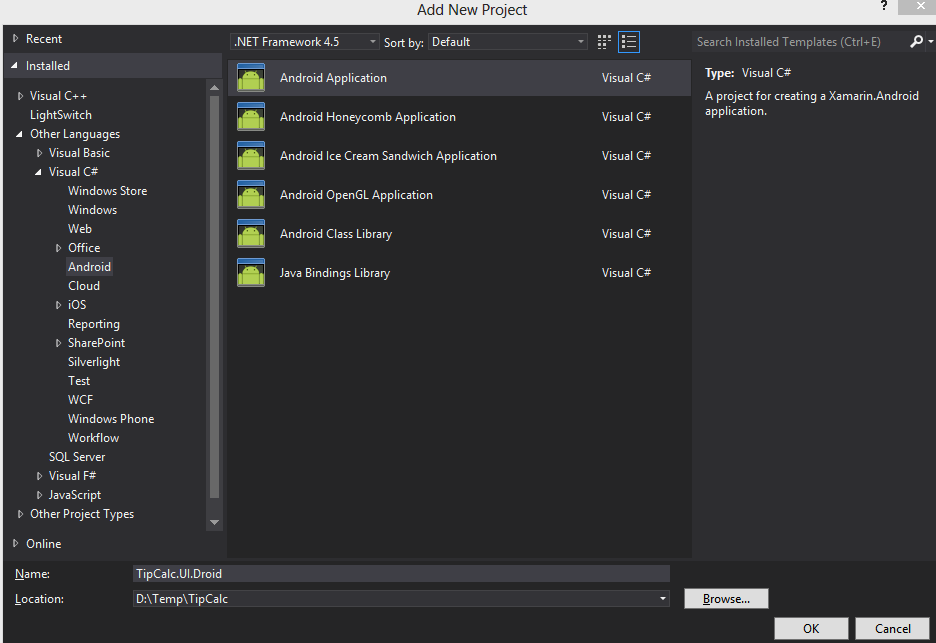
Remove Activity1.cs and Main.axml from the project.
Add exactly the same way, through NuGet, the same MvvmCross package - Hot Tuna Starter Pack. We will see new files in the project:
- SplashScreen.cs - Initial Activity for Application
- Setup.cs - initialize MvvmCross and bind it to the 'core'
- FirstView.cs - Activity for our FirstViewModel
- FirstView.axml - and its layout
Add TipCalc.Core.csproj project to reference
Picture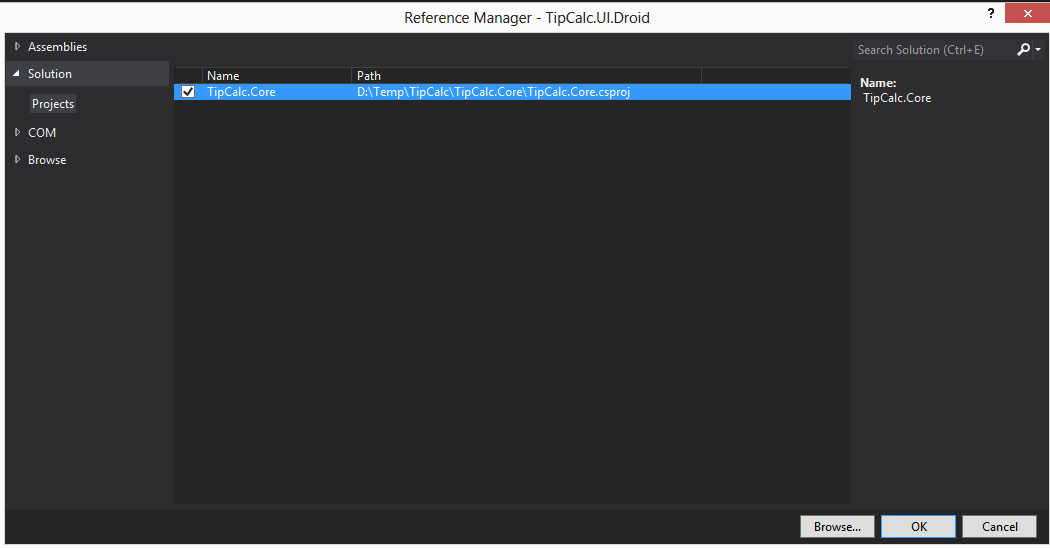
Now we draw the controls ourselves.
To do this, open FirstView.axml and edit it either in the graphical editor or in the xml editor. We will add there LinearLayout, TextView, EditText, SeekBar.
Through MvxBind, we associate the control properties with the property of our ViewModel.
This picture should be like this:
Picture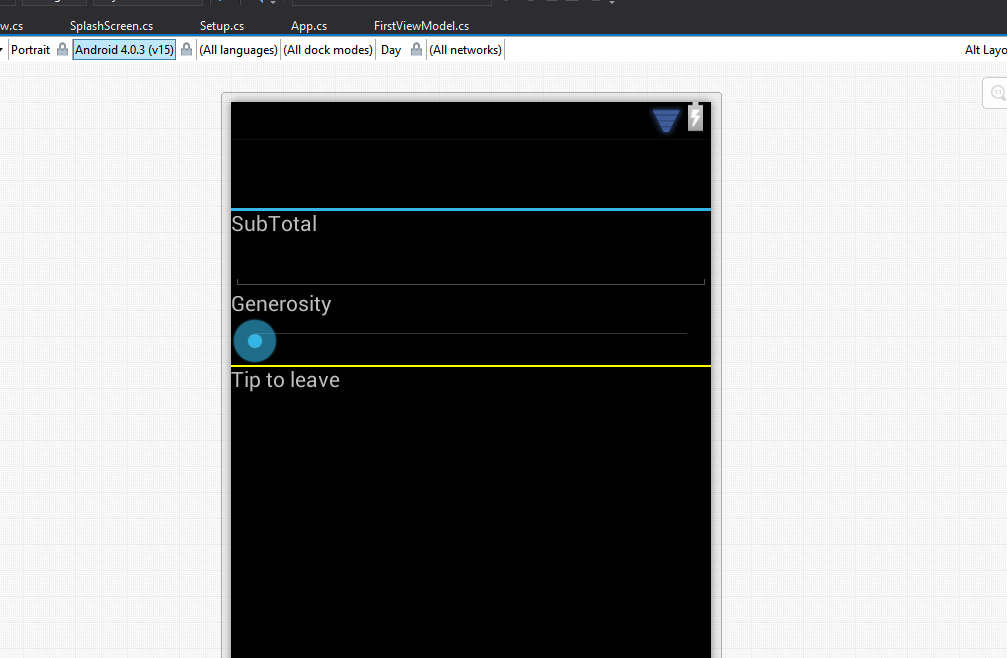
If we write this code:
FirstView.axml
<?xml version="1.0" encoding="utf-8"?> <LinearLayout xmlns:android="http://schemas.android.com/apk/res/android" xmlns:local="http://schemas.android.com/apk/res/TipCalc.UI.Droid" android:orientation="vertical" android:layout_width="fill_parent" android:layout_height="fill_parent"> <TextView android:layout_width="fill_parent" android:layout_height="wrap_content" android:text="SubTotal" /> <EditText android:layout_width="fill_parent" android:layout_height="wrap_content" local:MvxBind="Text SubTotal" /> <TextView android:layout_width="fill_parent" android:layout_height="wrap_content" android:text="Generosity" /> <SeekBar android:layout_width="fill_parent" android:layout_height="wrap_content" android:max="40" local:MvxBind="Progress Generosity" /> <View android:layout_width="fill_parent" android:layout_height="1dp" android:background="#ffff00" /> <TextView android:layout_width="fill_parent" android:layout_height="wrap_content" android:text="Tip to leave" /> <TextView android:layout_width="fill_parent" android:layout_height="wrap_content" local:MvxBind="Text Tip" /> </LinearLayout> It is important to note how we do the binding properties of controls. The Text property of the TextView element is bound (two-way) with the Tip property of our FirstViewModel class using the local: MvxBind = "Text Tip" line inside the control description itself. In all other respects, the axml file is absolutely identical to any layout in Android.
Save, compile and run. Voila, we change the amount of the invoice or our generosity and tips automatically change.
Results
- We installed Xamarin Studio
- We built a cross-platform library with common logic.
- We have created an Android app that communicates with logic through MvvmCross (this is not necessary, but Mvvm is cool)
What have we missed
- How does Xamarin work?
- What is Mvvm, how it is implemented in MvvmCross and what additional features we can get
- We did not build examples for iOs and Windows8
- And much more
Sources
Xamarin
MvvmCross project
MvvmCross tutorial
MvvmCross tutorial video
Source: https://habr.com/ru/post/182354/
All Articles