Procedural texturing: cobblestone texture generation

We write a generator that takes a dozen input parameters and gives the texture of the cobblestone.
Introduction
My hobby is computer graphics and the invention of bicycles. After playing in .kkrieger and reading this and this post, I had a burning desire to write my own texture generator. Choosing as a theme texture - cobblestones, began to google. Honestly, google cobble stone texture generator was difficult, even with the option-minecraft. Spitting on this thing began to think for himself.
Where to begin
The course of my thoughts was approximately as follows:
- i need stones
- you need more stones! For a great texture. And the larger the texture, the longer the generation time. This is bad.
- stones are different (in size and color)
- stones convex (relief)
- rough stones texture
- different types of stones have different types of roughness
- since the texture has color and relief, it would not be bad to separate these components. Let there be a pure color texture and a normal map.
In our generator, the texture will be built in stages: first we create one texture, apply filters to it, mix it with another texture, etc. Now we need to remember or find known algorithms that can help us. I will simply list and briefly describe all the methods that I used in my generator, simultaneously talking about optimizations.
I decided to write the generator in C ++ using the Qt 4.XY library in QtCreator. However, the generator class itself, I tried to write without Qt.
')
Cellular texture
This is the basis of the algorithm. It is she who creates the frame for the stones. Here is described in detail what a mesh texture is and how to create it.
In my code, the generateCelluarTexture function is responsible for this:
Spoiler
unsigned char *ProceduralTexture::generateCelluarTexture(int size){ if (size<2) size = 2; int cellX = w/size+2; int cellY = h/size+2; int pointsX[cellX][cellY]; int pointsY[cellX][cellY]; srand(seed); for (int i=0; i<cellX; i++) for (int j=0; j<cellY; j++){ pointsX[i][j] = i*size+rand()%((int)(size*0.7))+size*0.15-size; pointsY[i][j] = j*size+rand()%((int)(size*0.7))+size*0.15-size; } int distBuff[n]; int maxDist = INT_MIN; for (int i=0; i<n; i++){ int x = i%w; int y = i/w; int min = INT_MAX; int min2 = INT_MAX; int startX = x/size; int finishX = startX+3; for (int cp=-1, point=0; startX<finishX; startX++){ int startY = y/size; int finishY = startY+3; for (; startY<finishY; startY++, point++){ if (startX<0 || startX>=cellX || startY<0 || startY>=cellY) continue; int d = distance(x, y, pointsX[startX][startY], pointsY[startX][startY]); if (d<min){ cp = point; min2 = min; min = d; } if (d<min2 && cp!=point) min2 = d; } } distBuff[i] = min2-min; if (maxDist<distBuff[i]) maxDist = distBuff[i]; } unsigned char *img = new unsigned char[n]; for (int i=0; i<n; i++) img[i] = (distBuff[i]*255)/maxDist; return img; } 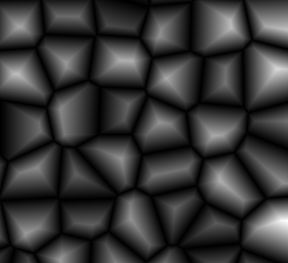
The function takes the size of the cell, returns a black and white image of the texture. Now not much about optimization.
First, in order not to go through all the points, I divided the image into rectangular areas of a given size (size). Thus, in order to find the nearest point to the current pixel, you need to view 9 points from the current and neighboring cells. This is written in the link above.
Secondly, we don’t have to look for an “honest” distance. I'm talking about the distance between two points. The square of the distance will completely disappear (we get rid of the extraction of the root) - the picture as a result turns out to be more contrast, but does not have a negative effect on the final texture.
Brightness and Contrast
I think many people used this filter in Photoshop or other graphic editors. Now we will write its implementation.
Code
void ProceduralTexture::brightnessContrast(unsigned char *img, float brightness, float contrast, bool onePass){ // onePass - if (brightness!=0){ if (brightness>0){ if (brightness>1) brightness = 1; brightness = 1.0f-brightness; for (int i=0; i<n; i++){ int r = 255-img[i]; r *= brightness; img[i] = 255-r; } } if (brightness<0){ if (brightness<-1) brightness = -1; brightness = 1.0f+brightness; for (int i=0; i<n; i++) img[i] *= brightness; } } if (contrast!=1){ if (contrast<0) contrast = 0; int avbr = 0; if (!onePass){ for (int i=0; i<n; i++) avbr += img[i]; avbr /= n; } else avbr = 127; for (int i=0; i<n; i++){ int res = contrast*(img[i]-avbr)+avbr; if (res<0) res = 0; if (res>255) res = 255; img[i] = res; } } } The function takes as input a pointer to an image and the coefficients of brightness and contrast. Formulas for calculation are described here .
Perlin noise
There are quite a lot of articles written on the noise of the pearl (including on the habr), I will not describe the algorithm, I will tell only about the optimizations and give an example of the code.
Code
// : interpolateTable = NULL; powTable = new float[maxOctaves]; for (int i=0; i<maxOctaves; i++) powTable[i] = pow(0.5, i); inline int ProceduralTexture::getRnd(int x, int y){ return (0x6C078965*(seed^((x*2971902361)^(y*3572953751))))&0x7FFFFFFF; } inline int ProceduralTexture::pointOfPerlinNoise(int x, int y, int cellSize){ int dx = x-(x/cellSize)*cellSize; int dy = y-(y/cellSize)*cellSize; int z1 = getRnd(x-dx, y-dy); // z3 --- z4 int z2 = getRnd(x-dx+cellSize, y-dy); // | | int z3 = getRnd(x-dx, y-dy+cellSize); // + z + int z4 = getRnd(x-dx+cellSize, y-dy+cellSize); // z1 --- z2 int z1z3 = z1*(1.0f-interpolateTable[dy])+z3*interpolateTable[dy]; int z2z4 = z2*(1.0f-interpolateTable[dy])+z4*interpolateTable[dy]; return z1z3*(1.0f-interpolateTable[dx])+z2z4*interpolateTable[dx]; } unsigned char *ProceduralTexture::generatePerlinNoise(int octaves){ unsigned char *img = new unsigned char[n]; if (octaves<1) octaves = 1; if (octaves>maxOctaves) octaves = maxOctaves; for (int i=0; i<n; i++) img[i] = 0; float norm = 255.0f/INT_MAX; for (int j=1; j<=octaves; j++){ int f = 1<<(octaves-j); delete[] interpolateTable; interpolateTable = new float[f]; for (int i=0; i<f; i++){ float a = ((float)i/(float)f)*M_PI; interpolateTable[i] = (1.0f-cosf(a))*0.5f; } for (int i=0; i<n; i++) img[i] += pointOfPerlinNoise(i%w, i/w, f)*powTable[j]*norm; } return img; } 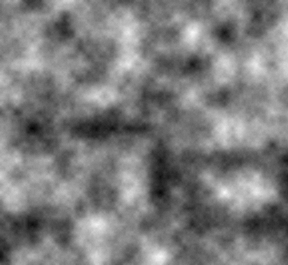
First optimization: we get rid of the calculation of the interpolation coefficient (1.0f-cosf (a)) * 0.5f) - for this we simply calculate all the options in advance. And there are not so many options here - the maximum amount is piled up. Therefore, before calculating each octave, we calculate all the coefficients and enter them into the interpolateTable array.
The second optimization is similar to the first - all the places where squares are calculated are replaced by pre-calculated values (powTable).
I also tried to simplify RNG as much as possible and get rid of floating point numbers as much as possible.
Soft jagged effect
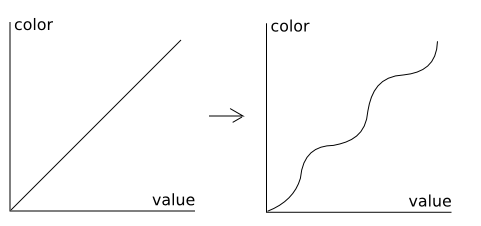
I invented this effect myself (and perhaps invented a bicycle - I don’t know). But the name he had better come up with failed - sorry. What is similar to the effect of posterization in Photoshop, only it not only cuts the palette, but also smooths the transitions. I will try to portray its essence in the form of a graph:
It is necessary to convert a straight line linear gradient graph into a kind of ladder with smoothed corners.
To do this, take the intensity value of the color of the current pixel, divide it by the number of iterations (steps). We remember the integer part and the remainder of the division. From the remainder we subtract half of its maximum diazon and multiply by the coefficient of smoothness. The resulting number is added back to the integer part. Oh, easier to show in the code:
void ProceduralTexture::postEffect(unsigned char *img, int iterations, float smooth){ for (int i=0; i<n; i++){ float s = (float)img[i]/255.0f; float ds = s*(float)iterations-(float)((int)(s*iterations)); ds = smooth*(ds-0.5f)+0.5f; if (ds>1) ds = 1; if (ds<0) ds = 0; s = ((float)((int)(s*(float)iterations))+ds)/(float)iterations; img[i] = s*255; } } The function takes as input a pointer to an image that needs to be converted, the number of iterations and the degree of smoothness. To feel exactly how this image filter changes, I will give an example:
the number of iterations is always five. The degree of smoothness from left to right: 1, 1.5, 2.5


By the way, this filter is used in the second picture in the post title.
Mixing
A blend filter is required to combine two images. For example, cellular texture and noise of pearl. Mixing can be implemented in many different ways. I did as follows:
When mixing, the valueTest parameter is indicated - this number characterizes the intensity of the pixel above which it (the pixel) is not processed. The opacity parameter is also indicated - the transparency itself when blending.
Code
void ProceduralTexture::mix(unsigned char *img1, unsigned char *img2, int valueTest, float opacity){ for (int i=0; i<n; i++) if (img2[i]<=valueTest){ int b = img2[i]; int r = img1[i]; b = ((float)b/valueTest)*255.0f; r = r-(255-b)*opacity; if (r<0) r = 0; img1[i] = r; } } Colour
Each pebble has its own unique color. But in general, all these colors are similar to each other. For example, pebbles can be called green or brown, but among them there will be many different shades of green or brown. The RGB palette for such purposes is not very suitable, as it is difficult for her to command “give all shades of a gray-brown-crimson color in the range of, say, 10%”. Therefore, I chose the HSV palette. Through it is convenient to set the color: the brightness of the stones, saturation and hue. You can also specify a hue range. So, for example, if I need shades of yellow, I can set the hue component to 60 plus or minus 10. In the RGB palette, I would have to tinker with all the channels.
However, when using the HSV model, there is a need for color conversion - because in the final image we have an RGB model. Taking the algorithm from the same wiki, we will write the code:
Spoiler
inline ColorRGB ProceduralTexture::hsvToRgb(ColorHSV &hsv){ ColorRGB rgb; if (hsv.s){ hsv.h %= 360; if (hsv.h<0) hsv.h += 360; int i = hsv.h/60; float f = ((float)hsv.h/60.0f)-(float)i; unsigned char c1 = (hsv.v*(100-hsv.s))*0.0255f; unsigned char c2 = (hsv.v*(100-hsv.s*f))*0.0255f; unsigned char c3 = (hsv.v*(100-hsv.s*(1.0ff)))*0.0255f; hsv.v *= 2.55f; switch (i){ case 0: rgb.r = hsv.v; rgb.g = c3; rgb.b = c1; break; case 1: rgb.r = c2; rgb.g = hsv.v; rgb.b = c1; break; case 2: rgb.r = c1; rgb.g = hsv.v; rgb.b = c3; break; case 3: rgb.r = c1; rgb.g = c2; rgb.b = hsv.v; break; case 4: rgb.r = c3; rgb.g = c1; rgb.b = hsv.v; break; case 5: rgb.r = hsv.v; rgb.g = c1; rgb.b = c2; break; } } else rgb.r = rgb.g = rgb.b = hsv.v; return rgb; } 
It now remains to write the function of painting the pebbles. I just overloaded the mesh generation function. In fact, the whole filling is reduced to the fact that we, when generating the initial set of random points, assign them a color.
Spoiler
ColorRGB *ProceduralTexture::generateCelluarTexture(int size, ColorHSV color, int hueRange){ if (size<2) size = 2; int cellX = w/size+2; int cellY = h/size+2; int pointsX[cellX][cellY]; int pointsY[cellX][cellY]; ColorRGB cellColor[cellX][cellY]; srand(seed); for (int i=0; i<cellX; i++) for (int j=0; j<cellY; j++){ pointsX[i][j] = i*size+rand()%((int)(size*0.7))+size*0.15-size; pointsY[i][j] = j*size+rand()%((int)(size*0.7))+size*0.15-size; } color.h -= (hueRange/2); for (int i=0; i<cellX; i++) for (int j=0; j<cellY; j++){ ColorHSV c = color; ch += rand()%hueRange; cellColor[i][j] = hsvToRgb(c); } ColorRGB *img = new ColorRGB[n]; for (int i=0; i<n; i++){ int x = i%w; int y = i/w; int px = 0; int py = 0; int min = INT_MAX; int startX = x/size; int finishX = startX+3; for (; startX<finishX; startX++){ int startY = y/size; int finishY = startY+3; for (; startY<finishY; startY++){ if (startX<0 || startX>=cellX || startY<0 || startY>=cellY) continue; int d = distance(x, y, pointsX[startX][startY], pointsY[startX][startY]); if (d<min){ px = startX; py = startY; min = d; } } } img[i] = cellColor[px][py]; } return img; } Normal map
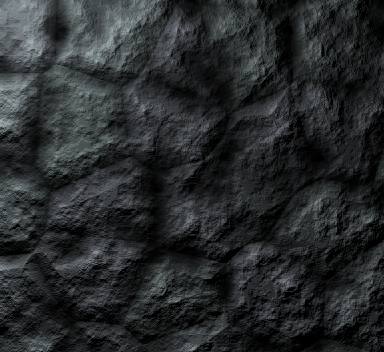
To give relief, I wrote a shader, which using a texture and a normal map creates a picture that you saw in the post title. A normal map can be generated from the source image. To do this, I calculate the difference between adjacent pixels - this is the angle of deviation of the normal. After going through all the pixels, finding the minimum and maximum angle I normalize them (angles).
Spoiler
void ProceduralTexture::generateNormalMap(unsigned char *img){ normalMap = new ColorRG[n]; int maxR = 0; int maxG = 0; for (int i=0; i<n; i++){ int x = i%w; int y = i/w; if (x>0){ int dr = (int)img[y*w+x-1]-(int)img[y*w+x]; if (dr>maxR) maxR = dr; } if (y>0){ int dg = (int)img[(y-1)*w+x]-(int)img[y*w+x]; if (dg>maxG) maxG = dg; } } maxR *= 2; maxG *= 2; for (int i=0; i<n; i++){ int x = i%w; int y = i/w; if (x>0){ int r = 127+(((int)img[y*w+x-1]-(int)img[y*w+x])*255)/maxR; if (r>255) r = 255; if (r<0) r = 0; normalMap[y*w+x].r = r; } else { int r = 127-(((int)img[y*w+x+1]-(int)img[y*w+x])*255)/maxR; if (r>255) r = 255; if (r<0) r = 0; normalMap[y*w+x].r = r; } if (y>0){ int g = 127+(((int)img[(y-1)*w+x]-img[y*w+x])*255)/maxG; if (g>255) g = 255; if (g<0) g = 0; normalMap[y*w+x].g = g; } else { int g = 127-(((int)img[(y+1)*w+x]-img[y*w+x])*255)/maxG; if (g>255) g = 255; if (g<0) g = 0; normalMap[y*w+x].g = g; } } } 
And here is the shader itself. For clarity, I made point lighting in the position of the mouse cursor (in the pictures in the title, the mouse cursor was in the upper left corner
Spoiler
// varying vec4 texCoord; void main(){ gl_Position = gl_ModelViewProjectionMatrix*gl_Vertex; texCoord = gl_MultiTexCoord0; } // uniform sampler2D colorMap; uniform sampler2D normalMap; varying vec4 texCoord; uniform vec2 light; uniform vec2 screen; uniform float dist; void main() { vec3 normal = texture2D(normalMap, texCoord.st).rgb; normal = 2.0*normal-1.0; vec3 n = normalize(normal); vec3 l = normalize(vec3((gl_FragCoord.xy-light.xy)/screen, dist)); float a = dot(n, l); gl_FragColor = a*texture2D(colorMap, texCoord.st); } Glue it all together
I applied the above functions in the following order:
- creation of cellular texture
- applying brightness / contrast filter
- creating texture with the noise of the pearl
- application of effect of gradation to perlin noise
- applying a brightness / contrast filter to perlin noise
- mixing of cellular texture and perlin noise
- create normal map
- coloring
Each of the steps described has its own input parameters. By changing them you can get a huge amount of unique textures.
But what about the seamless texture?
Honestly, I wanted to make the ability to create a seamless texture. But for some reason it was lazy. The recipe is simple: when generating a cellular texture, when searching for distances at the borders, you need to use points from the opposite side of the texture. And when generating noise perlin ... if you honestly did not even think. Probably something similar.
Few optimizations. It was worth it?
In fact, the initial implementation of the code worked rather slowly, there were a lot of floating-point numbers, unnecessary iterations and calculations. All I did was, if possible, endure the calculations and translate into numbers with a fixed point. As a result, the performance between the original version and the current version has grown about 10 times. There was an idea to parallelize the algorithm, but because of the suspicion that everything depends on the work with memory, I threw this idea away.
Source
The main class to generate is called ProceduralTexture. I tried to write more or less beautifully, how much a 5th year student can do. All the rest is a body kit, the interface part is needed only for demonstration. Beautifully, I did not really try to write there.
source code
Some more examples


Source: https://habr.com/ru/post/182346/
All Articles