Configure Travis-CI for iOS open source projects
Continuous integration (continuous integration) - the practice of development, allowing to achieve greater confidence in the stability and correctness of any project. Open source projects are no exception.
About two months ago, in April 2013, Sauce labs announced the launch of iOS / Mac support for the Travis CI server. The service itself has been around for quite some time, and is quite popular in the open-source community thanks to the support of a large number of languages and usability. The service is free for any github user and open repositories. On Habré, there is already a post about the service and its settings for testing Ruby projects, so in this article I would like to talk about a more specific side of the service — setting up automatic builds of iOS projects for Travis-CI. The main focus of this article will be a bunch of CocoaPods + Cedar + Travis CI, but I will try to tell you a little about other things related to the topic.
So, let's begin.
We have a project on github , which has nothing to do with this article, but wants to be related to Travis CI. The project uses CocoaPods, all tests are written using the Cedar framework.
')
Go to the site of the service , log in with your github account. Go to the profile settings , and turn on the repository, on which we want to drive builds and tests.
Most of the configuration is done in the .travis.yml file, which you need to put in the root folder of your repository. In the process, travis-lint , ruby heme, can be useful, allowing you to validate this file for correctness.
The first step is to set the programming language for which the build will be performed.
The next step is to set up all the necessary gems and dependencies for the project. The following steps are available for the Travis worker:
The success of any of these commands (except after_success / after_failure and after / acript) is determined by the return value. Standard Linux code 0 means that the build was successful. Everything else is considered a file. To configure the necessary dependencies, use the before_install step.
In particular, to run tests on the simulator, we will use the ios_sim gem. Conveniently, Travis has a pre-installed Homebrew, so the installation of the heme is as follows
Let's run a little ahead. It is not enough just to run the build on the simulator, it is also important to get the results of the Cedar tests. The ios_ci gem will help us in this, allowing you to knock the project down, run it on the simulator, and get the test results. Put the heme:
The next configuration step is optional, and is associated with the specific folder structure of the selected project. The Xcode project file is not in the root directory of the repository, but in the Example directory. Therefore, we change the current directory to the project directory:
The final configuration step was to install CocoaPods, but Travis does it automatically if it finds it in the Podfile directory, so that the configuration is complete, you can proceed to the assembly.
We turn to the script that will directly drive our tests. You need to understand that this does not have to be a Sedarov script, or the make command. In fact, the only requirement that Travis CI puts forward to the script step is that it must return a value. 0 - success, everything else - Fail. Accordingly, you can build the project as you need it, and you can use any test framework, including the built-in OCUnit.
One of the requirements of the ios_ci gem is that in order to work correctly, it needs to transfer the root directory of the project with the source code. For this purpose, we will use one of the Travis environment variables, $ TRAVIS_BUILD_DIR, which contains the root folder of the repository (you can see all available environment variables here ).
The team to build the project and run the tests will look quite concisely
Thus, the full .travis.yml file will look like this:
All that is left to do is to commit to one of the branches, and push the changes on github. Travis-CI will automatically schedule the build, and after a minute or two it will begin to build the project. If everything goes well, the status will turn green, if not - red. At the same time, a message will be sent to the mail about the success or failure of the assembly.
1. Ability to select repository branches for which the build will be launched.
Thus, Travis will only build builds for commits made to these two branches. Similarly, you can add branches to the blacklist:
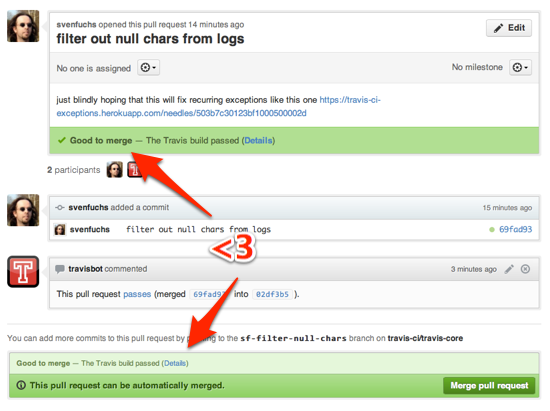
2. The ability to automatically run builds for pull requests. Moreover, the build status will be displayed directly in pull request on the github page.
3. Badge !

The badge is nothing more than a link of the following type
This article shows only the required minimum for setting up Travis-CI builds. The capabilities of this service are much greater, for example, the well-known RestKit framework uses Travis not only for building builds and tests, but also for generating documentation using appledoc .
Thank you for your attention, and successful open-source projects!
1. Not related to this article, but a good framework
2. Travis-CI
3. Habrostaty about Ruby - testing on Travis-CI
4. Travis-CI Service Documentation
5. CI - gem for testing iOS applications
6. Travis-lint
About two months ago, in April 2013, Sauce labs announced the launch of iOS / Mac support for the Travis CI server. The service itself has been around for quite some time, and is quite popular in the open-source community thanks to the support of a large number of languages and usability. The service is free for any github user and open repositories. On Habré, there is already a post about the service and its settings for testing Ruby projects, so in this article I would like to talk about a more specific side of the service — setting up automatic builds of iOS projects for Travis-CI. The main focus of this article will be a bunch of CocoaPods + Cedar + Travis CI, but I will try to tell you a little about other things related to the topic.
So, let's begin.
We have a project on github , which has nothing to do with this article, but wants to be related to Travis CI. The project uses CocoaPods, all tests are written using the Cedar framework.
')
Step one. Connecting a github repository
Go to the site of the service , log in with your github account. Go to the profile settings , and turn on the repository, on which we want to drive builds and tests.
Step two. Configuring a configuration file
Most of the configuration is done in the .travis.yml file, which you need to put in the root folder of your repository. In the process, travis-lint , ruby heme, can be useful, allowing you to validate this file for correctness.
The first step is to set the programming language for which the build will be performed.
language: objective-c The next step is to set up all the necessary gems and dependencies for the project. The following steps are available for the Travis worker:
- before_install
- before_script
- script
- after_success / after_failure
- after_script
The success of any of these commands (except after_success / after_failure and after / acript) is determined by the return value. Standard Linux code 0 means that the build was successful. Everything else is considered a file. To configure the necessary dependencies, use the before_install step.
In particular, to run tests on the simulator, we will use the ios_sim gem. Conveniently, Travis has a pre-installed Homebrew, so the installation of the heme is as follows
before_install: - brew install ios_sim Let's run a little ahead. It is not enough just to run the build on the simulator, it is also important to get the results of the Cedar tests. The ios_ci gem will help us in this, allowing you to knock the project down, run it on the simulator, and get the test results. Put the heme:
- gem install ios_ci The next configuration step is optional, and is associated with the specific folder structure of the selected project. The Xcode project file is not in the root directory of the repository, but in the Example directory. Therefore, we change the current directory to the project directory:
- cd Example The final configuration step was to install CocoaPods, but Travis does it automatically if it finds it in the Podfile directory, so that the configuration is complete, you can proceed to the assembly.
Step three. Build the project and run tests
We turn to the script that will directly drive our tests. You need to understand that this does not have to be a Sedarov script, or the make command. In fact, the only requirement that Travis CI puts forward to the script step is that it must return a value. 0 - success, everything else - Fail. Accordingly, you can build the project as you need it, and you can use any test framework, including the built-in OCUnit.
One of the requirements of the ios_ci gem is that in order to work correctly, it needs to transfer the root directory of the project with the source code. For this purpose, we will use one of the Travis environment variables, $ TRAVIS_BUILD_DIR, which contains the root folder of the repository (you can see all available environment variables here ).
The team to build the project and run the tests will look quite concisely
script: ios_ci cedar --source-root $TRAVIS_BUILD_DIR/Example --workspace DTTableViewManager.xcworkspace --scheme CedarUnitTests --build-path Build/Products Thus, the full .travis.yml file will look like this:
language: objective-c before_install: - gem install ios_ci - brew install ios-sim - cd Example script: ios_ci cedar --source-root $TRAVIS_BUILD_DIR/Example --workspace DTTableViewManager.xcworkspace --scheme CedarUnitTests --build-path Build/Products Step Four. Profit
All that is left to do is to commit to one of the branches, and push the changes on github. Travis-CI will automatically schedule the build, and after a minute or two it will begin to build the project. If everything goes well, the status will turn green, if not - red. At the same time, a message will be sent to the mail about the success or failure of the assembly.
Extra Travis-CI Buns
1. Ability to select repository branches for which the build will be launched.
branches: only: - master - develop Thus, Travis will only build builds for commits made to these two branches. Similarly, you can add branches to the blacklist:
branches: except: - legacy - experimental 2. The ability to automatically run builds for pull requests. Moreover, the build status will be displayed directly in pull request on the github page.
3. Badge !
The badge is nothing more than a link of the following type
https://travis-ci.org/[YOUR_GITHUB_USERNAME]/[YOUR_PROJECT_NAME].png?branch=master,staging,production This article shows only the required minimum for setting up Travis-CI builds. The capabilities of this service are much greater, for example, the well-known RestKit framework uses Travis not only for building builds and tests, but also for generating documentation using appledoc .
Thank you for your attention, and successful open-source projects!
Links
1. Not related to this article, but a good framework
2. Travis-CI
3. Habrostaty about Ruby - testing on Travis-CI
4. Travis-CI Service Documentation
5. CI - gem for testing iOS applications
6. Travis-lint
Source: https://habr.com/ru/post/182294/
All Articles