Forwarding ports in Mikrotik - educational program for beginners
Finding various instructions for working with Mikrotik RouterOS online, I noticed that most of them are not informative - at best they are presented in the form of screenshots of Winbox with scant comments, at worst - just a pile of command line strings from which to understand something there is no possibility at all.
Therefore, I decided to write a small set of instructions in which I will explain, not only WHAT needs to be performed, but also WHY and WHY.
So, let's start with the simplest and, at the same time, necessary - forwarding the port from the internal network to the "outside".
Any network can be schematically presented in this form:
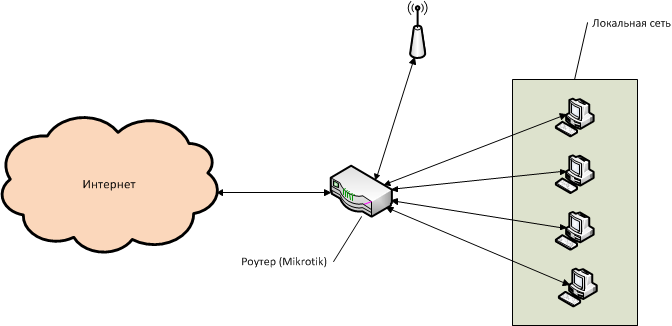
Let's look in a little more detail, on the example of the Mikrotik RB951-2n router. It has 5 ports, plus a WiFi module.
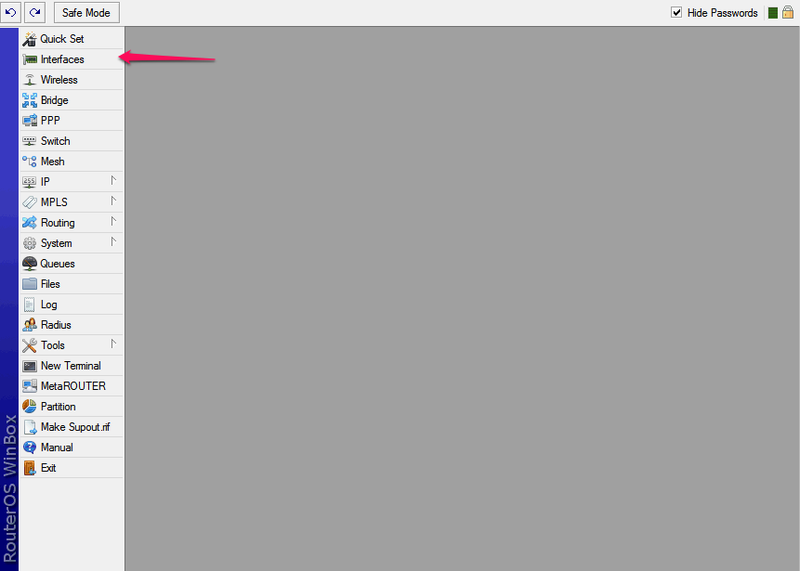
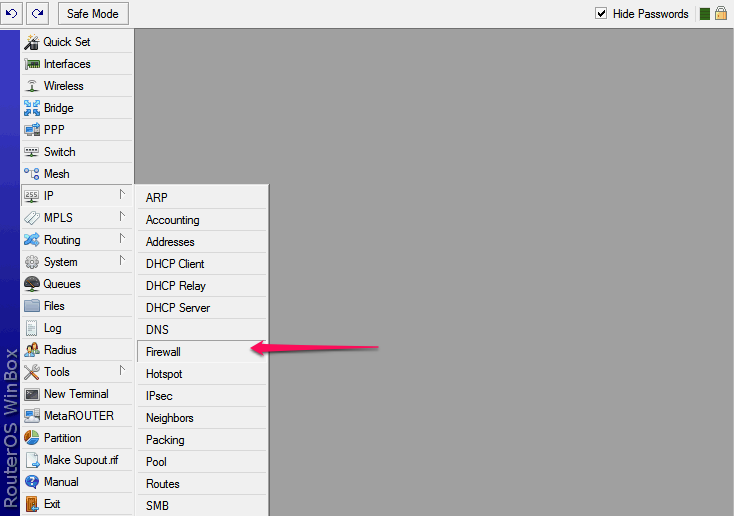
We connect via the web interface or by Winbox to the router (by default, the username is admin, without a password), go to the list of interfaces, this is the second item in the menu, Interfaces .
')
Here we see all the interfaces available to our router (the interface is, roughly speaking, the router's communication channel with another computer / computers)
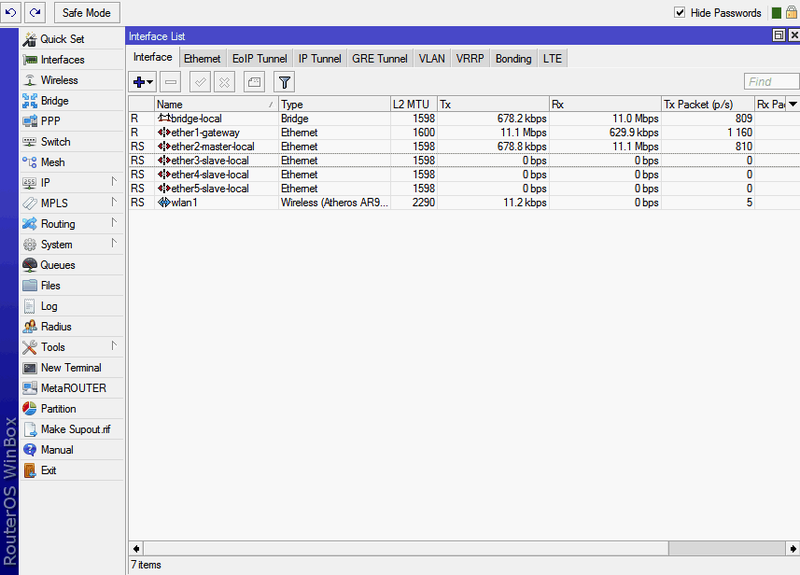
The first one is bridge-local - “local bridge”. In this case, it serves to establish a bridge between the local network and wireless connections via WiFi (In Mikrotik, you can either connect several interfaces to a switch or connect them with a bridge (bridge). Each of these two options has its own strengths and weaknesses But this is a topic for a separate article).
Next, ether1-gateway . Ether1 is the first RJ45 connector on the front panel of the router. By default, it is considered that the cable with the Internet coming from the provider is plugged into it. Therefore, it is called Gateway - “Gateway” (In principle, this does not have to be the first port, if you wish, you can designate any other port as a gateway, and even several ports at the same time, if you have connections from several providers).
Then come 4 LAN ports. They are combined into a switch, starting with the second RJ45 connector, it is called ether2-master-local , the remaining 3 are non-politically correct called slave-local . Here the logic is simple: it is stated in the parameters of ports 3, 4 and 5 that the main port is port number 2 - respectively, all four ports are automatically combined into a virtual switch. And this virtual switch of the internal network is combined with the wireless network through the bridge from the first line.
Between the external Internet and the internal network is NAT - Network Address Translation, literally “Network Address Translation”. A mechanism that allows computers on a local network to have internal addresses of their network while communicating normally with all other computers and servers on the Internet (while for an external server all computers within the network are represented by one address — the external address of the router). In short, it works like this: when accessing the internal network somewhere on the Internet, the router replaces the internal address of the computer with its address, receives a response from the server on the Internet, and forwards it to the local address of the computer that made the original request. This is called Masquerade - “Masquerade”: the data from the machine on the local network seems to be “put on a mask” and for an external server it looks like it comes from the router itself. In the same way, when connecting from an external network, we need to set up a rule somewhere which computer on the local network should respond to attempts to connect to some port on the router. Let me explain with an example:
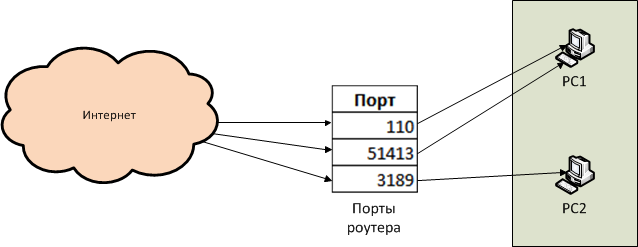
We want the router to be connected to our network on ports 110 and 51413 - the connection is redirected to PC1, and when connected to port 3189 - to PC2.
This is what NAT is for.
In Mikrotik, NAT management is located in the IP -> Firewall -> NAT section:
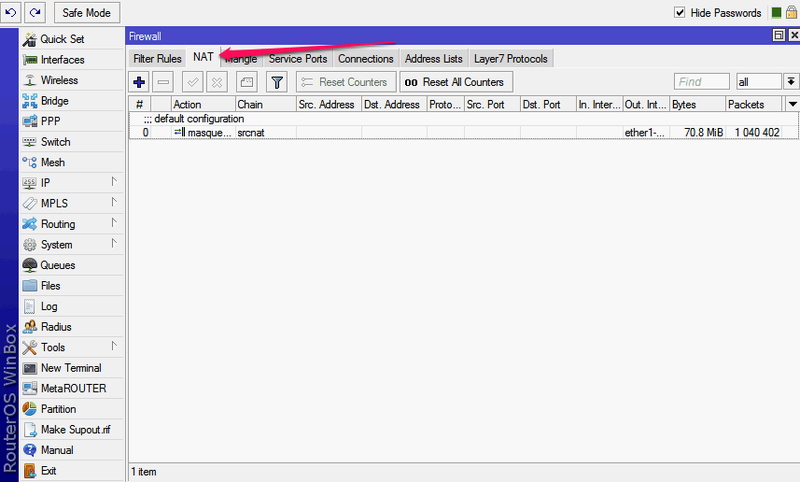
Here we see that one rule already exists. It is automatically created by the default configuration - this is the same “Masquerade”, it is necessary so that the computers on the internal network can properly access the servers on the Internet.
We need exactly the opposite - to add a rule for connecting from the outside to one of the machines in the local network. For example, for effective work of the torrent client, we want to make available port 51413 on a machine named nas.
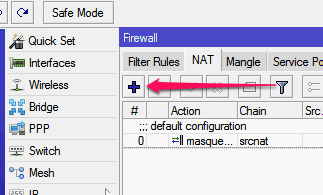
Push the blue plus sign
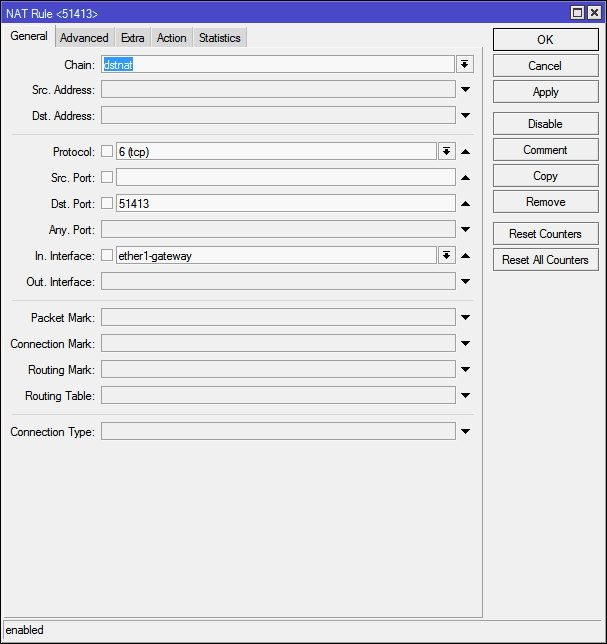
In the new rule window that appears, we need only a few options.

The first is Chain (Chain). There may be only two options - srcnat and dstnat . A chain is, roughly speaking, the direction of data flow. Srcnat - from the internal network to the external, dstnat - respectively, from the external to the internal. As it is easy to guess, in our case it is required to select dstnat .
Next come the Src. Address (source address) and Dst. Address (destination address). To connect from the outside, the source address will be the address of one of the billions of computers on the Internet, and the destination address will always be the external address of the router. These points make no sense.
Then the item Protocol (protocol). Here, the value must be selected, otherwise we will not be able to specify the port number. For torrents, select tcp here.
Src. Port (outgoing port) is the port from which the remote machine initiates a connection with our router. It is absolutely no difference to us, we are not putting anything here.
Dst. Port (destination port) - and this is exactly the port on which we want to accept the connection. In my torrent client is 51413.
Then comes the funny item Any. Port (any port) - it is, it is the union of the two previous points, here you can specify the value that will work both as the source port and as the destination port. In general, we do not need this.
Now a very important point:
In. interface (incoming interface) is, roughly speaking, the interface on which the specified port “listens”. If this parameter is not specified, then this port will also cease to be accessible from the internal network, even though the chain is dstnat . Therefore, we select here the interface through which we are connected to the Internet, in our case - ether1-gateway .
Out. interface (outgoing interface) - the interface to which the machine is connected to which we are forwarding. There is nothing to put here.
Further there are highly specialized parameters, I will not dwell on them now.
In the end, it turns out this picture:
The tabs Advanced (Advanced) and Extra (Optional) contain various parameters of fine-tuning, we need them without need, we go immediately to the Action (Action)
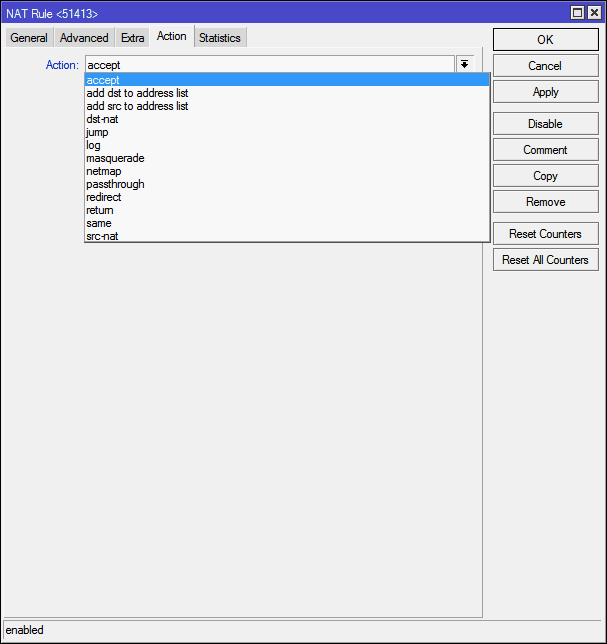
Here, from the Action list, you need to select a specific action that should be performed with a connection to the specified port. Choose from what:
accept - simply accepts the packet;
add-dst-to-address-list — Adds the destination address to the specified address list;
add-src-to-address-list - Same as above, but for the source address;
dst-nat - Redirects data from the external network to the internal network;
jump - Allows you to apply rules for data from another chain. For example, for the srcnat chain, apply the rules of the dstnat chain;
log - Just adds the package information to the router's log;
masquerade - The same “Masquerade”: substitution of the internal address of the machine from the local network to the address of the router;
netmap - Displays one address to another. In fact, the development of dst-nat;
passthrough - Skip the current rule item and move to the next. Used mainly for statistics;
redirect - Redirects data to another port within the router;
return - Returns control back if a jump was executed in this chain by the jump rule;
same - used in very rare cases when you need to apply the same rules for a group of addresses;
src-nat - Inverse dst-nat operation: redirect data from the internal network to the external.
For our purposes, dst-nat and netmap are suitable . The latter is a newer and improved version of the first, it is logical to use it:
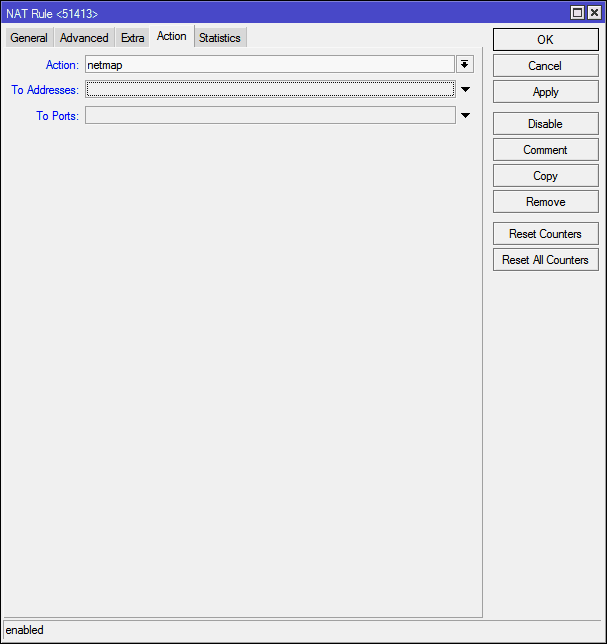
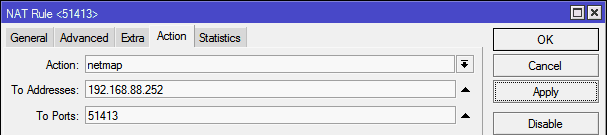
In the To Addresses field, you need to specify the address of the machine to which we want to redirect the port, in the To Ports field - respectively, the port itself.
In order not to bother, I write the name of the computer instead of the address, and specify the port:

And I click the Apply button, the router itself finds the address of the machine:
Finally, it makes sense to click Comment and specify a comment for the rule so that you don’t have to remember what the rule is and why
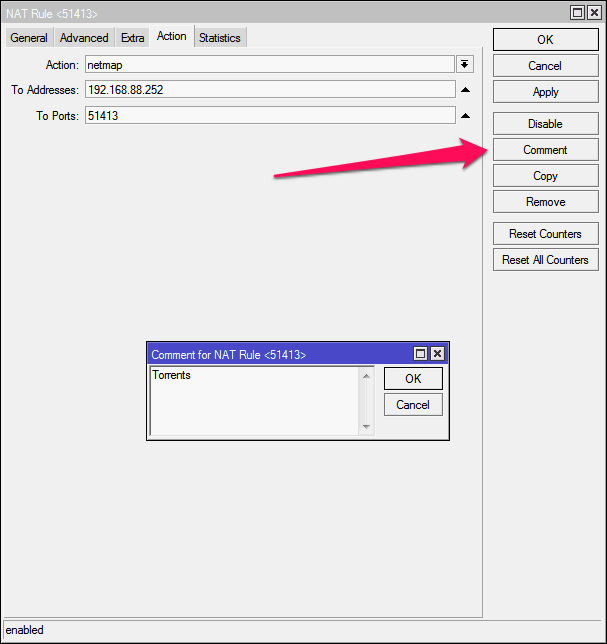
Ok , click OK in the comment input window and OK in the rule input window:
The rule is created, everything works.
Please note - an additional “open” port is not required!
The instruction is relevant for firmware versions 5 and 6. Until version 7, hardly anything will change.
Therefore, I decided to write a small set of instructions in which I will explain, not only WHAT needs to be performed, but also WHY and WHY.
So, let's start with the simplest and, at the same time, necessary - forwarding the port from the internal network to the "outside".
Any network can be schematically presented in this form:
Let's look in a little more detail, on the example of the Mikrotik RB951-2n router. It has 5 ports, plus a WiFi module.
We connect via the web interface or by Winbox to the router (by default, the username is admin, without a password), go to the list of interfaces, this is the second item in the menu, Interfaces .
')
Here we see all the interfaces available to our router (the interface is, roughly speaking, the router's communication channel with another computer / computers)
The first one is bridge-local - “local bridge”. In this case, it serves to establish a bridge between the local network and wireless connections via WiFi (In Mikrotik, you can either connect several interfaces to a switch or connect them with a bridge (bridge). Each of these two options has its own strengths and weaknesses But this is a topic for a separate article).
Next, ether1-gateway . Ether1 is the first RJ45 connector on the front panel of the router. By default, it is considered that the cable with the Internet coming from the provider is plugged into it. Therefore, it is called Gateway - “Gateway” (In principle, this does not have to be the first port, if you wish, you can designate any other port as a gateway, and even several ports at the same time, if you have connections from several providers).
Then come 4 LAN ports. They are combined into a switch, starting with the second RJ45 connector, it is called ether2-master-local , the remaining 3 are non-politically correct called slave-local . Here the logic is simple: it is stated in the parameters of ports 3, 4 and 5 that the main port is port number 2 - respectively, all four ports are automatically combined into a virtual switch. And this virtual switch of the internal network is combined with the wireless network through the bridge from the first line.
Between the external Internet and the internal network is NAT - Network Address Translation, literally “Network Address Translation”. A mechanism that allows computers on a local network to have internal addresses of their network while communicating normally with all other computers and servers on the Internet (while for an external server all computers within the network are represented by one address — the external address of the router). In short, it works like this: when accessing the internal network somewhere on the Internet, the router replaces the internal address of the computer with its address, receives a response from the server on the Internet, and forwards it to the local address of the computer that made the original request. This is called Masquerade - “Masquerade”: the data from the machine on the local network seems to be “put on a mask” and for an external server it looks like it comes from the router itself. In the same way, when connecting from an external network, we need to set up a rule somewhere which computer on the local network should respond to attempts to connect to some port on the router. Let me explain with an example:
We want the router to be connected to our network on ports 110 and 51413 - the connection is redirected to PC1, and when connected to port 3189 - to PC2.
This is what NAT is for.
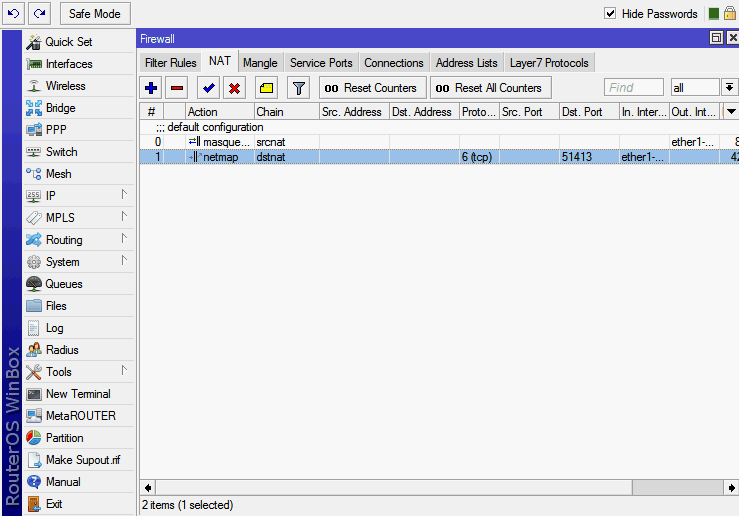
In Mikrotik, NAT management is located in the IP -> Firewall -> NAT section:
Here we see that one rule already exists. It is automatically created by the default configuration - this is the same “Masquerade”, it is necessary so that the computers on the internal network can properly access the servers on the Internet.
We need exactly the opposite - to add a rule for connecting from the outside to one of the machines in the local network. For example, for effective work of the torrent client, we want to make available port 51413 on a machine named nas.
Push the blue plus sign
In the new rule window that appears, we need only a few options.
The first is Chain (Chain). There may be only two options - srcnat and dstnat . A chain is, roughly speaking, the direction of data flow. Srcnat - from the internal network to the external, dstnat - respectively, from the external to the internal. As it is easy to guess, in our case it is required to select dstnat .
Next come the Src. Address (source address) and Dst. Address (destination address). To connect from the outside, the source address will be the address of one of the billions of computers on the Internet, and the destination address will always be the external address of the router. These points make no sense.
Then the item Protocol (protocol). Here, the value must be selected, otherwise we will not be able to specify the port number. For torrents, select tcp here.
Src. Port (outgoing port) is the port from which the remote machine initiates a connection with our router. It is absolutely no difference to us, we are not putting anything here.
Dst. Port (destination port) - and this is exactly the port on which we want to accept the connection. In my torrent client is 51413.
Then comes the funny item Any. Port (any port) - it is, it is the union of the two previous points, here you can specify the value that will work both as the source port and as the destination port. In general, we do not need this.
Now a very important point:
In. interface (incoming interface) is, roughly speaking, the interface on which the specified port “listens”. If this parameter is not specified, then this port will also cease to be accessible from the internal network, even though the chain is dstnat . Therefore, we select here the interface through which we are connected to the Internet, in our case - ether1-gateway .
Out. interface (outgoing interface) - the interface to which the machine is connected to which we are forwarding. There is nothing to put here.
Further there are highly specialized parameters, I will not dwell on them now.
In the end, it turns out this picture:
The tabs Advanced (Advanced) and Extra (Optional) contain various parameters of fine-tuning, we need them without need, we go immediately to the Action (Action)
Here, from the Action list, you need to select a specific action that should be performed with a connection to the specified port. Choose from what:
accept - simply accepts the packet;
add-dst-to-address-list — Adds the destination address to the specified address list;
add-src-to-address-list - Same as above, but for the source address;
dst-nat - Redirects data from the external network to the internal network;
jump - Allows you to apply rules for data from another chain. For example, for the srcnat chain, apply the rules of the dstnat chain;
log - Just adds the package information to the router's log;
masquerade - The same “Masquerade”: substitution of the internal address of the machine from the local network to the address of the router;
netmap - Displays one address to another. In fact, the development of dst-nat;
passthrough - Skip the current rule item and move to the next. Used mainly for statistics;
redirect - Redirects data to another port within the router;
return - Returns control back if a jump was executed in this chain by the jump rule;
same - used in very rare cases when you need to apply the same rules for a group of addresses;
src-nat - Inverse dst-nat operation: redirect data from the internal network to the external.
For our purposes, dst-nat and netmap are suitable . The latter is a newer and improved version of the first, it is logical to use it:
In the To Addresses field, you need to specify the address of the machine to which we want to redirect the port, in the To Ports field - respectively, the port itself.
In order not to bother, I write the name of the computer instead of the address, and specify the port:
And I click the Apply button, the router itself finds the address of the machine:
Finally, it makes sense to click Comment and specify a comment for the rule so that you don’t have to remember what the rule is and why
Ok , click OK in the comment input window and OK in the rule input window:
The rule is created, everything works.
Please note - an additional “open” port is not required!
The instruction is relevant for firmware versions 5 and 6. Until version 7, hardly anything will change.
Source: https://habr.com/ru/post/182166/
All Articles