Quadcopter for the evening not counting the delivery
 The idea of building a quadrocopter overwhelmed me a year ago. But as usual (at least in my case) the fix idea, which you cannot drive out of your head in any way, is to wait a couple of days. I had several such attacks with flying equipment. And the last one was caused by this post .
After reading the post and comments, I still decided to purchase components. It was late in the evening, or rather, it was already early at night (I decided that the fuse the next day could already pass and it would be a pity for me to give $ 400) and I forgot to order a couple of small things that the next day I ordered the second package (which, by the way, earlier main). And began 20 days of waiting.
Even while waiting for the parcel, I decided that I would make the first frame in a hurry, because most likely I would still break it. The idea was in the simplest frame - aluminum square pipes and glass fiber laminate in the center.
And then came the big parcel with a bunch of details.
Construction
The first problem: nowhere to find an aluminum pipe 10x10mm. There is only 15x15mm and wall thickness 1.5mm. And it is 2 times harder. I decided to use a wooden bead (looking ahead - I do not regret it).
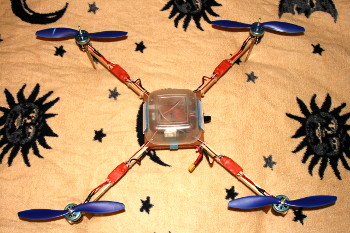
Frame
 As I said above - I decided to make the frame as simple as possible. 4 wooden sticks and a square fiberglass base.
I tried to do as accurately as possible. Dimension tolerance turned out to be within millimeter.
There is nothing to write about. Marked, drilled, cut, twisted.
The only thing - stripped the copper layer from the PCB. Fear shielding signal. Yes, and the weight will be a few grams less.
And the tree seems to be a good choice because of good vibration damping.
Electronics
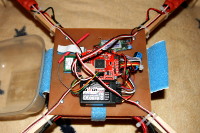 With the wiring had to suffer a little. My good soldering iron was stolen from me and now I use a 25-watt nameless one. Warming up the thick power wires is not such an easy task for him. Arduino decided to buy ready, and not to poison the board itself, as I thought at first, because factory boards are more reliable, and the price of all sensors is comparable to the finished board.
Otherwise, everything is elementary. I connected the plugs according to the instructions, wrote down the firmware in the Arduino and everything is ready.
')
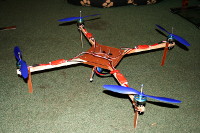
First flight
I apologize for commentators, but this video is the first flight and I can’t retake it for obvious reasons.
However, to be honest, the takeoff is not the first. Before that, there were a couple of checks in the meter from the ground - checking the accelerometer calibration.
Impressions
The resulting device is satisfied. On the forums, everyone writes that it is necessary to balance motors and propellers and vibration-isolate the control board. I did not do this. Everything works so well. However, I may not have enough experience. Maybe he should stay even better, but with the engines and propellers I was just lucky.
FPV
One of the main goals of the building is flying from the first person. I decided not to order everything at once - first learn to fly. But I remembered that I have a long-bought Chinese wireless video camera for 900Mhz. Attached it - FPV for short distances is possible, but due to the very large frequency drift depending on the temperature, the video quality is terrible. I will not post it - it's a shame to litter the Internet like this.
Security
During the second takeoff, an accident occurred. And with the participation of the pilot, that is me. The reason was several factors at once: inattention, gust of wind, etc. But first of all non-compliance with safety measures. The quadrocopter took off, bore the wind in my direction, inadvertently did not turn on stabilization ... As a result, I got a screw in the shoulder, and the quadr fell to the ground and bent the screw.
By the way, I straightened the screw - it works like a new one. This is a word about balancing.
Accessories
Main
| Title | Link | Price |
|---|---|---|
| Motors x4 | hexTronik DT700 Brushless Outrunner 700kv | $ 9.81 |
| Motor controllers x4 | TURNIGY Plush 25amp Speed Controller | $ 12.19 |
| Propellers | 10x4.5 SF Props | $ 2.80 |
| Flight controller | MultiWii PRO Flight Controller | $ 64.99 |
| Onboard battery | Turnigy 2650mAh 3S 30C | $ 16.51 |
| Remote Control | Turnigy 9X 9Ch Transmitter | $ 53.82 |
| Battery for remote | Turnigy 2650mAh 3S 1C | $ 12.79 |
Total $ 237.91.
But I took one spare motor, regulator, 2 batteries, 3 sets of propellers. Therefore, it cost me $ 282.02
Additional
| Title | Link | Price |
|---|---|---|
| Regulator Programmer | TURNIGY BESC Programming Card | $ 6.95 |
| Adhesive Velcro | Polyester Velcro Peel-n-stick adhesive side V-STRONG (1mtr) | $ 2.39 |
| Battery Connectors | Nylon XT60 Connectors Male / Female (5 pairs) | $ 3.29 |
| Charger | Turnigy Accucel-6 50W 6A Balancer / Charger | $ 22.99 |
| Power supply for charger | Hobbyking 105W 15V / 7A | $ 13.99 |
| Battery garter | Turnigy Battery Strap 330mm | $ 1.59 |
Subtotal: $ 49.61
And the delivery cost $ 71.99.
Specifications
Flight weight: 1.3kg
Declared thrust single screw: 950g
The size of the axes of the motors: 690mm
Flight time: 10+ minutes
Conclusion
Thanks for attention. The post was about nothing, but apparently, I just want to share the joy of owning this thing!
Please do not kick much. If you are interested in any details, then ask - I will be happy to answer / add a post.
UPD: Added a list of components and specifications
Source: https://habr.com/ru/post/182162/
All Articles