Step-by-step: SpecFlow setting for a Russian-language project when writing tests in the .Net environment
Not found on the Internet step by step Russian-language instructions on how to configure SpecFlow to work with Russian specifications. And in general there is no Russian instructions on how to start working with SpecFlow. But I found some skepticism among other automatizers about the fact that this can be done easily and simply, but I did not like the suggested alternatives in the long run (review of tests from the web by technical support specialists). I need SpecFlow exactly and in Russian!
I somehow figured it out, and, so that others would not doubt that it is not so difficult to do, and not stuffed their own bumps, I share my instructions. It is primarily intended for automated testers, so it may contain some obvious points for programmers.
This article is useful for those who:
This article is useless for those who:
I have a task to automate the testing of the key functionality of a single application, which is developed by a Russian company and focused mainly on domestic consumers. The application has been on the market for a decent number of years, and its documentation is measured in hundreds of pages. Releases are frequent, full of bugs, there are few testers.
')
The manual gave the go-ahead to try to apply the latest automation trends - Specification By Example , promising to highlight the key functionality, the automation of which has the highest priority, and describe it in the form of simple and clear User Story.
What to do next? List the scripts directly in the feature-files and fasten them to autotests!
Go to Tools - Extentions and Updates.
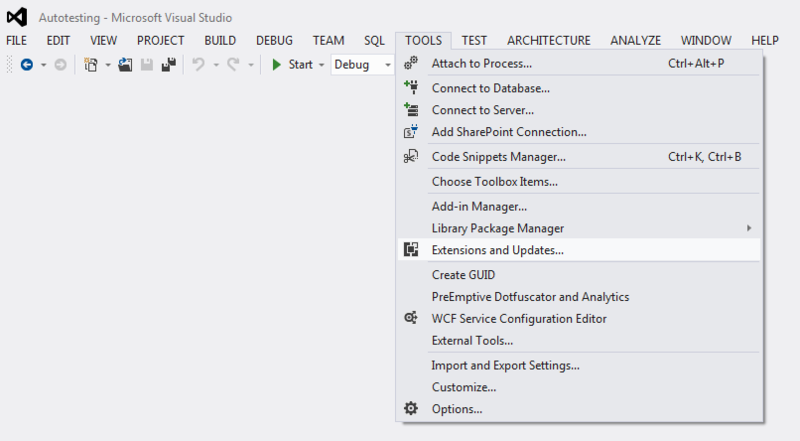
Go to the Online and look for SpecFlow.

Install the extension. The installer will ask to restart the studio.
You can skip this step if:
Prepare the App.config file in advance with the following content:
Instead of NUnit, you can specify another test runner.
This file will need to be enclosed in all projects containing test suites and feature files, so it is best to keep a copy of it separately.
I leave the link to the documentation in the comments on purpose - suddenly you want to change something else.
The configuration file grinds the default settings of SpecFlow, so when using English-language spec with NUnit, it is not needed.
Create a project like Unit Test.

From the project tree, delete the unnecessary file of the standard class:

Run the package manager console:
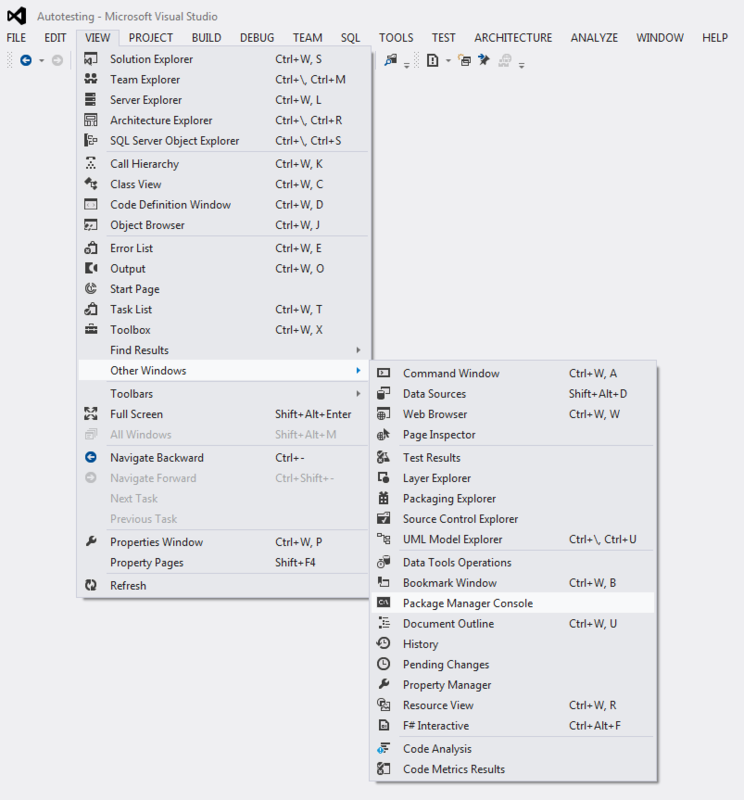
We run the command in it:
Where:
UnitTestProject1 is the name of your project.
SpecFlow.NUnit - the version of SpecFlow for NUnit. You can write just SpecFlow, then the tests will run not NUnit, but SpecRun. Read more here.

After the command has completed, the file App.config appears in the project folder. It is not visible in Solution Explorer.
It is necessary to replace the default config with the one we prepared in advance. You can do it in 2 ways:
1. Open the project folder in the file system and change the copy-paste.
2. Add a file to the project tree:

Now you can edit the content in the studio itself:

Each time after changing the configuration, SpecFlow will ask for permission to process its features again.
Add to the project SpecFlow feature File:

This file will contain a sample in English. Since we configured SpecFlow to Russian, syntax highlighting will not work - the project does not recognize “Given / When / Then” now:

The template itself can be changed, it is written about it in the comments .
We will describe the feature and script in Russian (can be copied from here):
When describing, one should keep in mind exactly which keywords are put in accordance with English:
For those who believe that the Gherkin “Given / When / Then” formula in Russian sounds like “If / When / Then” I pay special attention to the fact that in the SpecFlow “If” corresponds to “When”, and I personally find it quite logical Attempts to circumvent this and do “If” = “Given” end in confusion and confusion when generating steps.
Now you can make sure that the configuration was successful and the Russian keywords are recognized:

In the feature file itself, we launch the test steps generator from the context menu:

You can make sure once again that everything is correctly understood, and in our scenario all “Given”, “And”, “When”, “Then” were found:

Generate - generate steps.
Save as suggested or rename. In general, it is convenient when the files with the test steps coincide with the feature files by the name of the function being tested, so it is better to correctly name the feature from the very beginning.
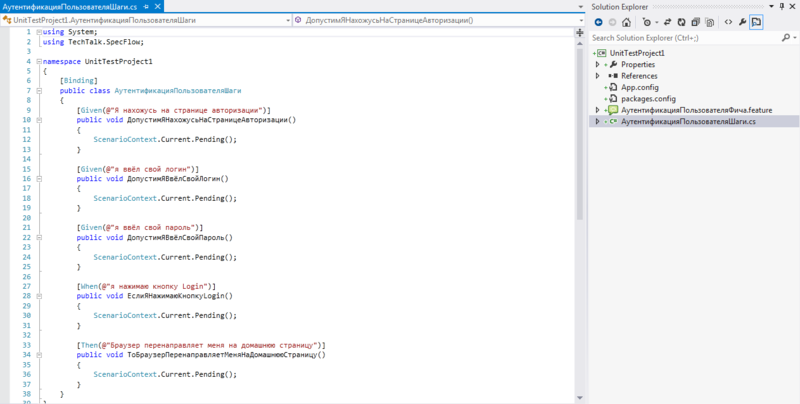
As a result, we generated steps with stubs for the autotest code:
Now, even before writing the AutoTest, you can already run the test and make sure that everything works correctly.
This is most conveniently done from the context menu in the feature file itself:
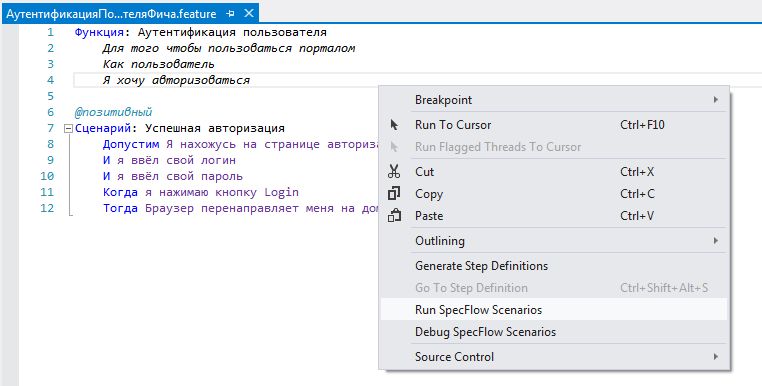
Everything is set up correctly if the test is recognized as underwritten and its launch does not occur:

In the screenshot, the tests inundated are from another project in the same Solution. NUnit runs all the tests at once.
If something is set up wrong - the test will collapse before writing the AutoTest filling. In the worst case, NUnit decides that there are no tests at all.
I naively tried to redefine the keywords in the App.Config file, I wrote there too much, and this led to the test falling:
If using this instruction you still encounter “red” results - write in the comments, this experience may be useful to someone.
Next you need to fasten autotests to the steps and expand the range of feature files and scripts. How to do this in Russian is actively explained by marshinov . His articles provide examples of the feature files described in English, but using the analogy can be figured out.
www.specflow.org/specflownew/ProjectSetupGuide.html
go.specflow.org/doc-config
github.com/techtalk/SpecFlow/wiki/Configuration
raw.github.com/techtalk/SpecFlow/master/Languages.xml
msdn.microsoft.com
I somehow figured it out, and, so that others would not doubt that it is not so difficult to do, and not stuffed their own bumps, I share my instructions. It is primarily intended for automated testers, so it may contain some obvious points for programmers.
This article is useful for those who:
- evaluates the prospects for applying the test automation approach to Specification by Example (BDD) , and wants to describe features and scripts in Russian , and wants to assess the scope of work;
- He wants to start using BDD in his project as soon as possible.
This article is useless for those who:
- he knows how to do it;
- ready to spend a few hours of work + speaks English well enough to understand the instructions yourself.
Formulation of the problem
I have a task to automate the testing of the key functionality of a single application, which is developed by a Russian company and focused mainly on domestic consumers. The application has been on the market for a decent number of years, and its documentation is measured in hundreds of pages. Releases are frequent, full of bugs, there are few testers.
')
The manual gave the go-ahead to try to apply the latest automation trends - Specification By Example , promising to highlight the key functionality, the automation of which has the highest priority, and describe it in the form of simple and clear User Story.
What to do next? List the scripts directly in the feature-files and fasten them to autotests!
Instruction
What is needed
- IDE for .Net. The instruction is written for the English-speaking Visual Studio 2012. In other IDEs, act by analogy.
- Select and install Test Runner if it does not already exist. I use NUnit. SpecFlow also supports other test run tools.
Step 1: Install SpecFlow
Go to Tools - Extentions and Updates.
Go to the Online and look for SpecFlow.
Install the extension. The installer will ask to restart the studio.
Step 2: Create the SpecFlow configuration file
You can skip this step if:
- You have only 1 project, and you do without any drafts and experiments. Then in step 3, copy the contents of this config and paste into your own.
- You will use the advice from the comment.
Prepare the App.config file in advance with the following content:
<?xml version="1.0" encoding="utf-8" ?> <configuration> <configSections> <section name="specFlow" type="TechTalk.SpecFlow.Configuration.ConfigurationSectionHandler, TechTalk.SpecFlow"/> </configSections> <specFlow> <!-- For additional details on SpecFlow configuration options see http://go.specflow.org/doc-config --> <unitTestProvider name="NUnit" /> <language feature="ru-RU" tool="ru-RU" /> <bindingCulture name="ru-RU" /> </specFlow> </configuration> Instead of NUnit, you can specify another test runner.
This file will need to be enclosed in all projects containing test suites and feature files, so it is best to keep a copy of it separately.
I leave the link to the documentation in the comments on purpose - suddenly you want to change something else.
The configuration file grinds the default settings of SpecFlow, so when using English-language spec with NUnit, it is not needed.
Step 3: Create a project
Create a project like Unit Test.
From the project tree, delete the unnecessary file of the standard class:
Run the package manager console:
We run the command in it:
PM> Install-Package SpecFlow.NUnit -ProjectName UnitTestProject1Where:
UnitTestProject1 is the name of your project.
SpecFlow.NUnit - the version of SpecFlow for NUnit. You can write just SpecFlow, then the tests will run not NUnit, but SpecRun. Read more here.
After the command has completed, the file App.config appears in the project folder. It is not visible in Solution Explorer.
It is necessary to replace the default config with the one we prepared in advance. You can do it in 2 ways:
1. Open the project folder in the file system and change the copy-paste.
2. Add a file to the project tree:
Now you can edit the content in the studio itself:
Each time after changing the configuration, SpecFlow will ask for permission to process its features again.
Step 4: Add a file with a description of the features
Add to the project SpecFlow feature File:
This file will contain a sample in English. Since we configured SpecFlow to Russian, syntax highlighting will not work - the project does not recognize “Given / When / Then” now:
The template itself can be changed, it is written about it in the comments .
We will describe the feature and script in Russian (can be copied from here):
: @ : Login When describing, one should keep in mind exactly which keywords are put in accordance with English:
<Language code="ru" cultureInfo="ru" defaultSpecificCulture="ru-RU" englishName="Russian"> <Feature></Feature> <Feature></Feature> <Feature></Feature> <Background></Background> <Background></Background> <Scenario></Scenario> <ScenarioOutline> </ScenarioOutline> <Examples></Examples> <Given></Given> <Given></Given> <Given></Given> <When></When> <When></When> <Then></Then> <Then></Then> <And></And> <And> </And> <But></But> <But></But> </Language> For those who believe that the Gherkin “Given / When / Then” formula in Russian sounds like “If / When / Then” I pay special attention to the fact that in the SpecFlow “If” corresponds to “When”, and I personally find it quite logical Attempts to circumvent this and do “If” = “Given” end in confusion and confusion when generating steps.
Now you can make sure that the configuration was successful and the Russian keywords are recognized:
Step 5: Generate Test Steps
In the feature file itself, we launch the test steps generator from the context menu:
You can make sure once again that everything is correctly understood, and in our scenario all “Given”, “And”, “When”, “Then” were found:
Generate - generate steps.
Save as suggested or rename. In general, it is convenient when the files with the test steps coincide with the feature files by the name of the function being tested, so it is better to correctly name the feature from the very beginning.
As a result, we generated steps with stubs for the autotest code:
Step 6: Run the test
Now, even before writing the AutoTest, you can already run the test and make sure that everything works correctly.
This is most conveniently done from the context menu in the feature file itself:
Everything is set up correctly if the test is recognized as underwritten and its launch does not occur:
In the screenshot, the tests inundated are from another project in the same Solution. NUnit runs all the tests at once.
If something is set up wrong - the test will collapse before writing the AutoTest filling. In the worst case, NUnit decides that there are no tests at all.
Cones
I naively tried to redefine the keywords in the App.Config file, I wrote there too much, and this led to the test falling:
Result Message: TestFixtureSetUp failed in < >If using this instruction you still encounter “red” results - write in the comments, this experience may be useful to someone.
What's next?
Next you need to fasten autotests to the steps and expand the range of feature files and scripts. How to do this in Russian is actively explained by marshinov . His articles provide examples of the feature files described in English, but using the analogy can be figured out.
Information sources:
www.specflow.org/specflownew/ProjectSetupGuide.html
go.specflow.org/doc-config
github.com/techtalk/SpecFlow/wiki/Configuration
raw.github.com/techtalk/SpecFlow/master/Languages.xml
msdn.microsoft.com
Source: https://habr.com/ru/post/182160/
All Articles