Cute castle - from modeling to the finished image
Good day. This article, although it is better to call it ToDo, may be useful to people with drawing abilities who know the basics of modeling and image processing, or know how to include the necessary programs. If this is about you, or if you are interested in how to make such a lock, I ask for cat.
')
I apologize to the amateurish description of the process, but as I can. Such a lock is created on the basis of a three-dimensional model, the render of which is processed in a graphic editor (a render is an image constructed by visualizing something). More on this method here .
In this article, I will use the 3Dmax and Photoshop packages, simply because I have worked a little with others.
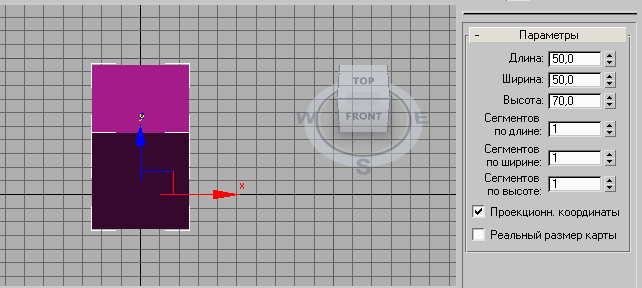
Create a scene. Turn on orthographic projection. Place a cube in the center of the scene.
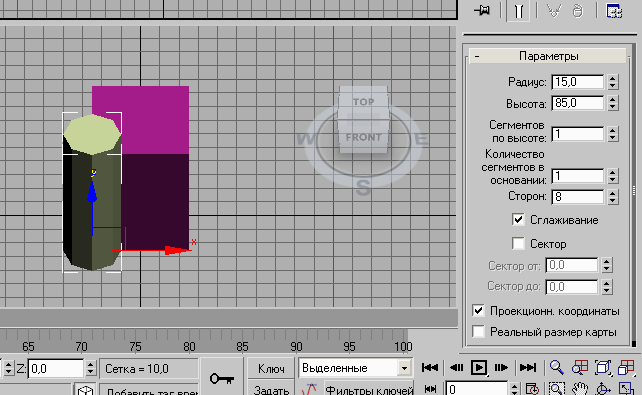
Create a cylinder on 8 side faces and centered on the corner of the cube.
Create a small cube, move it to the top of the cylinder, and turn it so that the result is at least a bit like what is shown in the picture below.

Create another cube of the same kind (or just clone the first one), move it to the other side and rotate as shown.

Repeat the previous paragraph until each face of the cylinder has a cube.

Convert the cylinder to an editable mesh, and attach all 8 small cubes to it.
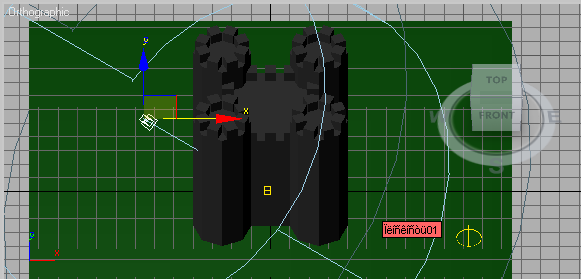
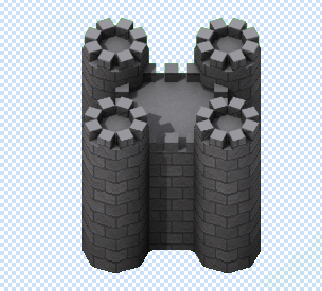
Then copy the "tower" and put a copy on another corner of the cube, and so on, until there are 4 "towers".

Create more small cubes, and put them on a large cube, as in the picture.

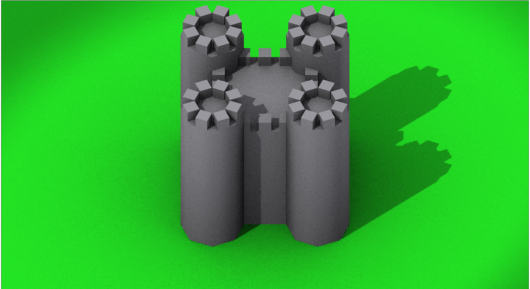
Repaint everything in gray color (yes sadly, but nobody builds violet locks). Add a plane, it's grass, and place the light sources. Personally, I have one skylight, and one sent to the center omni. Do not forget to increase the size of the shadow map, otherwise get ugly shadows.
Render the scene.
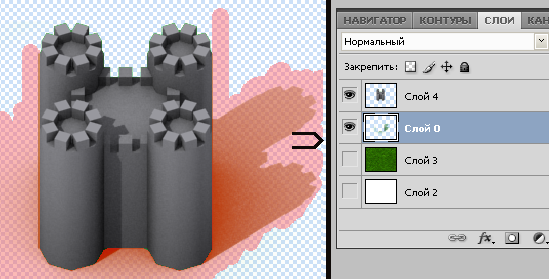
Open the picture in Photoshop, and remove all the greens. I suggest this: take the magic wand, right-click on the green color and select "Color Range". After we move the slider, until we select as much grass as possible, but the lock is intact. Ok, Delete.

Separate the shadow from the castle: quick mask, select the shadow, Ok, Ctrl + C, Delete, Ctrl + V.
Find the grass tile and disguise it all the space behind the castle, admire, hide the grass layer.

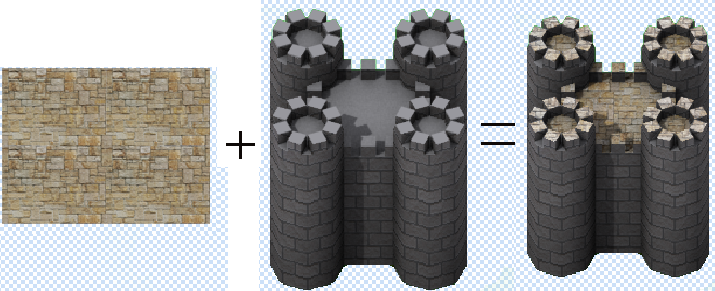
Find the texture of the masonry, put it on the castle, adjust each column of the texture under the tower (see picture), hide the excess, the overlay mode - overlap.
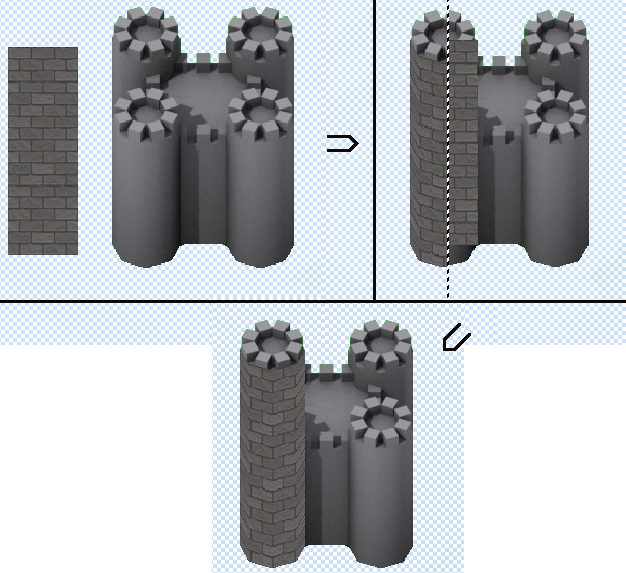
Repeat the previous paragraph for the remaining "towers".
And then for the walls.
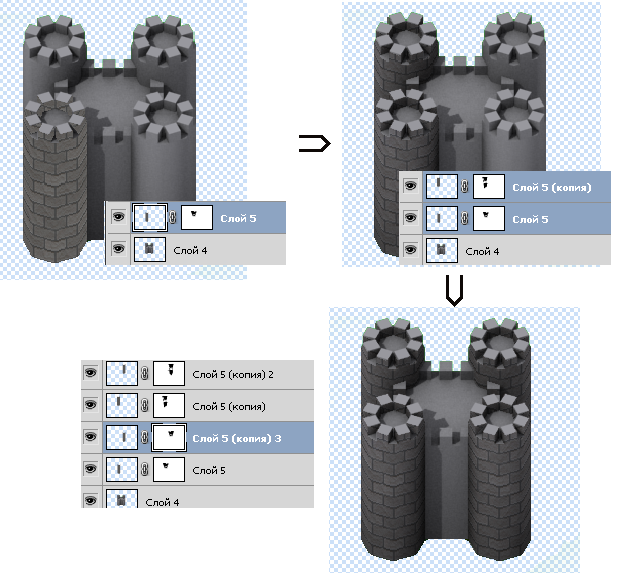
Repeat the same for horizontal planes but with a different texture.
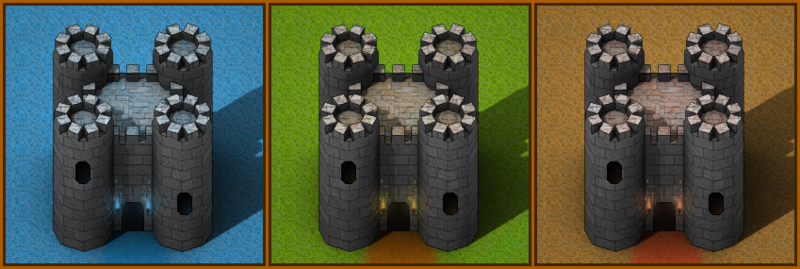
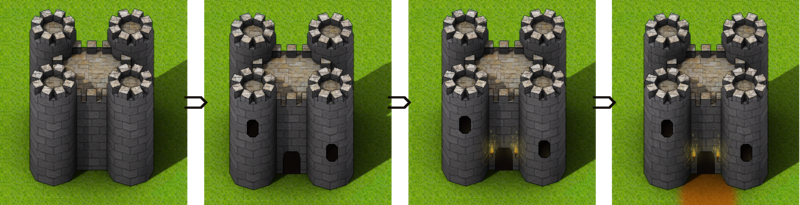
We return the grass, make a stroke, add gates and windows, torches (the evening), erosion of stones and the road.
That's all. Now you know how to create locks.
PS I do not know why, but when modeling I made a green grass-plane, if it is made white, then the shadow will be easier to distinguish.
')
I apologize to the amateurish description of the process, but as I can. Such a lock is created on the basis of a three-dimensional model, the render of which is processed in a graphic editor (a render is an image constructed by visualizing something). More on this method here .
In this article, I will use the 3Dmax and Photoshop packages, simply because I have worked a little with others.
Stage 1 - Simulation
Create a scene. Turn on orthographic projection. Place a cube in the center of the scene.
Create a cylinder on 8 side faces and centered on the corner of the cube.
Create a small cube, move it to the top of the cylinder, and turn it so that the result is at least a bit like what is shown in the picture below.
Create another cube of the same kind (or just clone the first one), move it to the other side and rotate as shown.
Repeat the previous paragraph until each face of the cylinder has a cube.
Convert the cylinder to an editable mesh, and attach all 8 small cubes to it.
Then copy the "tower" and put a copy on another corner of the cube, and so on, until there are 4 "towers".
Create more small cubes, and put them on a large cube, as in the picture.
Repaint everything in gray color (yes sadly, but nobody builds violet locks). Add a plane, it's grass, and place the light sources. Personally, I have one skylight, and one sent to the center omni. Do not forget to increase the size of the shadow map, otherwise get ugly shadows.
Render the scene.
Stage 2 - Painting
Open the picture in Photoshop, and remove all the greens. I suggest this: take the magic wand, right-click on the green color and select "Color Range". After we move the slider, until we select as much grass as possible, but the lock is intact. Ok, Delete.
Separate the shadow from the castle: quick mask, select the shadow, Ok, Ctrl + C, Delete, Ctrl + V.
Find the grass tile and disguise it all the space behind the castle, admire, hide the grass layer.
Find the texture of the masonry, put it on the castle, adjust each column of the texture under the tower (see picture), hide the excess, the overlay mode - overlap.
Repeat the previous paragraph for the remaining "towers".
And then for the walls.
Repeat the same for horizontal planes but with a different texture.
We return the grass, make a stroke, add gates and windows, torches (the evening), erosion of stones and the road.
That's all. Now you know how to create locks.
PS I do not know why, but when modeling I made a green grass-plane, if it is made white, then the shadow will be easier to distinguish.
Source: https://habr.com/ru/post/182110/
All Articles