"Workspace" and "Snippet" in Chrome Dev Tools

Workspace and Snippets - 2 tools in Chrome Dev Tools, the existence of which not everyone knows. These tools simplify web development, so I decided to talk about them today.
Training
It is best to install the latest version of Chrome Canary . In the last stable version, these features can also be activated, but I personally haven’t got Workspace working there.Workspace and Snippets in the latest version of Canary can be used without activating Developer Tools experiments - the tools are available immediately after installing the browser.
')
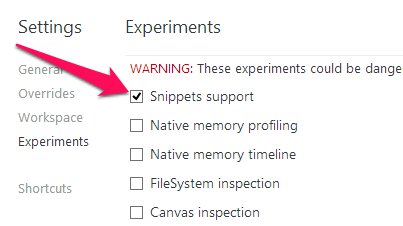
If you decide to try Snippets on a stable version (Workspace for some reason does not work): go to the magic chrome page : // flags / # enable-devtools-experiments and enable support for " Developer Tools experiments ". Restart the browser. After that, in the settings -> Experiments, you need to tick the box " Snippets support " and restart the browser again. The point for non-working Workspace is also there: "File system folders in the Sources Panel".
Workspace or forget about "Save As"
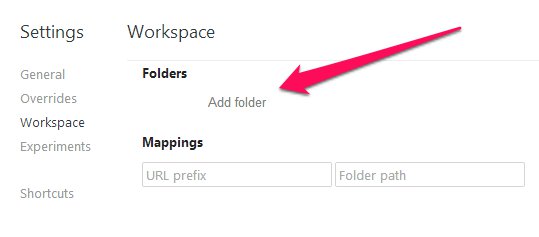
Workspace is the ability to edit files on a local disk from a browser. In addition, you can “snuff” files on the server and files on a local disk so that all changes to the files on the Sources tab are immediately saved to files on the disk.So let's get started. Open the developer panel in your favorite way (for example, Cmd / Ctrl + Shift + I ). Go to the settings (button in the lower right corner). There we find the tab " Workspace ". This is where the necessary local folders and mappings are configured. Do not hesitate, click on the " Add folder " and select the project folder on the local disk.

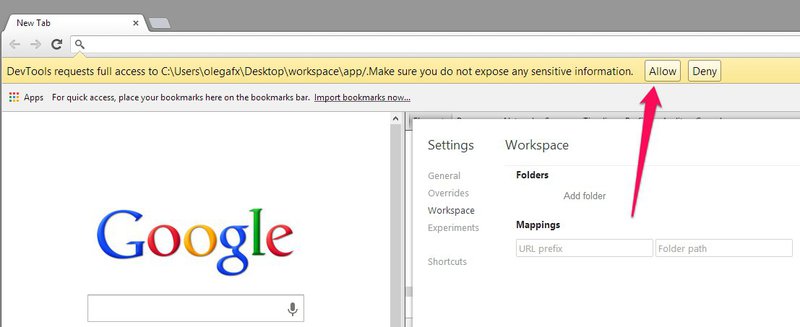
It is very important now to raise the eyes up and see the browser request for access to the folder on the disk. Agree, click " Allow ".
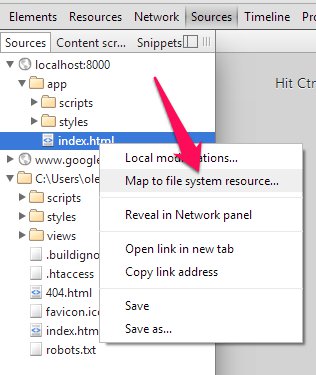
Then there are 2 ways: to the right and, as many like, to the left. Or we set up “mapping” right here, manually type the address in the “URL prefix”, the address of the folder in the “Folder path”. Or close the settings window and go to the Sources tab. In the navigator, both folders will be visible: the current open resource and the local one, which we previously set with you in the settings. Click the right mouse button on any file from this or another folder and click " Map to (file system | network) resource ". Choose with which file you need to “smotit”, if you offer to restart the Inspector - agree.
Everything, now 2 folders in the inspector will turn into one, and all changes will be automatically saved in a local directory.
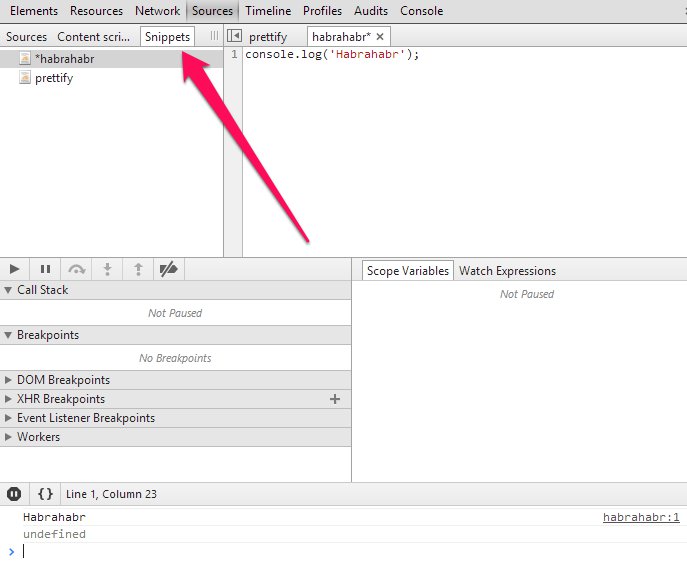
Snipples
Very handy feature. Some often executed piece of code can be rendered separately. You can find everything in the same Sources tab, only in the inspector you need to select the Snippets tab.It's very simple to create: right click -> New . Execute by clicking on the launch icon on the bottom left or Ctrl + Enter .
Conclusion
I hope that 2 of these small utility will greatly help you in the process of web development. I wanted to tell more and more in the video format, but, unfortunately, the absence of a normal microphone did not allow it. All nice coding!Source: https://habr.com/ru/post/181992/
All Articles