We write iOS video player and recorder in 5 minutes
Hello habra people
Under the cat step by step instructions on how to create your application with streaming video under iOS. You'll need XCode, KFOR with a client API, smooth hands (basically optional) and a cup of coffee.
Today we will show how simply and quickly using the BaeS platform Backendless to write an iOS application that can record video on the server and subsequently play it.
')
(Who missed the first post of the Russian-language review of all API of our platform, can find it here .)
Additional information and the algorithm of the API of the media service can be found in the documentation .
So, to start, run "Xcode"
Go File-> New-> Project
-> Select “Single View Application” and click the “Next” button
-> Enter the name of the application, on "SimpleVideoService"
-> Select “iPhone” as a device and click “Next”
-> Choose a place to store your project
Now you have a project with single view.
An application connected to the Backendless platform must be assigned an ID and a private key must be entered. This is done in AppDelegate.m:
Values for APP_ID and SECRET_KEY need to be obtained from the developer’s web console. Login to the console , “create / select” (select or create a new application) and click the “Manage” icon. The default sub-section, App Settings:
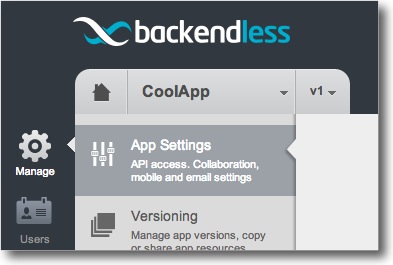
Use the “Copy” buttons to copy the values of the ID and the secret key of the iOS application to your code. Assign the copied values to “APP_ID” and “SECRET_KEY” respectively.
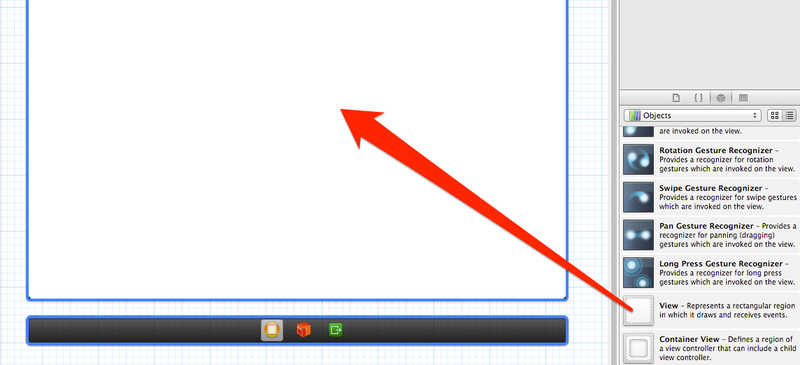
Drag and drop the “View” component into your main window
For convenience, change the background color of the workspace.

Add buttons to control the video stream.

Download SDK for iOS http://backendless.com/downloads , unpack and drag the library onto your project files:

We also need the following standard libraries:

Open ViewController.m, import backendless and define constants as shown below:
Assign the following variables:
Open ViewController.h and declare the * preview property to get the image from the camera and the * playbackView to play the recorded video:
The property * preview must be associated with the "View". To do this, select the “view” component, drag and drop “New Referencing Outlet” to “preview”.

This “view” will be used for the camera. We also need a “view” to play the video. Add an “Image View” and link it to the * playbackView.
Now we need to create button control handlers and add their signature to ViewController.h:
Add the implementation of the methods to ViewController.m.
Video Recording
In line 3, create an instance MediaPublishOptions and bind the component UI, which will show the recorded video.
In line 4 we create publisher. The publisher constructor accepts the stream name, channel name, options and responder. When the user stops recording, we check or currently publish (broadcast) the video, then disconnect from the stream and assign it to the publisher and player nil.
Playing Recorded Video
In line 3, we create the MediaPlaybackOptions instance and pass to the UI component, which will show the recorded video.
In line 4 we create a media player. The constructor accepts the stream name, channel name, options, and responder. Since the respondent points to itself, the ViewController class must implement IMediaStreamerDelegate.
Since we are implementing IMediaStreamerDelegate, we need to add the following code to respond to changes in the stream:
Almost everything is ready, it remains to link the buttons with handlers.
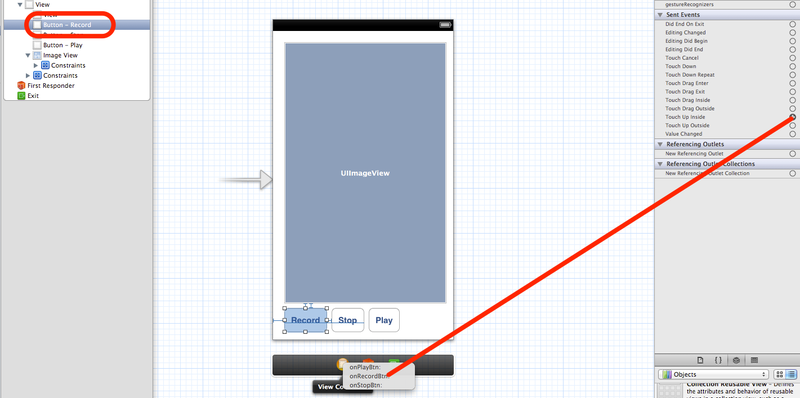
Repeat the same for the remaining buttons.
Everything :). Coffee is finished, the player works. Project code can be downloaded here .
Under the cat step by step instructions on how to create your application with streaming video under iOS. You'll need XCode, KFOR with a client API, smooth hands (basically optional) and a cup of coffee.
Today we will show how simply and quickly using the BaeS platform Backendless to write an iOS application that can record video on the server and subsequently play it.
')
(Who missed the first post of the Russian-language review of all API of our platform, can find it here .)
Description of the media service
Media Services API (media streams) - a set of services providing “play on demand” and live streaming video and audio. Applications can publish streams from a video camera and microphone for recording or live broadcast. Recorded media (video or audio) and live streams can be played on other clients.
Explanation: Media service allows you to stream video or audio from a client application to a server and play this stream on other devices. You can also play media content uploaded using the service file.
Application examples: video conference, video chat, live video broadcast simultaneously with or to all devices (from phone, tablet, PC camera), video or audio recording directly to the server, live audio broadcast (radio, music)
Additional information and the algorithm of the API of the media service can be found in the documentation .
So, to start, run "Xcode"
Go File-> New-> Project
-> Select “Single View Application” and click the “Next” button
-> Enter the name of the application, on "SimpleVideoService"
-> Select “iPhone” as a device and click “Next”
-> Choose a place to store your project
Now you have a project with single view.
An application connected to the Backendless platform must be assigned an ID and a private key must be entered. This is done in AppDelegate.m:
1 #import "AppDelegate.h" 2 #import "Backendless.h" 3 4 // *** *** 5 6 static NSString *APP_ID = @""; 7 static NSString *SECRET_KEY = @""; 8 static NSString *VERSION_NUM = @"v1"; 9 10 @implementation AppDelegate 11 12 - (BOOL)application:(UIApplication *)application didFinishLaunchingWithOptions:(NSDictionary *)launchOptions 13 { 14 [backendless initApp:APP_ID secret:SECRET_KEY version:VERSION_NUM]; 15 return YES; 16 } 17 18 ..... Values for APP_ID and SECRET_KEY need to be obtained from the developer’s web console. Login to the console , “create / select” (select or create a new application) and click the “Manage” icon. The default sub-section, App Settings:
Use the “Copy” buttons to copy the values of the ID and the secret key of the iOS application to your code. Assign the copied values to “APP_ID” and “SECRET_KEY” respectively.
Drag and drop the “View” component into your main window
For convenience, change the background color of the workspace.
Add buttons to control the video stream.
Download SDK for iOS http://backendless.com/downloads , unpack and drag the library onto your project files:
We also need the following standard libraries:
- AudioToolbox.framework
- AVFoundation.framework
- CoreData.framework
- CoreGraphics.framework
- CoreMedia.framework
- CoreVideo.framework
- Libz.dylib
- Security.framework
Open ViewController.m, import backendless and define constants as shown below:
1 #import "Backendless.h" 2 3 #define VIDEO_TUBE @"videoTube" 4 #define STREAM_NAME @"defaultStreamName" Assign the following variables:
1 @interface ViewController () 2 { 3 MediaPublisher *_publisher; 4 MediaPlayer *_player; 5 } Open ViewController.h and declare the * preview property to get the image from the camera and the * playbackView to play the recorded video:
1 @property (strong, nonatomic) IBOutlet UIView *preview; 2 @property (strong, nonatomic) IBOutlet UIImageView *playbackView; The property * preview must be associated with the "View". To do this, select the “view” component, drag and drop “New Referencing Outlet” to “preview”.
This “view” will be used for the camera. We also need a “view” to play the video. Add an “Image View” and link it to the * playbackView.
Now we need to create button control handlers and add their signature to ViewController.h:
1 -(IBAction)onStopBtn:(id)sender; 2 -(IBAction)onPlayBtn:(id)sender; 3 -(IBAction)onRecordBtn:(id)sender; Add the implementation of the methods to ViewController.m.
Video Recording
1 - (void)onRecordBtn:(id)sender 2 { 3 MediaPublishOptions *options = [MediaPublishOptions recordStream:self.preview]; 4 _publisher =[backendless.mediaService publishStream: STREAM_NAME tube:VIDEO_TUBE options:options responder:self]; 5 } In line 3, create an instance MediaPublishOptions and bind the component UI, which will show the recorded video.
In line 4 we create publisher. The publisher constructor accepts the stream name, channel name, options and responder. When the user stops recording, we check or currently publish (broadcast) the video, then disconnect from the stream and assign it to the publisher and player nil.
1 -(void)onStopBtn:(id)sender 2 { 3 if (_publisher) 4 { 5 [_publisher disconnect]; 6 _publisher = nil; 7 } 8 9 if (_player) 10 { 11 [_player disconnect]; 12 _player = nil; 13 } 14 } Playing Recorded Video
1 - (void)onPlayBtn:(id)sender 2 { 3 MediaPlaybackOptions *options = [MediaPlaybackOptions recordStream:self.playbackView]; 4 _player = [backendless.mediaService playbackStream:STREAM_NAME tube:VIDEO_TUBE: options:options responder:self]; 5} In line 3, we create the MediaPlaybackOptions instance and pass to the UI component, which will show the recorded video.
In line 4 we create a media player. The constructor accepts the stream name, channel name, options, and responder. Since the respondent points to itself, the ViewController class must implement IMediaStreamerDelegate.
Since we are implementing IMediaStreamerDelegate, we need to add the following code to respond to changes in the stream:
1 -(void) streamConnectFailed:(id)sender code:(int)code description:(NSString *)description 2 { 3 NSLog(@"<IMediaStreamerDelegate> streamConnectFailed: %d = %@", (int)code, description); 4 [self onStopBtn:sender]; 5 6 NSString *message = (code == -1) ? 7 @"Unable to connect to the server. Make sure the hostname/IP address and port number are valid\n" : 8 [NSString stringWithFormat:@"connectFailedEvent: %@ \n", description]; 9 UIAlertView *av = [[UIAlertView alloc] initWithTitle:@"Error:" message:message delegate:nil cancelButtonTitle:@"Ok" otherButtonTitles:nil]; 10 [av show]; 11 } 12 13 -(void) streamStateChanged:(id)sender state:(StateMediaStream)state description:(NSString *)description 14 { 15 switch (state) { 16 17 case MEDIASTREAM_DISCONNECTED: { 18 19 [self onStopBtn:sender]; 20 break; 21 } 22 23 case MEDIASTREAM_PAUSED: { 24 25 [self onStopBtn:sender]; 26 break; 27 } 28 29 case MEDIASTREAM_PLAYING: { 30 31 // PUBLISHER 32 if (_publisher) { 33 34 if (![description isEqualToString:@"NetStream.Publish.Start"]) { 35 [self onStopBtn:sender]; 36 break; 37 } 38 } 39 40 // PLAYER 41 if (_player) { 42 43 if (![description isEqualToString:@"NetStream.Play.Start"]) { 44 UIAlertView *av = [[UIAlertView alloc] initWithTitle:@"Error:" message:[NSString stringWithString:description] delegate:nil cancelButtonTitle:@"Ok" otherButtonTitles:nil]; 45 [av show]; 46 break; 47 } 48 49 self.playbackView.hidden = NO; 50 } 51 break; 52 } 53 54 default: 55 break; 56 } 57 } Almost everything is ready, it remains to link the buttons with handlers.
Repeat the same for the remaining buttons.
Everything :). Coffee is finished, the player works. Project code can be downloaded here .
Source: https://habr.com/ru/post/181984/
All Articles