Juniper Wireless Systems - First Meet
I got a set of Juniper Networks enterprise-class wireless (Wi-Fi) equipment on my desk. This solution allows you to organize centrally managed networks of global scale based on specialized software, a wide range of controllers and access points. Originally developed by Trapeze (acquired by Juniper in 2010), hardware and software continue to grow rapidly; The 9th software version and the virtual controller will be released soon. With the growing popularity of wireless technologies, the presence of a Wi-Fi module in each mobile device, the trend towards BYOD, the need for a “normal” technical solution arises among a growing number of medium and large enterprises. If you are faced with a choice of equipment supplier, or you have already bought such a system, my post (the first of three on the topic) will help you to orient yourself, to understand what's what, to quickly put the iron into operation.
Traditional wireless networks are built on the basis of "access points" - devices that typically serve one Wi-Fi network (SSID), providing some level of security (authorization, encryption), manageability, and communication with the wired part of the network. Now such devices cost less than $ 100, are well suited for home use, or the tasks of “distributing the Internet” to an office of 10 employees. The need for larger systems with a single center of control has led to the emergence of wireless controllers serving "stupid" access points. In this scheme, the controller manages the centralized authorization, SSID, subscribers roaming, controls the “long-term parameters” of the air: power, frequency, terminates the users' wireless connections to the wired environment. The access point is responsible for receiving / transmitting packets on the air, encrypts radio data, communicates with the controller and transmits user traffic in the tunnel to it. In even larger networks, specialized controllers for a pool of controllers, support for mobility information, and advanced diagnostic and reporting tools are used.
The line of wireless systems manufactured by Juniper Networks is built according to this scheme.
')
In my possession were:
This set is quite enough for most tests, including data roaming and fault tolerance.
The wireless controller is a single-board specialized computer on the PowerPC platform, which runs the operating system MSS (Mobility System Software) version 8.0.2.2, which is based on Linux. WLA-8 has two uplinks and 6 ports with PoE support, for direct connection of access points.

The access point is powered by Ethernet, consumes about 15 watts at a peak. Inside it, the "MSS response part" is loaded from the controller. The device itself is mounted on a weighty metal base (which is also a radiator), has six antennas (three for b / g / n and a / n) to create spatial data streams.

On the basis of the existing equipment, we will try to initialize the system, analyze the initial setup step by step, and try to solve several typical problems. We will configure controllers from the command line, they have no graphical interface, but there is a Ringmaster. In any case, the preparatory stage is just necessary to start.
Do not get tired of repeating. Read the docks. Read them before you start doing something. Of course, “in the course of work,” you can also learn a lot, nevertheless, you save your own time by reading the manufacturer’s documentation to the end so as not to do the obvious nonsense and redo the same thing many times. Manufacturer documentation actually comes down to one big book: the Mobility System Software Configuration Guide . Please do not be lazy to read 1000 pages of simple text.
Before opening the boxes, you must prepare the answers to the following questions:
When initially turned on, or by a quickstart command, the controller enters the configuration initialization mode, which can be controlled via the console port (DB9, 9600/8 / N / 1). You have to answer a number of simple questions:
WLC-1 # quickstart
This will erase any existing config. Continue? [n]: y
Answer the following questions. Enter '?' for help. ^ C to break out
System Name [MX-8]: WLC-1
Country Code [US]: RU ! The choice of country code determines the acceptable operating frequency range of access points - a required parameter
System IP address []: 172.16.130.30
System IP address netmask []: 255.255.255.0
Default route []: 172.16.130.1
Do you need to use 802.1Q tagged ports for connectivity on the default VLAN? [n]: n
Enable Webview [y]:
Admin username [admin]: anton
Admin password [mandatory]: ****
Enable password [optional]: ****
Do you wish to set the time? [y]:
Enter the date (dd / mm / yy) []: 03/06/13
Enter the time (hh: mm: ss) []: 23:41:00
Enter the timezone []: MSK
Enter the offset (without DST) from GMT for 'MSK' in hh: mm [0: 0]: 4: 0
Do you wish to configure wireless? [y]: y ! you are prompted to immediately set up a wireless network
Enter a clear SSID to use: ssid1 ! this is the first wireless network that will be open for connection, with authorization through a web form
Do you want Web Portal authentication? [y]:
Enter a username to be used with the Web Portal, to exit: test
Enter a password for test: ***
Enter a username to be used with Web Portal, to exit:
Do you want to do 802.1x and PEAP-MSCHAPv2? [y]:
Enter a crypto SSID to use: ssid2 ! this second network, with connection authorization
Enter a username with which to do PEAP-MSCHAPv2, to exit: test2
Enter a password for test2: ***
Enter a username with which to do PEAP-MSCHAPv2, to exit:
Do you want to configure access points? [y] :! here you are prompted to immediately configure your local access points
Enter a port number [1-6] on which an AP resides, to exit: 5 ! which port of the controller is connected point
Enter AP model on port 5: WLA532-WW
Enter a port number [1-6] on which an AP resides, to exit:
Do you want to configure distributed access points? [y]: n ! here you are offered to configure the access points connected to the LAN, we will do this later
success: created keypair for ssh
success: Type "save config" to save the configuration
success: change accepted.
* WLC-1 # save config
success: configuration saved.
WLC-1 #
A “ * ” in front of the device name indicates that there are unsaved changes in the current configuration.
After such a “basic setup” the controller works, the access point too, and you can connect to it (via ssid1 and ssid2 networks). Surprisingly, the access point connected directly to the controller operates without any assignment of an IP address to it (its own IP addressing rises there).
The controller is very easy to configure. Enter enable mode, then you have three types of commands: set , clear , show . The “commit” operation, as in JunOS, is missing.
Upon completion of the initial configuration wizard, it is recommended to set a set of additional parameters: your domain name and DNS server addresses, syslog server address, NTP, enable SNMP and set community, set the mobility domain name (for roaming if you have several controllers) and address initial device (seed) of mobility group.
Great, the controller is configured, go to its CLI via ssh (the local console is no longer needed).
Wireless access points are connected either in local mode (to the controller port) or in distributed mode (by IP). In the second case, a DHCP server must be configured in your network, which in addition to the addresses, gives option 43 to the addresses of the controllers (its format is not like Cisco's, but its own). To facilitate the task of setting up access points "out of the box" (recall, the console port and they do not have buttons), there is a command set ap auto mode enable , which "picks up" devices requesting to connect. You can also set the point settings manually using its “fingerprint” (written on a sticker on the case):
set ap 2 serial-id mg0211508096 model WLA532-WW
set ap 2 name WLA-2
set ap 2 blink enable
set ap 2 fingerprint 1a: fb: 2e: d2: ab: e0: 59: 87: a7: 3c: 2a: 20: ec: 2a: 9b: cc
set ap 2 radio 1 mode enable
set ap 2 radio 2 mode enable
An automatically configured access point can later be renamed and renumbered. You can look at the list of connected access points:
WLC-1 # show ap status
The radio is working, we need to determine our wireless network (SSID). You will need to specify her name, encryption settings, authorization:
set service-profile sp-WiFiAccess ssid-name WiFiAccess ! your network name
set service sp-wifiAccess auth-fallthru last-resort
set service-profile sp-WiFiAccess psk-phrase 12345678 ! password (key) - later in the configuration file will be encrypted
set service-profile sp-WiFiAccess wpa-ie auth-dot1x disable ! do not use 802.1x (via RADIUS server)
set service-profile sp-WiFiAccess rsn-ie cipher-ccmp enable ! AES / CCMP, also known as WPA2
set service-profile sp-WiFiAccess rsn-ie auth-psk enable
set service-profile sp-WiFiAccess rsn-ie auth-dot1x disable
set service-profile sp-WiFiAccess rsn-ie enable
set service-profile sp-WiFiAccess attr vlan-name default ! what network (VLAN) are we placing clients
All possible options are given in the documentation. If you plan to use the same network (with the same settings, of course) on several controllers, you need to "propagate" the service-profile and radio-profile segments.
Now you need to set the radio settings - determine the frequency channels, ranges. The default settings are enough for a start, the details are in the documentation.
set radio-profile default auto-tune power-config enable
Now you need to apply the service profiles to the radio profile:
set radio-profile default service-profile sp-WiFiAccess
and try to connect the client to our WiFiAccess wireless network (WPA2-PSK) with the password 12345678 :
WLC-1 # show sessions network
Works!
For corporate use, the authorization that is not protected by one well-known key (password) WPA2-PSK, but a full-fledged 802.1x protocol, using a RADIUS server and an external database, is more suitable. As such, we use FreeRADIUS, working in conjunction with the billing system NETAMS 4.0 .
The user established in billing with a valid subscription to the service is successfully connected when entering the correct individual login-password.
The overall impression of the tested equipment remained good. Roaming and fault tolerance are temporarily overboard. From the point of view of reliability, lack of glitches - there are no complaints. The convenience of configuration and diagnostics via CLI is doubtful, although it has its advantages (save-pastes). In terms of functionality, the Juniper wireless system provides everything needed to build a large and complex system. Compared to the main competitor, Cisco Unified Wireless, the features and capabilities are the same to the smallest detail. There is a significant difference in the naming of the same entities (WLA-access point; service profile-WLAN, remote WLA-FlexConnect), but this is a matter of habit. In any case, both systems are based on the same standards and protocols, and carry the general logic of the organization.
Alas, it is possible to manage a wireless system through the command line (all functionality is available), but it is not convenient (not only users in our century web admin but also admins love a nice GUI). Fortunately, Juniper offers a graphical centralized controller set management system, RingMaster , which will be discussed in the next article.
PS The author is engaged in the design and integration of systems based on equipment from different manufacturers, but not affiliated with them.
0. Principles of the organization of the controller-controlled network
Traditional wireless networks are built on the basis of "access points" - devices that typically serve one Wi-Fi network (SSID), providing some level of security (authorization, encryption), manageability, and communication with the wired part of the network. Now such devices cost less than $ 100, are well suited for home use, or the tasks of “distributing the Internet” to an office of 10 employees. The need for larger systems with a single center of control has led to the emergence of wireless controllers serving "stupid" access points. In this scheme, the controller manages the centralized authorization, SSID, subscribers roaming, controls the “long-term parameters” of the air: power, frequency, terminates the users' wireless connections to the wired environment. The access point is responsible for receiving / transmitting packets on the air, encrypts radio data, communicates with the controller and transmits user traffic in the tunnel to it. In even larger networks, specialized controllers for a pool of controllers, support for mobility information, and advanced diagnostic and reporting tools are used.
1. What does Juniper offer?
The line of wireless systems manufactured by Juniper Networks is built according to this scheme.
- Access points, WLA , are represented by a set of five devices, with one or two radio modules, different numbers of supported MIMO streams, maximum speeds, and the ability to connect external antennas. They are made in the form of "smoke detector" and are designed for installation on the ceiling of the office. Eat through 802.3af PoE, except WLA632 (street version). The connection capabilities of the console, any interface and buttons do not have.
- WLC controllers are five types of hardware and one virtual for VMware, differ in performance (the number of serviced access points), the number and speed of network interfaces, the presence of the second power supply unit. There are models with a built-in small PoE switch designed to directly enable WLA. They have a console port and are configured via the command line.
- The RingMaster software (a Java application), which runs either under Windows or on a separate WLM1200 device (single-computer computer), which can also run additional SmartPass guest access software, is used to control the set of controllers via the GUI.
')
2. What we tested
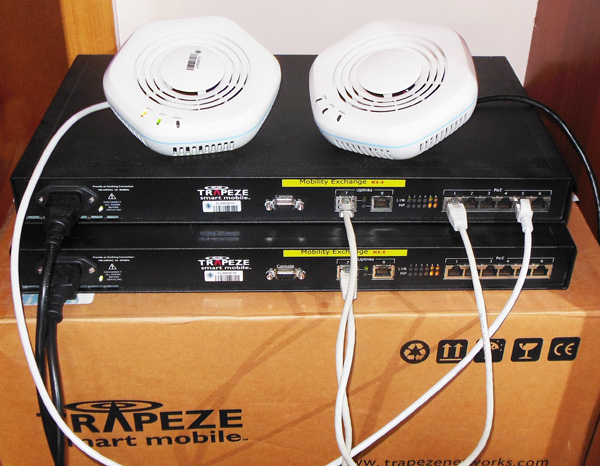
In my possession were:
- WLA-8 controller (aka MX-8) with one power supply unit - two pieces
- WLA532-WW access points - two pieces
- Firewall SRX240H PoE - used as an access point power supply
This set is quite enough for most tests, including data roaming and fault tolerance.
The wireless controller is a single-board specialized computer on the PowerPC platform, which runs the operating system MSS (Mobility System Software) version 8.0.2.2, which is based on Linux. WLA-8 has two uplinks and 6 ports with PoE support, for direct connection of access points.
The access point is powered by Ethernet, consumes about 15 watts at a peak. Inside it, the "MSS response part" is loaded from the controller. The device itself is mounted on a weighty metal base (which is also a radiator), has six antennas (three for b / g / n and a / n) to create spatial data streams.
On the basis of the existing equipment, we will try to initialize the system, analyze the initial setup step by step, and try to solve several typical problems. We will configure controllers from the command line, they have no graphical interface, but there is a Ringmaster. In any case, the preparatory stage is just necessary to start.
3. Preparatory stage
Do not get tired of repeating. Read the docks. Read them before you start doing something. Of course, “in the course of work,” you can also learn a lot, nevertheless, you save your own time by reading the manufacturer’s documentation to the end so as not to do the obvious nonsense and redo the same thing many times. Manufacturer documentation actually comes down to one big book: the Mobility System Software Configuration Guide . Please do not be lazy to read 1000 pages of simple text.
Before opening the boxes, you must prepare the answers to the following questions:
- How many wireless controllers you will have, where you install them, to which LAN ports you connect
- How many access points do you have? Will you connect them to the PoE ports of the controllers, or connect them on the LAN to existing PoE switches?
- What are the parameters of TCP / IP controllers (addresses, VLAN numbers, DNS names) and access points
- What are the parameters of deployed wireless networks - SSID names, authorization methods, which VLAN wraps user traffic, etc.
- Will you have authorization on the RADIUS server online? Through the domain? Through LDAP?
- What are the radio parameters of the network - bands 2.4 and / or 5 GHz, channels
- What are the requirements for roaming clients, support voices over the radio, and so on.
3. Initializing the controller
When initially turned on, or by a quickstart command, the controller enters the configuration initialization mode, which can be controlled via the console port (DB9, 9600/8 / N / 1). You have to answer a number of simple questions:
WLC-1 # quickstart
This will erase any existing config. Continue? [n]: y
Answer the following questions. Enter '?' for help. ^ C to break out
System Name [MX-8]: WLC-1
Country Code [US]: RU ! The choice of country code determines the acceptable operating frequency range of access points - a required parameter
System IP address []: 172.16.130.30
System IP address netmask []: 255.255.255.0
Default route []: 172.16.130.1
Do you need to use 802.1Q tagged ports for connectivity on the default VLAN? [n]: n
Enable Webview [y]:
Admin username [admin]: anton
Admin password [mandatory]: ****
Enable password [optional]: ****
Do you wish to set the time? [y]:
Enter the date (dd / mm / yy) []: 03/06/13
Enter the time (hh: mm: ss) []: 23:41:00
Enter the timezone []: MSK
Enter the offset (without DST) from GMT for 'MSK' in hh: mm [0: 0]: 4: 0
Do you wish to configure wireless? [y]: y ! you are prompted to immediately set up a wireless network
Enter a clear SSID to use: ssid1 ! this is the first wireless network that will be open for connection, with authorization through a web form
Do you want Web Portal authentication? [y]:
Enter a username to be used with the Web Portal, to exit: test
Enter a password for test: ***
Enter a username to be used with Web Portal, to exit:
Do you want to do 802.1x and PEAP-MSCHAPv2? [y]:
Enter a crypto SSID to use: ssid2 ! this second network, with connection authorization
Enter a username with which to do PEAP-MSCHAPv2, to exit: test2
Enter a password for test2: ***
Enter a username with which to do PEAP-MSCHAPv2, to exit:
Do you want to configure access points? [y] :! here you are prompted to immediately configure your local access points
Enter a port number [1-6] on which an AP resides, to exit: 5 ! which port of the controller is connected point
Enter AP model on port 5: WLA532-WW
Enter a port number [1-6] on which an AP resides, to exit:
Do you want to configure distributed access points? [y]: n ! here you are offered to configure the access points connected to the LAN, we will do this later
success: created keypair for ssh
success: Type "save config" to save the configuration
success: change accepted.
* WLC-1 # save config
success: configuration saved.
WLC-1 #
A “ * ” in front of the device name indicates that there are unsaved changes in the current configuration.
After such a “basic setup” the controller works, the access point too, and you can connect to it (via ssid1 and ssid2 networks). Surprisingly, the access point connected directly to the controller operates without any assignment of an IP address to it (its own IP addressing rises there).
The controller is very easy to configure. Enter enable mode, then you have three types of commands: set , clear , show . The “commit” operation, as in JunOS, is missing.
Upon completion of the initial configuration wizard, it is recommended to set a set of additional parameters: your domain name and DNS server addresses, syslog server address, NTP, enable SNMP and set community, set the mobility domain name (for roaming if you have several controllers) and address initial device (seed) of mobility group.
4. Connecting access points
Great, the controller is configured, go to its CLI via ssh (the local console is no longer needed).
Wireless access points are connected either in local mode (to the controller port) or in distributed mode (by IP). In the second case, a DHCP server must be configured in your network, which in addition to the addresses, gives option 43 to the addresses of the controllers (its format is not like Cisco's, but its own). To facilitate the task of setting up access points "out of the box" (recall, the console port and they do not have buttons), there is a command set ap auto mode enable , which "picks up" devices requesting to connect. You can also set the point settings manually using its “fingerprint” (written on a sticker on the case):
set ap 2 serial-id mg0211508096 model WLA532-WW
set ap 2 name WLA-2
set ap 2 blink enable
set ap 2 fingerprint 1a: fb: 2e: d2: ab: e0: 59: 87: a7: 3c: 2a: 20: ec: 2a: 9b: cc
set ap 2 radio 1 mode enable
set ap 2 radio 2 mode enable
An automatically configured access point can later be renamed and renumbered. You can look at the list of connected access points:
WLC-1 # show ap status
 Flags: o = operational [1], c = configure [0], d = download [0], b = boot [0]
        a = auto AP, m = mesh AP, p / P = mesh portal (ena / actv), r = redundant [0]
        z = remote AP in outage, i / i = insecure (control / control + data)
        u = unencrypted, e / E = encrypted (control / control + data)
 Radio: E = enabled - 20MHz channel, S = sentry, s = spectral-data
        W / w = enabled - 40MHz wide channel (HTplus / HTminus)
        D = admin disabled, U = mesh uplink
 IP Address: * = AP behind NAT

 AP Flag IP Address Model MAC Address Radio 1 Radio 2 Uptime
 ---- ---- --------------- ------------ --------------- - ------- ------- ------
    5 o - u Port 5 WLA532-WW 78: 19: f7: 7c: 6a: 40 E 11/13 w112 / 18 02h34m
    2 o - e 172.16.130.110 WLA532-WW 78: 19: f7: 75: 5f: 80 E 6/13 w136 / 21 02h30m
5. Configure service profiles
The radio is working, we need to determine our wireless network (SSID). You will need to specify her name, encryption settings, authorization:
set service-profile sp-WiFiAccess ssid-name WiFiAccess ! your network name
set service sp-wifiAccess auth-fallthru last-resort
set service-profile sp-WiFiAccess psk-phrase 12345678 ! password (key) - later in the configuration file will be encrypted
set service-profile sp-WiFiAccess wpa-ie auth-dot1x disable ! do not use 802.1x (via RADIUS server)
set service-profile sp-WiFiAccess rsn-ie cipher-ccmp enable ! AES / CCMP, also known as WPA2
set service-profile sp-WiFiAccess rsn-ie auth-psk enable
set service-profile sp-WiFiAccess rsn-ie auth-dot1x disable
set service-profile sp-WiFiAccess rsn-ie enable
set service-profile sp-WiFiAccess attr vlan-name default ! what network (VLAN) are we placing clients
All possible options are given in the documentation. If you plan to use the same network (with the same settings, of course) on several controllers, you need to "propagate" the service-profile and radio-profile segments.
6. Configure radio profiles
Now you need to set the radio settings - determine the frequency channels, ranges. The default settings are enough for a start, the details are in the documentation.
set radio-profile default auto-tune power-config enable
Now you need to apply the service profiles to the radio profile:
set radio-profile default service-profile sp-WiFiAccess
and try to connect the client to our WiFiAccess wireless network (WPA2-PSK) with the password 12345678 :
WLC-1 # show sessions network
 User Name SessID Type Address VLAN AP / Rdo
 --------------------- ------ ----- ------------------ - -------------- -------
 LR-WiFiAccess-0 2 * open 172.16.130.112 default 5/2
Works!
Here is the complete config of the controller
 set ip route default 172.16.130.1 1
 set ip dns domain k18.netams.com
 set ip dns enable
 set ip dns server 8.8.8.8 PRIMARY
 set log server 172.16.130.100 severity error
 set system name WLC-1
 set system ip-address 172.16.130.30
 set system countrycode RU
 set timezone MSK 4 0
 set service-profile sp-WiFiAccess ssid-name WiFiAccess
 set service sp-wifiAccess auth-fallthru last-resort
 set service-profile sp-WiFiAccess keep-initial-vlan enable
 set service-profile sp-WiFiAccess psk-encrypted fffffffffffffffffffffffff
 set service-profile sp-WiFiAccess wpa-ie auth-dot1x disable
 set service-profile sp-WiFiAccess rsn-ie cipher-ccmp enable
 set service-profile sp-WiFiAccess rsn-ie cipher-tkip enable
 set service-profile sp-WiFiAccess rsn-ie auth-psk enable
 set service-profile sp-WiFiAccess rsn-ie auth-dot1x disable
 set service-profile sp-WiFiAccess rsn-ie enable
 set service-profile sp-WiFiAccess attr vlan-name default
 set enablepass password fffffffffffffffffffffffff
 set radio-profile default auto-tune power-config enable
 set radio-profile default 11n channel-width-na 20MHz
 set radio-profile default service-profile sp-WiFiAccess
 set ap auto mode enable
 set ap 2 serial-id mg0211508096 model WLA532-WW
 set ap 2 name WLA-2
 set ap 2 blink enable
 set ap 2 fingerprint 1a: fb: 2e: d2: ab: e0: 59: 87: a7: 3c: 2a: 20: ec: 2a: 9b: cc
 set ap 2 radio 1 mode enable
 set ap 2 radio 2 mode enable
 set ap 5 port 5 model WLA532-WW
 set ap 5 radio 1 mode enable
 set ap 5 radio 2 mode enable
 set ip snmp server enable
 set port poe 5 enable
 set snmp protocol v1 disable
 set snmp protocol v2c enable
 set vlan 1 port 1
 set vlan 1 port 2
 set vlan 1 port 3
 set vlan 1 port 4
 set vlan 1 port 6
 set vlan 1 port 7
 set vlan 1 port 8
 set interface 1 ip 172.16.130.30 255.255.255.0
 set snmp community name CommunityRO access read-only
 set mobility-domain mode seed domain-name LocalMobilityDomain
 set mobility-domain member 172.16.130.31
 set security acl name portalacl permit udp 0.0.0.0 255.255.255.255 eq 68 0.0.0.0 255.255.255.255 eq 67
 set security acl name portalac 0.0.0.0 capture 255.255.255.255 capture
 commit security acl portalacl
 set ntp enable
 set ntp server 83.143.51.50
7. Authorization through 802.1x
For corporate use, the authorization that is not protected by one well-known key (password) WPA2-PSK, but a full-fledged 802.1x protocol, using a RADIUS server and an external database, is more suitable. As such, we use FreeRADIUS, working in conjunction with the billing system NETAMS 4.0 .
  set service-profile Secure-DOT1X ssid-name DOT1X
  set service-profile Secure-DOT1X 11n short-guard-interval disable
  set service-profile Secure-DOT1X rsn-ie cipher-ccmp enable
  set service-profile Secure-DOT1X rsn-ie enable
  set service-profile Secure-DOT1X attr vlan-name default
  set radius server debian64 address 172.16.130.13 timeout 5 retransmit 3 deadtime 5 encrypted-key 0832494d1b1c11
  set radius server debian64 mac-addr-format colons

  set radio-profile default service-profile Secure-DOT1X

  set server group debian64-group members debian64
  set accounting dot1x ssid DOT1X ** start-stop debian64-group
  set authentication dot1x ssid DOT1X ** pass-through debian64-group
The user established in billing with a valid subscription to the service is successfully connected when entering the correct individual login-password.
8. Results
The overall impression of the tested equipment remained good. Roaming and fault tolerance are temporarily overboard. From the point of view of reliability, lack of glitches - there are no complaints. The convenience of configuration and diagnostics via CLI is doubtful, although it has its advantages (save-pastes). In terms of functionality, the Juniper wireless system provides everything needed to build a large and complex system. Compared to the main competitor, Cisco Unified Wireless, the features and capabilities are the same to the smallest detail. There is a significant difference in the naming of the same entities (WLA-access point; service profile-WLAN, remote WLA-FlexConnect), but this is a matter of habit. In any case, both systems are based on the same standards and protocols, and carry the general logic of the organization.
Alas, it is possible to manage a wireless system through the command line (all functionality is available), but it is not convenient (not only users in our century web admin but also admins love a nice GUI). Fortunately, Juniper offers a graphical centralized controller set management system, RingMaster , which will be discussed in the next article.
PS The author is engaged in the design and integration of systems based on equipment from different manufacturers, but not affiliated with them.
Source: https://habr.com/ru/post/181868/
All Articles