Two networks with one cable between Mikrotik Router OS and Shibby Tomato USB on Netgear WNR3500L
Prerequisites
Initially, there was a Mikrotik router, which is also an access point. On the wired and wireless networks have been allocated different addressing. This is convenient if a laptop connected via a wireless network requires high-speed access to local resources (network storage) over a gigabit wire.But, the trouble is, the network was used from two floors, and there was only one wired access. And the quality of wireless communication on the floor without a dot left much to be desired. In addition, the unused Netgear WNR3500L was available.
Nothing foreshadowed trouble
Officially, Shibby TomatoUSB supports tagged vlans and even, in an experimental way, allows you to reassign VIDs (only 15 Vlans are available, and without reassigning their VIDs, respectively, from 1 to 15). The solution seems to lie on the surface.On Mikrotika
We create two vlans on the Netgir port of connection, we unite one vlan into a bridge with a wireless interface, and the other with a master interface of the blackboard switch. How to do this, I will not describe, because there is a detailed comprehensive documentation on the Mikrotik Router OS. Addressing, DHCP server, IGMP (for DLNA operation between networks) and other settings are re-weighted for newly created bridges.On Netgir
Theoretically, we need to take two Vlans via WAN and distribute without tags to the LAN switch and the wireless interface, respectively. But if everything is simple with a wired network, then what to do with a wireless one?Advanced → VLAN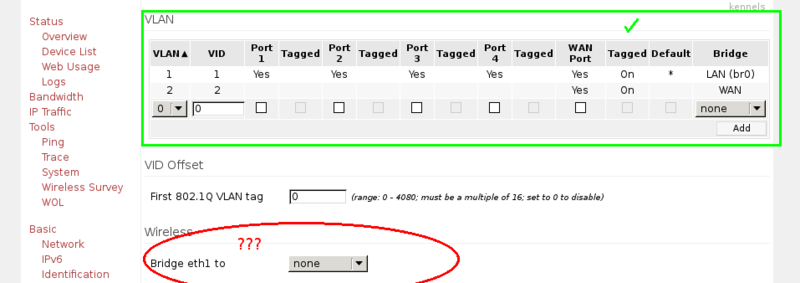
We would connect it to the bridge with the appropriate vlan, just like at Mikrotik. But the web interface of tomato does not allow this. Just as it does not allow you to enable the WiFi interface in the vlan (looking ahead, I will say that this possibility is not provided at the iron level, if I figured out enough in the code). Dead end.Dive
The problem with the firmware used is that with the minimum help on the web interface, the internals are documented a little less than nothing. Only the study of the source of the firmware allowed me to get the knowledge that led me to the solution of the problem. I'll share them with you.Before experimenting
A small pre-setting will save you a lot of time and nerves.Fig. 1 : Enable ICMP response.
Advanced → Firewall
Fig. 2 : turn on the SSH server, turn off the telnet and enter your public key.Administration → Admin Access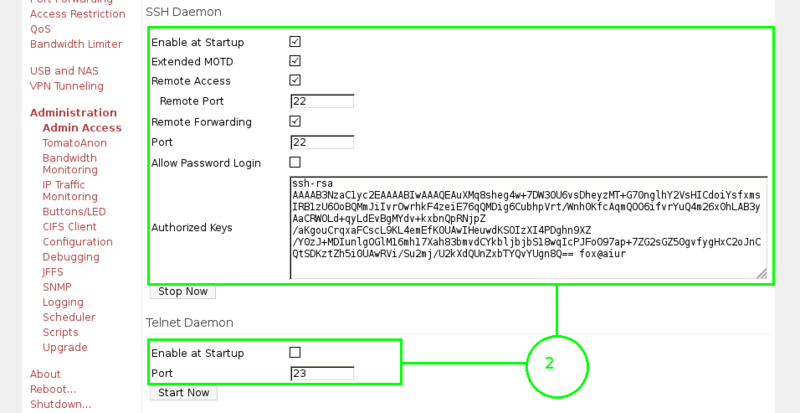
Fig. 3 : in case something goes wrong, we will prepare a script that returns the network settings to its original state, and hang its execution on the WPS button. Otherwise, with every unsuccessful action with the network, we will be forced to reset the router to the default configuration and load a backup of the configuration (yes, did you make a backup before starting to break down?). The procedure takes about five minutes and with regular performance pretty nervous.Administration → Button / LED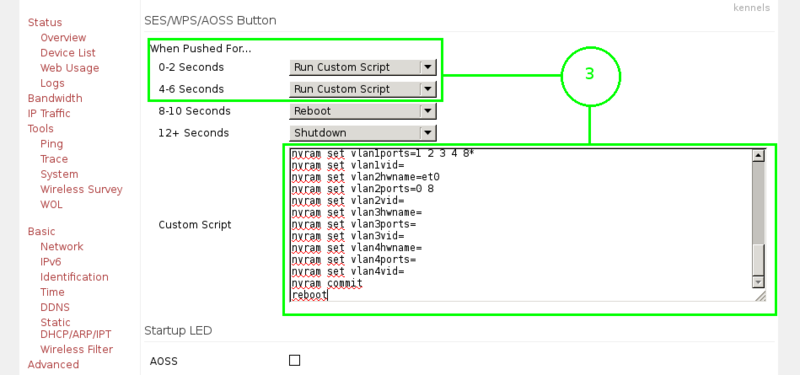
Custom script
The current values to be included in the script can be obtained with the nvram show command. If you have a gigabit router and a megabit router, change the eight in the vlan X ports parameters to the top five.nvram set lan1_ifname= nvram set lan1_ifnames= nvram set lan1_ipaddr= nvram set lan1_netmask= nvram set lan1_proto= nvram set lan1_stp= nvram set lan_desc=1 nvram set lan_dhcp=0 nvram set lan_domain= nvram set lan_gateway=<gw> nvram set lan_hostname=<hostname> nvram set lan_hwaddr=<mac addr> nvram set lan_hwnames= nvram set lan_ifname=br0 nvram set lan_ifnames=vlan1 nvram set lan_invert=0 nvram set lan_ipaddr=<ip> nvram set lan_lease=86400 nvram set lan_netmask=<netmask> nvram set lan_proto=static nvram set lan_route= nvram set lan_state=1 nvram set lan_stp=0 nvram set lan_wins= nvram set landevs=vlan1 nvram set vlan1hwname=et0 nvram set vlan1ports=1 2 3 4 8* nvram set vlan1vid= nvram set vlan2hwname=et0 nvram set vlan2ports=0 8 nvram set vlan2vid= nvram set vlan3hwname= nvram set vlan3ports= nvram set vlan3vid= nvram set vlan4hwname= nvram set vlan4ports= nvram set vlan4vid= nvram commit reboot And actually setting
Fig. 4 : in order for the WAN to be in the UP state, the firmware obliges us to configure anything on it over the Ethernet: even an IP, even a tunnel. The disable value will make the port completely inactive, and combining it with a LAN switch is not what we want. It would be possible to hang on it any ip-address, but there is a possibility of routing sticking in the future. Address 0.0.0.0 will also turn off the port. The optimal solution is to assign an address to the link-local interface.Fig. 5 : in our case it is useless to specify the default gateway in this field. (Internet access may be necessary for the router for several reasons. First, it is time synchronization. Also, I use the Tomato build with the torrent client).
Fig. 6 : even though the web interface does not allow to combine the vlan and the wireless network into a bridge, the firmware itself can do this. Therefore, we configure the second bridge. The bridges are assigned addresses from the blocks allocated earlier on Mikrotik for wired and wireless networks, respectively.
Fig. 7 : but the DNS servers indicated on this tab, as opposed to the default gateway, will work.
Basic → Network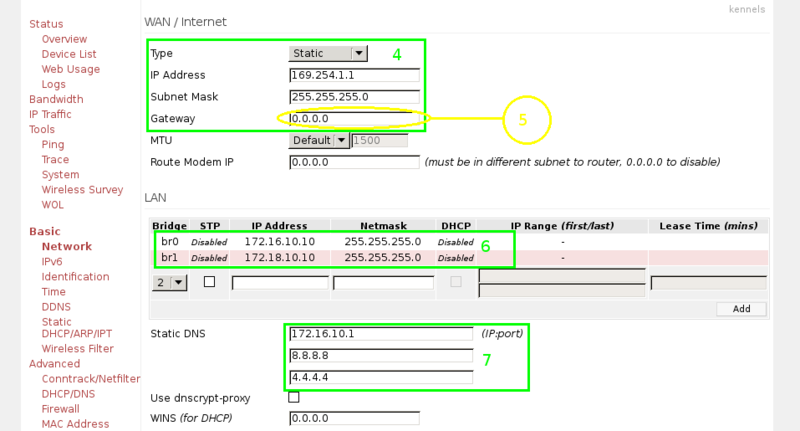
Fig. 8 : we will specify the default route manually as static.Advanced → Routing
Fig. 9 : skip both vlans with tags on the WAN port.Fig. 10 : we add the wireless interface to the second bridge created earlier. While the wireless network will be the only component of the bridge.
Fig. 11 : and here attention! Practice has shown that this functionality does not work on the router in use, so you will have to use those VIDs that are available on Netgire: from the first to the fifteenth.
Advanced → VLAN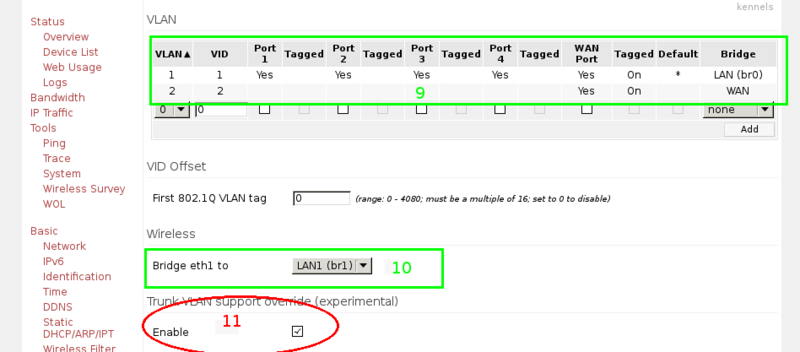
And now the promised dismemberment
Of the console utilities, we are primarily interested in nvram and robocfg . The first allows you to interact with the flash-memory area, in which the firmware configuration is stored as an array of pairs variable = value . The second is to manage the configuration of vlans on the ports. However, further work with vlans is not required for the situation described. We also have standard ifconfig , vconfig , brctl and ip .After examining the list of interfaces, we will see that there are two bridges (they configured themselves), two Ethernet interfaces ( eth0 is a wired network, eth1 is wireless) and two vlans. The WAN port did not receive a separate ezernet interface. With the help of some strong witch, a vlan appears on his behalf, assigned to the virtual WAN bridge on the Advanced → VLAN page of the web interface.
To take a look at the configuration, run the command
nvram show Of interest are the parameters starting with wan_ and lan . The first group of parameters describes, as it is easy to guess, the WAN interface, and the second is nothing more than a list of bridges. In total there can be up to four of them in the system, one of which is mandatory (group of parameters lan_ ).It is wan_ifnameX that points to the one that becomes WAN. And lan X _ifnames - contains a list of interfaces included in the bridge. Knowing this, we can do what the web interface does not allow - to combine the vlan and the wireless network into a bridge.
nvram set lan1_ifnames=vlan2 eth1 nvram commit reboot ProfitIt remains to set up a wireless network with a key and a name similar to that of the first point.
At last
The vlan X _ parameter set describes 15 vlans that we can configure on the router. Parameter hwname - the name of the interface driver; ports - ports that the vlan goes to: 0 - WAN, 1-4 - switch ports, 8 (for 100MB - 5) - the virtual port of the processor must be present in each vlan. The letter t after the port number means that on this port the vlan will be tagged. The asterisk is “vlan by default”, this vlan inside the switch tagged packets that came without a tag. The vid parameter sets the alternative VID for the vlan. But this functionality, as mentioned above, does not work.I did not find the ports parameter mention in the code, except for the source code of the robocfg utility. Apparently, it is used by the driver, which is supplied in binary form.
')
Source: https://habr.com/ru/post/181780/
All Articles