A simple blog with comments on Django: development and deployment for the smallest
This article is intended for newcomers to web programming and covers the issues of developing a Django blog using Twitter Bootstrap and deploying it to PythonAnywhere free hosting. I tried to write as much as possible easier and more clearly. For more experienced users, this reading will not tell anything new, and some tricks may seem ineffective.
I assume that the reader is already familiar with the syntax of Python, has a minimal understanding of Django (for a start, it is good to get trained on http://codeacademy.com on the relevant topic and read the tutorial on Django ), and also knows how to work on the command line.
So, we start with the organization of the working environment on the local computer. In principle, any operating system in which you feel confident will be suitable for our requests, here I describe the process for GNU / Linux, and for other systems the steps may differ slightly. The system must have virtualenv installed - a utility for creating an isolated working environment (so that the libraries we use do not interfere with other programs and projects).
')
Create and activate the environment:
On Windows, the last command should be:
Install Django using the Python pip package manager.
Create a new project. Let's call it somehow original - for example, mysite.
The script will work and create a mysite directory with another mysite directory and several * .py files inside.
Use the manage.py script to create a django application called blog.
Let's edit the settings in the mysite / settings.py file (note: I mean ~ / projects / mysite / mysite / settings.py) by adding the following to it:
In the first line, we indicate the encoding in which we work, in order to avoid confusion and glitches, I propose to indicate it in all changeable * .py files, re-encoding them, respectively, in UTF-8.
The full path to our project will be stored in BASE_DIR to use relative paths for further configuration
We will set up a database, in our project it is quite possible to use SQLite
Set the time zone and language:
In order for Django to find out about the created application, add a “blog” to the INSTALLED_APPS tuple, and also uncomment the line “django.contrib.admin” to enable the built-in admin panel:
To admin work, edit the mysite / urls.py
Create a model in blog / models.py
Based on this model, Django will automatically create tables in the database.
We register it in the admin blog / admin.py
Create tables with the command:
When you first call this command, Django will offer to create a superuser, we will use this offer.
We start the debug server that provides Django:
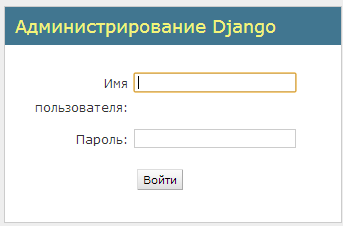
Now enter the url in the browser
http: // localhost: 8000 / admin /
If everything went well, we should see this:
We go with the previously created login / password in the admin panel - now we have the ability to add and delete posts (buttons to the right of Posts)
Let's create some posts for debugging.
Now let's create the frontend, we need only two template pages - one with a listing of all the posts, the second - the content of the post.
Edit the blog / views.py
Add a line to urlpatterns mysite / urls.py
To ensure that all URLs starting with / blog / will be processed using urls.py from the blog module, and create the urls.py file in the blog directory with the following content:
Now you need to create page templates. By default, for the PostListView class, Django will search for a template in blog / templates / blog / post_list.html (such a long and strange path is related to the framework logic, the developer’s power to change this behavior, but I don’t touch on this in this article)
create this file:
Well, let's try how everything works by going to the URL at http: // localhost: 8000 / blog / . If there are no errors, we will see a list of posts, where the title of each post is a link.
While these links lead nowhere, you need to fix it. By default, for the PostDetailView class, the template is in blog \ templates \ blog \ post_detail.html.
Create it:
And check again: http: // localhost: 8000 / blog / 1 /
Add the ability to comment on our records, for this purpose we will use the services DISQUS , which we will install using pip
This module provides commentary functionality, with anti-spam protection, avatars and other things, and also takes care of their storage:
Add to post_detail.html before {% endblock%}
In the INSTALLED_APPS file settings.py add 'disqus'
And also add in settings.py
The last two values are obtained by registering on http://disqus.com .
We test the project in the browser. Great, the functionality of our application inspires, but we need to do something with the design. The simplest, and at the same time modern version, is to use Twitter Bootstrap.
Download the archive http://twitter.imtqy.com/bootstrap/assets/bootstrap.zip and unzip it into the static directory of our project (I mean ~ / projects / mysite / static - create it)
Edit settings.py so that Django knows where to look for static pages.
Create a blog / templates / blog / base.html file with the following content
This is the main template for our pages, we include it in post_list.html and post_detail.html by adding the first line to them
We check the performance. Now the beauty is imposed, you can proceed with the deployment of the application on a free cloud hosting.
Registering a free N00b account in PythonAnywhere . I liked this service ease of installation Django, everything happens almost the same as on the local computer.
Suppose we created a user in PythonAnywhere named djangotest, then our application will be located at djangotest.pythonanywhere.com . Attention: substitute djangotest for your PythonAnywhere login later.
Change in settings.py
and append
Uploading files to the hosting in any of the available ways.
In my opinion, for an inexperienced user, the easiest way is to archive the project folder, upload the archive to the server (in the Files-> Upload a file section) and unzip it on the server with a command in the bash shell (Consoles Section -> bash):
for example, if we uploaded the file mysite.tar.gz then we execute in the console PythonAnywhere
Now we set up the working environment on the server, enter into the PythonAnywhere console:
Configure static pages in the Web -> Static files section:
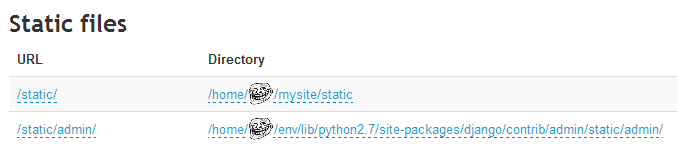
In the first line - the place where the bootstrap lies, in the second there are static files of the built-in Django admin panel.
Configuring WSGI (Web -> It is configured via a WSGI file stored at: ...):
Click the Web button -> Reload djangotest.pythonanywhere.com
We go to djangotest.pythonwewere.com/blog/ - congratulations, it was not easy, but you did it. Now you have your own cozy blog, designed with your own hands on the most modern web technologies!
I assume that the reader is already familiar with the syntax of Python, has a minimal understanding of Django (for a start, it is good to get trained on http://codeacademy.com on the relevant topic and read the tutorial on Django ), and also knows how to work on the command line.
So, we start with the organization of the working environment on the local computer. In principle, any operating system in which you feel confident will be suitable for our requests, here I describe the process for GNU / Linux, and for other systems the steps may differ slightly. The system must have virtualenv installed - a utility for creating an isolated working environment (so that the libraries we use do not interfere with other programs and projects).
')
Create and activate the environment:
mkdir ~/projects cd ~/projects virtualenv env source env/bin/activate On Windows, the last command should be:
env\Scripts\activate Install Django using the Python pip package manager.
pip install django Create a new project. Let's call it somehow original - for example, mysite.
django-admin.py startproject mysite && cd mysite The script will work and create a mysite directory with another mysite directory and several * .py files inside.
Use the manage.py script to create a django application called blog.
python manage.py startapp blog Let's edit the settings in the mysite / settings.py file (note: I mean ~ / projects / mysite / mysite / settings.py) by adding the following to it:
# coding: utf-8 import os BASE_DIR = os.path.dirname(os.path.dirname(__file__)) In the first line, we indicate the encoding in which we work, in order to avoid confusion and glitches, I propose to indicate it in all changeable * .py files, re-encoding them, respectively, in UTF-8.
The full path to our project will be stored in BASE_DIR to use relative paths for further configuration
We will set up a database, in our project it is quite possible to use SQLite
DATABASES = { 'default': { 'ENGINE': 'django.db.backends.sqlite3', 'NAME': os.path.join(BASE_DIR, 'db.sqlite3'), } } Set the time zone and language:
TIME_ZONE = 'Europe/Moscow' LANGUAGE_CODE = 'ru-ru' In order for Django to find out about the created application, add a “blog” to the INSTALLED_APPS tuple, and also uncomment the line “django.contrib.admin” to enable the built-in admin panel:
INSTALLED_APPS = ( 'django.contrib.auth', 'django.contrib.contenttypes', 'django.contrib.sessions', 'django.contrib.sites', 'django.contrib.messages', 'django.contrib.staticfiles', 'django.contrib.admin', 'blog', ) To admin work, edit the mysite / urls.py
from django.conf.urls import patterns, include, url from django.contrib import admin admin.autodiscover() # admin.py urlpatterns = patterns('', url(r'^admin/', include(admin.site.urls)), #URL http://_/admin/ ) Create a model in blog / models.py
from django.db import models class Post(models.Model): title = models.CharField(max_length=255) # datetime = models.DateTimeField(u' ') # content = models.TextField(max_length=10000) # def __unicode__(self): return self.title def get_absolute_url(self): return "/blog/%i/" % self.id Based on this model, Django will automatically create tables in the database.
We register it in the admin blog / admin.py
from django.contrib import admin from blog.models import Post # blog/models.py admin.site.register(Post) Create tables with the command:
python manage.py syncdb When you first call this command, Django will offer to create a superuser, we will use this offer.
We start the debug server that provides Django:
python manage.py runserver Now enter the url in the browser
http: // localhost: 8000 / admin /
If everything went well, we should see this:
We go with the previously created login / password in the admin panel - now we have the ability to add and delete posts (buttons to the right of Posts)
Let's create some posts for debugging.
Now let's create the frontend, we need only two template pages - one with a listing of all the posts, the second - the content of the post.
Edit the blog / views.py
from blog.models import Post from django.views.generic import ListView, DetailView class PostsListView(ListView): # model = Post # class PostDetailView(DetailView): # model = Post Add a line to urlpatterns mysite / urls.py
url(r'^blog/', include('blog.urls')), To ensure that all URLs starting with / blog / will be processed using urls.py from the blog module, and create the urls.py file in the blog directory with the following content:
#coding: utf-8 from django.conf.urls import patterns, url from blog.views import PostsListView, PostDetailView urlpatterns = patterns('', url(r'^$', PostsListView.as_view(), name='list'), # URL http://_/blog/ # url(r'^(?P<pk>\d+)/$', PostDetailView.as_view()), # URL http://_/blog// # ) Now you need to create page templates. By default, for the PostListView class, Django will search for a template in blog / templates / blog / post_list.html (such a long and strange path is related to the framework logic, the developer’s power to change this behavior, but I don’t touch on this in this article)
create this file:
{% block content %} {% for post in object_list %} <p>{{ post.datetime }}</p> <h2><a href="{{ post.get_absolute_url }}">{{ post.title }}</a></h2> <p>{{ post.content }}</p> {% empty %} <p> </p> {% endfor %} {% endblock %} Well, let's try how everything works by going to the URL at http: // localhost: 8000 / blog / . If there are no errors, we will see a list of posts, where the title of each post is a link.
While these links lead nowhere, you need to fix it. By default, for the PostDetailView class, the template is in blog \ templates \ blog \ post_detail.html.
Create it:
{% block content %} <p>{{ post.datetime }}</p> <h2>{{ post.title }}</h2> <p>{{ post.content }}</p> {% endblock %} And check again: http: // localhost: 8000 / blog / 1 /
Add the ability to comment on our records, for this purpose we will use the services DISQUS , which we will install using pip
pip install django-disqus This module provides commentary functionality, with anti-spam protection, avatars and other things, and also takes care of their storage:
Add to post_detail.html before {% endblock%}
<p> {% load disqus_tags %} {% disqus_dev %} {% disqus_show_comments %} </p> In the INSTALLED_APPS file settings.py add 'disqus'
INSTALLED_APPS = ( 'django.contrib.auth', 'django.contrib.contenttypes', 'django.contrib.sessions', 'django.contrib.sites', 'django.contrib.messages', 'django.contrib.staticfiles', 'django.contrib.admin', 'blog', 'disqus', ) And also add in settings.py
DISQUS_API_KEY = '***' DISQUS_WEBSITE_SHORTNAME = '***' The last two values are obtained by registering on http://disqus.com .
We test the project in the browser. Great, the functionality of our application inspires, but we need to do something with the design. The simplest, and at the same time modern version, is to use Twitter Bootstrap.
Download the archive http://twitter.imtqy.com/bootstrap/assets/bootstrap.zip and unzip it into the static directory of our project (I mean ~ / projects / mysite / static - create it)
Edit settings.py so that Django knows where to look for static pages.
STATICFILES_DIRS = ( os.path.join(BASE_DIR, 'static'), ) Create a blog / templates / blog / base.html file with the following content
<!DOCTYPE html> <html lang="ru"> <head> <meta charset="utf-8" /> <title>MyBlog</title> <link href="{{STATIC_URL}}bootstrap/css/bootstrap.css" rel="stylesheet"> <style> body { padding-top: 60px; /* 60px to make the container go all the way to the bottom of the topbar */ } </style> <link href="{{STATIC_URL}}bootstrap/css/bootstrap-responsive.css" rel="stylesheet"> <!--[if lt IE 9]> <script src="http://html5shim.googlecode.com/svn/trunk/html5.js"></script> <![endif]--> <script src="{{STATIC_URL}}bootstrap/js/bootstrap.js" type="text/javascript"></script> {% block extrahead %} {% endblock %} <script type="text/javascript"> $(function(){ {% block jquery %} {% endblock %} }); </script> </head> <body> <div class="navbar navbar-inverse navbar-fixed-top"> <div class="navbar-inner"> <div class="container"> <div class="brand">My Blog</div> <ul class="nav"> <li><a href="{% url 'list' %}" class=""> </a></li> </ul> </div> </div> </div> <div class="container"> {% block content %}Empty page{% endblock %} </div> <!-- container --> </body> </html> This is the main template for our pages, we include it in post_list.html and post_detail.html by adding the first line to them
{% extends 'blog/base.html' %} We check the performance. Now the beauty is imposed, you can proceed with the deployment of the application on a free cloud hosting.
Registering a free N00b account in PythonAnywhere . I liked this service ease of installation Django, everything happens almost the same as on the local computer.
Suppose we created a user in PythonAnywhere named djangotest, then our application will be located at djangotest.pythonanywhere.com . Attention: substitute djangotest for your PythonAnywhere login later.
Change in settings.py
DEBUG = False and append
ALLOWED_HOSTS = ['djangotest.pythonanywhere.com'] Uploading files to the hosting in any of the available ways.
In my opinion, for an inexperienced user, the easiest way is to archive the project folder, upload the archive to the server (in the Files-> Upload a file section) and unzip it on the server with a command in the bash shell (Consoles Section -> bash):
for example, if we uploaded the file mysite.tar.gz then we execute in the console PythonAnywhere
tar -zxvf mysite.tar.gz Now we set up the working environment on the server, enter into the PythonAnywhere console:
virtualenv env source env/bin/activate pip install django django-disqus Configure static pages in the Web -> Static files section:
In the first line - the place where the bootstrap lies, in the second there are static files of the built-in Django admin panel.
Configuring WSGI (Web -> It is configured via a WSGI file stored at: ...):
activate_this = '/home/djangotest/env/bin/activate_this.py' execfile(activate_this, dict(__file__=activate_this)) import os import sys path = '/home/djangotest/mysite' if path not in sys.path: sys.path.append(path) os.environ['DJANGO_SETTINGS_MODULE'] = 'mysite.settings' import django.core.handlers.wsgi application = django.core.handlers.wsgi.WSGIHandler() Click the Web button -> Reload djangotest.pythonanywhere.com
We go to djangotest.pythonwewere.com/blog/ - congratulations, it was not easy, but you did it. Now you have your own cozy blog, designed with your own hands on the most modern web technologies!
Source: https://habr.com/ru/post/181556/
All Articles