Windows 8 Custom Installation Guide
Introduction
Today I want to talk about how to create your own installation image of Windows 8, with all the installed updates, programs and user settings.
The use of such an assembly automates the work of the system administrator to install and configure the operating system. It is especially important for those cases when it is necessary to install a set of programs of the same type on a large number of computers. The guide will also be useful for those who just want to create their own installation image of Windows 8 with a set of programs and drivers used by it.
This manual covers the preparation of such an assembly, the creation of a bootable USB flash drive and the recording of the resulting assembly on a USB flash drive. Also, the resulting image can be installed later on using Network Deployment Services (WDS) on any number of computers in a corporate network, but this is the topic of the next guide.
')
The text is designed for novice users, so sometimes the simplest things are explained and illustrated.
Resources
We will need in the course of the following artifacts
An image of the Windows 8 installation disk in ISO format
I made my choice in favor of Windows 8 Enterprise x64.
I will explain why. The choice of Enterprise edition is determined by the maximum functionality that this edition provides.
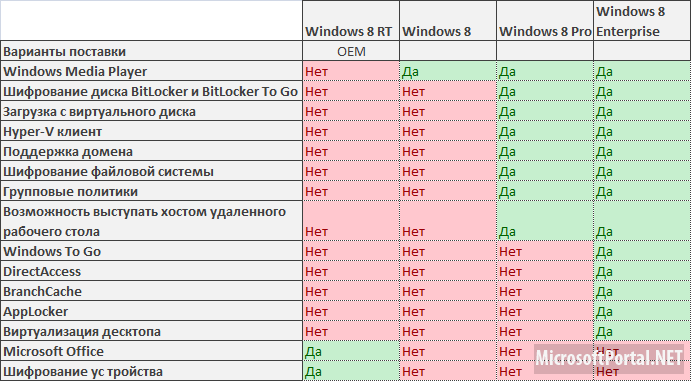
But in principle, for home use it is also possible to use the Professional edition, here at will.
X64 hardware platform. The choice of 64-bit version of the system is due to several crucial factors.
1. For a 32-bit system (x86), only 3.24 GB of address space is available. Today, 4 GB is not so much. And many new laptops and desktops are sold with a memory capacity of 6 GB or higher. Therefore, the choice is unambiguous in favor of a 64-bit system, which does not have such limitations. More details about the differences between the editions of Windows 8 can be found on the Microsoft website.
2. The resulting image will most likely be larger than 4GB. My installation image with a "gentleman's" set of programs (including MS Office 2013) is 7.5 GB. When installing a 32-bit version of Windows, if the size of the image will be more than 4GB, an error will be issued. When using the installation of the 64-bit version, there are no such problems. Those who want to create their own build based on a 32-bit Windows installation image, keep this fact in mind. In this case, the size of the deployed distribution kit with all installed programs should occupy approximately 12 GB, and then later, when it is compressed into the final installation image, its size will be no more than 4 GB.
Estimated 90-day versions of Windows 8 can be downloaded from the link from the Microsoft website
Or official, available for MSDN subscribers .
VirtualBox Virtual Machine Manager
I use a virtual machine to install the initial image of the system and further configure the programs, since this is the most convenient and fastest way, which significantly saves time.
You can download VirutualBox on the official Oracle VM VirtualBox website.
The virtual machine manager installation package itself, currently the current version of VirtualBox 4.2.12 for Windows hosts x86 / amd64
And if you wish, you can download the VirtualBox 4.2.12 Oracle VM VirtualBox Extension Pack All supported platforms
Imagex utility
With this utility we will create the final image of our assembly, suitable for installation on other computers.
This utility is included in the Windows Deployment and Assessment Kit (ADK) for Windows 8 (abbreviated as WAIK for Windows 8). The kit takes more than 2.5 GB.
In this case, we will only need Imagex utility; you can download it from this link imagex.zip (~ 590 Kb)
RDS Boot KIT Constructor and Recovery DiskSuite Kit
This is a very powerful designer that allows you to create a bootable USB flash drive, where you can optionally place various resuscitators at the same time such as HirensBootCD, LiveCD, Kaspersky Rescue Disk, etc., as well as operating system distributions - WinXP, Win7 and Win8. The main thing is to have enough space on the flash drive. There are no analogs at the moment either in the Russian Internet or in the “decaying” west :).
You need to download the latest version of the RDS Boot KIT designer from http://disksuite.ru/ and, if desired, the Recovery DiskSuite set itself, which includes iso images of various resuscitators and distributions. I prefer to use my own proven images, rather than those that come with Recovery DiskSuite.
Just in case, I give a link to the version of the designer, the work with which is described in the RDS Boot KIT.zip manual .
8Gb flash drive and more
The 8Gb flash drive is the minimum, but the rule here is that the more the better. This volume, by the way, may not be enough if a lot of programs are installed. I purchased a 32Gb volume, but now I understand that I needed 64Gb to fit more of my own distributions of other Windows versions.
~ 50Gb of free space on HDD, at least
One of the advantages of using a virtual machine is that you can take snapshots of the state of the virtual machine, and then return to any of these snapshots. A kind of time machine. I took pictures after going through each stage of creating my own assembly. And if I made a mistake somewhere, I would go back to the previous snapshot and already did without errors. But the price for this convenience is the extra space on the hard disk, which is required for snapshots.
If you download all the full distributions, and do not skimp on the snapshots of the state of the virtual machine, it is desirable to have about 100GB of free space on your hard disk.
Stages of work
1. Preparatory stage . Install and configure the virtual machine manager. Creating and configuring the virtual machine itself;
2. Installing Windows on a virtual machine and translating the Windows installation to audit mode;
3. Work in audit mode . At this stage, it is necessary to update the system, install and configure the program, system and user profile. After completing these steps, you should exit from the audit mode and put Windows into the normal installation mode;
4. Preparing the final image of your own Windows installation;
5. Write your own installation assembly to a USB flash drive.
#one. Preparatory stage
1. Install VirutualBox by following the steps of the installation wizard. After installation, we launch the virtual machine manager, go to Settings File-> Settings and set up according to the following presentation:
(At the moment, Slidershare is buggy, I give its link to this presentation on GoogleDrive)
Configuring Virtual Machine Manager
First, we set the boot order by specifying the CD / DVD-ROM device as the first device on which the boot record will be searched and from which to boot.
Next, we plug in the installation image of Windows 8 Enterprise x64, which we said earlier, to the virtual machine CD / DVD-ROM drive.
And on the third slide, we connect a flash drive to our virtual machine, which we must first connect to our main computer. In the future, we will have to work with it from a virtual machine. Its name may differ from what is shown in the screenshot. It depends on the flash drive model.
2. Create a new virtual machine, following the instructions of the wizard. The process of creating a VM and setting its parameters can be viewed at the next presentation.
Create Virtual Machine Settings
Virtual memory of a virtual machine needs to be allocated depending on the amount of RAM available for the host system; the more we allocate, the faster the virtual machine will run. But it is desirable to leave the main system at least 2GB of RAM. I, for example, have 12GB, I allocate 6GB for a virtual machine, 6 I leave for the main system.
# 2. Install Windows
1. After creating the virtual machine, we start it, the installation of Windows will automatically begin, then during the installation process, you must select the parameters, as shown in the next presentation.
Install Windows
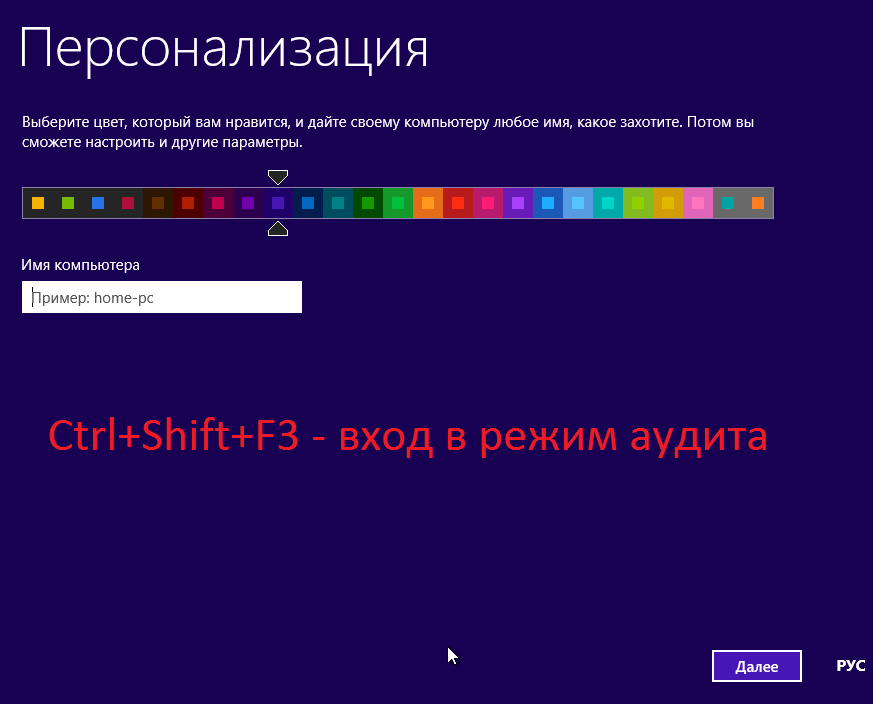
After the files are copied and the installation is completed, an automatic reboot will occur, a system initial setup screen (Personalization) will appear, where we need to choose the color of the design and the name of the computer.
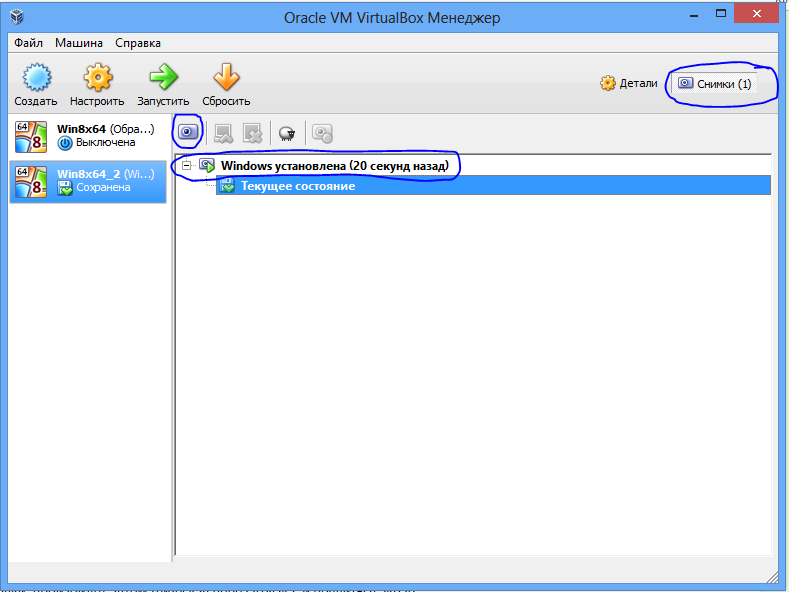
Here it is advisable to take a snapshot of the virtual machine so that we can return to this state at any time, or copy it to a new virtual machine so as not to waste time installing the system. To do this, go to the virtual machine manager window, and click the command buttons shown in the screenshot below. I called the resulting snapshot "Windows installed."
Next, we need to put the Windows installation into audit mode. To do this, go back to the virtual machine window on the initial settings (Personalization) screen; we have to press the key combination Ctrl + Shift + F3 .
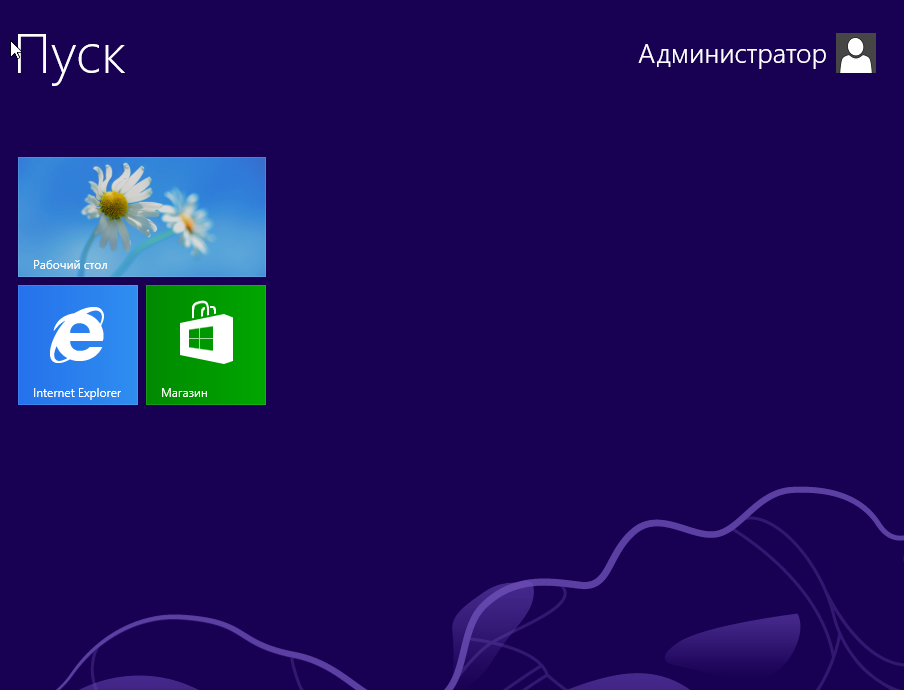
The virtual machine reboots and installs Windows into audit mode, logs in under the built-in Administrator account.
# 3. Work in audit mode
Audit mode is used to add settings to Windows installation images. In this mode, you can install applications, add device drivers, and test the installation.
Upon entering the desktop, the System Preparation Tool dialog box will be displayed.
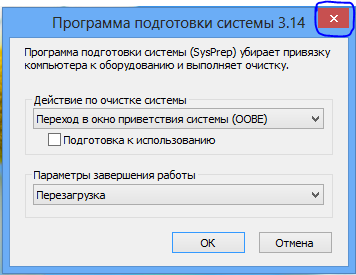
This window will appear every time you log on to the desktop after rebooting the system while it is in audit mode. It should be closed.
# 2.1 Install Updates
First of all, it is recommended to install the latest updates. It is understood that the computer running the virtual machine is connected to the Internet.
To do this, we will need to enable automatic updates and install them.
Press the key combination Win (Windows checkbox) + X and select the item -> Control Panel \ System and Security \ Window Update.
The process of finding, downloading and installing updates is shown in the next presentation. After downloading each portion of available updates, you must shut down the system to install them.
Installing Windows Updates
It is necessary to perform the search and installation of updates several times, since some updates appear only after the previous ones have been installed.
Until we see the message that there are no more current updates, as in the screenshot below:
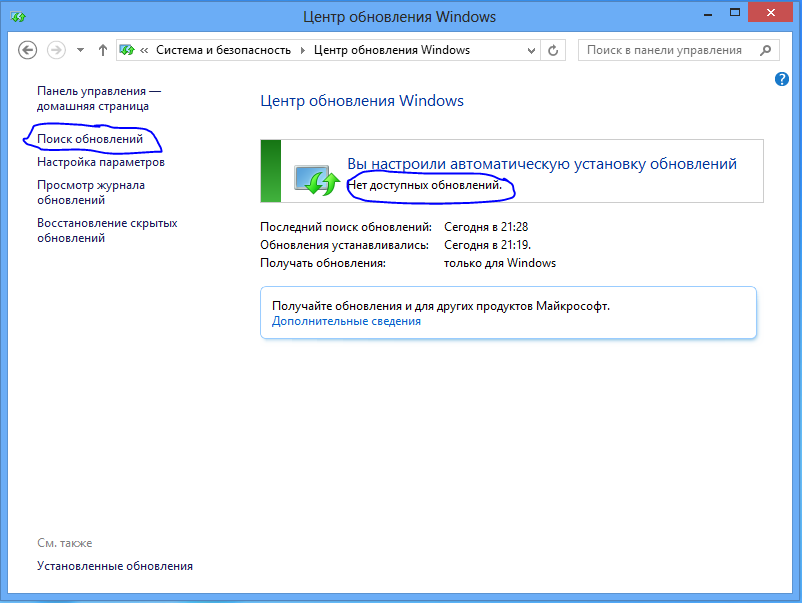
The process of finding and installing updates is quite lengthy and takes a lot of time, it is good that it will need to be done only once, since now all the necessary updates will be included in our assembly.
After installing all the necessary updates, I advise you to take another snapshot of the virtual machine, I called it "Windows updated."
# 2.2 Installing applications
The next step is to install the applications we need, configure the system and user profile.
I will not dwell on this in detail, since everyone has their own preferred set of programs, and installing them is no different from installing in the normal Windows operating mode. If any application needs to reboot the system, then you can do it any number of times.
After the installation of the necessary programs, system settings and user profile is completed, it is recommended to perform a system update again, and after that I advise you to remove temporary files and repair registry errors using some utility like CCleaner .
Here I recommend creating another snapshot of the state of the virtual machine, and call it “Before Generalization”
2.3 Generalization of Windows and the transition to normal installation mode
Next, we will need to perform a generalization of the system, which includes cleaning the system, removing the hardware binding and putting the Windows installation back into normal mode.
Before we begin this, we will need to prepare an unattended Windows installation answer file, in which we indicate that during generalization, we will need to copy Administrator’s profile data into the default profile, based on which user profiles of our assembly will be created later.
To do this, create in Notepad a file named CopyProfile.xml, into which you will need to insert the following text:
<?xml version="1.0" encoding="utf-8"?> <unattend xmlns="urn:schemas-microsoft-com:unattend"> <settings pass="specialize"> <component name="Microsoft-Windows-Shell-Setup" processorArchitecture="amd64" publicKeyToken="31bf3856ad364e35" language="neutral" versionScope="nonSxS" xmlns:wcm="http://schemas.microsoft.com/WMIConfig/2002/State" xmlns:xsi="http://www.w3.org/2001/XMLSchema-instance"> <CopyProfile>true</CopyProfile> </component> </settings> <settings pass="generalize"> <component name="Microsoft-Windows-Security-SPP" processorArchitecture="amd64" publicKeyToken="31bf3856ad364e35" language="neutral" versionScope="nonSxS" xmlns:wcm="http://schemas.microsoft.com/WMIConfig/2002/State" xmlns:xsi="http://www.w3.org/2001/XMLSchema-instance"> <SkipRearm>1</SkipRearm> </component> </settings> </unattend> Or you can download the finished file here CopyProfile.xml
This file must be written to our flash drive. And connect this flash drive to a virtual machine, as shown in the following screenshot, which shows the bottom right corner of the virtual machine window.
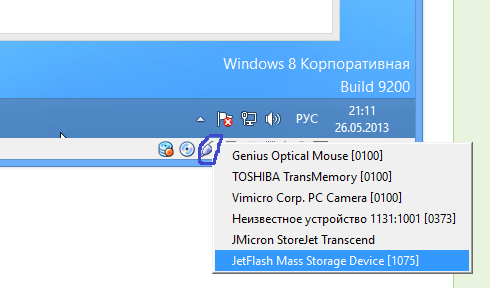
Right-click on the USB device icon and select our USB flash drive from the drop-down menu.
After connecting the flash drive, go to Windows Explorer and see which letter is assigned to it. Remember her.
My flash drive is connected under the letter E: \
Next, run the command line: press the key combination Win + R, type cmd in the command line, and then click OK, as shown in the following screenshot.
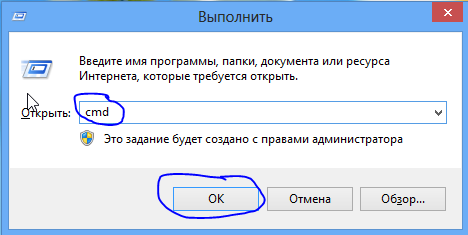
The console command execution window opens in which you need to run the Sysprep utility with the following parameters:
% systemroot% \ system32 \ sysprep \ sysprep.exe / generalize / oobe / shutdown /unattend:E:\CopyProfile.xml
Where instead of the letter E in the parameter /unattend:E:\CopyProfile.xml, you must specify the letter assigned to the flash drive connected to the virtual machine.
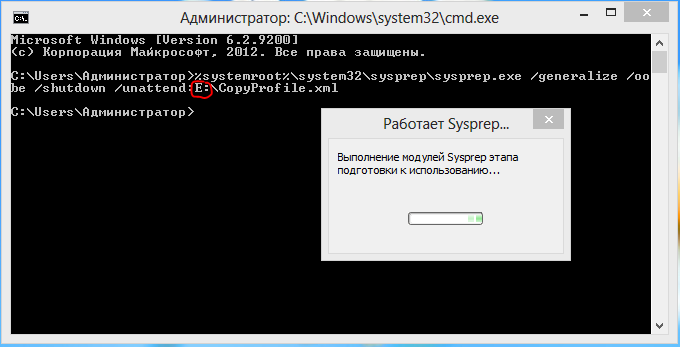
Next is the process of generalization, after which the virtual machine will shut down itself.
If you believe the documentation from Microsoft, then you can now begin to take an image, but you shouldn’t do this (both to believe the documentation and to take an image. Trust but verify), since the full copy of the administrator profile to the default profile does not occur.
Therefore, it is necessary to make a leap in the subversive, and copy this profile.
To do this, we turn on the virtual machine again and wait for Windows to load until the initial user profile configuration dialog (Personalization) appears. In the course of the download, the installation will be carried out, and the restart will be performed. Following the steps of the wizard, we create a user, thereby completing the installation of Windows as shown in the next presentation.
Setting user personalization options
We are waiting for the end of the setup until the user profile is created, after which the system boots up in the normal mode ready for work.
Now we need to enable the built-in Administrator account and log in to it.
Again, click Win + X and in the drop-down menu select the item "Computer Management". Next, follow the path: Utilities -> Local Users and Groups -> Users.
In the list of users choose Administrator. Right click -> Properties. Uncheck Disable account. Click OK.
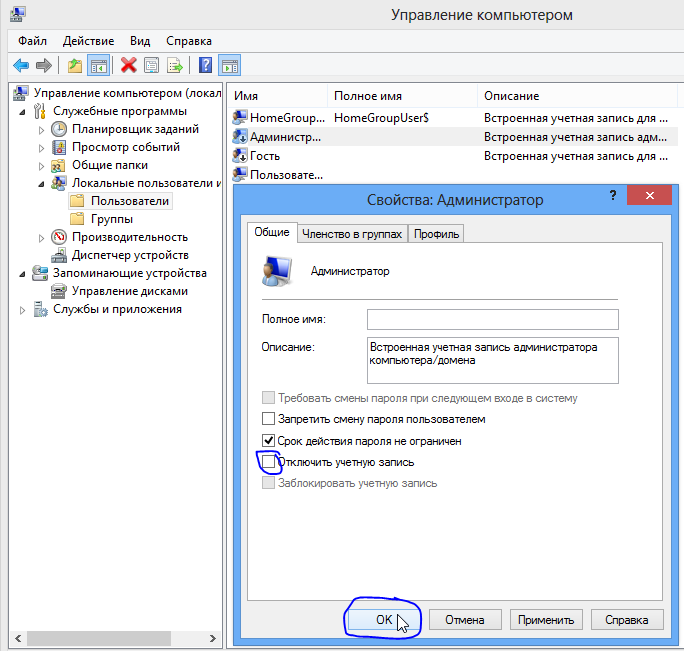
Then we need to login with the Administrator account that we just turned on. Press the Right Ctrl + Del key combination (or in the virtual machine window menu select the Machine option -> Send Ctrl + Alt + Del), and select the Exit option.
We go into the system under the Administrator, and open, as in the previous step, the list of user management. This time, we need to delete the user we created earlier. Select it in the list, right-click to open the drop-down menu and select Delete in it. You will be asked to confirm the deletion twice, and we agree to delete this user two times.
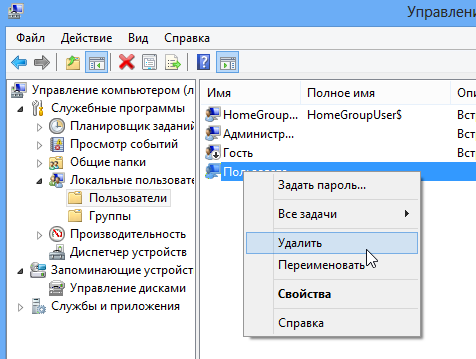
Open the console window again, and run the sysprep utility with the following parameters:
% systemroot% \ system32 \ sysprep \ sysprep.exe / generalize / oobe / shutdown
At the end of the virtual machine off.
Now everything is ready to remove the final image of the installation of Windows.
You should take another snapshot of the state of the virtual machine. And call it - "Before removing the image."
#four. Preparing the final Windows installation image
At this stage, we need to create the install.wim file, which will contain our installation assembly Windows.
To do this, turn on the virtual machine. Here we must be attentive and agile. Immediately after switching on, for 5 seconds, the words “Press any key to boot from CD or DVD ...” appear, which tells us that you need to press any key to boot the Windows installation from the virtual CD / DVD drive. It is necessary to have time to press any key, if suddenly you do not have time, then you can close the virtual machine by restoring a snapshot of the previous state.
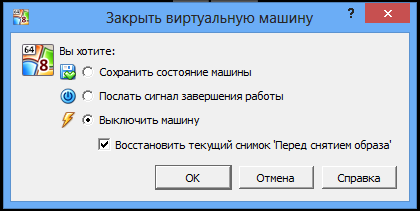
If you managed to press in time, then the Windows 8 installation program will boot from the virtual DVD. We wait until the welcome window appears and press the key combination Shift + F10
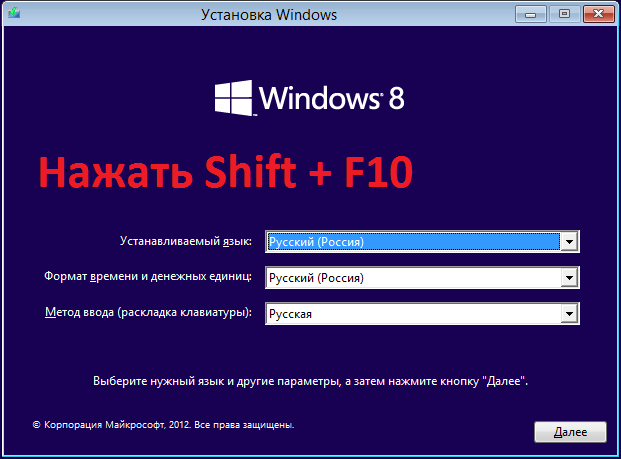
The console command input window opens. Now we need to connect our flash drive to the virtual machine again, since we’ll be recording the image of our Windows build to it.
Important note - the flash drive must be formatted in NTFS format, because unlike FAT32, in this file system format, restrictions on the maximum file size of 4Gb are removed, but most likely the image we receive will take up more than 7GB.
To format a USB flash drive, you must select it in the explorer of the main system, right-click the mouse to bring up a drop-down menu in which to select the "Format ..." option, and adjust the parameters in accordance with those shown in the screenshot
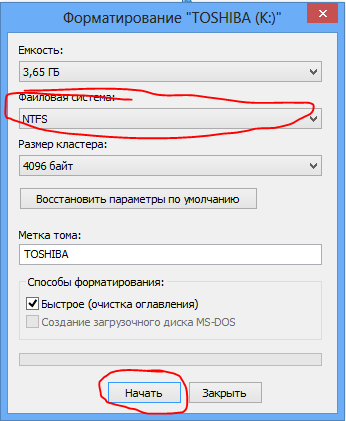
Also, on the USB flash drive, you must write the imagex.exe utility, I gave a link to the archive with this utility at the beginning of this article.
After connecting the flash drive to the virtual machine, it is necessary to determine the letters of the disks on which the Windows is configured, and the letter of the flash drive that we connected.
If you do everything as written in this manual, then the disk with Windows configured by us will be on the D: \ drive, and the USB flash drive connected by us under the letter F: \
The easiest way to check this is by going to the right disk, typing the d: command and pressing the Enter key, and after running the dir command, which shows the contents of the disk.
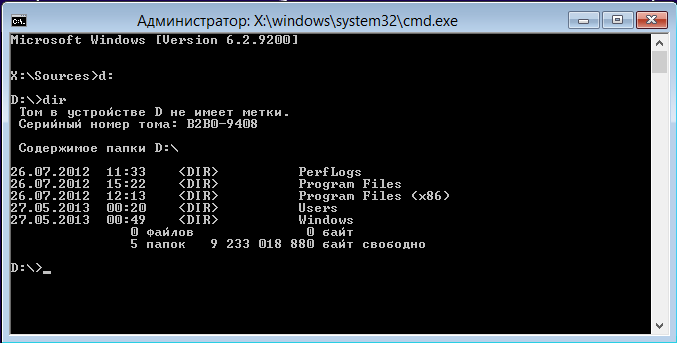
You should also check the disk F:
To capture an image, you need to enter the command in the console
F: \ imagex \ x64 \ imagex.exe / capture D: F: \ install.wim / flags "Enterprise" "Windows 8 Enterprise" "My Windows 8 Build" / compress maximum
More information about Imagex can be found on the Microsoft website at this link - the Imagex utility .
F: \ imagex \ x64 \ imagex.exe - path to imageX utility
/ capture D: - a parameter indicating that it is necessary to capture a section D:
F: \ install.wim - specify the path to the saved WIM file to which the image of the D: partition will be captured. / flags "Enterprise" - the flag designating edition of Windows 8.
"Windows 8 Enterprise" is the name of the image.
"My Windows 8 Build" - (optional) image description
/ compress maximum - type of compression of files in the image. For the / compress option, the maximum (maximum compression), fast (fast compression) and none (without compression) values are allowed. If not specified, fast compression is used. Maximum compression can reduce the size of the image, but the capture takes longer than with fast compression. The speed of unpacking an image is almost independent of the type of compression.
Capturing an image is quite a long process, and takes a long time, from one hour to 4 hours. Depending on the power of the computer, the RAM allocated to the virtual machine, and the size of the assembly itself.
After the end of the removal of the image, we will create the install.wim file on the flash drive. You can turn off the virtual machine, we don’t need it anymore.
The install.wim file should be copied to the hard drive of the main computer, we will work with it in the next step, when we will create a bootable USB flash drive, formatting it first.
#five. Creating a bootable flash drive with its own build of Windows
To create a bootable USB flash drive with its own build, we need the RDS Boot KIT constructor from http://disksuite.ru/
In detail, I will not dwell on the nuances of the work of this designer, it can be used to make a very powerful tool for diagnosing, resuscitating and restoring the software part of any computer and put it all on one flash drive.
We are also directly interested in creating bootable media and writing to it the Windows installation assembly we created earlier.
Create a folder on your hard drive, I called it RDS, download the constructor into it, and launch it. At the first launch, the directory structure of the constructor is created, and on this, the constructor finishes its work, with the message that it is necessary to place the corresponding ISO images in the intended directories.
Now you need to place the ISO image of the Windows 8 installation, from which we previously installed Windows on the virtual machine, into the designer folder along the path: RDS \ Windows8 \ x64
Run the constructor again, and follow its instructions. First, it indicates the drive letter assigned to the flash drive with which we are going to work, and it is necessary to put a colon after the letter. We agree to formatting and select NTFS as the file system, after which we agree to copy the Windows8 distribution, and wait for the designer to finish.
Now we have a ready bootable USB flash drive. You should replace the standard Windows standard build file with the one created earlier by us.
To do this, on the flash drive along the path Windows8 \ x64, we replace the install.wim file with the one we created earlier in step # 4.
And there is one more thing. Next to the Install.wim file on the USB flash drive, there is an unattended Windows installation answer file called AutoUnattend.xml. It must be replaced with the one created by us.
To do this, create in Notepad a file named AutoUnattend.xml and paste the following text into it:
<?xml version="1.0" encoding="utf-8"?> <unattend xmlns="urn:schemas-microsoft-com:unattend"> <settings pass="windowsPE"> <component name="Microsoft-Windows-International-Core-WinPE" processorArchitecture="amd64" publicKeyToken="31bf3856ad364e35" language="neutral" versionScope="nonSxS" xmlns:wcm="http://schemas.microsoft.com/WMIConfig/2002/State" xmlns:xsi="http://www.w3.org/2001/XMLSchema-instance"> <SetupUILanguage> <UILanguage>ru-RU</UILanguage> </SetupUILanguage> <InputLocale>en-US;ru-RU</InputLocale> <SystemLocale>ru-RU</SystemLocale> <UILanguage>ru-RU</UILanguage> <UserLocale>ru-RU</UserLocale> </component> <component name="Microsoft-Windows-Setup" processorArchitecture="amd64" publicKeyToken="31bf3856ad364e35" language="neutral" versionScope="nonSxS" xmlns:wcm="http://schemas.microsoft.com/WMIConfig/2002/State" xmlns:xsi="http://www.w3.org/2001/XMLSchema-instance"> <UserData> <ProductKey> <Key></Key> </ProductKey> <AcceptEula>true</AcceptEula> </UserData> <Display> <ColorDepth>32</ColorDepth> <HorizontalResolution>1280</HorizontalResolution> <VerticalResolution>800</VerticalResolution> </Display> </component> </settings> <settings pass="oobeSystem"> <component name="Microsoft-Windows-International-Core" processorArchitecture="amd64" publicKeyToken="31bf3856ad364e35" language="neutral" versionScope="nonSxS" xmlns:wcm="http://schemas.microsoft.com/WMIConfig/2002/State" xmlns:xsi="http://www.w3.org/2001/XMLSchema-instance"> <InputLocale>en-US;ru-RU</InputLocale> <UILanguage>ru-RU</UILanguage> <UserLocale>ru-RU</UserLocale> <SystemLocale>ru-RU</SystemLocale> </component> <component name="Microsoft-Windows-Shell-Setup" processorArchitecture="amd64" publicKeyToken="31bf3856ad364e35" language="neutral" versionScope="nonSxS" xmlns:wcm="http://schemas.microsoft.com/WMIConfig/2002/State" xmlns:xsi="http://www.w3.org/2001/XMLSchema-instance"> <OOBE> <HideEULAPage>true</HideEULAPage> <HideLocalAccountScreen>false</HideLocalAccountScreen> <HideOnlineAccountScreens>false</HideOnlineAccountScreens> <HideWirelessSetupInOOBE>false</HideWirelessSetupInOOBE> <SkipMachineOOBE>false</SkipMachineOOBE> <ProtectYourPC>1</ProtectYourPC> <SkipUserOOBE>false</SkipUserOOBE> </OOBE> <TimeZone>Central Asia Standard Time</TimeZone> </component> </settings> </unattend> Or you can download a ready-made file from this link AutoUnattend.xml
That's all, we have a ready-made bootable USB flash drive with its own image of installing Windows. Which will significantly save time deploying Windows.
Source: https://habr.com/ru/post/181261/
All Articles