Django: Using QR codes to quickly enter the site from mobile devices
If you have a website that is often used from mobile devices (such as phones and tablet PCs), then you may have wondered how to implement quick login - so that the user does not need to enter either the website address, or the login and password ( or E-mail and password).
On some sites you may have seen the ability to send an SMS with a quick access link - this is essentially the same thing. The main difference of the approach described in this note is that instead of sending an SMS, we will generate a QR code that contains a link that allows you to enter the site without entering authorization data.
')
By the way, the whole process of writing the application, which is given below, can be viewed in the screencast (available on YouTube , or in higher quality as an MPEG2 file in 1080p ).
Before you start implementing this authorization option, let's consider how it differs from the option with sending an SMS message:
It turns out that the option with QR codes is quite good. And even if high security is important to us, then theoretically no one bothers to send a QR code by e-mail, or, for example, to request a password each time (once again, enter the password on a convenient large computer keyboard, it seems to me much easier than typing the site address + login / email address + password on the virtual keyboard of the mobile device). Nevertheless, now I propose to implement the simplest, basic version of a quick entry using QR codes, the implementation of which we will need a minimum of time.
The text below, like the screencast, explains the various features of the implementation. If you want to quickly add an application to the site, then you can install it through pip:
In this case, you will only have to include the urls scheme of the application in your main urls.py, as well as add templates. Installation instructions as well as the source code can be found on Github .
Below is described how you can build the application yourself - as relevant, for example, if you immediately want to edit something in it.
So, first of all, let's move to the working directory of the Django project, in which we want to add such authorization, and create a new application. Let's call it, for example, qrauth:
In the directory that appears, create a file qr.py:
It uses the python-qrcode module . You can install it using pip:
In order to get pictures with a transparent (rather than white) background, we specifically use our class to create pictures, inheriting it from qrcode.image.pil.PilImage. If you are satisfied with pictures with a white background, then it will be enough to write this:
It is worth noting that in this case, the pictures that qrcode.make returns (and, accordingly, the function make_qr_code) are not optimal in terms of size. For example, using optipng their size can be reduced by about 70% (of course, without loss of quality). However, in most cases this is unprincipled - in any case, their size is small (within a few kibibytes).
Next, create the utils.py file and add functions that we will then use in views (views):
The generate_random_string function generates a string of random characters of a given length. By default, the string is composed of letters of the Latin alphabet (both lower and upper case) and numbers.
The salted_hash function solos and hashes the string.
Now open views.py and write the views:
When accessing a page with a QR code (qr_code_page), a random string of 50 characters is generated. Next, a new key-value pair is added to Redis (you can install the client with the help of
In the context of the template, a generated random string is specified: this string is then used in the address where the picture with the QR code is returned (but for authorization, a hash is used, and the address with the hash is included in the QR code: thus, even if someone else knows the address of the picture, then for authorization this will not be enough - for authorization you need to know the salted hash for the random string specified in the address of the picture).
Further, when loading a picture (qr_code_picture), the random string contained in the picture address is again hashed, and then it is checked whether there is a corresponding key in Redis. If there is such a key, and contains the identifier of the current user, then a QR code is created and returned containing an absolute link for instant authorization on the site. Otherwise, error 404 is returned.
The domain is obtained here using django.contrib.sites . You can specify the domain through the administrative interface (/ admin / sites / site /).
If your server is behind a reverse proxy (for example, nginx), and you are using SSL, then make sure that information about this is included in requests to the upstream server — this is necessary so that request.is_secure () gives the correct value (for this define in the settings SECURE_PROXY_SSL_HEADER , but keep in mind that you will need to set / remove this header on the proxy server side - otherwise, if, for example, your site is accessible via HTTP and HTTPS, the user who logs in via HTTP can set this header so that request.is_secure () will return to True, and that is bad in terms of safety).
And yes, starting with Python 2.6, instead of
When clicking on the link for instant authorization, it is checked whether there is a key in Redis that corresponds to the hash specified in the link. If not, the user is redirected to the page with the message that the QR code is invalid (in this example, this page does not require writing a separate presentation). If there is, then the key is deleted in Redis, after which it is checked whether there is a user with such an identifier in the database. If not, then again, it is redirected to the page with the message that the QR code is invalid. If there is - then there is an authorization and the user is redirected to the main page of the site.
Now add the urls.py file and define the application URL scheme in it:
Also, do not forget to open your main urls.py (which is indicated in ROOT_URLCONF), and include urlpatterns from urls.py from the created application:
Now open the template directory and add the qrauth directory there.
Example for invalid_code.html:
Example for page.html:
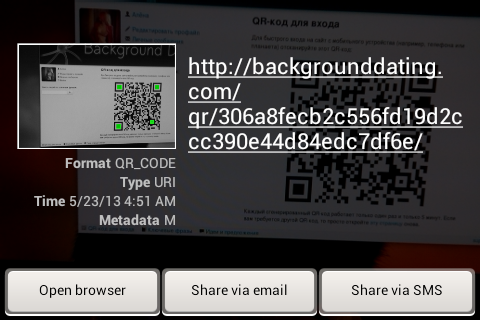
Actually, it now remains to open the site in the browser and check. If the QR code is successfully generated and displayed, try to scan it using a phone or something else with a camera and the Internet.
If there are any questions or thoughts about what other options may be for quick and convenient authorization from mobile devices - I will be glad to comment.
Good luck to everyone and enjoy programming!
Happy summer! :)
On some sites you may have seen the ability to send an SMS with a quick access link - this is essentially the same thing. The main difference of the approach described in this note is that instead of sending an SMS, we will generate a QR code that contains a link that allows you to enter the site without entering authorization data.
')
By the way, the whole process of writing the application, which is given below, can be viewed in the screencast (available on YouTube , or in higher quality as an MPEG2 file in 1080p ).
Before you start implementing this authorization option, let's consider how it differs from the option with sending an SMS message:
- The SMS message is a little safer: on the one hand, we pass the link through third parties (in particular, SMS gate, cellular operator), but on the other hand, first, the link will not be available via JS (and, accordingly, even if the site has XSS, then the attacker will not be able to get the link from the SMS message - but from the QR code you can get it), and secondly you can get physical access to the computer with a browser in which the user is authorized on the site, in general easier than accessing a computer and, at the same time, accessing the body user background
- An SMS message, at the same time, is not so universal: it will not work, if for some reason there is no cellular connection, or the mobile device used by the user does not at all imply the ability to work in cellular networks (but has a camera and Internet connection, and an application for scanning QR codes on it is or easy to install)
- Sending SMS messages costs money, generating QR codes is absolutely free
- SMS messages in some situations may significantly decrease the speed and reliability indicators (that is, the message may come with a significant delay, or may not even come at all), and scanning of QR codes is predictable and usually works well (at least, if with the camera is all right)
- To send SMS messages, the site needs a user's phone number, but not all users like the idea of entering their phone number anywhere on the Internet.
It turns out that the option with QR codes is quite good. And even if high security is important to us, then theoretically no one bothers to send a QR code by e-mail, or, for example, to request a password each time (once again, enter the password on a convenient large computer keyboard, it seems to me much easier than typing the site address + login / email address + password on the virtual keyboard of the mobile device). Nevertheless, now I propose to implement the simplest, basic version of a quick entry using QR codes, the implementation of which we will need a minimum of time.
The text below, like the screencast, explains the various features of the implementation. If you want to quickly add an application to the site, then you can install it through pip:
pip install django-qrauthIn this case, you will only have to include the urls scheme of the application in your main urls.py, as well as add templates. Installation instructions as well as the source code can be found on Github .
Below is described how you can build the application yourself - as relevant, for example, if you immediately want to edit something in it.
So, first of all, let's move to the working directory of the Django project, in which we want to add such authorization, and create a new application. Let's call it, for example, qrauth:
python manage.py startapp qrauthIn the directory that appears, create a file qr.py:
try: from PIL import Image, ImageDraw except ImportError: import Image, ImageDraw import qrcode.image.base import qrcode.image.pil class PilImage(qrcode.image.pil.PilImage): def __init__(self, border, width, box_size): if Image is None and ImageDraw is None: raise NotImplementedError("PIL not available") qrcode.image.base.BaseImage.__init__(self, border, width, box_size) self.kind = "PNG" pixelsize = (self.width + self.border * 2) * self.box_size self._img = Image.new("RGBA", (pixelsize, pixelsize)) self._idr = ImageDraw.Draw(self._img) def make_qr_code(string): return qrcode.make(string, box_size=10, border=1, image_factory=PilImage) It uses the python-qrcode module . You can install it using pip:
pip install qrcodeIn order to get pictures with a transparent (rather than white) background, we specifically use our class to create pictures, inheriting it from qrcode.image.pil.PilImage. If you are satisfied with pictures with a white background, then it will be enough to write this:
import qrcode def make_qr_code(string): return qrcode.make(string, box_size=10, border=1) It is worth noting that in this case, the pictures that qrcode.make returns (and, accordingly, the function make_qr_code) are not optimal in terms of size. For example, using optipng their size can be reduced by about 70% (of course, without loss of quality). However, in most cases this is unprincipled - in any case, their size is small (within a few kibibytes).
Next, create the utils.py file and add functions that we will then use in views (views):
import os import string import hashlib from django.conf import settings def generate_random_string(length, stringset="".join( [string.ascii_letters+string.digits] )): """ Returns a string with `length` characters chosen from `stringset` >>> len(generate_random_string(20) == 20 """ return "".join([stringset[i%len(stringset)] \ for i in [ord(x) for x in os.urandom(length)]]) def salted_hash(string): return hashlib.sha1(":)".join([ string, settings.SECRET_KEY, ])).hexdigest() The generate_random_string function generates a string of random characters of a given length. By default, the string is composed of letters of the Latin alphabet (both lower and upper case) and numbers.
The salted_hash function solos and hashes the string.
Now open views.py and write the views:
import redis from django.contrib.auth.decorators import login_required from django.contrib.auth import login, get_backends from django.contrib.sites.models import get_current_site from django.template import RequestContext from django.shortcuts import render_to_response from django.http import HttpResponse, HttpResponseRedirect, Http404 from django.core.urlresolvers import reverse from django.contrib.auth.models import User from privatemessages.context_processors import \ number_of_new_messages_processor from utils import generate_random_string, salted_hash from qr import make_qr_code @login_required def qr_code_page(request): r = redis.StrictRedis() auth_code = generate_random_string(50) auth_code_hash = salted_hash(auth_code) r.setex(auth_code_hash, 300, request.user.id) return render_to_response("qrauth/page.html", {"auth_code": auth_code}, context_instance=RequestContext(request)) @login_required def qr_code_picture(request, auth_code): r = redis.StrictRedis() auth_code_hash = salted_hash(auth_code) user_id = r.get(auth_code_hash) if (user_id == None) or (int(user_id) != request.user.id): raise Http404("No such auth code") current_site = get_current_site(request) scheme = request.is_secure() and "https" or "http" login_link = "".join([ scheme, "://", current_site.domain, reverse("qr_code_login", args=(auth_code_hash,)), ]) img = make_qr_code(login_link) response = HttpResponse(mimetype="image/png") img.save(response, "PNG") return response def login_view(request, auth_code_hash): r = redis.StrictRedis() user_id = r.get(auth_code_hash) if user_id == None: return HttpResponseRedirect(reverse("invalid_auth_code")) r.delete(auth_code_hash) try: user = User.objects.get(id=user_id) except User.DoesNotExist: return HttpResponseRedirect(reverse("invalid_auth_code")) # In lieu of a call to authenticate() backend = get_backends()[0] user.backend = "%s.%s" % (backend.__module__, backend.__class__.__name__) login(request, user) return HttpResponseRedirect(reverse("dating.views.index")) When accessing a page with a QR code (qr_code_page), a random string of 50 characters is generated. Next, a new key-value pair is added to Redis (you can install the client with the help of
pip install redis ), where the salted hash of the generated random string is set as the key, and the user ID is used as the value (this is necessary for the picture with the QR code , which is added to the page, was available only to this user). This key is set to the expiration time, in the example specified 300 seconds (5 minutes).In the context of the template, a generated random string is specified: this string is then used in the address where the picture with the QR code is returned (but for authorization, a hash is used, and the address with the hash is included in the QR code: thus, even if someone else knows the address of the picture, then for authorization this will not be enough - for authorization you need to know the salted hash for the random string specified in the address of the picture).
Further, when loading a picture (qr_code_picture), the random string contained in the picture address is again hashed, and then it is checked whether there is a corresponding key in Redis. If there is such a key, and contains the identifier of the current user, then a QR code is created and returned containing an absolute link for instant authorization on the site. Otherwise, error 404 is returned.
By the way, do you understand what can be easily improved here?
When performing
You can also use not just a hash, but, for example, a hash with a prefix - especially important if similar keys are also created somewhere else.
int(user_id) != request.user.id ValueError may occur - if there is such a key in Redis, but its value is not suitable for conversion to a decimal integer. It is solved using try ... except , or using the string isdigit method. Alternatively, you can get a string from request.user.id and compare it with the received key value.You can also use not just a hash, but, for example, a hash with a prefix - especially important if similar keys are also created somewhere else.
The domain is obtained here using django.contrib.sites . You can specify the domain through the administrative interface (/ admin / sites / site /).
If your server is behind a reverse proxy (for example, nginx), and you are using SSL, then make sure that information about this is included in requests to the upstream server — this is necessary so that request.is_secure () gives the correct value (for this define in the settings SECURE_PROXY_SSL_HEADER , but keep in mind that you will need to set / remove this header on the proxy server side - otherwise, if, for example, your site is accessible via HTTP and HTTPS, the user who logs in via HTTP can set this header so that request.is_secure () will return to True, and that is bad in terms of safety).
And yes, starting with Python 2.6, instead of
request.is_secure() and "https" or "http" you can write "https" if request.is_secure() else "http" .When clicking on the link for instant authorization, it is checked whether there is a key in Redis that corresponds to the hash specified in the link. If not, the user is redirected to the page with the message that the QR code is invalid (in this example, this page does not require writing a separate presentation). If there is, then the key is deleted in Redis, after which it is checked whether there is a user with such an identifier in the database. If not, then again, it is redirected to the page with the message that the QR code is invalid. If there is - then there is an authorization and the user is redirected to the main page of the site.
Now add the urls.py file and define the application URL scheme in it:
from django.conf.urls import patterns, url from django.views.generic.simple import direct_to_template urlpatterns = patterns('qrauth.views', url( r'^pic/(?P<auth_code>[a-zA-Z\d]{50})/$', 'qr_code_picture', name='auth_qr_code' ), url( r'^(?P<auth_code_hash>[af\d]{40})/$', 'login_view', name='qr_code_login' ), url( r'invalid_code/$', direct_to_template, {'template': 'qrauth/invalid_code.html'}, name='invalid_auth_code' ), url( r'^$', 'qr_code_page', name='qr_code_page' ), ) Also, do not forget to open your main urls.py (which is indicated in ROOT_URLCONF), and include urlpatterns from urls.py from the created application:
urlpatterns = patterns('', # … url(r'^qr/', include('qrauth.urls')), # … ) Now open the template directory and add the qrauth directory there.
Example for invalid_code.html:
{% extends "base.html" %} {% block title %}QR- {% endblock %} {% block content %} <div class="error"> <h1>QR- </h1> <p>QR-, , . , QR- .</p> </div> {% endblock %} Example for page.html:
{% extends "base.html" %} {% block title %}QR- {% endblock %} {% block content %} <div class="qr_code"> <h1>QR- </h1> <p> (, ) QR-:</p> <div><img src="{% url auth_qr_code auth_code %}" alt="QR"></div> <p> QR- 5 . QR-, <a href="{% url qr_code_page %}"> </a> .</p> </div> {% endblock %} Actually, it now remains to open the site in the browser and check. If the QR code is successfully generated and displayed, try to scan it using a phone or something else with a camera and the Internet.
If there are any questions or thoughts about what other options may be for quick and convenient authorization from mobile devices - I will be glad to comment.
Good luck to everyone and enjoy programming!
Happy summer! :)
Source: https://habr.com/ru/post/181093/
All Articles