nopCommerce 3.00 open source CMS: review of new features, support for Windows Azure

nopCommerce is an open source e-commerce engine written in ASP.NET MVC 4. According to the developers, today the system has been downloaded more than one million times and continues to gain popularity.
On the fourth of May of this year a new version of the system was released - 3.00. The key innovations are support for multi-store and multi-vendor. It is noteworthy that nopCommerce has become one of the first open source CMS in the world, which supports both of these functional features.
Let's take a closer look at each of them.
')
Multi-store
Multi-store allows you to have two or more online stores by installing nopCommerce only once, and use only one common database. These stores may be available on different domains (URL). You do not need to duplicate products and categories for each store, and users can use the same account for all stores. Each of the stores can have unique settings and graphic design. And the administrator can process orders and manage the catalog in one single administration panel.
Let's look at the process of installing and setting up two stores. Suppose we have two addresses: www.store1.com and www.store2.com .
Download and install nopCommerce on www.store1.com . This will be the only place where the site files will be located (cshtml, dll, etc.). Now we need to make sure that all requests to www.store2.com are redirected to www.store1.com . This should be done in the hosting administration panel (for example, plesk) of your www.store2.com using CNAME .
Now in the hosting of the admin panel of www.store1.com you need to configure domain alias for www.store2.com . This step may be confusing for some users. But after it is completed when you request www.store2.com you will see the site installed on www.store1.com . Below you can see how to perform step 3 if you are using Plesk:
- Go to the hosting admin panel www.store1.com
- On the Websites & Domains tab, select Add New Domain Alias
- Enter a name for alias. For example, store2.com
- Make sure that the Web service option is selected.
- Turn off the Synchronize DNS zone with the primary domain .
Now you need to go to the nopCommerce admin panel. Select Configuration, then Stores. You will see a list of all your stores (by default, only one):

Click Edit and configure the store as described below: In the Store name field, enter the name of your store. In the Store URL, enter the store URL - http://www.store1.com/ . In HOST values, enter all possible HTTP_POST values, separated by commas. For example, for the first store it will be store1.com, www.store1.com , and for the second - store2.com, www.store2.com . This field will allow the system to understand the URL of the store will be requested by buyers.
Now you can proceed directly to preparing the catalog and setting up stores. For example, if you open a page with product details, you will see the Store tab, where you can specify in which stores this product will be available. Similarly, you can specify the availability of stores for categories, manufacturers, news, blog entries, supported currencies and languages.
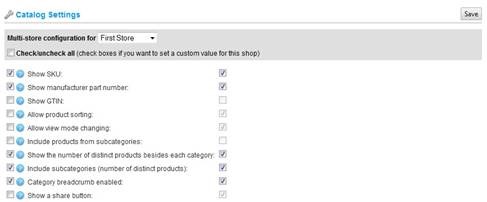
If you open the directory settings page, you will see that you can override the default settings for each of the stores, as shown below:
Multi-vendor
Now let's discuss multi- vendor and drop shipping . This functionality allows the owner of an online store to sell goods, acting as an intermediary between the buyer and the supplier (vendor). At the same time, the store owner does not even have the goods in stock. Vendors can independently fill the store's catalog if they have been granted access to the administration panel.
When a customer places an order, each of the vendors whose products have been purchased, receives an email notification. After that, the vendor sends the goods to the buyer on behalf of the store owner, who usually makes payment to the vendor himself at the end of the month. Your store may contain products from different vendors. Each vendor can have an admin panel where they can manage their products, view orders with their products, view reports. Of course, the vendor has access only to its products.
Money gets the owner of the store when placing orders. Then he independently translates them to vendors. Of course, the buyer pays only once for one company (directly to the store).
The process of creating a vendor is described below.
Go to the administration panel, then select Customers in the menu and then Vendors. Click the Add a new vendor button and follow the on-screen instructions to create a vendor (just enter the vendor’s name and email). This step is quite simple.

Now we need to attach the newly created vendor to the user (customer), which will then be used by the vendor itself to log in to the system and its personal administration panel. Open the page with the details of the user (customer) you want to attach to the vendor
On the Customer Info tab, in the Manager of vendor field, select the vendor you just created. Now open the Customer Roles tab and make sure the user is in the Vendors role.
As you can see everything is quite simple. After completing these steps, the vendor can use this user account to log into the administration panel and manage their products.
Windows Azure
Separately, I would like to mention that recently nopCommerce supports Windows Azure , and installation is possible from the Windows Azure Gallery. Let's see how to install nopCommerce in Windows Azure in a few minutes.
In the Windows Azure administration panel, select Start , then New Web site , then From gallery .
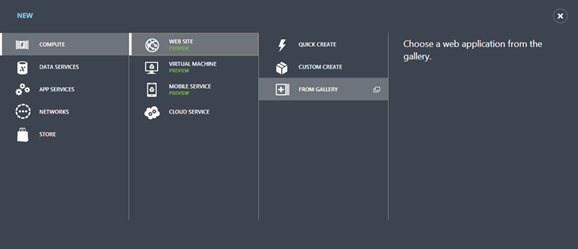
Next, select nopCommerce from the list of programs available for installation. In the next step, you will need to enter the data required to access your database.
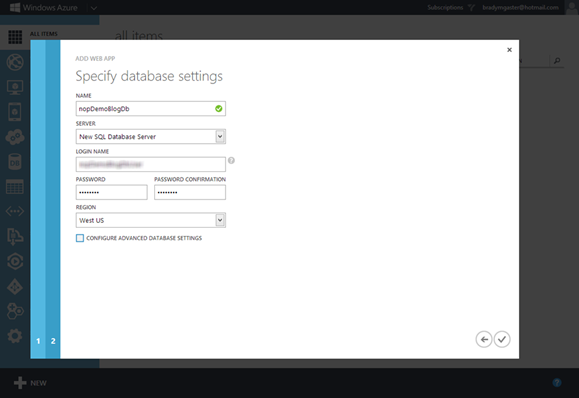
Click OK , and site creation will be completed. Now open the address of the newly created site and you will see the standard nopCommerce installation page
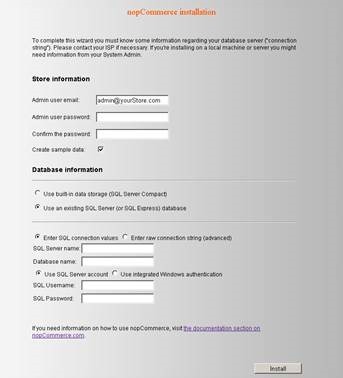
Here you will need to re-enter the data to access your database. To do this, open the page of the newly created site in the Windows Azure portal and select View connection string . Well, you can simply copy the data about your database to the nopCommerce installation page and click the Install button
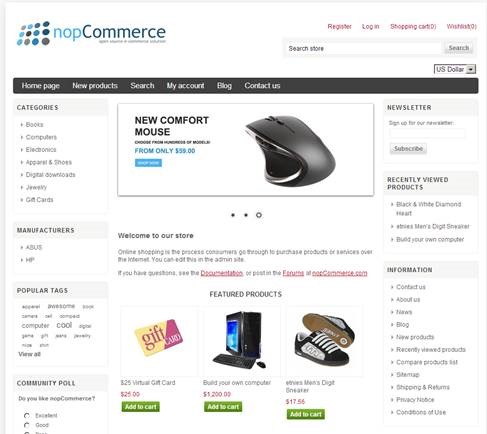
When the installation is complete, you will see the main page of the site you just installed.
You can look at the full list of the functionality added in version 3.00 on this page . You can test nopCommerce on the official demo site . A list of the most interesting sites operating on the basis of nopCommerce can be found on the Showcase Live Shops page. Official site of the project: http://www.nopcommerce.com/
Source: https://habr.com/ru/post/180957/
All Articles