Setting up a VoIP-GSM gateway Hybertone GoIP4 and Asterisk PBX using FreePBX

Perhaps, there is enough information that Asterisk , FreePBX and VoIP-GSM gateway are, and they do not need introduction. In the hands of the server with the installed, based on CentOS , distribution AsteriskNOW , budget four-channel gateway Hybertone GoIP4 . The task of organizing an IP PBX with three operators and three GSM channels has been set, therefore, without unnecessary articulate introductions, immediately to the point.
I omit the description, which is no different from any other OS installation, extension settings and IVR with Time Conditions, about which, if necessary, I will write later. We install the SIM-card that does not require PIN (in my case - 3 pieces), turn on the gateway in the network, look at the router's IP address, attach it via MAC, and go through the browser (password / login: admin), where we see a simple and clear WEB-interface:

I will add that the initialization of SIM-cards from the moment of power-up takes about two minutes.
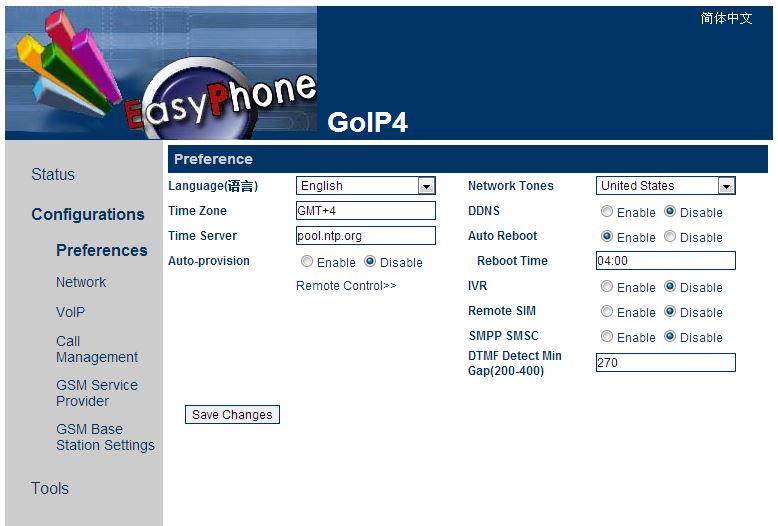
Open Configurations > Preferences , select the time zone, automatic reboot time, disable IVR:
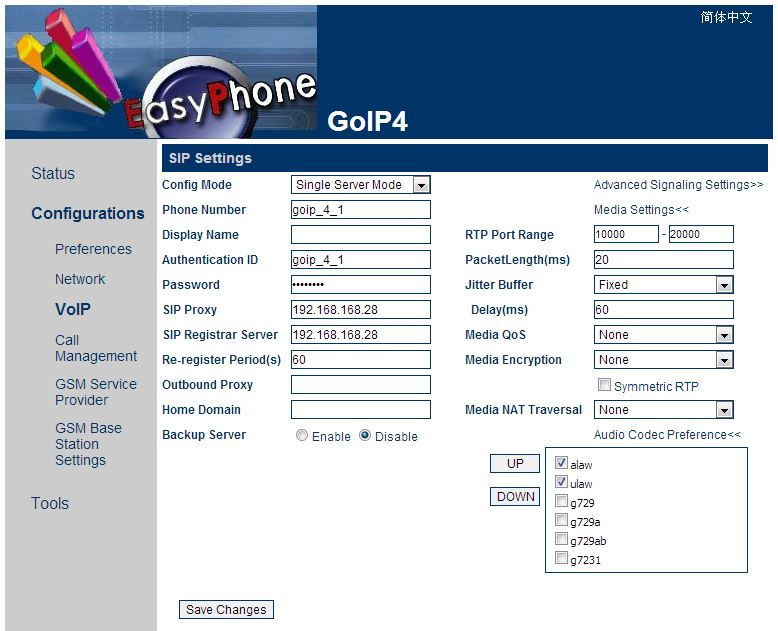
Open Configurations > VoIP , choose the gateway mode (I chose Single Server Mode, since it was not a task to separate outgoing calls, and I consider to waste precious time on setting up each channel separately), choose the used codecs, as well as authorization data for Asterisk (Phone Number, Authentication ID / Password), as well as the IP address of our PBX:
')
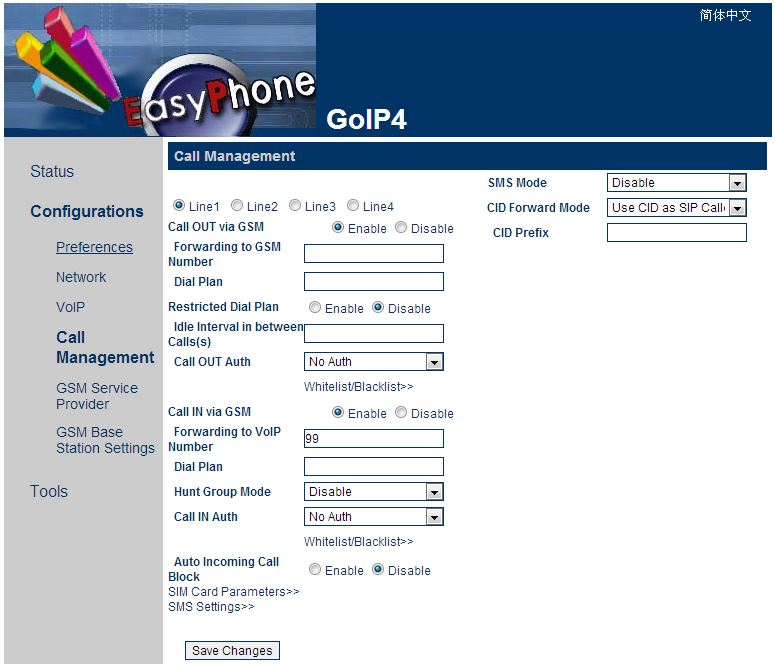
Open Configurations > Call Management , where we change the CID Forward Mode to Use SID as SIP Caller ID so that when an incoming call is received, see the number of the subscriber, not the Phone Number of the gateway, as well as enter the number into the Forwarding to VoIP Number field incoming calls will be transferred, what needs to be done for each line (in my case, I had to start a virtual Extension that translates all calls to Time Conditions, which is at the end of the article):
Do not forget to change the passwords in Tools > Change Password , disable unused channels in Tools > GSM Channel Shut Down and save the settings in Tools > Backup / Restore Configurations !
At this point, the setup of the VoIP-GSM Gateway Hybertone GoIP4 is completed, let's proceed to setting up Asterisk PBX using FreePBX. Go to Connectivity > Trunks , select Add SIP Trunk . We specify the Trunk Name, as well as the Maximum Channels number of lines:
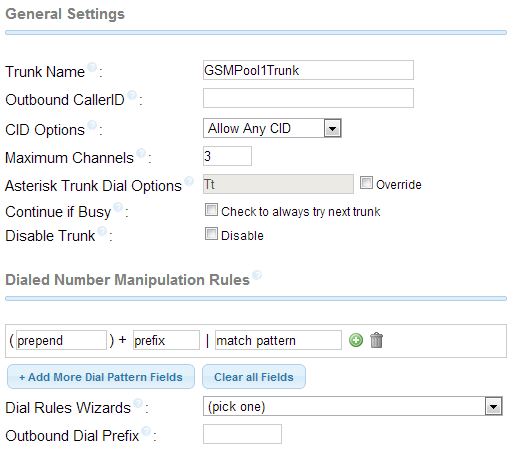
Next, we specify the authorization data and other settings:
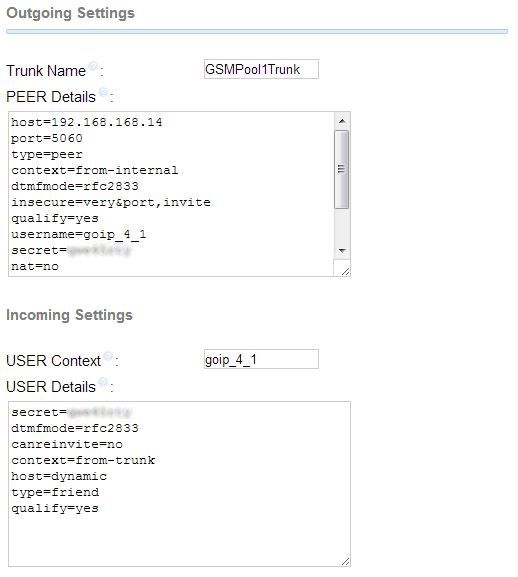
Instead of 192.168.168.14 , goip_4_1 and password, you need to substitute your values:
PEER buildings
host = 192.168.168.14
port = 5060
type = peer
context = from-internal
dtmfmode = rfc2833
insecure = very & port, invite
qualify = yes
username = goip_4_1
secret = password
nat = no
fromuser = goip_4_1
defaultuser = goip_4_1
conext = from-internal
port = 5060
type = peer
context = from-internal
dtmfmode = rfc2833
insecure = very & port, invite
qualify = yes
username = goip_4_1
secret = password
nat = no
fromuser = goip_4_1
defaultuser = goip_4_1
conext = from-internal
USER Details
secret = password
dtmfmode = rfc2833
canreinvite = no
context = from-trunk
host = dynamic
type = friend
qualify = yes
dtmfmode = rfc2833
canreinvite = no
context = from-trunk
host = dynamic
type = friend
qualify = yes
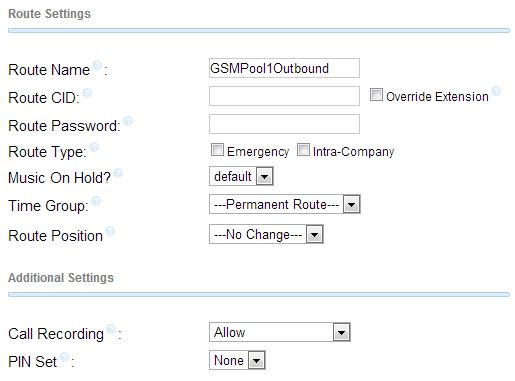
Go to Connectivity > Outbound Routes , prescribe a Route Name and configure Dial Patterns in which you need to specify as many “X” in the third rule as the number corresponding to the length of your city, specify in Trunk Sequence for Matched Routes recently created trunk:

And, of course, Connectivity > Intbound Routes . We enter the Description, select Set Destination, which I have, for some reason, did not earn earlier, and because of which I had to use a virtual extension.
At this connection the gateway to the PBX is over. The instruction does not claim to be the “best solution”, but only my implementation of the task. Comments and comments are welcome.
In the process of setting up the equipment, the following resources were used: the FreePBX forum, the Asterisk forum, and instructions for the VoIP-GSM series of GoIP series gateways.
Source: https://habr.com/ru/post/180855/
All Articles