“Parlez vous Francais ?!” Or how to make your application speak many languages
Hello,
Not much time has passed since I started learning Objective-C, but I started working on a serious application. And before me there were various tasks (problems), how to implement this or that. I want to share with you one of the solutions, one of my tasks.
So let's start with. I was confronted with the task of writing a billing application for one Israeli mobile operator, where you can check your account balance and perform some settings for your mobile lines.
')
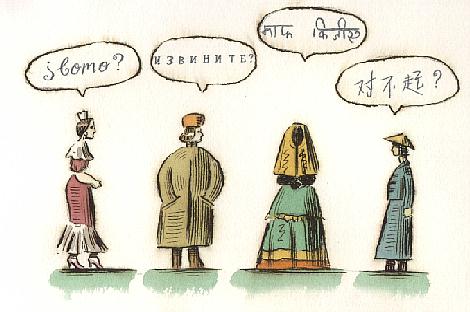
The project corresponded several times until I stopped at the option I needed to navigate the application. I chose ECSlideViewController . The decision was just the way. The website of this operator supports 6 languages and I thought if I make an application, then I need to make it as good, with the maximum possible implementation for the end user, so that it would reach the original website by functionality. And this short article will focus on the localization of the application for many languages.
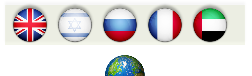
Let's start everything in order, something needs to be done manually, and something you will have to do with code. As I said above, my application so far has 5 languages (English, Hebrew, Russian, French, Arabic). Not yet fully translated it, since the application is in development. I will only give you a start, where to start, and continue by yourself.
Before coming to this, I read many articles, examples and theories. It turned out to be an order of magnitude easier than I thought. On the way to the solution, I erased my code files 2 times, but it's good that I did backup and then I was able to restore everything normally. Although once I had to rewrite a lot of code first. But in order to save you from mistakes, I decided to write this article.
And so you first need to make pens. Objective-C has a strict language separation system. Each language is in its own directory and under its own language name. For example, English will be in the directory en.lproj. Let's start creating language directories in the root directory of the project.
We create several such languages, 2-3 for a start, then you can add about a dozen others at your discretion. But it will not stand to overdo it, as usual in such applications, 1-3 languages no more. Rarely when it comes to 4's. Recently, languages are included only in applications with games. And since many games are not written in Objective-C, the localization of the add is not there.

I created English, Hebrew, Russian. You can create your own languages. Please note that language directories have a strict format and should be denoted with exactly those letters that Objective-C knows. English will be - “en”, Russian will be - “ru”, Arabic will be - “ar”, etc.
Here you can find the right format for your localization.
Now we create one file called Lozalizable.strings in the way shown in the picture:
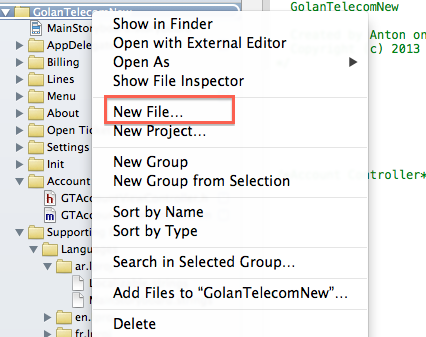
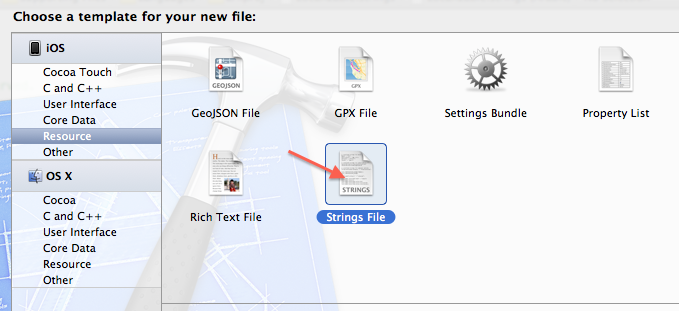
after that, in the root directory you have the above file.
open it and write the first line that we want to translate, from English to Russian, with exactly the syntax as shown in the picture
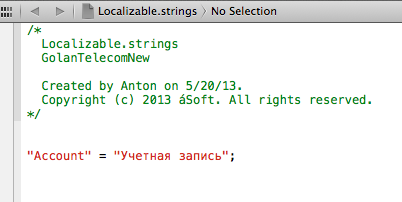
On the left is the original text to be translated, and on the right is its translation. therefore, we leave the original language of the application unchanged on the left and translate it into other languages based on it.
Now copy our file to the ru.lproj directory. Why we copy and not paste, for a simple reason. The same file, but with a different translation, will be used in all languages, so we use the source file as a template to make a list of words of the source language. copy it 3 times. and place each instance in each created directory with languages. Note that the file names are the same.
Assume that you already have your own project, we will not create a new one, and you have strings (NSString) in one of the classes. Take for example the Label object.
how can we localize it forcibly. I have a language panel with 5 buttons for this. Each button is responsible for setting its own language. I save the label of the selected language in NSUserDefaults as a string of the first letters of the language (en, ar, ru, he).
When you click on the button, exactly what was intended, I set the language and write it in NSUserDefaults.
The sample code would be something like this:
Here, I have, for convenience, each button set its own tag (tag), which is passed to the switch cycle and, based on the label, I write down the line I need in NSUserDefaults in the category «Language». Here you can continue to experiment and add different popup message that the language is changed or you want to warn the user that the language will change to another. There is no limit fantasies.
Further, in our code, we will add a method that will look in NSUserDefaults when the application starts and check what is currently installed, and based on the label, load the Localizable.strings file we need from the desired language directory.
Actually the method itself will be as follows:
You can change the name of the languageSelectedStringForKey method, as you like. The main thing is that it reflects the essence of what this method will do.
And now we have a button that sets us the desired localization. And there is a method that checks the current setting in NSUserDefaults and loads the language we need. In order for the language to change, you need to close the application and reopen it, not collapse, namely close it completely. While I was editing the article, I found for myself how to do it. in your case it may be different. in the switchLanguages method, after adding to NSUserDefaults, you need to call the method
Now back to our long-suffering myLabel .
and replace the line with this:
Now just do a Run and see how the text in myLabel changes to the one you specified when you clicked the button.
But if you want to localize your application, according to the installed language in the phone, for example, the user changed the interface setting to Russian, then you can write this standard line
Then the language will be changed everywhere to the one that you specified in the phone and all lines must be in that format. In this case, it will be a static localization of the application, while the user has not changed the interface of his phone to another.
With this approach, you do not need to write almost anything. No methods and code, and create those language directories with the necessary files that I described above and instead of using the custom method languageSelectedStringForKey , use only this NSLocalizedString . You can choose the approach that you like.
It is also important to know that localization is not just one line. I just explained how to start with a simple one, localization is the date and time, pictures and sound files can also be localized. Learn more about the localization of applications, you can watch the video from last year's WWDC2012 Session # 224. They explain everything in detail.
Those who are interested in this article will find a base on localization in it. This will save them several hours, and maybe even days to find the right solution. Do not be limited to one language, maybe your application will find support in another country. And if you have your own methods of implementing the same idea, you can write your tutorial mlm to leave a comment with the decision. others will read. And yes, dedicated to all the embittered http://habrahabr.ru/post/178747/
That was such a simple way. Patience and a little effort.
Happy Coding!
Not much time has passed since I started learning Objective-C, but I started working on a serious application. And before me there were various tasks (problems), how to implement this or that. I want to share with you one of the solutions, one of my tasks.
So let's start with. I was confronted with the task of writing a billing application for one Israeli mobile operator, where you can check your account balance and perform some settings for your mobile lines.
')
The project corresponded several times until I stopped at the option I needed to navigate the application. I chose ECSlideViewController . The decision was just the way. The website of this operator supports 6 languages and I thought if I make an application, then I need to make it as good, with the maximum possible implementation for the end user, so that it would reach the original website by functionality. And this short article will focus on the localization of the application for many languages.
Let's get started
Let's start everything in order, something needs to be done manually, and something you will have to do with code. As I said above, my application so far has 5 languages (English, Hebrew, Russian, French, Arabic). Not yet fully translated it, since the application is in development. I will only give you a start, where to start, and continue by yourself.
Before coming to this, I read many articles, examples and theories. It turned out to be an order of magnitude easier than I thought. On the way to the solution, I erased my code files 2 times, but it's good that I did backup and then I was able to restore everything normally. Although once I had to rewrite a lot of code first. But in order to save you from mistakes, I decided to write this article.
And so you first need to make pens. Objective-C has a strict language separation system. Each language is in its own directory and under its own language name. For example, English will be in the directory en.lproj. Let's start creating language directories in the root directory of the project.
We create several such languages, 2-3 for a start, then you can add about a dozen others at your discretion. But it will not stand to overdo it, as usual in such applications, 1-3 languages no more. Rarely when it comes to 4's. Recently, languages are included only in applications with games. And since many games are not written in Objective-C, the localization of the add is not there.
I created English, Hebrew, Russian. You can create your own languages. Please note that language directories have a strict format and should be denoted with exactly those letters that Objective-C knows. English will be - “en”, Russian will be - “ru”, Arabic will be - “ar”, etc.
Here you can find the right format for your localization.
Now we create one file called Lozalizable.strings in the way shown in the picture:
after that, in the root directory you have the above file.
open it and write the first line that we want to translate, from English to Russian, with exactly the syntax as shown in the picture
On the left is the original text to be translated, and on the right is its translation. therefore, we leave the original language of the application unchanged on the left and translate it into other languages based on it.
Now copy our file to the ru.lproj directory. Why we copy and not paste, for a simple reason. The same file, but with a different translation, will be used in all languages, so we use the source file as a template to make a list of words of the source language. copy it 3 times. and place each instance in each created directory with languages. Note that the file names are the same.
Floor work done
Assume that you already have your own project, we will not create a new one, and you have strings (NSString) in one of the classes. Take for example the Label object.
- myLabel.text = @ "Account" ;
how can we localize it forcibly. I have a language panel with 5 buttons for this. Each button is responsible for setting its own language. I save the label of the selected language in NSUserDefaults as a string of the first letters of the language (en, ar, ru, he).
When you click on the button, exactly what was intended, I set the language and write it in NSUserDefaults.
The sample code would be something like this:
- - ( IBAction ) switchLanguages : ( id ) sender {
- NSUserDefaults * userDefaults = [ [ NSUserDefaults alloc ] init ] ;
- switch ( [ sender tag ] ) {
- case 10 :
- [ userDefaults setObject : @ "en" forKey : @ "Language" ] ;
- [ userDefaults synchronize ] ;
- break ;
- case 11 :
- [ userDefaults setObject : @ "he" forKey : @ "Language" ] ;
- [ userDefaults synchronize ] ;
- break ;
- case 12 :
- [ userDefaults setObject : @ "ru" forKey : @ "Language" ] ;
- [ userDefaults synchronize ] ;
- break ;
- case 13 :
- [ userDefaults setObject : @ "fr" forKey : @ "Language" ] ;
- [ userDefaults synchronize ] ;
- break ;
- case 14 :
- [ userDefaults setObject : @ "ar" forKey : @ "Language" ] ;
- [ userDefaults synchronize ] ;
- break ;
- default :
- [ userDefaults setObject : @ "he" forKey : @ "Language" ] ;
- [ userDefaults synchronize ] ;
- break ;
- }
- }
Here, I have, for convenience, each button set its own tag (tag), which is passed to the switch cycle and, based on the label, I write down the line I need in NSUserDefaults in the category «Language». Here you can continue to experiment and add different popup message that the language is changed or you want to warn the user that the language will change to another. There is no limit fantasies.
Further, in our code, we will add a method that will look in NSUserDefaults when the application starts and check what is currently installed, and based on the label, load the Localizable.strings file we need from the desired language directory.
Actually the method itself will be as follows:
- - ( NSString * ) languageSelectedStringForKey : ( NSString * ) key {
- NSString * language = [ [ NSUserDefaults standardUserDefaults ] stringForKey : @ "Language" ] ;
- NSString * path;
- if ( [ language isEqual : @ "en" ] ) {
- path = [ [ NSBundle mainBundle ] pathForResource : @ "en" ofType : @ "lproj" ] ;
- }
- else if ( [ language isEqual : @ "he" ] ) {
- path = [ [ NSBundle mainBundle ] pathForResource : @ "he" ofType : @ "lproj" ] ;
- }
- else if ( [ language isEqual : @ "ru" ] ) {
- path = [ [ NSBundle mainBundle ] pathForResource : @ "ru" ofType : @ "lproj" ] ;
- }
- else if ( [ language isEqual : @ "fr" ] ) {
- path = [ [ NSBundle mainBundle ] pathForResource : @ "fr" ofType : @ "lproj" ] ;
- }
- else if ( [ language isEqual : @ "ar" ] ) {
- path = [ [ NSBundle mainBundle ] pathForResource : @ "ar" ofType : @ "lproj" ] ;
- }
- else {
- path = [ [ NSBundle mainBundle ] pathForResource : @ "he" ofType : @ "lproj" ] ;
- }
- NSBundle * languageBundle = [ NSBundle bundleWithPath : path ] ;
- NSString * str = [ languageBundle localizedStringForKey : ( key ) value : @ "" table : nil ] ;
- return str;
- }
You can change the name of the languageSelectedStringForKey method, as you like. The main thing is that it reflects the essence of what this method will do.
And now we have a button that sets us the desired localization. And there is a method that checks the current setting in NSUserDefaults and loads the language we need. In order for the language to change, you need to close the application and reopen it, not collapse, namely close it completely. While I was editing the article, I found for myself how to do it. in your case it may be different. in the switchLanguages method, after adding to NSUserDefaults, you need to call the method
[ self viewDidLoad ] ;. Here everyone can be individually, but this is where additional actions need to be carried out with the application. It worked for me.
Now back to our long-suffering myLabel .
and replace the line with this:
- myLabel.text = [ self languageSelectedStringForKey : @ "Account" ] ;
Now just do a Run and see how the text in myLabel changes to the one you specified when you clicked the button.
But if you want to localize your application, according to the installed language in the phone, for example, the user changed the interface setting to Russian, then you can write this standard line
- myLabel.text = NSLocalizedString ( @ "Account" , nil ) ;
Then the language will be changed everywhere to the one that you specified in the phone and all lines must be in that format. In this case, it will be a static localization of the application, while the user has not changed the interface of his phone to another.
With this approach, you do not need to write almost anything. No methods and code, and create those language directories with the necessary files that I described above and instead of using the custom method languageSelectedStringForKey , use only this NSLocalizedString . You can choose the approach that you like.
It is also important to know that localization is not just one line. I just explained how to start with a simple one, localization is the date and time, pictures and sound files can also be localized. Learn more about the localization of applications, you can watch the video from last year's WWDC2012 Session # 224. They explain everything in detail.
Those who are interested in this article will find a base on localization in it. This will save them several hours, and maybe even days to find the right solution. Do not be limited to one language, maybe your application will find support in another country. And if you have your own methods of implementing the same idea, you can write your tutorial mlm to leave a comment with the decision. others will read. And yes, dedicated to all the embittered http://habrahabr.ru/post/178747/
That was such a simple way. Patience and a little effort.
Happy Coding!
Source: https://habr.com/ru/post/180765/
All Articles