Mobile applications for managing smart home based on Z-Wave using OpenRemote
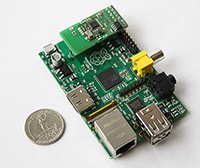
Not so long ago, the Z-Wave module for the Raspberry Pi - RaZBerry was introduced, which turns the mini-computer into a full-fledged smart home controller. The Z-Wave network is controlled via a web-based interface using the HTTP / JavaScript API. Using JavaScript, you can create a set of functions for automation (turning on / off the light, checking the temperature, polling the motion sensor, etc.), which you can then perform by sending an HTTP request.
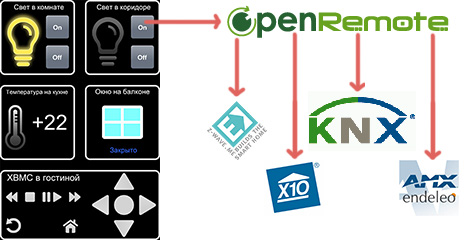
The product of the OpenRemote company of the same name allows you to create mobile applications for a smart home without programming, and different technologies can be used in the same application: Z-Wave, KNX, X10, ZigBee, computer control via ssh, etc.
OpenRemote is a server that executes any commands and an interface designer in which you create buttons, switches, labels, etc., and you already assign commands to these elements, in our case these are HTTP requests for executing JavaScript functions on the Z-Wave server.
')
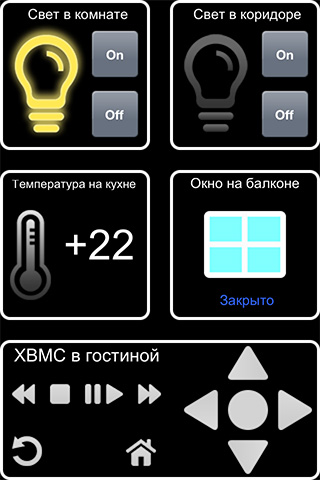
Next, I will tell you how to create a smart home control console for iPhone and Android! And this is what our applications will look like when we finish:
Under the cut a lot of pictures.
1. Creating a Z-Wave network using a Raspberry Pi + RaZberry controller
- Installing RaZberry Software on Raspberry Pi
- Adding Z-Wave devices
- Check device operation
- About the provided automation API
- Creating JS scripts for remote control
2. Installing the OpenRemote Controller and Mobile Application
3. Creating the design of the application and the logic of its work
- Design development
- Creation of control commands and sensors
- Association of buttons with commands
- Sync with mobile app
4. Summary
5. References
Creating a Z-Wave network using a Raspberry + RaZberry controller
RaZberry is a board connected to the Raspberry Pi via GPIO, which allows you to create and manage a Z-Wave network. For better understanding read Faq . Included with the board is the software that needs to be installed.
Installing RaZberry Software on Raspberry
The installer only supports Debian-based distributions (Raspbian, Xbian, etc.). However, you can install software on OpenElec and other OS with pens.
Run the command to install the Z-Way software:
wget -q -O - http://razberry.z-wave.me/install | sudo bash After installation, you must restart the Raspberry Pi to apply the changes for the Serial port.
To get into the control panel of a smart home, go to http: // IP_OF_YOUR_RASPBERRY: 8083 . The program interface is very simple, it is easy to understand it, there is documentation . Browsers have maximum compatibility with the interface: Chrome, Safari, Firefox, other browsers: IE, Opera may not work correctly.
Adding Z-Wave devices
Decide on a list of used equipment:
- Relay Fibaro Single Switch 3kW 2 pcs.
- Sensor for opening doors / windows and temperature Fibaro Door / Window Sensor 1pc.
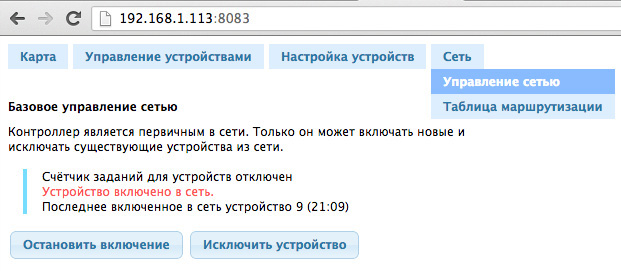
In the bottom menu, select Expert Mode . Using the top menu, go to the Network → Network Management tab and click on Enable (re) the device , it will start the process of waiting for the device to turn on the network, now on the device press the service button three times so that the controller can see and add it.
Check device operation
Make sure the device works. Go to the Device Settings tab, click on only that the added device in the left column and check the Stage of the interview , there should be an Interview passed successfully and there should not be any points and hacks Ø between.

If the interview is not completed (there are dots and Ø signs), then you can repeat it, to do this, at the bottom of the screen, click More Actions → Repeat the interview forcibly (expert mode must be enabled to see this menu).
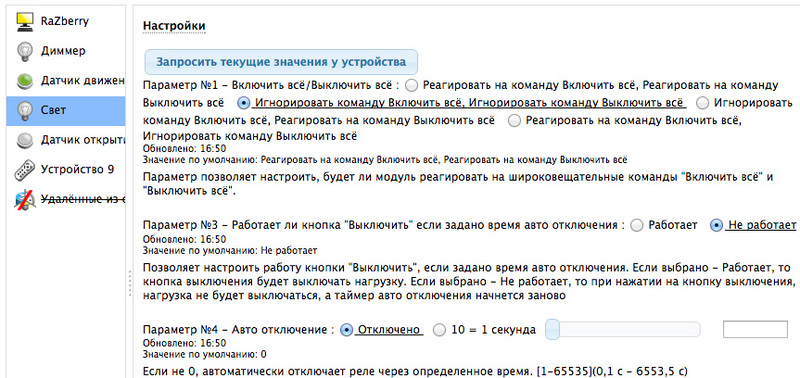
After a successful interview, on the Device Settings tab , you can configure some parameters of the device (do not forget to apply the settings with the Apply settings button to this device at the bottom of the screen, and also wake the device if it works on batteries):
To control the device, go to the Device Management → Switches tab.

About the provided automation API
Making sure that all devices are working correctly, we will now try to manage them remotely. There are several ways:
1. Using HTTP / JSON API
2. Using the JavaScript API
The HTTP / JSON API uses simple syntax to control devices.
You can turn on the light from the browser:
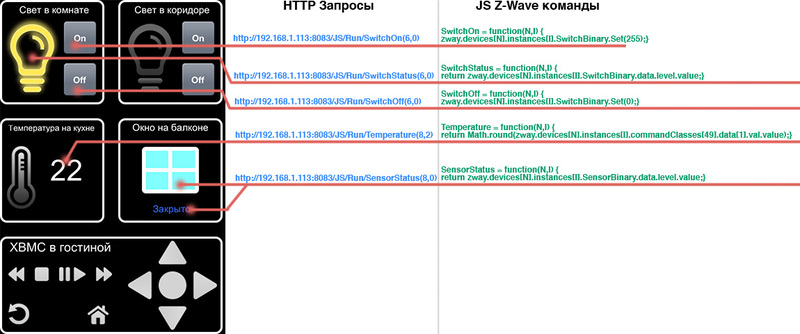
http://192.168.1.113:8083/ZWaveAPI/Run/devices[6].instances[0].SwitchBinary.Set(255) Or request a temperature:
http://192.168.1.113:8083/ZWaveAPI/Run/devices[8].instances[2].commandClasses[49].data[1].val.value JavaScript API allows you to write various automation scripts, for example: turn on / off the light, interrogate the sensor, get the temperature, turn off the light 2 minutes after switching on. These scripts can work independently (for example: at night the light is turned on only by 15%, so as not to blind the eyes), and can be called remotely using the HTTP / JSON API .
Light inclusion script:
SwitchOn = function(N,I) { zway.devices[N].instances[I].SwitchBinary.Set(255); } Calling the light-on script:
http://192.168.1.113:8083/JS/Run/SwitchOn(6,0) Unfortunately, direct access to devices using the HTTP / JSON API from OpenRemote is problematic for several reasons:
1. The characters [] must be recoded to UTF-8 in the OpenRemote Constructor
2. When polling sensors, OpenRemote expects “on” or “off”, and Z-Wave sensors can send 255 or 0.
3. For each device, you will have to write your request, and with the help of JS you can use only one function to enable various devices, changing only the function parameter in the request — the device number.
When using the JavaScript API, all these problems disappear - several functions of “helpers” will help to translate Z-Wave terms into concepts convenient for OpenRemote.
More details about the syntax of the HTTP / JSON API and JavaScript API can be found in a recent article on RaZberry on Habré .
Creating JS scripts for remote control
JS scripts are in / opt / z-way-server / automation / , create a file in which our automation functions openremote.js will be stored, so that it automatically loads when you turn on Z-Way, add to the end of the main automation file main.js :
// ====================================================== executeFile(automationRoot + "/" + "tags.js"); executeFile(automationRoot + "/" + "openremote.js"); startAutomation(); /opt/z-way-server/automation/openremote.js
// SwitchOn = function(N,I) { zway.devices[N].instances[I].SwitchBinary.Set(255); } // SwitchOff = function(N,I) { zway.devices[N].instances[I].SwitchBinary.Set(0); } // (/ ) SensorStatus = function(N,I) { return zway.devices[N].instances[I].SensorBinary.data.level.value; } // (/) SwitchStatus = function(N,I) { return zway.devices[N].instances[I].SwitchBinary.data.level.value; } // Temperature = function(N,I) { return Math.round(zway.devices[N].instances[I].commandClasses[49].data[1].val.value); } The parameter N is the device number in the network.
Parameter I - within a single device there can be physically several devices (channels), for example, 2 relays or a temperature sensor, a motion sensor, and a light sensor. Parameter I is the channel number within devices. If the device contains only one physical device, then this parameter is 0.
After creating the file, you need to either restart Z-Way with the command:
/etc/init.d/Z-Way restart or load the script manually by sending a request from the browser:
http://192.168.1.113:8083/JS/Run/executeFile("automation/openremote.js") You can check the functionality of the functions from the browser.
Turn on the light:
http://192.168.1.113:8083/JS/Run/SwitchOn(6,0) Request temperature:
http://192.168.1.113:8083/JS/Run/Temperature(8,2) The Z-Way server log helps very well in debugging:
tail -f /var/log/z-way-server.log If everything works, go to the next item!
Installing the OpenRemote Controller
The OpenRemote controller is a server that receives commands from a mobile or web application and then transmits them to another controller or server. In our case, this is a Z-Way server.
The site OpenRemote has a very detailed installation instructions, which I suggest to use:
Official instructions for installing OpenRemote in English
I note only that OpenRemote is written in Java and we need a version of a virtual machine with floating-point hardware:
JAVA for ARM processors in floating point support
Install the mobile application for your phone:
Mobile application OpenRemote
Before you start developing an application, for a better understanding, see how it will work:
Creating application design and logic of its work
All previous steps were only preparation for the main thing - the creation of a mobile application!
Open the cloud designer http://designer.openremote.org . To understand it is not difficult!
Design development
Immediately proceed to the design.
1. Click the UI Designer tab.
 and create a new panel, naming it for example, iPhone4.
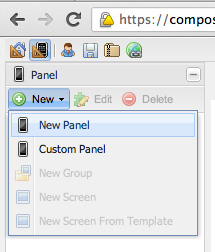
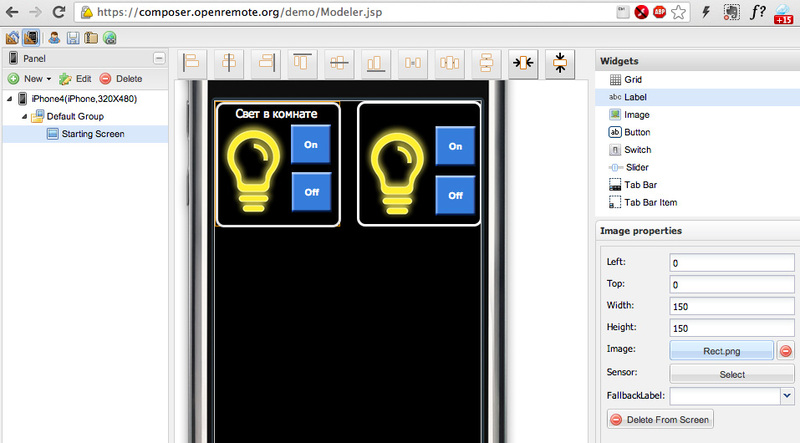
2. Drag buttons and images from the right panel to the iPhone screen.

3. In the properties of the image (right panel) load your pictures and use the Left, Right, Width, Height fields to arrange them on the screen as you need. I downloaded the images of the square and the light bulb, also added the inscription.
Creation of control commands and sensors
Now you need to assign commands to the buttons, and the light bulb image should change depending on the state of the light (on / off).
1. Click the tab
 and create a new device, calling it for example, Raspberry.
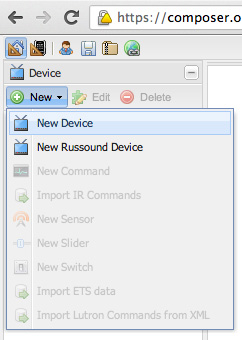
2. Select the newly created Raspberry device and create a new command for it. New →
 New command . Select the HTTP protocol , enter the URL of the JS command, and set the method to POST .
This command turns on device number 6. Similarly, we create commands to turn on other devices and shutdown commands.
http://192.168.1.113:8083/JS/Run/SwitchOn(6,0) 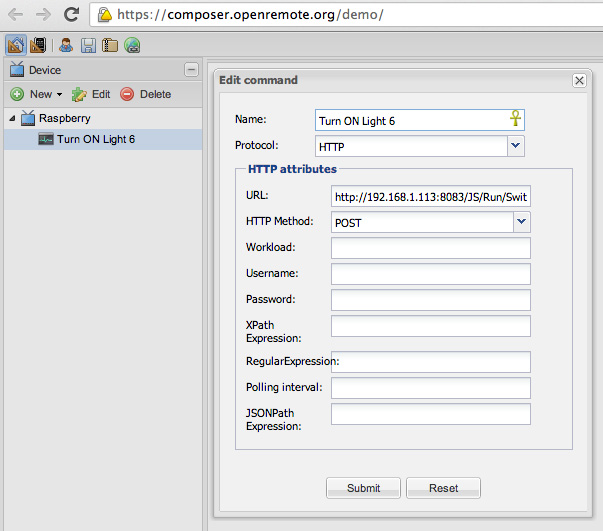
3. Now you need to create a team to poll the state of light. This command will be called every 2 seconds, so if you manually turn off the light, then in our application it will immediately become noticeable. As usual New →
New command , but in addition you need to specify how often to poll Polling , set 2s , the letter s is required.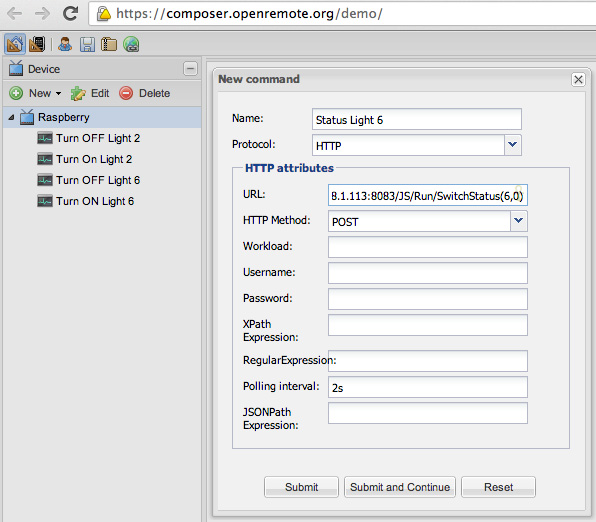
4. Create a Sensor that will process the received values from this command and transfer them to the image or inscriptions. New →
 New Sensor , select the command that the sensor will execute, set the custom type, add two on and off states, associate them with the returned Z-Wave values.
Association of buttons with commands
1. The last stage of application development, the association of buttons with commands. Return to the UI Designer app designer.
, select your button and in its properties set the command that it should execute.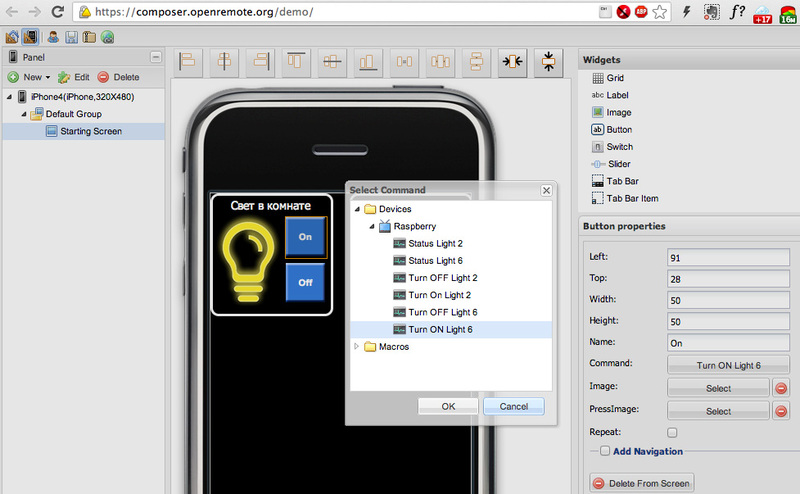
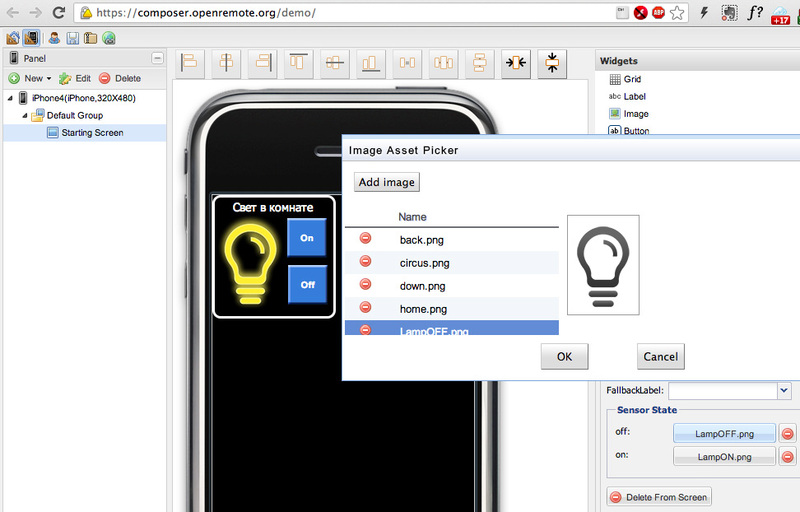
2. Associate the image with the sensor so that when the device state changes, the image in the application also changes. Select an image and install a sensor in its properties.

3. In the image properties, select which picture will be displayed if the sensor is sent on and which one if the sensor is sent off .
Sync with mobile app
1. Our application is ready, it remains only to pour it into the phone. Go to the address of the OpenRemote controller http: // OpenRemoteServer: 8080 / controller / , and click Sync with Online Designer , thus you upload the created application to the OpenRemote controller.

2. At http: // OpenRemoteServer: 8080 / webconsole / you can see our ready application.

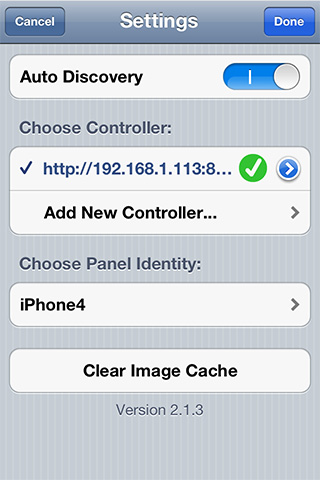
3. Open the OpenRemote application on your mobile, set the address of the OpenRemote server, select the iPhone4 panel that we created in the UI Designer .
4. Now you can test the application on your mobile, I continued to develop further, added a temperature sensor, a window opening sensor, and made a panel to control the XBMC media player.
Summary
I spent one day studying OpenRemote and developing the application! This tool is very easy to learn, which saves time. OpenRemote provides endless possibilities for home automation, combining various protocols under one wing, and RaZberry has proven to be a very good solution for managing Z-Wave equipment from OpenRemote.
Links
Z-Way Documentation
RaZberry - smart home based on Z-Wave and Raspberry Pi
How To Install OpenRemote Controller on Raspberry Pi
OpenRemote Configure Z-Wave for Razberry
Source: https://habr.com/ru/post/180749/
All Articles