3D printer UP! - review and first print
I already wrote about the gun , but about the printer that this gun did not print - no. Today I will talk about the 3D printer UP! Plus Chinese company PP3DP , which is sold in the Russian company 3DP Home .

According to the classification of printers, which I have already described , the printer belongs to the class “X Head / ZY Bed”. In simple terms, the head moves only along the X axis (if you look at the printer from the front - left and right. However, if you look at the printer from the back, it will be the same), and the platform on which it finds the printing object goes up and down and closer -farther. In general, UP is the only known printer in this category.
► Printer
From the store, the printer comes in a regular unmarked cardboard box, not counting the small blue PP3DP sticker. The box is so boring and ordinary compared to the printer itself, that I didn’t even take a picture of it (I’m lying, I just forgot to do it because I wanted to start typing).
The package is unusual. Although, it is unusual just as much as the device itself is unusual. It seems to me that in ten years we will write “The equipment is rather scanty - there are neither additional silicone cartridges , nor a roboruka removing from the stand - what is there to write about ..”
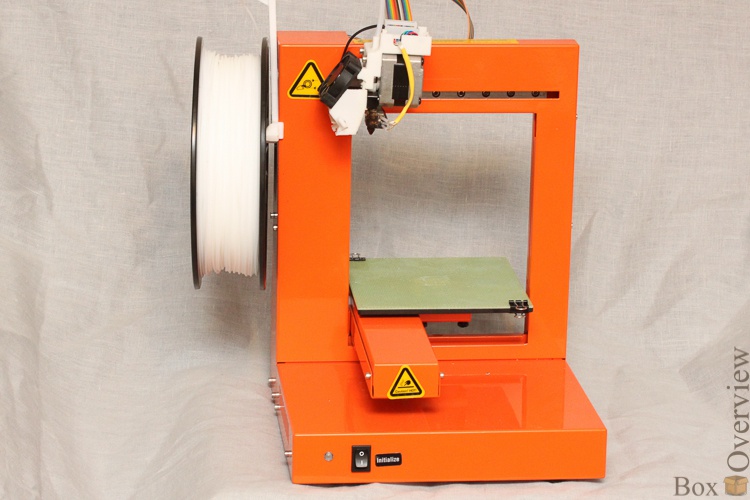
So, about the set of coasters. It includes: the printer itself:
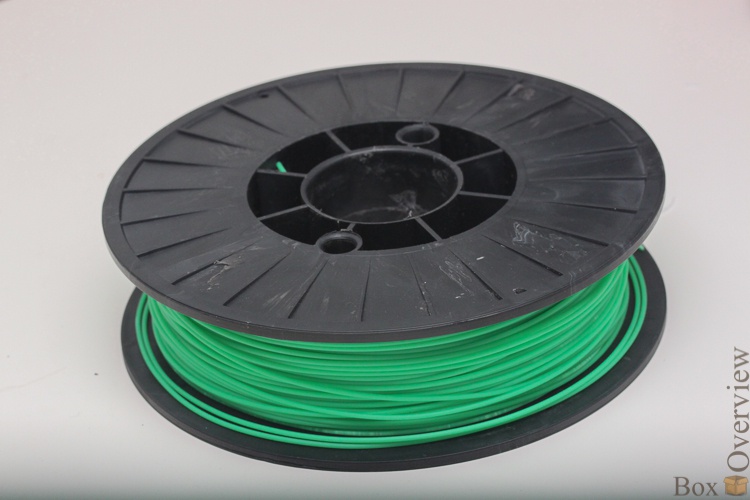
And a coil of 700 grams of ABS plastic:
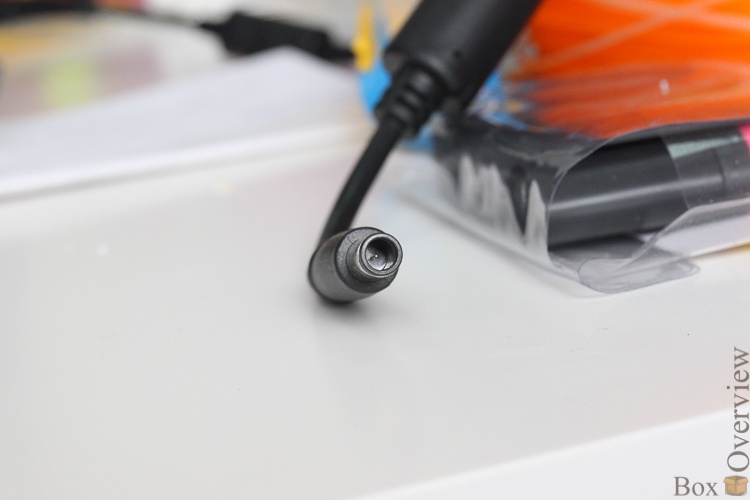
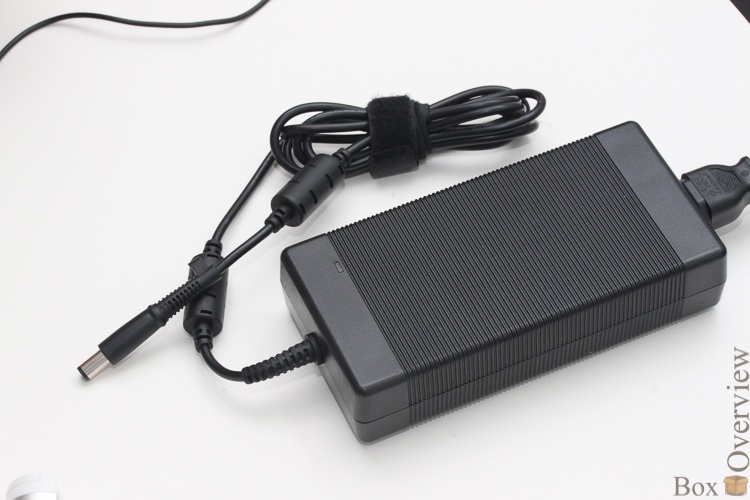
A large and heavy power supply of almost 200W from HP with their proprietary connector:
Such power is needed primarily for the operation of the extruder heater and stepper motors that move the printhead and the platform.
Three special perforated platforms, a handful of screws (most of them are not needed for the printer, and lay in my bag all the time), 3 screwdrivers that fit all the screws that are in the printer, and the key to remove the nozzle:

It is certainly good that the manufacturers made sure that the user could disassemble and assemble the printer (is there additional screws for this?), But in reality it turns out that only the print head is available to the user, and the warranty seal is on the printer case itself :

However, the printer is positioned as an option to “turn on and start typing”, which is indeed the case - during use I didn’t have to do something harder than removing the nozzle for cleaning - I’ll tell you about it, because the manual describes it rather poorly. And of course - "until you disassemble the device, you can not be considered its owner." Well, okay, we will not climb over the seal, but here’s what we’re going to do - the print head, we’ll take it apart.
Okay, go to the printer itself.
At the top of the printer is a printhead, almost completely covered with a cover with the name of the manufacturer’s website:

However, the cover is easily removed. I like it better when it is removed, because the extruder itself and the printing process can be seen this way:

The head consists of a heating element, to which two wires fit - the power supply of the heater and the thermal sensor:
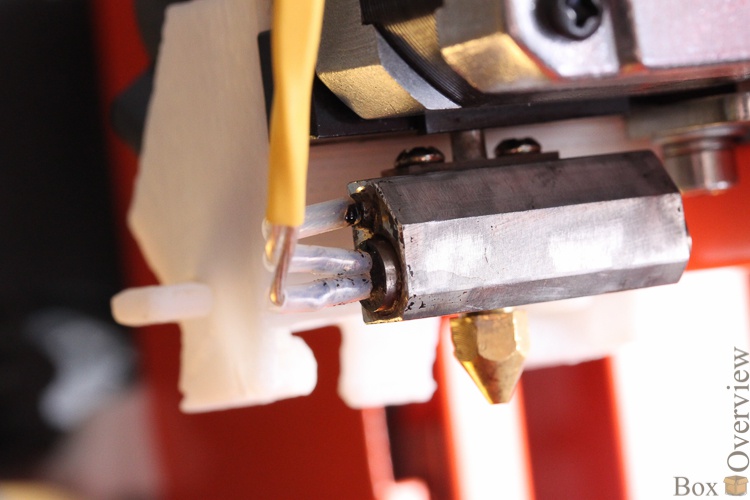
A nozzle with a calibrated hole is screwed into the heating element through which the plastic is squeezed out.

On the side of the print head - a small fan:

Its function is to create a temperature gradient with the heater. wrote the previous sentence, and realized that I was hit. Because now I have to explain why there is a fan standing there, why a temperature gradient is needed, and what this is all about. Since it pulls into a separate part, I will first talk about the rest of the printer, and then write about these jokes. But especially impatient, can read immediately
Then I will analyze (in the literal and figurative sense) the print head, so now I will not dwell on it. Go ahead, ie below. Below is atambourine, beat him uh ... no. Below is the platform:
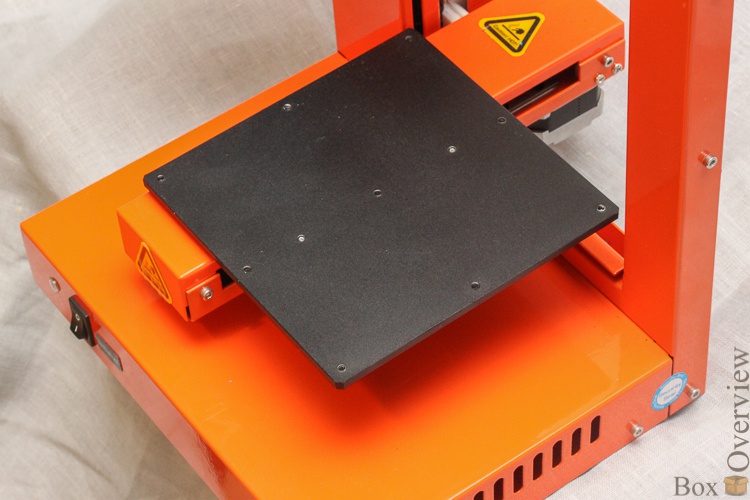
It can be as much lower as not very low, because it moves up and down, depending on the height of the model. They printed one layer - they moved the platform down, we printed the next one. And so time after time.Here the printer job is boring
On the bar that holds the platform - a warning icon:

Indeed, the platform is heated during operation, this is done so that the plastic does not tear it off due to temperature distortion.
It does not heat as much as the nozzle and the head, but by clutching it, it is quite possible to get a light burn. By the way, heating does not save from temperature deformation - when printing large parts of the area, the perforated platform still bends quite strongly, and it must be well fixed at the corners so that the model does not turn out to be bent.
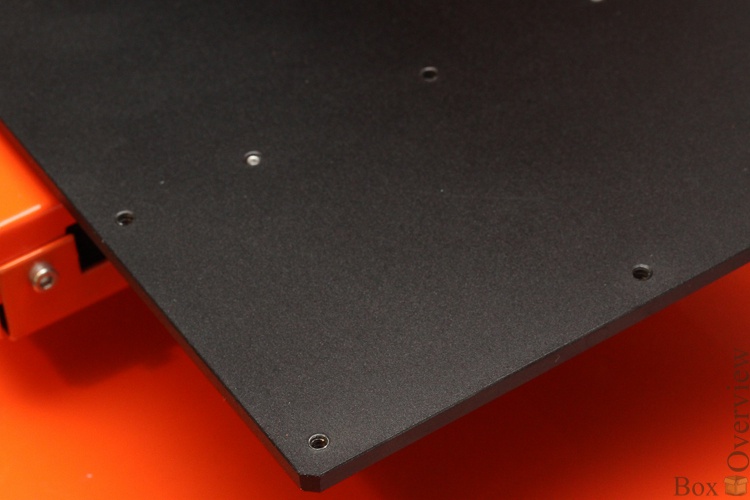
Below the platform is its mounting and calibration method in the form of three spring-loaded screws:

With their help, you can compensate for the bending of the platform or its inclination. In addition, the program still has a software calibration method.
On the back of the U-shaped bar - a series of screws and fasteners for the head plume (printed):
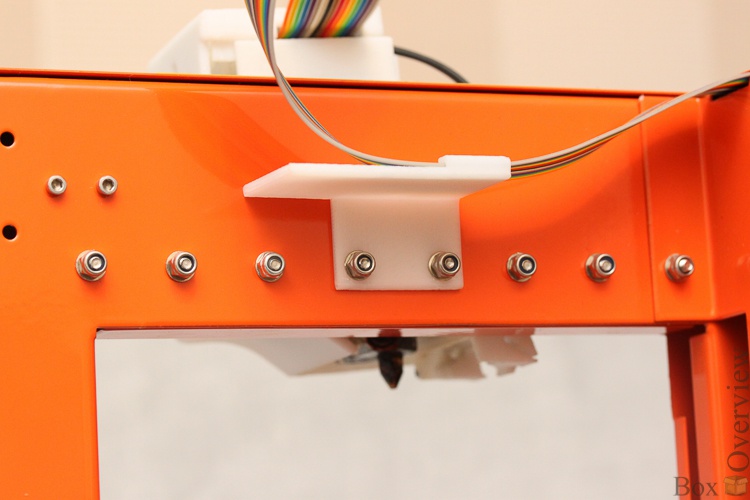
On the side (seen in the first photo) - mount for plastic coil, also, by the way, printed. It must be removed from the box and attached with one screw, then hang the coil on it.
The bottom of the printer consists of a base in which the electronics are located, and a part of the mechanics responsible for lifting the platform. On the front side there is a status LED, and an on / off / initialization button:

Why is there a sticker with the inscription - I do not know. A single press of the button will turn on the printer, a second press will begin initialization (setting zero on three axes), and a long press will turn off the printer.
The LED shows the status of the printer, but it does this rather stupidly - it blinks quickly when the model is loaded from the computer, it flashes slowly when printing, it stops blinking if there are problems.
On the sides - air vents and warranty seal. But the back is more interesting - the plugs and the power button:

Here, from left to right, the power connector, the power connector of the feeder (not used in the new model), the power button.
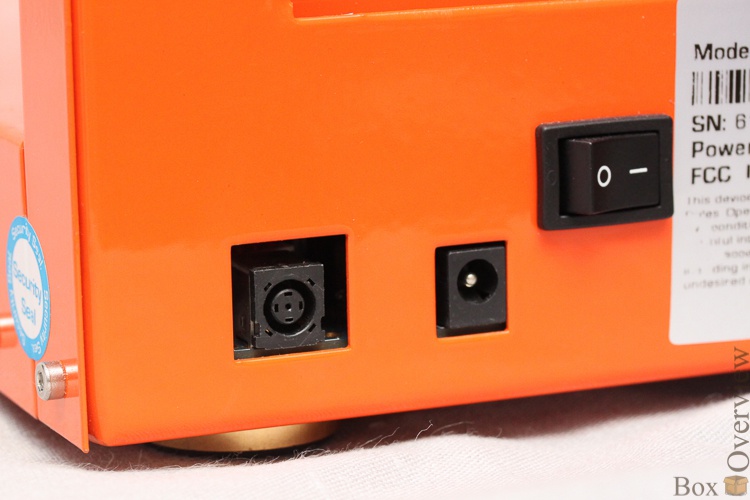
By the way, the power button is inconvenient. In case of problems - for example, you accidentally moved the platform and the head rested and stalled in the model, or just knocked on the hardware, the first thing you want to turn off the printer. How do you do this? Push your hand under the platform and press the switch. Electronics and motors are cut down and the platform like a guillotine falls on your hand. It is, of course, at the bottom where the bar is not hot, and not very heavy, but for the first time it is unexpected. Now, if we put the shutdown button on the side - there would be no problems.
The feeder was in the first printer model (which was simply called UP), and in the Plus version, which I describe, it has already been moved to the head. But the plug remained. Next we have a sticker:
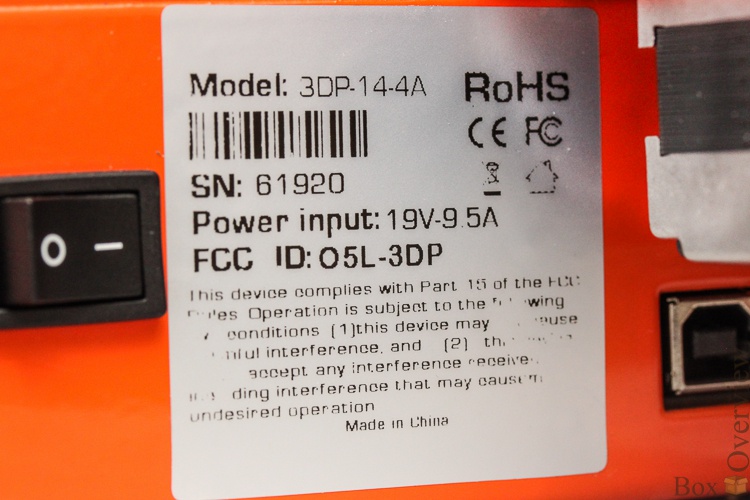
Telling about the name, model, and serial number, as well as showing the appetite of the printer - almost 10 amps at 20 volts is quite a lot. Next, in the corner, the USB connector lurks:
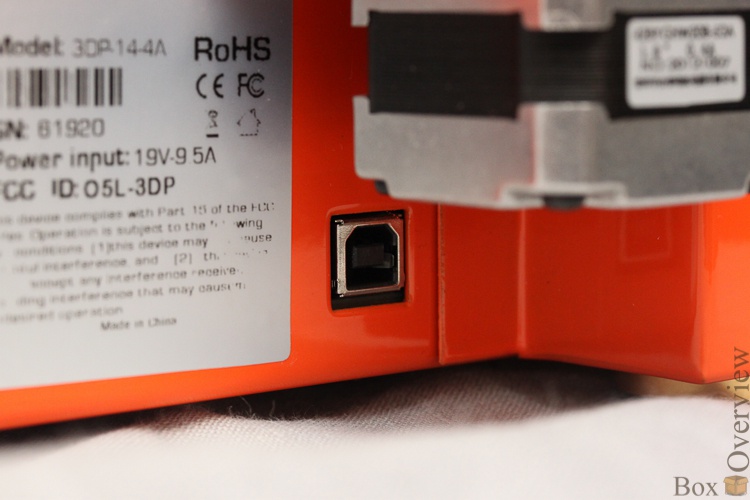
By the way, it is also located uncomfortable - right under the engine. He certainly does not touch him, but it is inconvenient to insert him. Although, I’m already driving it - I inserted it twice in all - for the first time, and when I moved the printer to another table.
')
► Entertaining rheology or temperature gradient.
Understanding the printer and printing, I suddenly found out for myself that for the simple task of extruding heated plastic it is necessary to take into account the rather complex physical properties of plastic.
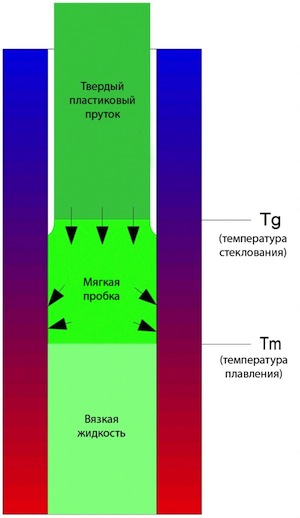
In short: simply heating the head will not come out - the plastic does not go like water immediately from a solid to a liquid state, but first becomes soft. This very softness of plastic is a harmful phenomenon and manufacturers of printers struggle with it in every possible way, reducing the amount of plastic with glass transition temperature as much as possible. This is done by creating a temperature gradient at which liquid plastic is inside the head and below, and still solid in the feed tube and above.
The fact is that the pressure required to push a viscous (even in the “liquid” state) plastic is not created by the pump, but by the rod itself - it is pushed with a force into the head by a gear wheel with notches, worn on the shaft of the stepping motor. The bar presses on the plastic melt, and the only thing left is how to get out through the nozzle opening. The bar passing further melts and the next part of the bar presses on it.
But plastic at glass transition temperature has an interesting property - it seems soft and deformable, but at the same time it rubs against the walls of the feed tube like a solid body.
Different projects implement this node in different ways - someone makes the tube just long enough for the temperature to drop itself, but gets another problem - the longer the tube, the higher demands are placed on the smoothness of the inner walls and joints.
If it starts expanding or narrowing somewhere, or not only a cavity appears in the wall of the tube, but simply a recess or barb, then next to this place there will be eddies of plastic flow and its stagnation. Stagnation is when the flow of plastic goes along the shortest path to the nozzle, around it is molten plastic that moves slower than the flow or does not move at all. Plastic life at high temperature is limited to a few minutes, because it starts to bubble, lose plasticity, and then harden and crumble into grains. The grains are captured by the flow and fall into the nozzle, hammering it.
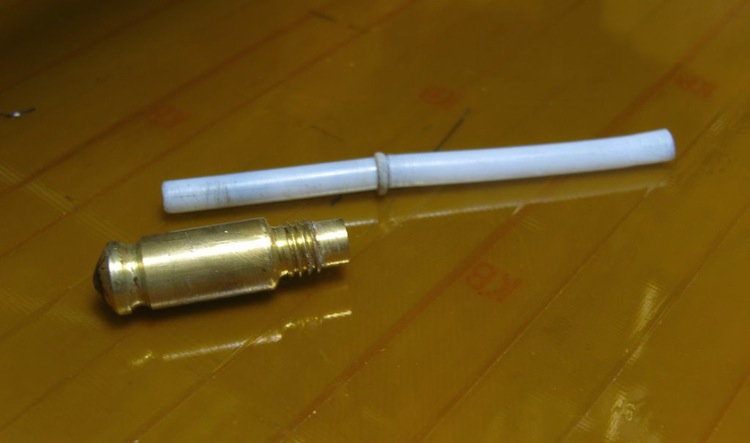
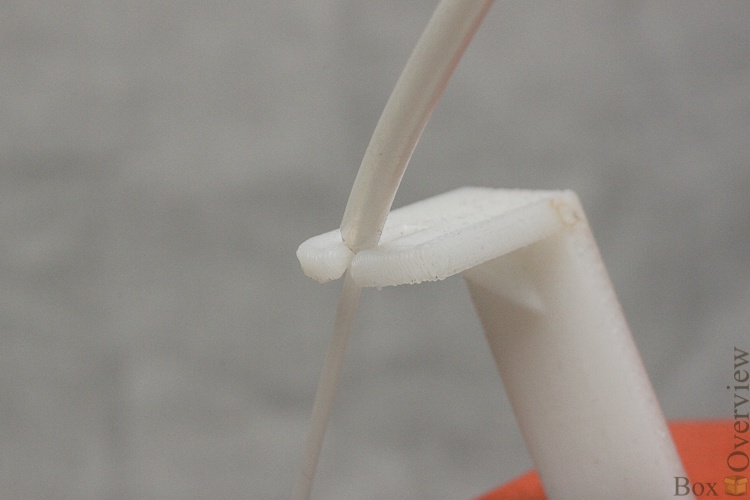
This problem is also solved - the tube is made of PTFE, to which the plastic simply does not stick. But another problem arises - the need to seal the joints very readily - the fluoroplastic is very fluid under pressure and creeps into the tiniest gap in the form of a bubble (because the pressure inside the head is large enough). Here, for example, a fluoroplastic tube that crawled under pressure between the head and the tube:
For example, PR of a wonderful person who describes the assembly and operation of a RepRap-printer in a diary, and who knows firsthand about this problem with the nozzle. I stole two previous pictures from him. For example, here he talks about the design of the nozzle, and here about how they have encountered problems.
UP manufacturers didn’t think about it, and made the delivery tube as short as possible, and they created a sufficient temperature gradient with a radiator and a fan. This completely removes these problems - the plastic never got stuck and the engine gear hid it without any problems, although the printer worked almost constantly during the day. The only disadvantage of this solution is that the fan is quite noisy, and often covers the noise from the stepper motors. But in general, the printer is noisy at work no more than a laptop when heated or a computer.
► Preparation and first print
Despite the principle of "First try, and then read the instructions," I overcame myself, and not wanting to spoil the printer still downloaded  user manual from the Russian site and read it. I warn you against this, it describes the assembly, installation and configuration of the old version, and the change with the new one is enough. It describes the installation of the thread feeder (it is not in the new model), the installation of the print head (it is already installed), the incorrect process of setting the height of the head, and the process of painting the platform, instead of adjusting the height for the perforated plate.
Download better version with offsite, there are a lot of pictures. Although it does not reflect the whole reality. For example, there are several tools that were not included with the printer, and a version of the program is described that does the calibration automatically by printing several bands with different heights.
Therefore, some subtleties had to reach your mind. We unpack the printer, we remove clamps from green plastic (one fastens the printing head, the second - a platform)
We connect the printer to the power supply and computer, install the downloaded program, show Windows on the folder with the drivers.
After installing the drivers, run the program, select the Initialize item in the menu, wait until the printer stops moving parts and squeaking. We take a textolite platform, fasten it to the platform. A set of screws and holes in the platform and the platform are hinted to us that the platform should be screwed:
But this is a deceptive impression. This can be done, but this is terribly inconvenient - you need to unscrew it each time to remove the platform. We will act more cunningly, and we will buy a set of clothespins for the smallest documents in a stationery store:
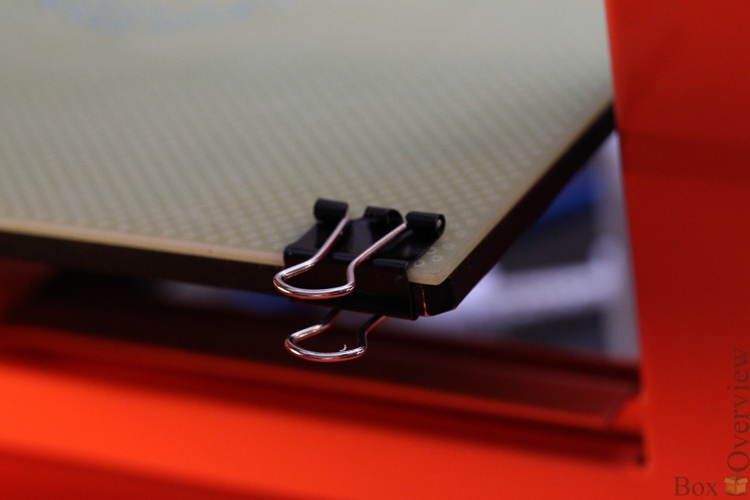
2 pieces perfectly clamp the pad and are suitable for small objects:

For large models, 4 jokes will be needed - otherwise the platform will bend a bit due to the thermal expansion of the plastic. Next we need to set the height of the print head - the distance from the nozzle to the pad. This is done in the program:

Set the height, for example 130, click To and watch the platform. Gradually increasing the height, we achieve a reduction in clearance between the platform and the head. I have this height was 133.4, and after cleaning the head was 133.6. After you have found the height, click Set Nozzle Height, OK.
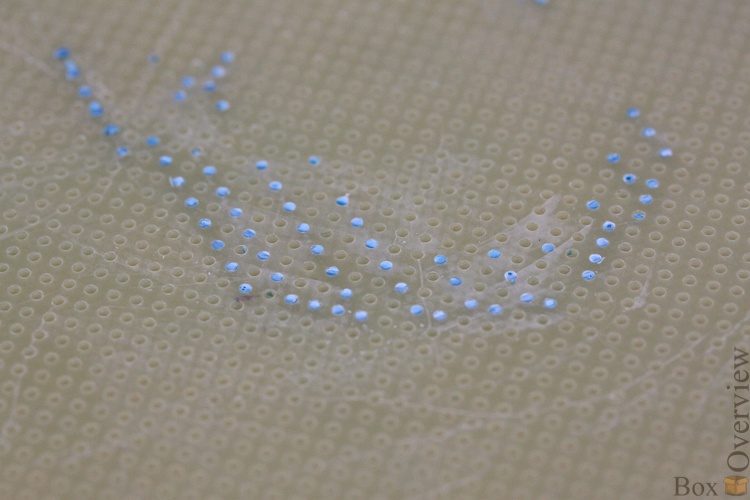
The point here is this. There are holes in the platform. A lot of holes. When printing the substrate, in order that the plastic does not detach from the platform, the extruder head squeezes the soft plastic into these holes, securing the substrate. Calibration is necessary to find such a height that the plastic is not pushed completely into the holes, but also lay on their surface. Like this:
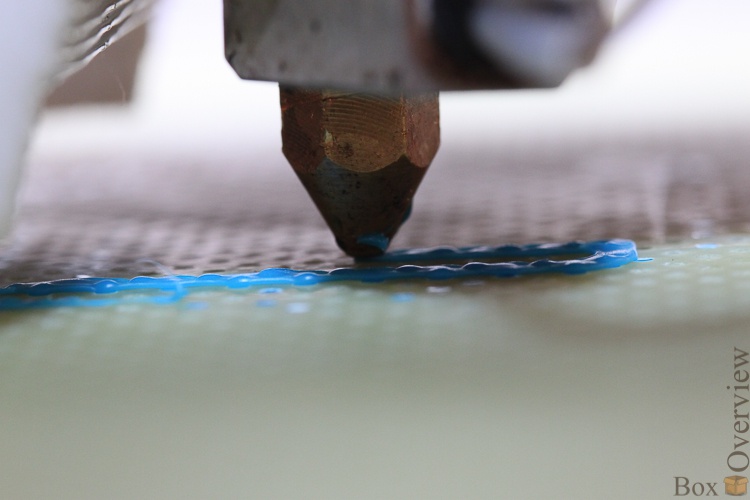
Flat sausage on the surface of the site. Not a thin translucent layer, and not a round sausage. Here's an example of how not to do it - it will be almost impossible to tear a model from the substrate:
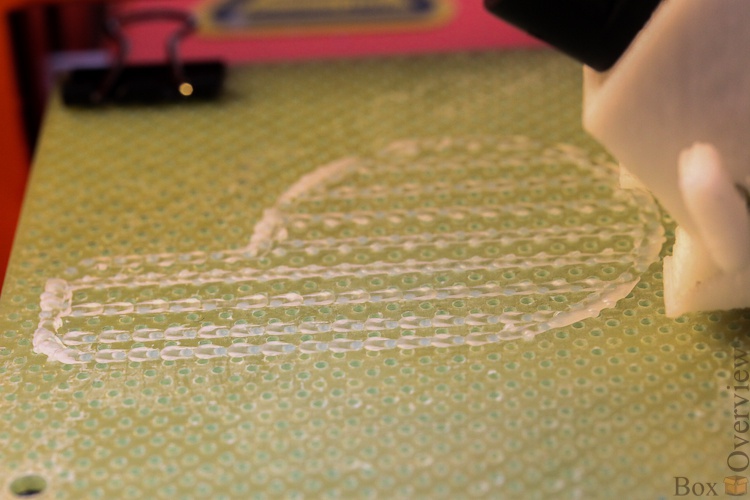
In general, the printer is not very strict about errors, and if you put a little at the wrong height, nothing terrible will happen. If it is too large (ie, the head is too close to the surface), then you will have holes filled with plastic in the platform:
Although they will appear over time. The plastic can be pushed out with a needle or you can just throw the pad in acetone for a couple of hours - the plastic will dissolve.
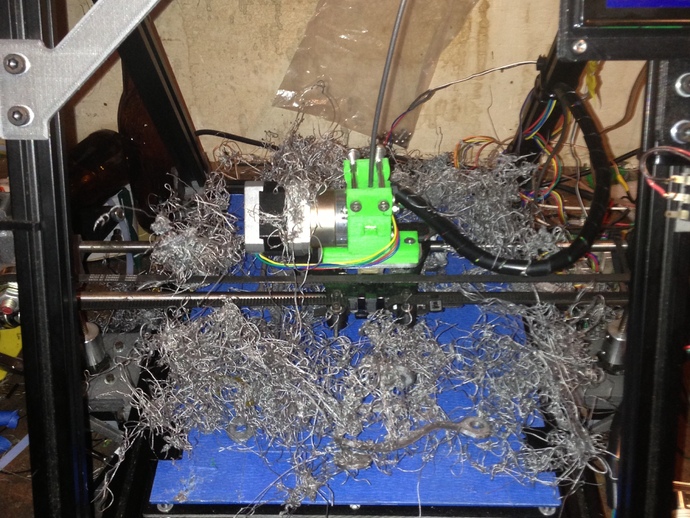
If the height is low (that is, too far from the surface), then the model will not stick to the platform, and may deform during printing. Or fly off the platform at all with a sharp movement - if the plastic does not fall into the holes at all. In this case, you will witness an entertaining spectacle - Angels hair. The printer will continue to work according to the program, moving the head and squeezing out plastic, which will no longer stick to the model, but will freeze in the air. It looks like this:
Or, my option . Photo is crap, so I don’t show it.
In any case, nothing can be spoiled in the printer in this way, unless you dirty the head, so you can experiment - print a couple of models at different settings and understand the principle, after which you can literally calibrate “by eye” - simply by evaluating the gap. Although, this should be done quite rarely - only when changing the extruder nozzle, or removing-installing the print head.
In the English version of the manual, this procedure is also described, but they have some other version of the program, which itself prints several test strips and the calibration comes down to choosing the most successful one. My program was not so smart, and she did not offer to do anything like that.
Install the coil with plastic on the holder, release the end of the plastic, pass it through the holder mounting:
We skip the plastic through the tube from the kit, so that at one end the tube rests on the holder and the other on the print head.

Accordingly, the tip of the plastic should go inside the head.
We go to Maintenance, press the To Bottom button (if the platform is at the top) so that the plastic does not smear over it, then the New spool button, select the plastic type - ABS and the default weight is 700 grams.
The program needs weight in order not to start printing a model for which there is guaranteed not enough plastic. If you each time you change the coil will enter the weight of the plastic on it, then the program will take away from the weight of the plastic the weight of the current model, and when there is not enough plastic remaining, you will be notified. And the type of plastic must be chosen, because they have different melting points. This is where you should take this seriously, and still read on the package what type of plastic you are now putting into the printer. The wrong choice could theoretically spoil the nozzle, or the heating head.
Press the Extrude button. The printer beeps, then heats up, then again, and squeezes a trickle of plastic from the salp:
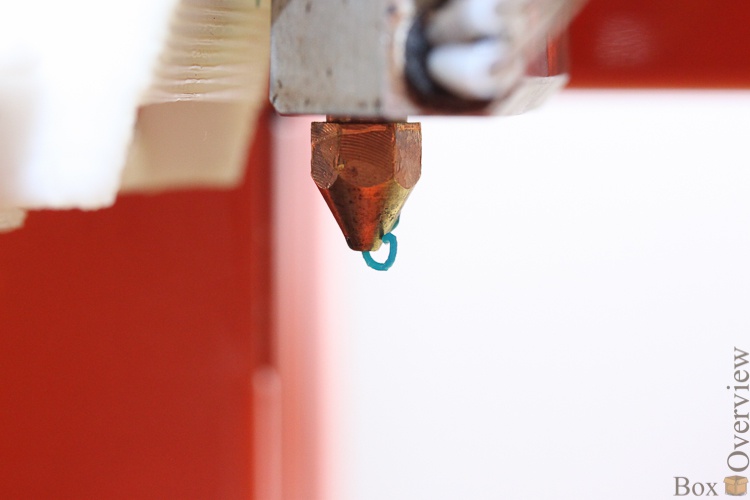
All this means the supply and heating system is normal, and the adjustment is complete.
Now you can go to thingiverse.com , select any model, download the STL file, and load it into the program by double clicking on it, or through the Open menu in the program itself.
If the model is placed in the workspace, then click Auto Place, then Print, and click OK in the window. I will tell about all the other parameters later, now we have one task - to print at least something.
The program calculates the position and support, cuts the model into layers, sends them to the printer (it can be quite long if the model is large), after heating the head and the platform, the printer will finally start printing:

Layer by layer, attachment to the platform, then the first layer of the substrate:

Then the second:
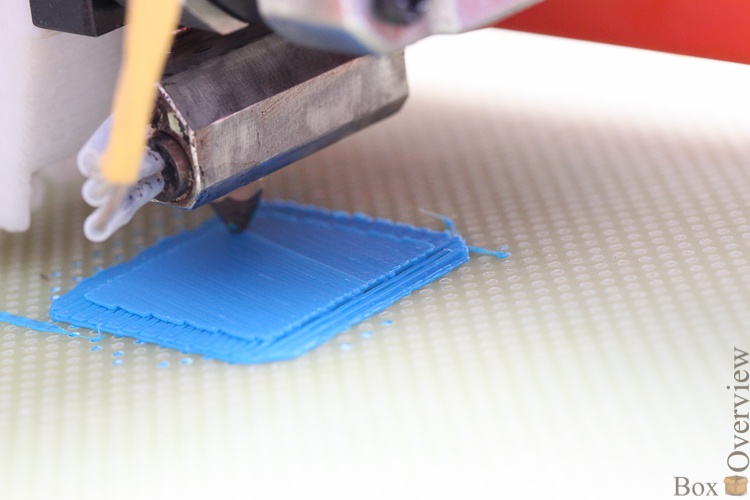
Then a couple more layers:
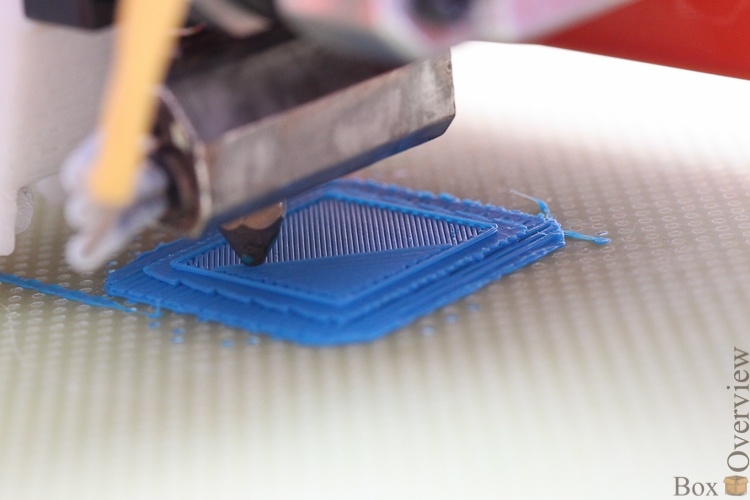
And then the object itself:

In this case, the cube:

Congratulations, you have aboy, uh ... cube.
► Cost
The cost of the printer - 69900 rubles when buying in 3DP Home.
When buying on the manufacturer's website, the printer will cost $ 1,499 + $ 192 = $ 1,691.
The cost of a plastic coil weighing 700 grams costs 2400 rubles and $ 70, respectively.
True, plastic with a thickness of 1.75mm can be bought from many companies, if you don’t bother with the “company”, and it is much cheaper. But the solution to the problems because of the quality of the plastic falls on you - at least you will have to make a filter that cleans the external plastic from dust.
► Links
 Printer manufacturer
 Official distributor in the Russian Federation, the company 3DP Home
 Overview of the previous version of the printer from 3dnews
If you do not have an account on Habrahabr, you can read and comment on our articles on BoxOverview.com
According to the classification of printers, which I have already described , the printer belongs to the class “X Head / ZY Bed”. In simple terms, the head moves only along the X axis (if you look at the printer from the front - left and right. However, if you look at the printer from the back, it will be the same), and the platform on which it finds the printing object goes up and down and closer -farther. In general, UP is the only known printer in this category.
► Printer
From the store, the printer comes in a regular unmarked cardboard box, not counting the small blue PP3DP sticker. The box is so boring and ordinary compared to the printer itself, that I didn’t even take a picture of it (I’m lying, I just forgot to do it because I wanted to start typing).The package is unusual. Although, it is unusual just as much as the device itself is unusual. It seems to me that in ten years we will write “The equipment is rather scanty - there are neither additional silicone cartridges , nor a roboruka removing from the stand - what is there to write about ..”
So, about the set of coasters. It includes: the printer itself:
And a coil of 700 grams of ABS plastic:
A large and heavy power supply of almost 200W from HP with their proprietary connector:
Such power is needed primarily for the operation of the extruder heater and stepper motors that move the printhead and the platform.
Three special perforated platforms, a handful of screws (most of them are not needed for the printer, and lay in my bag all the time), 3 screwdrivers that fit all the screws that are in the printer, and the key to remove the nozzle:
It is certainly good that the manufacturers made sure that the user could disassemble and assemble the printer (is there additional screws for this?), But in reality it turns out that only the print head is available to the user, and the warranty seal is on the printer case itself :
However, the printer is positioned as an option to “turn on and start typing”, which is indeed the case - during use I didn’t have to do something harder than removing the nozzle for cleaning - I’ll tell you about it, because the manual describes it rather poorly. And of course - "until you disassemble the device, you can not be considered its owner." Well, okay, we will not climb over the seal, but here’s what we’re going to do - the print head, we’ll take it apart.
Okay, go to the printer itself.
At the top of the printer is a printhead, almost completely covered with a cover with the name of the manufacturer’s website:
However, the cover is easily removed. I like it better when it is removed, because the extruder itself and the printing process can be seen this way:
The head consists of a heating element, to which two wires fit - the power supply of the heater and the thermal sensor:
A nozzle with a calibrated hole is screwed into the heating element through which the plastic is squeezed out.
On the side of the print head - a small fan:
Its function is to create a temperature gradient with the heater. wrote the previous sentence, and realized that I was hit. Because now I have to explain why there is a fan standing there, why a temperature gradient is needed, and what this is all about. Since it pulls into a separate part, I will first talk about the rest of the printer, and then write about these jokes. But especially impatient, can read immediately
Then I will analyze (in the literal and figurative sense) the print head, so now I will not dwell on it. Go ahead, ie below. Below is a
It can be as much lower as not very low, because it moves up and down, depending on the height of the model. They printed one layer - they moved the platform down, we printed the next one. And so time after time.
On the bar that holds the platform - a warning icon:
Indeed, the platform is heated during operation, this is done so that the plastic does not tear it off due to temperature distortion.
It does not heat as much as the nozzle and the head, but by clutching it, it is quite possible to get a light burn. By the way, heating does not save from temperature deformation - when printing large parts of the area, the perforated platform still bends quite strongly, and it must be well fixed at the corners so that the model does not turn out to be bent.
Below the platform is its mounting and calibration method in the form of three spring-loaded screws:
With their help, you can compensate for the bending of the platform or its inclination. In addition, the program still has a software calibration method.
On the back of the U-shaped bar - a series of screws and fasteners for the head plume (printed):
On the side (seen in the first photo) - mount for plastic coil, also, by the way, printed. It must be removed from the box and attached with one screw, then hang the coil on it.
The bottom of the printer consists of a base in which the electronics are located, and a part of the mechanics responsible for lifting the platform. On the front side there is a status LED, and an on / off / initialization button:
Why is there a sticker with the inscription - I do not know. A single press of the button will turn on the printer, a second press will begin initialization (setting zero on three axes), and a long press will turn off the printer.
The LED shows the status of the printer, but it does this rather stupidly - it blinks quickly when the model is loaded from the computer, it flashes slowly when printing, it stops blinking if there are problems.
On the sides - air vents and warranty seal. But the back is more interesting - the plugs and the power button:
Here, from left to right, the power connector, the power connector of the feeder (not used in the new model), the power button.
By the way, the power button is inconvenient. In case of problems - for example, you accidentally moved the platform and the head rested and stalled in the model, or just knocked on the hardware, the first thing you want to turn off the printer. How do you do this? Push your hand under the platform and press the switch. Electronics and motors are cut down and the platform like a guillotine falls on your hand. It is, of course, at the bottom where the bar is not hot, and not very heavy, but for the first time it is unexpected. Now, if we put the shutdown button on the side - there would be no problems.
The feeder was in the first printer model (which was simply called UP), and in the Plus version, which I describe, it has already been moved to the head. But the plug remained. Next we have a sticker:
Telling about the name, model, and serial number, as well as showing the appetite of the printer - almost 10 amps at 20 volts is quite a lot. Next, in the corner, the USB connector lurks:
By the way, it is also located uncomfortable - right under the engine. He certainly does not touch him, but it is inconvenient to insert him. Although, I’m already driving it - I inserted it twice in all - for the first time, and when I moved the printer to another table.
')
► Entertaining rheology or temperature gradient.
Understanding the printer and printing, I suddenly found out for myself that for the simple task of extruding heated plastic it is necessary to take into account the rather complex physical properties of plastic.In short: simply heating the head will not come out - the plastic does not go like water immediately from a solid to a liquid state, but first becomes soft. This very softness of plastic is a harmful phenomenon and manufacturers of printers struggle with it in every possible way, reducing the amount of plastic with glass transition temperature as much as possible. This is done by creating a temperature gradient at which liquid plastic is inside the head and below, and still solid in the feed tube and above.
The fact is that the pressure required to push a viscous (even in the “liquid” state) plastic is not created by the pump, but by the rod itself - it is pushed with a force into the head by a gear wheel with notches, worn on the shaft of the stepping motor. The bar presses on the plastic melt, and the only thing left is how to get out through the nozzle opening. The bar passing further melts and the next part of the bar presses on it.
But plastic at glass transition temperature has an interesting property - it seems soft and deformable, but at the same time it rubs against the walls of the feed tube like a solid body.
Different projects implement this node in different ways - someone makes the tube just long enough for the temperature to drop itself, but gets another problem - the longer the tube, the higher demands are placed on the smoothness of the inner walls and joints.
If it starts expanding or narrowing somewhere, or not only a cavity appears in the wall of the tube, but simply a recess or barb, then next to this place there will be eddies of plastic flow and its stagnation. Stagnation is when the flow of plastic goes along the shortest path to the nozzle, around it is molten plastic that moves slower than the flow or does not move at all. Plastic life at high temperature is limited to a few minutes, because it starts to bubble, lose plasticity, and then harden and crumble into grains. The grains are captured by the flow and fall into the nozzle, hammering it.
This problem is also solved - the tube is made of PTFE, to which the plastic simply does not stick. But another problem arises - the need to seal the joints very readily - the fluoroplastic is very fluid under pressure and creeps into the tiniest gap in the form of a bubble (because the pressure inside the head is large enough). Here, for example, a fluoroplastic tube that crawled under pressure between the head and the tube:
For example, PR of a wonderful person who describes the assembly and operation of a RepRap-printer in a diary, and who knows firsthand about this problem with the nozzle. I stole two previous pictures from him. For example, here he talks about the design of the nozzle, and here about how they have encountered problems.
UP manufacturers didn’t think about it, and made the delivery tube as short as possible, and they created a sufficient temperature gradient with a radiator and a fan. This completely removes these problems - the plastic never got stuck and the engine gear hid it without any problems, although the printer worked almost constantly during the day. The only disadvantage of this solution is that the fan is quite noisy, and often covers the noise from the stepper motors. But in general, the printer is noisy at work no more than a laptop when heated or a computer.
► Preparation and first print
Despite the principle of "First try, and then read the instructions," I overcame myself, and not wanting to spoil the printer still downloaded user manual from the Russian site and read it. I warn you against this, it describes the assembly, installation and configuration of the old version, and the change with the new one is enough. It describes the installation of the thread feeder (it is not in the new model), the installation of the print head (it is already installed), the incorrect process of setting the height of the head, and the process of painting the platform, instead of adjusting the height for the perforated plate.Download better
version with offsite, there are a lot of pictures. Although it does not reflect the whole reality. For example, there are several tools that were not included with the printer, and a version of the program is described that does the calibration automatically by printing several bands with different heights.Therefore, some subtleties had to reach your mind. We unpack the printer, we remove clamps from green plastic (one fastens the printing head, the second - a platform)
We connect the printer to the power supply and computer, install the downloaded program, show Windows on the folder with the drivers.
After installing the drivers, run the program, select the Initialize item in the menu, wait until the printer stops moving parts and squeaking. We take a textolite platform, fasten it to the platform. A set of screws and holes in the platform and the platform are hinted to us that the platform should be screwed:
But this is a deceptive impression. This can be done, but this is terribly inconvenient - you need to unscrew it each time to remove the platform. We will act more cunningly, and we will buy a set of clothespins for the smallest documents in a stationery store:
2 pieces perfectly clamp the pad and are suitable for small objects:
For large models, 4 jokes will be needed - otherwise the platform will bend a bit due to the thermal expansion of the plastic. Next we need to set the height of the print head - the distance from the nozzle to the pad. This is done in the program:
Set the height, for example 130, click To and watch the platform. Gradually increasing the height, we achieve a reduction in clearance between the platform and the head. I have this height was 133.4, and after cleaning the head was 133.6. After you have found the height, click Set Nozzle Height, OK.
The point here is this. There are holes in the platform. A lot of holes. When printing the substrate, in order that the plastic does not detach from the platform, the extruder head squeezes the soft plastic into these holes, securing the substrate. Calibration is necessary to find such a height that the plastic is not pushed completely into the holes, but also lay on their surface. Like this:
Flat sausage on the surface of the site. Not a thin translucent layer, and not a round sausage. Here's an example of how not to do it - it will be almost impossible to tear a model from the substrate:
In general, the printer is not very strict about errors, and if you put a little at the wrong height, nothing terrible will happen. If it is too large (ie, the head is too close to the surface), then you will have holes filled with plastic in the platform:
Although they will appear over time. The plastic can be pushed out with a needle or you can just throw the pad in acetone for a couple of hours - the plastic will dissolve.
If the height is low (that is, too far from the surface), then the model will not stick to the platform, and may deform during printing. Or fly off the platform at all with a sharp movement - if the plastic does not fall into the holes at all. In this case, you will witness an entertaining spectacle - Angels hair. The printer will continue to work according to the program, moving the head and squeezing out plastic, which will no longer stick to the model, but will freeze in the air. It looks like this:
Or, my option . Photo is crap, so I don’t show it.
In any case, nothing can be spoiled in the printer in this way, unless you dirty the head, so you can experiment - print a couple of models at different settings and understand the principle, after which you can literally calibrate “by eye” - simply by evaluating the gap. Although, this should be done quite rarely - only when changing the extruder nozzle, or removing-installing the print head.
In the English version of the manual, this procedure is also described, but they have some other version of the program, which itself prints several test strips and the calibration comes down to choosing the most successful one. My program was not so smart, and she did not offer to do anything like that.
Install the coil with plastic on the holder, release the end of the plastic, pass it through the holder mounting:
We skip the plastic through the tube from the kit, so that at one end the tube rests on the holder and the other on the print head.
Accordingly, the tip of the plastic should go inside the head.
We go to Maintenance, press the To Bottom button (if the platform is at the top) so that the plastic does not smear over it, then the New spool button, select the plastic type - ABS and the default weight is 700 grams.
The program needs weight in order not to start printing a model for which there is guaranteed not enough plastic. If you each time you change the coil will enter the weight of the plastic on it, then the program will take away from the weight of the plastic the weight of the current model, and when there is not enough plastic remaining, you will be notified. And the type of plastic must be chosen, because they have different melting points. This is where you should take this seriously, and still read on the package what type of plastic you are now putting into the printer. The wrong choice could theoretically spoil the nozzle, or the heating head.
Press the Extrude button. The printer beeps, then heats up, then again, and squeezes a trickle of plastic from the salp:
All this means the supply and heating system is normal, and the adjustment is complete.
Now you can go to thingiverse.com , select any model, download the STL file, and load it into the program by double clicking on it, or through the Open menu in the program itself.
If the model is placed in the workspace, then click Auto Place, then Print, and click OK in the window. I will tell about all the other parameters later, now we have one task - to print at least something.
The program calculates the position and support, cuts the model into layers, sends them to the printer (it can be quite long if the model is large), after heating the head and the platform, the printer will finally start printing:
Layer by layer, attachment to the platform, then the first layer of the substrate:
Then the second:
Then a couple more layers:
And then the object itself:
In this case, the cube:
Congratulations, you have a
► Cost
The cost of the printer - 69900 rubles when buying in 3DP Home.When buying on the manufacturer's website, the printer will cost $ 1,499 + $ 192 = $ 1,691.
The cost of a plastic coil weighing 700 grams costs 2400 rubles and $ 70, respectively.
True, plastic with a thickness of 1.75mm can be bought from many companies, if you don’t bother with the “company”, and it is much cheaper. But the solution to the problems because of the quality of the plastic falls on you - at least you will have to make a filter that cleans the external plastic from dust.
► Links
Printer manufacturer Official distributor in the Russian Federation, the company 3DP Home Overview of the previous version of the printer from 3dnewsIf you do not have an account on Habrahabr, you can read and comment on our articles on BoxOverview.com
Source: https://habr.com/ru/post/180735/
All Articles