Starting Windows Phone 8 Development: Lesson 1. Application Layout and Event Handler
Starting Windows Phone 8 Development: Lesson 1. Application Layout and Event Handler
The beginning of Windows Phone 8 Development: lesson 2. Access to the local storage application
The beginning of Windows Phone 8 Development: lesson 3. Navigating through pages and passing parameters
The beginning of Windows Phone 8 Development: lesson 4. Communication with services and data binding
In the network a lot of materials devoted to the development of Windows Phone. But with a special case of Windows Phone 8 - things are a little sadder. In this series of articles will be consecrated material, smoothing the gap. However, if you are looking for materials to directly start learning how to write applications for this mobile OS, it will be hard. I advise you to start by studying the application just under Windows 8. However, if you are a software developer, regardless of origin or platform, then this is what you need.
In my articles, I do not adhere to any specific goals, do not create interconnected lessons or something similar. I simply share my ideas and experiences, which can be taken as a basis and expanded according to your needs.
')
So. Let's answer the question, what are the stages of development during the creation of an application? Here are the conclusions I came to:
• Application Layout and Events Handing (Application Layout and Event Handling)
• Access to Application Isolated Local Storage (Access to the application's isolated storage)
• Navigation between Pages and passing Parameters (Navigating the application and passing parameters)
• Communicating with Services and Data Binding (Communication with services and data)
• Threading and Asynchronous Calls (Streams and Asynchronous Calls)
• Access to Phone Resources like Address Book and GPS (Access to phone resources, such as phone book and GPS)
• Panorama and Pivot Applications
• Animation and Transitions using Blend for Visual Studio 2012
To develop applications, you will need Windows Phone SDK 8 and Visual Studio 2012, as well as a developer license. Where to get them and how to set up already have a sufficient amount of information on the Internet.
- Windows Phone apps use XAML
- XAML is used on the application pages for defining the layout (Layout), as well as the associated CS or VB, which are responsible for handling events.
- XAML is similar to HTML5 and is responsible for the appearance of our pages.
Launch Visual Studio and create a new Windows Phone project. We will use C #.

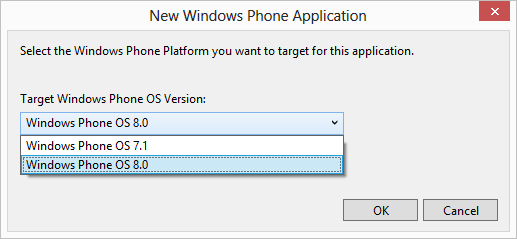
Then you have the opportunity, under which version of the OS to create a project. 7.1 or 8.0. Choose naturally 8.
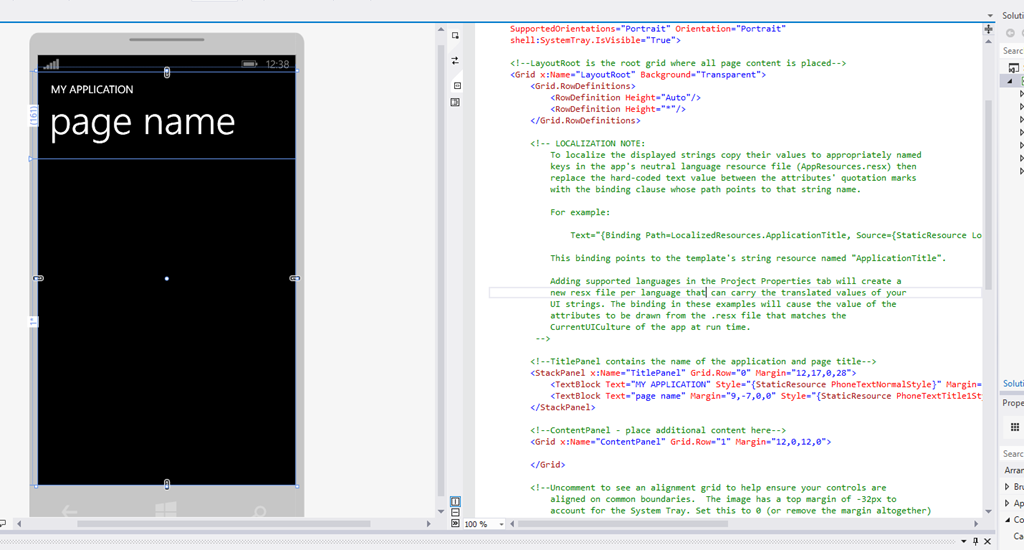
Immediately after creating a project, you have at least two windows open. On the left - a preview of the page, on the right - the code editor. That is, editing XAML is immediately visually reflected. However, I am not an adherent of visual editing. And in my lessons it is almost never used.
There is a fairly large number of controls, such as the Grid (grid), Canvas (canvas), StackPanel, etc. Use the StackPanel.
I like StackPanel, since you can create both horizontal and vertical controls, as well as invest StackPanel into each other.
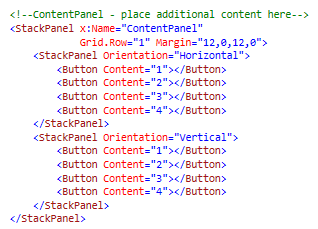
Now look at the code below. It has two StackPanel inside the ContentPanel. One with a horizontal orientation, and the other with a vertical one, and each in turn contains four buttons.
And now pay attention to the visual editor of the page.

As you can see, XAML is very easy to use. You set the necessary tags and their properties. Problems with addiction should not arise.
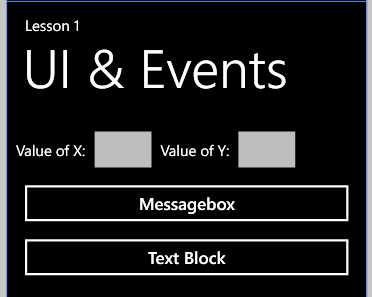
The first example I think will make you smile. But…. You enter two numbers, they multiply, and the result is displayed. You get something similar to this:
The layout is quite simple. It consists of two StackPanels with four buttons, as in the example above, but instead of the buttons in the first StackPanels there are two text fields and two input fields. Text fields are TextBlock, input fields are TextBox.
Notice that I added the InputScope to the TextBox, informing me that only a numeric keypad is needed and not a full one.
The layout we have made up. It remains to inform the application what and how it should do when the data is received.
Creating an event handler is easy thanks to Visual Studio. Just select the item you want. In our case, this is the Messagebox button and double click on it. The second way to do the same thing is to select an element and on the Properties panel click on the button with the image of a lightning, after which a list of all possible events will appear. Select "Click".
Visual Studio will load the conjugate CS file, in which the description of events takes place.

Behavior is elementary. Show MessageBox with the result. MessageBox accepts a string that informs it to multiply and return the string with the result using the ToString function.

For a more informative output, we derive the numbers that multiply, the multiplication sign, and the result as well. 2 X 2 = 4.
Notice that I use the double.Parse method to cast the string values from TextBox to numeric, of type double.
Repeat Step 1, but this time with another button and update the event handler.

The code is simpler because we don't use strings. And just pass the result to the TextBlock.
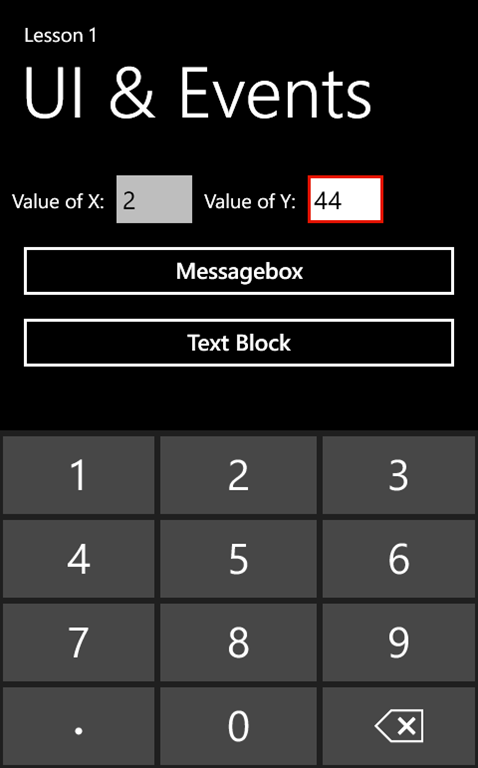
A useful feature of the SDK is device emulation support. However, in detail about this talk a little later. And now let's just build and run the project on the emulator by pressing ctrl + F5. This process is rather slow. So be patient and wait for the full load. After downloading, enter values for X and Y. Please note that the keyboard has only numeric values.
Now click on the Messagebox and TextBlock buttons.
- Windows Phone applications consist of pages built on XAML
- XAML is used to describe the visual part of the page, and the attached CS or VB files - to describe the events.
- Controls are described almost the same way as in HTML - using tags. And each tag consists of properties defining its behavior and format, such as InputScope for TextBox.
- To create an event handler - double click in the visual designer on the desired item. Or select the desired item in the properties window.
- All that is entered / displayed on / from the screen is a string.
- We used the double.Parse method to convert to a number and then work with it. A method ToString - to display the result on the screen.
- To build and run the project on the emulator, use the key combination ctrl + F5.
The beginning of Windows Phone 8 Development: lesson 2. Access to the local storage application
The beginning of Windows Phone 8 Development: lesson 3. Navigating through pages and passing parameters
The beginning of Windows Phone 8 Development: lesson 4. Communication with services and data binding
In the network a lot of materials devoted to the development of Windows Phone. But with a special case of Windows Phone 8 - things are a little sadder. In this series of articles will be consecrated material, smoothing the gap. However, if you are looking for materials to directly start learning how to write applications for this mobile OS, it will be hard. I advise you to start by studying the application just under Windows 8. However, if you are a software developer, regardless of origin or platform, then this is what you need.
In my articles, I do not adhere to any specific goals, do not create interconnected lessons or something similar. I simply share my ideas and experiences, which can be taken as a basis and expanded according to your needs.
')
So. Let's answer the question, what are the stages of development during the creation of an application? Here are the conclusions I came to:
• Application Layout and Events Handing (Application Layout and Event Handling)
• Access to Application Isolated Local Storage (Access to the application's isolated storage)
• Navigation between Pages and passing Parameters (Navigating the application and passing parameters)
• Communicating with Services and Data Binding (Communication with services and data)
• Threading and Asynchronous Calls (Streams and Asynchronous Calls)
• Access to Phone Resources like Address Book and GPS (Access to phone resources, such as phone book and GPS)
• Panorama and Pivot Applications
• Animation and Transitions using Blend for Visual Studio 2012
To develop applications, you will need Windows Phone SDK 8 and Visual Studio 2012, as well as a developer license. Where to get them and how to set up already have a sufficient amount of information on the Internet.
Some facts before starting development
- Windows Phone apps use XAML
- XAML is used on the application pages for defining the layout (Layout), as well as the associated CS or VB, which are responsible for handling events.
- XAML is similar to HTML5 and is responsible for the appearance of our pages.
Create application
The first
Launch Visual Studio and create a new Windows Phone project. We will use C #.
Then you have the opportunity, under which version of the OS to create a project. 7.1 or 8.0. Choose naturally 8.
The second
Immediately after creating a project, you have at least two windows open. On the left - a preview of the page, on the right - the code editor. That is, editing XAML is immediately visually reflected. However, I am not an adherent of visual editing. And in my lessons it is almost never used.
How to describe application pages using XAML?
There is a fairly large number of controls, such as the Grid (grid), Canvas (canvas), StackPanel, etc. Use the StackPanel.
How does StackPanel work?
I like StackPanel, since you can create both horizontal and vertical controls, as well as invest StackPanel into each other.
Now look at the code below. It has two StackPanel inside the ContentPanel. One with a horizontal orientation, and the other with a vertical one, and each in turn contains four buttons.
Code
<!--ContentPanel - place additional content here--> <Stackpanel :Name="ContentPanl" Grid.Row=1 Nargin="12,0,12,0"> <StackPanel Orientation="Horioontal"> <Button content="1"></Button> <Button content="2"></Button> <Button content="3"></utton> <Button content="4"</Button> </StackPanel> <StackPanel Orientation="Vertical"> <Button content="1"></Buttcn> <Button Content="2"></Buttcn> <Button content="3"></Button> <Button content "4"></Button> </StackPanel> </StackPanel> And now pay attention to the visual editor of the page.
As you can see, XAML is very easy to use. You set the necessary tags and their properties. Problems with addiction should not arise.
So, what are we going to do today?
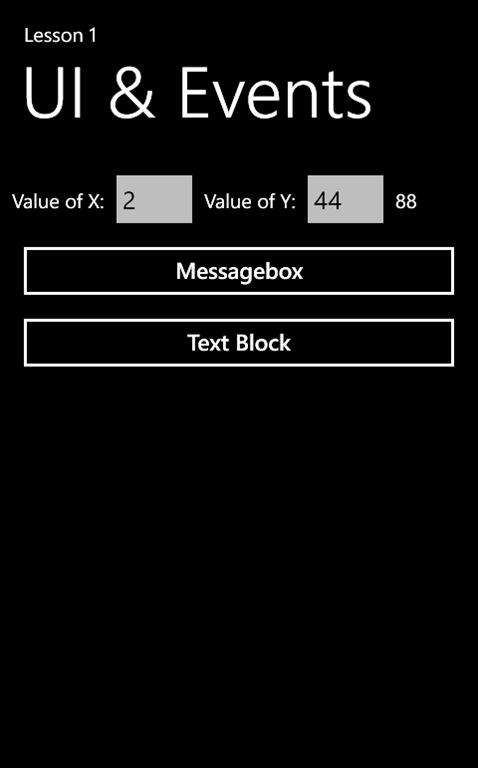
The first example I think will make you smile. But…. You enter two numbers, they multiply, and the result is displayed. You get something similar to this:
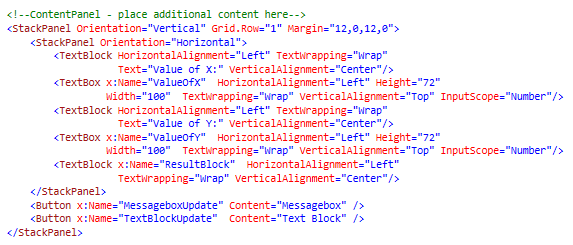
The layout is quite simple. It consists of two StackPanels with four buttons, as in the example above, but instead of the buttons in the first StackPanels there are two text fields and two input fields. Text fields are TextBlock, input fields are TextBox.
Code
<L-ContentPanel - place additional content here--> <StackPanel Orientation="vertical" Gid.RC''="1" Margin="12,0,12,0"> <StackPanel Orientation="rizontl"> <Textlock HorizontalAlignment="Left" TextWapping="Wap" Text="value of X:" VticalAlignmnt="Center"/> <TtBox x:Name="valueOfX" HorizontAlignment="Left" Weight="72" Width="100" TextWrapping="Wrap" VerticalAlignmt="Top" InputScope="Number"/> <TxtBlok Horizontal1ignmnt="left" TextWrapping="Wrap" Text="value of v:" VerticalAlignment="Center"/> <TextBox x:Name="valueOfY" HorizontalAlignment="Left" Weight="72" Width="100" TextWrapping="Wrap" VerticalAlignment="Top" InputScope="Number"/> <TextBlck :Name="Result Block" HorizontalAlignment="Left" TetWpping="Wap" VerticalAlignment="Center"/> </StackPanel> <Button x:Name="MessgeboxUpdate" Content="Messagebox" /> <Button x:Name="TextBlockUpdte" Content="Txt Block" /> </StackPanel> Notice that I added the InputScope to the TextBox, informing me that only a numeric keypad is needed and not a full one.
Regarding the code
The layout we have made up. It remains to inform the application what and how it should do when the data is received.
Step 1
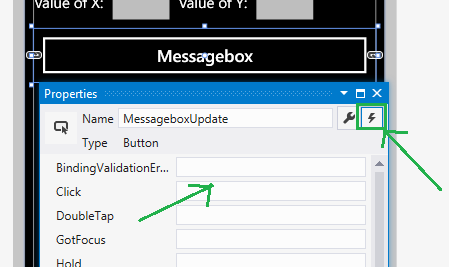
Creating an event handler is easy thanks to Visual Studio. Just select the item you want. In our case, this is the Messagebox button and double click on it. The second way to do the same thing is to select an element and on the Properties panel click on the button with the image of a lightning, after which a list of all possible events will appear. Select "Click".
Step 2
Visual Studio will load the conjugate CS file, in which the description of events takes place.
Code
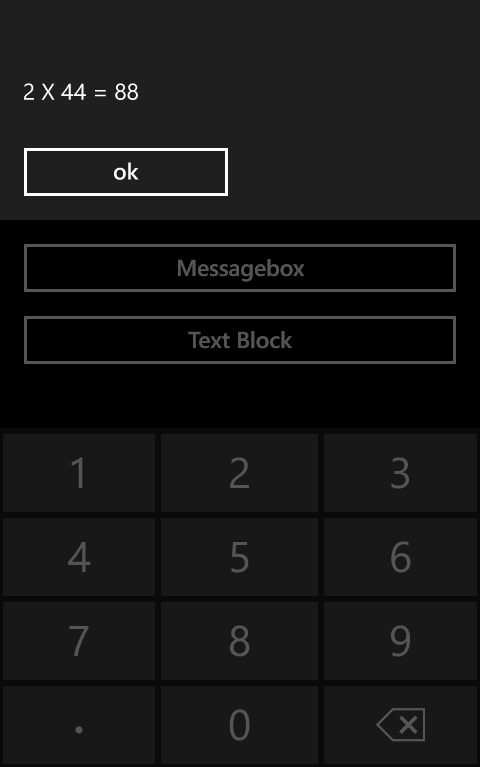
private void MessageboxUpdate_C1ick(object sender, RoutedEventArgs e) { MessageBox.Show(ValueOfX.Text + "X" + Valuf.Text + " = " + (double.Parse(VdlueOfX.Text) * double.Parse(ValueOf.Text)).ToString()); } Behavior is elementary. Show MessageBox with the result. MessageBox accepts a string that informs it to multiply and return the string with the result using the ToString function.
Code
(double.Parse(ValueOfX.Text) * double.Parse(ValueOfY.Text)).ToString(); For a more informative output, we derive the numbers that multiply, the multiplication sign, and the result as well. 2 X 2 = 4.
Notice that I use the double.Parse method to cast the string values from TextBox to numeric, of type double.
Step 3
Repeat Step 1, but this time with another button and update the event handler.
Code
private void Textlockpdate_C1ick(object sender, RoutedEventArgs e) { ResultBlock.Text = (duble.se(Vluf.Tt) * double.se(ValuOfY.Text)).ToString(); } The code is simpler because we don't use strings. And just pass the result to the TextBlock.
We are testing!
A useful feature of the SDK is device emulation support. However, in detail about this talk a little later. And now let's just build and run the project on the emulator by pressing ctrl + F5. This process is rather slow. So be patient and wait for the full load. After downloading, enter values for X and Y. Please note that the keyboard has only numeric values.
Now click on the Messagebox and TextBlock buttons.
I hope this lesson was useful. And now let's summarize:
- Windows Phone applications consist of pages built on XAML
- XAML is used to describe the visual part of the page, and the attached CS or VB files - to describe the events.
- Controls are described almost the same way as in HTML - using tags. And each tag consists of properties defining its behavior and format, such as InputScope for TextBox.
- To create an event handler - double click in the visual designer on the desired item. Or select the desired item in the properties window.
- All that is entered / displayed on / from the screen is a string.
- We used the double.Parse method to convert to a number and then work with it. A method ToString - to display the result on the screen.
- To build and run the project on the emulator, use the key combination ctrl + F5.
Source: https://habr.com/ru/post/180301/
All Articles