Creating custom virtual machines and images in Windows Azure
Greetings to all, dear geek readers!
Today I want to tell you about something virtual, virtual machine - and preferably public.
And if so, then I don’t have a lot of options, so we’ll talk about Windows Azure virtual machines, or rather about creating custom virtual machines, as well as about the mechanisms that take part in it.
Well, let's dive!

')
When it comes to virtual machines in a public cloud, many eyes light up and quite logical thoughts appear: “But can I shove my virtual machine into a cloud that is already set up to live TAM and NOT HERE?” .
The question, as I said, is quite a fair and worthy of attention - let's deal with it.
Indeed, Windows Azure Virtual Machines allows you not only to create VMs from ready-made images, but also to import already pre-configured VHD disks for their further work already in the public Windows Azure cloud. This means that you can fully configure and configure a virtual machine with the software you need on the Hyper-V hypervisor locally in your data center - and then continue to work, as they say, “from the outside”.
And then any experienced specialist will have another, quite to himself, an interesting question: “OK, I have uploaded custom VHD, everything works - all is fire! Well, if I need to fill 100 or 1000 such VMs - should I clone them or download them later!? But if I process and upload a virtual sysprep server, can I then clone this disk from the library? ”
And here an interesting moment arises: if you “skip” a VHD disk with a pre-installed OS and software through sysprep, generalize the OS — in fact, from the point of view of Windows Azure, not a disk, but an image for deploying the next OS copies. There are several points to consider if you want to import not a disk, but an image into Windows Azure:

1) Generalization using sysprep is required;
2) In no case do not do an automatic installation using the file unattended.xml - .e. just do not place this file on the target disk;
3) Do not install the Windows Azure Integration Components integration components inside the VHD with the OS;
4) Do not install Windows Azure Agent (Windows Azure Agent).
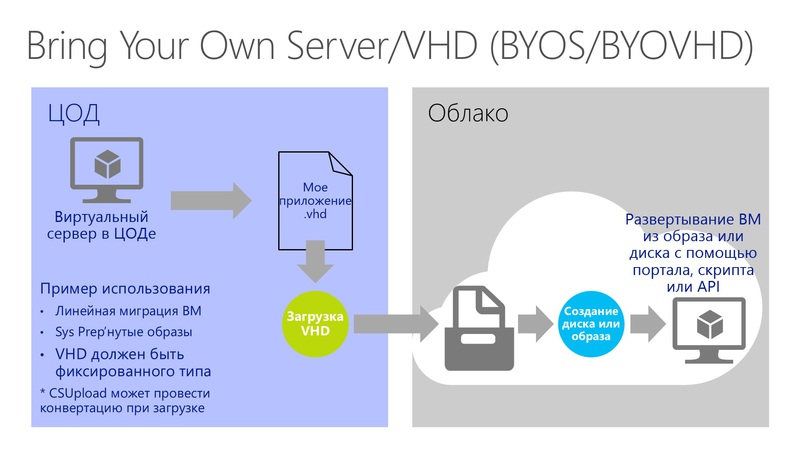
To make it easier to remember, I propose a simple picture:

Another important point is that the disks for import must be fixed (fixed), in terms of their size and extensibility properties.
Simply put, it is easier to say and does not work - everything is really simple and interesting, if you remember the small rules about which I told you today. The only thing to be mentioned is that, just like you load disks from a data center into a public cloud, you can also easily download a VHD disk and use it to work in Hyper-V.
An observant reader and geek will ask: “Stop, why VHD, not VHDX? Is the format newer and more promising? ”
The answer will be this: today we can offer only the import and export of VHD-disks, but not VHDX. Over time, of course, there will be such an opportunity.
When loading a virtual disk using the CSUpload command, you can convert the disk to VHD format when the VM is booted.
Well, colleagues - that's all for today.
I hope it was concise and useful!
Have a nice week.
Respectfully,
fireman,
George A. Gadzhiev
Information Infrastructure Expert
Microsoft Corporation.
Today I want to tell you about something virtual, virtual machine - and preferably public.
And if so, then I don’t have a lot of options, so we’ll talk about Windows Azure virtual machines, or rather about creating custom virtual machines, as well as about the mechanisms that take part in it.
Well, let's dive!
')
Disks and images
When it comes to virtual machines in a public cloud, many eyes light up and quite logical thoughts appear: “But can I shove my virtual machine into a cloud that is already set up to live TAM and NOT HERE?” .
The question, as I said, is quite a fair and worthy of attention - let's deal with it.
Indeed, Windows Azure Virtual Machines allows you not only to create VMs from ready-made images, but also to import already pre-configured VHD disks for their further work already in the public Windows Azure cloud. This means that you can fully configure and configure a virtual machine with the software you need on the Hyper-V hypervisor locally in your data center - and then continue to work, as they say, “from the outside”.
And then any experienced specialist will have another, quite to himself, an interesting question: “OK, I have uploaded custom VHD, everything works - all is fire! Well, if I need to fill 100 or 1000 such VMs - should I clone them or download them later!? But if I process and upload a virtual sysprep server, can I then clone this disk from the library? ”
And here an interesting moment arises: if you “skip” a VHD disk with a pre-installed OS and software through sysprep, generalize the OS — in fact, from the point of view of Windows Azure, not a disk, but an image for deploying the next OS copies. There are several points to consider if you want to import not a disk, but an image into Windows Azure:
1) Generalization using sysprep is required;
2) In no case do not do an automatic installation using the file unattended.xml - .e. just do not place this file on the target disk;
3) Do not install the Windows Azure Integration Components integration components inside the VHD with the OS;
4) Do not install Windows Azure Agent (Windows Azure Agent).
To make it easier to remember, I propose a simple picture:
Another important point is that the disks for import must be fixed (fixed), in terms of their size and extensibility properties.
Simply put, it is easier to say and does not work - everything is really simple and interesting, if you remember the small rules about which I told you today. The only thing to be mentioned is that, just like you load disks from a data center into a public cloud, you can also easily download a VHD disk and use it to work in Hyper-V.
An observant reader and geek will ask: “Stop, why VHD, not VHDX? Is the format newer and more promising? ”
The answer will be this: today we can offer only the import and export of VHD-disks, but not VHDX. Over time, of course, there will be such an opportunity.
When loading a virtual disk using the CSUpload command, you can convert the disk to VHD format when the VM is booted.
Well, colleagues - that's all for today.
I hope it was concise and useful!
Have a nice week.
Respectfully,
fireman,
George A. Gadzhiev
Information Infrastructure Expert
Microsoft Corporation.
Source: https://habr.com/ru/post/180283/
All Articles