How to grow beans in Raspberry PI and take a TimeLapse video
Greetings, gentlemen!
Once, a child in a school was asked to grow beans to see what it was sprouting and how a plant grows from a bean.
I immediately had the idea to make a TimeLapse video, as it grows there.
But HOW to do it, the existing camera does not allow itself to control thereptile .
Having a curious cat aggravates the situation ...
In the meantime, in the closet gathering dust around the gift of friends - Raspberry PI
the photo does not fit, the Logitech C200 webcam was found in the storeroom, to protect against the cat I decided to build a shelf on the window (so that I couldn’t get it), the only free window found in the kitchen, as a result - next to which you can do everything you need.
the stationary computer is also buzzing decently, it’s not very pleasant to sleep with one in one room.
')
remember Phileas Fogg, and one of his quotes
and here I remember that I have a raspberry pi;)
and it can be used instead of a large computer!
and this is a full-fledged Linux comp!
here is our hero on duty
that PI is very convenient, so that it ceases to be a media player (raspbnc) and just become Linux (raspbian)
just change the SD card (good enough of this good, and 2 gig for his eyes)
those. according to the instructions from the site we put on the card Rasbian, we connect to the TV, configurable (without graphics)
disconnect from the TV, all other actions are done by ssh,
since the time that it is all going to work is not known, we will assume that everything is bad, and write to an external USB flash drive
there is no internet on the shelf!
well, let it stand autonomously, we will sometimes pull out the flash drive and see what happens.
those. you need to configure everything in advance and make this thing as autonomous as possible
Next, we are looking for a package that can take screenshots from the webcam
we find fswebcam , set it from the repository, check it, it works!
Further we write a script that starts from the crown 1 time per minute!
the main script itself switches the light bulb to the user control mode (by default it flashes when accessing the flash drive, we use it as an indicator)
then he takes a photo of our plant
and then it causes a script that flashes a light bulb
script - a clean flasher, for the convenience of the user
30 seconds with a frequency of 1 per second
15 seconds with a frequency of 2 times per second
and then goes out
This script is guaranteed to work <60 seconds, it is restarted from the main script once a minute.
on the indicator you can see in what condition PI is now (and when finally the flash drive can be temporarily pulled out)
left a trifle
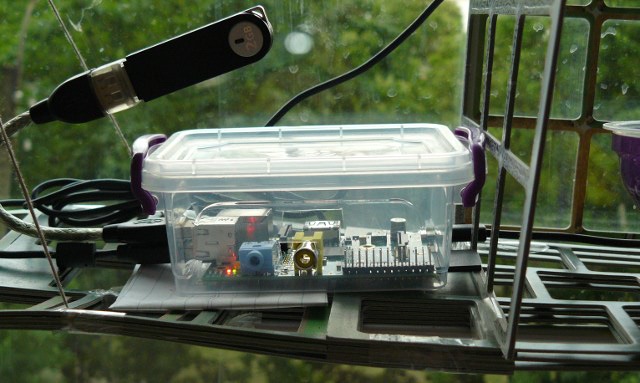
the shelf was made from the waste of the game Carcassonne (there were cardboard sheets with holes left)
which were collected with the help of scotch tape in enough for our task a strong shelf
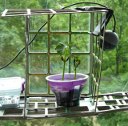
and on it was built a place where the object will stand, and where to mount the camera!
ropes of the required length were made of threads, and this is all hung on the window!
it looks like it all

Here is the "subject table" larger

it was all left for a few days, turned on a light bulb at night ...
at the end of the process received a folder with a bunch of photos,
selected the desired range
and apply magic ffmpeg (now known as avconv)
This magic script takes files with the names f0001.jpg and further from the src folder and makes a .mp4 file with a frequency of 30 frames per second.
Files from the form YYYYMMDD-HHMM.jpg in fNNNNN.jpg rename the simplest script, here it is not very interesting.
Well, in the end, that's what happened
what was not thought at the beginning,
For a strange reason, the PI webcam did not want to shoot 640x480 frames, only 320x200, maybe there is little power?
Without an LED flasher it was not clear whether it works!
I highly recommend doing the work indicator
the plant eventually got out of the frame, it is necessary to study the issue in advance and make the appropriate equipment
the sun is very VERY bright, the camera is wedging;)
for good it would be necessary to take a normal camera
correct constant lighting
put the right sprout
to mount correctly (add music)
but also what came out very informative!
growth goes at night!
Raspberry PI is very handy thing for home toys!
ps about errors please start in PM!
pps ask questions!
Once, a child in a school was asked to grow beans to see what it was sprouting and how a plant grows from a bean.
I immediately had the idea to make a TimeLapse video, as it grows there.
But HOW to do it, the existing camera does not allow itself to control the
Having a curious cat aggravates the situation ...
In the meantime, in the closet gathering dust around the gift of friends - Raspberry PI
In the post there is no Rocket science, just a description of the problem, ways to solve it and the final result.
Actually description of the task
- need to remove how the beans grow
- all experiments to do on the window - plants need the sun
- the cat is a curious beast and there is a chance that it will ruin everything
- how long it will last is not very clear
- this is clearly a one-time task
the photo does not fit, the Logitech C200 webcam was found in the storeroom, to protect against the cat I decided to build a shelf on the window (so that I couldn’t get it), the only free window found in the kitchen, as a result - next to which you can do everything you need.
the stationary computer is also buzzing decently, it’s not very pleasant to sleep with one in one room.
')
remember Phileas Fogg, and one of his quotes
Use what is at hand, and do not look for another. (16 series, "In New Orleans")
and here I remember that I have a raspberry pi;)
and it can be used instead of a large computer!
and this is a full-fledged Linux comp!
here is our hero on duty
that PI is very convenient, so that it ceases to be a media player (raspbnc) and just become Linux (raspbian)
just change the SD card (good enough of this good, and 2 gig for his eyes)
those. according to the instructions from the site we put on the card Rasbian, we connect to the TV, configurable (without graphics)
disconnect from the TV, all other actions are done by ssh,
since the time that it is all going to work is not known, we will assume that everything is bad, and write to an external USB flash drive
there is no internet on the shelf!
well, let it stand autonomously, we will sometimes pull out the flash drive and see what happens.
those. you need to configure everything in advance and make this thing as autonomous as possible
Next, we are looking for a package that can take screenshots from the webcam
we find fswebcam , set it from the repository, check it, it works!
Further we write a script that starts from the crown 1 time per minute!
script which we pull from do.sh crown
#!/bin/sh path='/mnt' killall blink1.sh >/dev/null sudo sh -c 'echo 1 >/sys/class/leds/led0/brightness' if [ -c /dev/video0 ] then fswebcam -q -c /home/pi/plant/config.cfg --flip v $path/plant/`date +%Y%m%d-%H%M%S.jpg` fi sudo sh -c 'echo 0 >/sys/class/leds/led0/brightness' /home/pi/plant/blink1.sh & sync script that blinks light blink1.sh
#!/bin/sh sudo sh -c 'echo none >/sys/class/leds/led0/trigger' n=1 while test $n -le 30 do sudo sh -c 'echo 1 >/sys/class/leds/led0/brightness' sleep 0.5 sudo sh -c 'echo 0 >/sys/class/leds/led0/brightness' sleep 0.5 n=$(($n + 1)) done n=1 while test $n -le 15 do sudo sh -c 'echo 1 >/sys/class/leds/led0/brightness' sleep 0.25 sudo sh -c 'echo 0 >/sys/class/leds/led0/brightness' sleep 0.25 sudo sh -c 'echo 1 >/sys/class/leds/led0/brightness' sleep 0.25 sudo sh -c 'echo 0 >/sys/class/leds/led0/brightness' sleep 0.25 n=$(($n + 1)) done the main script itself switches the light bulb to the user control mode (by default it flashes when accessing the flash drive, we use it as an indicator)
then he takes a photo of our plant
and then it causes a script that flashes a light bulb
script - a clean flasher, for the convenience of the user
30 seconds with a frequency of 1 per second
15 seconds with a frequency of 2 times per second
and then goes out
This script is guaranteed to work <60 seconds, it is restarted from the main script once a minute.
on the indicator you can see in what condition PI is now (and when finally the flash drive can be temporarily pulled out)
left a trifle
the shelf was made from the waste of the game Carcassonne (there were cardboard sheets with holes left)
which were collected with the help of scotch tape in enough for our task a strong shelf
and on it was built a place where the object will stand, and where to mount the camera!
ropes of the required length were made of threads, and this is all hung on the window!
it looks like it all
Here is the "subject table" larger
it was all left for a few days, turned on a light bulb at night ...
final processing
at the end of the process received a folder with a bunch of photos,
selected the desired range
and apply magic ffmpeg (now known as avconv)
avconv -f image2 -r 30 -i src/f%04d.jpg -c:v libx264 -r 30 out2.mp4 This magic script takes files with the names f0001.jpg and further from the src folder and makes a .mp4 file with a frequency of 30 frames per second.
Files from the form YYYYMMDD-HHMM.jpg in fNNNNN.jpg rename the simplest script, here it is not very interesting.
Well, in the end, that's what happened
difficulties and conclusions
what was not thought at the beginning,
For a strange reason, the PI webcam did not want to shoot 640x480 frames, only 320x200, maybe there is little power?
Without an LED flasher it was not clear whether it works!
I highly recommend doing the work indicator
the plant eventually got out of the frame, it is necessary to study the issue in advance and make the appropriate equipment
the sun is very VERY bright, the camera is wedging;)
for good it would be necessary to take a normal camera
correct constant lighting
put the right sprout
to mount correctly (add music)
but also what came out very informative!
growth goes at night!
Raspberry PI is very handy thing for home toys!
ps about errors please start in PM!
pps ask questions!
Source: https://habr.com/ru/post/180227/
All Articles