Installing Citrix XenServer on Software RAID
Citrix Xen Server, while being based on the Linux distribution, during the installation process does not allow managing the size of the partitions and the configuration of the hard disks for the installed system. By default, during installation, he asks only for a disk on which installation is required with automatic partitioning of disk space to fit his needs. During the installation, 3 primary partitions are created on the selected disk. Two 4GB each and one for the rest of the space. (By the way, can someone tell me what the second 4GB partition is for? I suppose that in case of updates and system restorations, there is a copy of the first partition with the installed system, but I did not find exact information.)
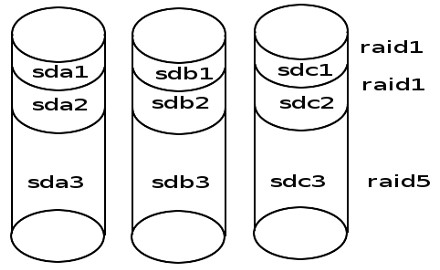
Faced with the need to raise the Xen Server on three disks, I thought about ensuring at least some kind of data integrity. So the scheme of the final array will take the following form:
Further, how it is implemented.
To begin with, we put the system on the first disk. The installation will not be carried out in steps, because there are more than enough materials about this in the network. The only thing I want to note is that during installation, you need to refuse to connect the storage of virtual machines. For this

On the Virtual Machine Storage screen, remove the check mark in the first line. We will connect the storage after creating the array. And if you create it now ogrebem extra headache for its subsequent transfer.
After installing the system and downloading go to the console and begin to create an array. To begin with the theory. We are sitting on the first disk on a working system. Create a broken array on the two remaining disks. We make a copy of the working system on the created array. Reboot from the broken array. We connect the original disk to the array and wait for the integrity of the array to be restored. After that we create storage for virtual machines. And so, let's get started.
Having loaded into the system we look at the structure of the disk created by the installer.
The output will be something like this:
We are important numbers start and end sectors.
')
Erase the partition table on the second and third disk:
Install the GPT partition table there:
Create a partition table that is identical to the first disk table (attention to the numbers, set identical for the corresponding partition on the original disk with the installed system):
But the partition IDs need to be replaced. I did the same as the original disk and killed a lot of the time to fix the problem that the system did not want to start from the array. fd00 partition id with raid
Set the boot partition flags
In this case, I will pay special attention only to the mdadm --create lines. As you might guess, the --level type of the array. On the first two sections we create a mirror. We unite the third sections in RAID 5. --raid-devices number of devices included in the array. missing means an array in a degraded state and at the end of the sections included in the array through the gap. Naturally two of the three. Partitions on the sda disk will be added to the array after.
Create and mount the file system.
We copy.
Replace in the file / mnt / etc / fstab the name of the root of the file system to / dev / md0. Just edit the configuration file.
Copy the bootloader to the second and third disk.
We generate a new image of the system.
Fix the download config. To do this, open the file /mnt/boot/extlinux.conf in a text editor and replace (root = LABEL = xxx) with root = / dev / md0.
From mount all partitions previously connected and reboot the system. Now we are loading not from the first disk, but from any other input into the broken array.
Change the type of partitions and add the partitions of the first disk to our array.
After that, the array rebuild will automatically start. Depending on the size of the disks can take quite a long time. You can monitor the status and time until the end by looking at the / proc / mdstat file. For continuous monitoring:
You can try to increase the speed of the rebild. Google has a lot of pages on this topic. Without digging deeply through this article, I simply increased the stripe_cache_size value and calmed down.
Actually a single command on the device / dev / md2 is created storage.
Everything. The system is ready for use. As a result, we have a system on top of a software array that is not tied to a specific hardware controller. The array can be moved to another server and quickly raise a working system. I think it will be necessary to register only new network cards in the system. I hope those who read to the end of such a guide useful.
Faced with the need to raise the Xen Server on three disks, I thought about ensuring at least some kind of data integrity. So the scheme of the final array will take the following form:
Further, how it is implemented.
System installation.
To begin with, we put the system on the first disk. The installation will not be carried out in steps, because there are more than enough materials about this in the network. The only thing I want to note is that during installation, you need to refuse to connect the storage of virtual machines. For this
On the Virtual Machine Storage screen, remove the check mark in the first line. We will connect the storage after creating the array. And if you create it now ogrebem extra headache for its subsequent transfer.
Array configuration
Partitioning on the second and third disk.
After installing the system and downloading go to the console and begin to create an array. To begin with the theory. We are sitting on the first disk on a working system. Create a broken array on the two remaining disks. We make a copy of the working system on the created array. Reboot from the broken array. We connect the original disk to the array and wait for the integrity of the array to be restored. After that we create storage for virtual machines. And so, let's get started.
Having loaded into the system we look at the structure of the disk created by the installer.
sgdisk -p /dev/sda The output will be something like this:
Disk /dev/sda: 5860533168 sectors, 2.7 TiB Logical sector size: 512 bytes Disk identifier (GUID): 77D7DEB8-2759-490F-9BA9-7269A5F9247C Partition table holds up to 128 entries First usable sector is 34, last usable sector is 5860533134 Partitions will be aligned on 2048-sector boundaries Total free space is 6042 sectors (3.0 MiB) Number Start (sector) End (sector) Size Code Name 1 2048 8388641 4.0 GiB 0700 2 8390656 16777249 4.0 GiB 0700 3 16779264 5860533134 2.7 TiB 8E00 We are important numbers start and end sectors.
')
Erase the partition table on the second and third disk:
sgdisk --zap-all /dev/sdb sgdisk --zap-all /dev/sdc Install the GPT partition table there:
sgdisk --mbrtogpt --clear /dev/sdb sgdisk --mbrtogpt --clear /dev/sdc Create a partition table that is identical to the first disk table (attention to the numbers, set identical for the corresponding partition on the original disk with the installed system):
sgdisk --new=1:2048:8388641 /dev/sdb sgdisk --new=2:8390656:16777249 /dev/sdb sgdisk --new=3:16779264:5860533134 /dev/sdb sgdisk --new=2:8390656:16777249 /dev/sdc sgdisk --new=1:2048:8388641 /dev/sdc sgdisk --new=3:16779264:5860533134 /dev/sdc But the partition IDs need to be replaced. I did the same as the original disk and killed a lot of the time to fix the problem that the system did not want to start from the array. fd00 partition id with raid
sgdisk --typecode=1:fd00 /dev/sdb sgdisk --typecode=2:fd00 /dev/sdb sgdisk --typecode=3:fd00 /dev/sdb sgdisk --typecode=1:fd00 /dev/sdc sgdisk --typecode=2:fd00 /dev/sdc sgdisk --typecode=3:fd00 /dev/sdc Set the boot partition flags
sgdisk /dev/sda --attributes=1:set:2 sgdisk /dev/sdb --attributes=1:set:2 sgdisk /dev/sdc --attributes=1:set:2 Create raid arrays.
mdadm --stop /dev/md0 mknod /dev/md0 b 9 0 mknod /dev/md1 b 9 1 mknod /dev/md2 b 9 2 mdadm --create /dev/md0 --level=1 --raid-devices=3 missing /dev/sdb1 /dev/sdc1 mdadm --create /dev/md1 --level=1 --raid-devices=3 missing /dev/sdb2 /dev/sdc2 mdadm --create /dev/md2 --level=5 --raid-devices=3 missing /dev/sdb3 /dev/sdc3 mdadm --grow /dev/md0 -b internal mdadm --grow /dev/md1 -b internal mdadm --grow /dev/md2 -b internal In this case, I will pay special attention only to the mdadm --create lines. As you might guess, the --level type of the array. On the first two sections we create a mirror. We unite the third sections in RAID 5. --raid-devices number of devices included in the array. missing means an array in a degraded state and at the end of the sections included in the array through the gap. Naturally two of the three. Partitions on the sda disk will be added to the array after.
Copy the working system to the created array.
Create and mount the file system.
mkfs.ext3 /dev/md0 mount /dev/md0 /mnt We copy.
cp -vxpR / /mnt Replace in the file / mnt / etc / fstab the name of the root of the file system to / dev / md0. Just edit the configuration file.
Copy the bootloader to the second and third disk.
mount --bind /dev /mnt/dev mount -t sysfs none /mnt/sys mount -t proc none /mnt/proc chroot /mnt /sbin/extlinux --raid --install /boot exit dd if=/mnt/usr/share/syslinux/gptmbr.bin of=/dev/sdb dd if=/mnt/usr/share/syslinux/gptmbr.bin of=/dev/sd We generate a new image of the system.
chroot /mnt mkinitrd -v -f --theme=/usr/share/splash --without-multipath /boot/initrd-`uname -r`.img `uname -r` exit Fix the download config. To do this, open the file /mnt/boot/extlinux.conf in a text editor and replace (root = LABEL = xxx) with root = / dev / md0.
From mount all partitions previously connected and reboot the system. Now we are loading not from the first disk, but from any other input into the broken array.
Add the first disk to the array.
Change the type of partitions and add the partitions of the first disk to our array.
sgdisk --typecode=1:fd00 /dev/sda1 sgdisk --typecode=2:fd00 /dev/sda2 sgdisk --typecode=3:fd00 /dev/sda3 mdadm -a /dev/md0 /dev/sda1 mdadm -a /dev/md1 /dev/sda2 mdadm -a /dev/md2 /dev/sda3 After that, the array rebuild will automatically start. Depending on the size of the disks can take quite a long time. You can monitor the status and time until the end by looking at the / proc / mdstat file. For continuous monitoring:
watch -n 1 cat /proc/mdstat You can try to increase the speed of the rebild. Google has a lot of pages on this topic. Without digging deeply through this article, I simply increased the stripe_cache_size value and calmed down.
Creating a data warehouse.
Actually a single command on the device / dev / md2 is created storage.
xe sr-create content-type=user type=lvm device-config:device=/dev/md2 shared=false name-label="Local storage" Everything. The system is ready for use. As a result, we have a system on top of a software array that is not tied to a specific hardware controller. The array can be moved to another server and quickly raise a working system. I think it will be necessary to register only new network cards in the system. I hope those who read to the end of such a guide useful.
Source: https://habr.com/ru/post/179825/
All Articles