Remove dust from 1000 photos using Gimp and Script-Fu
I think many photographers had to clean the captured photos from dust particles on the matrix. Without a full Photoshop-a or LightRoom-a quickly handle a large number of photos is extremely difficult.
But we have Gimp and the desire to write a script for it.
On Habré there were quite a few articles about the possibility of writing scripts in the Gimp.
Here is the most detailed overview of the Script-fu language itself and the possibility of writing extensions to the Gimp on it.
Here is an article about batch processing.
In theory, after reading 2 of these articles, you can do anything. But only when solving the problem indicated in the title, I ran into many nuances, which took a long time to overcome, and which are described in few places. Even in English-speaking Tutorial and Help-ah. About them and will be discussed.
SLR digital cameras, except for all their advantages, are endowed with a slight drawback. Dust on the matrix. To eliminate it, there is a mass of physical devices, and in some models there are even built-in special internal systems for shaking off dust from matrices (here is a big article about all the technologies in this direction).
But in everyday life there are situations when you go on vacation without taking a single “shvabrochki” to clean the matrix, and even a pear to blow off the dust. Well, or filmed 1000 shots, and only at home during the analysis I noticed a huge speck of dust on all frames, and so striking the eyes.
')
In this case, most experts use Adobe Photoshop Light Room or the latest editions of full Adobe Photoshop .
LR uses rich photo batch processing capabilities .
In full Photoshop - the possibility of creating Action-s .
But ordinary people usually have neither LightRoom nor even Photoshop.
But there is Gimp, the possibility of writing scripts to it, and a little time and zeal.
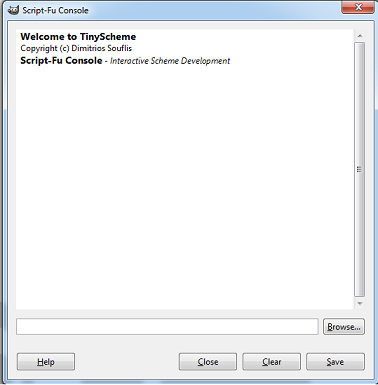
To do this, open the Gimp and in it the Script-Fu console

The appearance of the console on the right.
The script is better to write in any text editor that displays the connection brackets. I used Notepad ++ for this. After writing, we will insert the script into the console and check how it works.
To implement the idea, we will use a certain clone functional which, in essence, should do the same as the copy tool in the GUI of the Gimp itself. We will enter the coordinates of our speck of dust in the photo and somehow set the area from which to clone the site to close this speck of dust.
To test the idea, I did not immediately write a “function” according to all the rules, as described here .
For a start, I found the functionality I needed in the procedure browser.
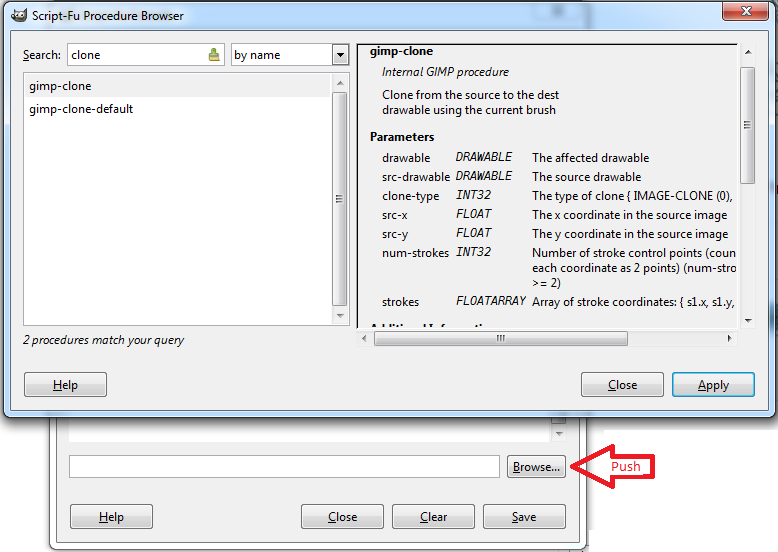
And he began to select the parameters.
Here began the most interesting and not documented. The devil is in the details.
As we see from the description of the function, 7 parameters are fed to its input, the first two of them, these are DRAWABLE objects. A little googling can easily find examples of scripts that get these drawabale from the path to the picture
Here is the code
The first 2 parameters are there (since both the source and the target are our own picture)
The third parameter is set to IMAGE-CLONE, because we want to clone from the same image and not from some kind of previously created pattern. 4th and 5th, too, everything is clear - we write here the coordinates of our speck of dust.
But the 6th and 7th parameters are not so obvious.
By trial and error I found out that this tool works with a brush. And just the 6th and 7th parameters set the path that this brush will move. I will describe below how to set the brush correctly.
Most of the time it took to understand the 6th parameter, and not a little confusion made a comment to it.
6 numbers in the array, but they describe only 3 coordinates. If you need 4 coordinates, you would write 8 and then an array of 8 numbers. and so on.
Now about the brush. Alas, in this version of Gimp (2.8.4) there is a glitch when working with brushes. You can not select a brush from the existing ones and set its size (this bug ). The size will be taken either standard or the one that you have in the GUI now exposed for it.
That's why we have to make our own brush and set parameters for it (which is actually more convenient)
Here is the code that opens the test image, creating a brush and cloning the left part of the picture - on the right side along a given route (draw a triangle).
Copy the script to the console and click Enter. If everything succeeds, we see the following in the console
In case of errors, we will see a description of the error.
But the pictures before and after the script.
With the parameters of the brush, you can play at your discretion.
Using the code from the article described above , we write a function that we will apply to the folder, it will apply cloning to each photo, and save the result to a new file in a new folder.
The path to the folders (input and output), the point which we will close (i.e. our speck of dust) and its size will be passed as a parameter. We will clone from the area to the right of the dust particles.
We get such a script
Paste it into the console. Now we have the script-fu-batch-dust-remove function in the console.
Now open our photos with dust, find the size of the dust particle using a brush (by moving the mouse over the dust particle and selecting the size of the brush so that it completely covers the dust particle). The coordinates of our cursor on the photo are written from the bottom to the bottom.
Write down the obtained coordinates and radius
Copy all the files that we want to fix in the folder. Copying everything is not worth it, I copied only those where the speck of dust is clearly striking, i.e. For example, on the background of a clear sky or the sea or other uniform texture. If you copy everything - even those where the dust particles are not visible due to the heterogeneity of the image in this place - then spoil these photos with unnecessary cloning.
Run the script in the console
And in the folder E: / toEdit / out we get all the files with the same names - but already without dust!
The result is achieved.
PS
After a series of experiments, I came to the conclusion that it is better to use the function not gimp-clone but gimp-heal. With her, the results are better, regardless of the image surrounding the dust. The parameters are exactly the same, only there is no IMAGE-CLONE
So the call in my script will be something like this.
UPD1
Examples of the script with gimp-heal
Successful processing (diaphragm 22)
Before
After

Not entirely successful treatment (diaphragm 11)
Before
After (half the window now instead of a speck of dust)

Result at aperture 7.0
Before
After (it is clear that a small aura still remained, it would probably be necessary to increase the radius for this photo)

In most cases, the result as in the first or third picture is good, because specks of dust are much more striking when surrounded by a monotonous background, and they perfectly close on it. The script copes with its task - removes the clearly visible specks of dust, and for posting on the web album, such processing is enough. If you want to print something in high resolution, the photos will naturally be modified individually.
UPD2
In light of the fact that in the script I used the gimp-file-save method to save the results, the output files are smaller in size than the original ones. Those. It turns out gimp-file-save shakes JPEG in a different quality than the source files. If to whom it is critical - they can read about the file-jpeg-save procedures in the browser and use it instead of the simpler solution I proposed with gimp-file-save.
But we have Gimp and the desire to write a script for it.
On Habré there were quite a few articles about the possibility of writing scripts in the Gimp.
Here is the most detailed overview of the Script-fu language itself and the possibility of writing extensions to the Gimp on it.
Here is an article about batch processing.
In theory, after reading 2 of these articles, you can do anything. But only when solving the problem indicated in the title, I ran into many nuances, which took a long time to overcome, and which are described in few places. Even in English-speaking Tutorial and Help-ah. About them and will be discussed.
Retreat
SLR digital cameras, except for all their advantages, are endowed with a slight drawback. Dust on the matrix. To eliminate it, there is a mass of physical devices, and in some models there are even built-in special internal systems for shaking off dust from matrices (here is a big article about all the technologies in this direction).
But in everyday life there are situations when you go on vacation without taking a single “shvabrochki” to clean the matrix, and even a pear to blow off the dust. Well, or filmed 1000 shots, and only at home during the analysis I noticed a huge speck of dust on all frames, and so striking the eyes.
')
In this case, most experts use Adobe Photoshop Light Room or the latest editions of full Adobe Photoshop .
LR uses rich photo batch processing capabilities .
In full Photoshop - the possibility of creating Action-s .
But ordinary people usually have neither LightRoom nor even Photoshop.
But there is Gimp, the possibility of writing scripts to it, and a little time and zeal.
We write a script
To do this, open the Gimp and in it the Script-Fu console
The appearance of the console on the right.
The script is better to write in any text editor that displays the connection brackets. I used Notepad ++ for this. After writing, we will insert the script into the console and check how it works.
To implement the idea, we will use a certain clone functional which, in essence, should do the same as the copy tool in the GUI of the Gimp itself. We will enter the coordinates of our speck of dust in the photo and somehow set the area from which to clone the site to close this speck of dust.
To test the idea, I did not immediately write a “function” according to all the rules, as described here .
For a start, I found the functionality I needed in the procedure browser.
And he began to select the parameters.
Here began the most interesting and not documented. The devil is in the details.
As we see from the description of the function, 7 parameters are fed to its input, the first two of them, these are DRAWABLE objects. A little googling can easily find examples of scripts that get these drawabale from the path to the picture
Here is the code
( let* ( (image (car (gimp-file-load RUN-NONINTERACTIVE "E:/test.png" "E:/test.png"))) (drawable (car (gimp-image-get-active-layer image))) ) ) The first 2 parameters are there (since both the source and the target are our own picture)
The third parameter is set to IMAGE-CLONE, because we want to clone from the same image and not from some kind of previously created pattern. 4th and 5th, too, everything is clear - we write here the coordinates of our speck of dust.
But the 6th and 7th parameters are not so obvious.
By trial and error I found out that this tool works with a brush. And just the 6th and 7th parameters set the path that this brush will move. I will describe below how to set the brush correctly.
Most of the time it took to understand the 6th parameter, and not a little confusion made a comment to it.
Number of stroke control points (count points as 2 points) (num-strokes> = 2)I persistently entered here the number of coordinates, not numbers. And got unexpected results. It turns out it's just the number of numbers in the next parameter (array). Those. Suppose if we want to start cloning at x = 50 y = 50 and make a route with a brush through 3 points from point 0, 0 to point 10, 10 and then to point 20, 30 (the points will be connected by straight lines, but not looped, i.e. the latter does not connect with the first) then we need to write something like this
(gimp-clone drawable drawable IMAGE-CLONE 50 50 6 #(0 0 10 10 20 30) ) 6 numbers in the array, but they describe only 3 coordinates. If you need 4 coordinates, you would write 8 and then an array of 8 numbers. and so on.
Now about the brush. Alas, in this version of Gimp (2.8.4) there is a glitch when working with brushes. You can not select a brush from the existing ones and set its size (this bug ). The size will be taken either standard or the one that you have in the GUI now exposed for it.
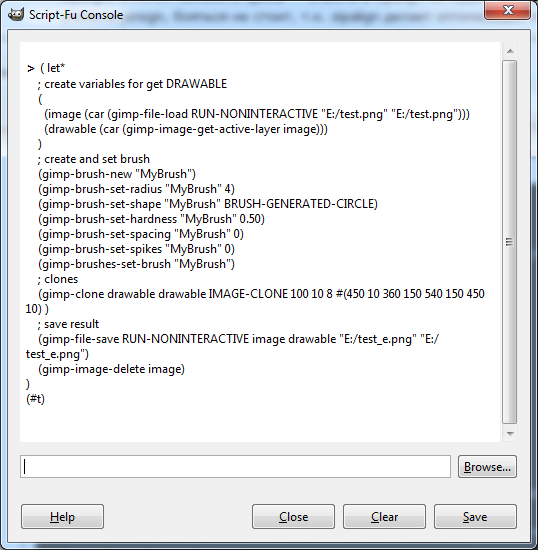
That's why we have to make our own brush and set parameters for it (which is actually more convenient)
Here is the code that opens the test image, creating a brush and cloning the left part of the picture - on the right side along a given route (draw a triangle).
( let* ; create variables for get DRAWABLE ( (image (car (gimp-file-load RUN-NONINTERACTIVE "E:/test.png" "E:/test.png"))) (drawable (car (gimp-image-get-active-layer image))) ) ; create and set brush (gimp-brush-new "MyBrush") (gimp-brush-set-radius "MyBrush" 4) (gimp-brush-set-shape "MyBrush" BRUSH-GENERATED-CIRCLE) (gimp-brush-set-hardness "MyBrush" 0.50) (gimp-brush-set-spacing "MyBrush" 0) (gimp-brush-set-spikes "MyBrush" 0) (gimp-brushes-set-brush "MyBrush") ; clones (gimp-clone drawable drawable IMAGE-CLONE 100 10 8 #(450 10 360 150 540 150 450 10) ) ; save result (gimp-file-save RUN-NONINTERACTIVE image drawable "E:/test_e.png" "E:/test_e.png") (gimp-image-delete image) ) Copy the script to the console and click Enter. If everything succeeds, we see the following in the console
In case of errors, we will see a description of the error.
But the pictures before and after the script.
With the parameters of the brush, you can play at your discretion.
We apply the result to thousands of files.
Using the code from the article described above , we write a function that we will apply to the folder, it will apply cloning to each photo, and save the result to a new file in a new folder.
The path to the folders (input and output), the point which we will close (i.e. our speck of dust) and its size will be passed as a parameter. We will clone from the area to the right of the dust particles.
We get such a script
(define (script-fu-batch-dust-remove inputFolder outputFolder dustX dustY dustRadius) (let* ((filelist (cadr (file-glob (string-append inputFolder DIR-SEPARATOR "*") 1)))) ; create and set brush (gimp-brush-new "DustBrush") (gimp-brush-set-radius "DustBrush" dustRadius) (gimp-brush-set-shape "DustBrush" BRUSH-GENERATED-CIRCLE) (gimp-brush-set-hardness "DustBrush" 0.70) (gimp-brush-set-spacing "DustBrush" 0) (gimp-brush-set-spikes "DustBrush" 0) (gimp-brushes-set-brush "DustBrush") ; go throw all files in inputFolder (while (not (null? filelist)) (let* ((filename (car filelist)) (image (car (gimp-file-load RUN-NONINTERACTIVE filename filename))) (drawable (car (gimp-image-get-active-layer image))) (dustCoordinates (vector dustX dustY)) ) ; clone (gimp-clone drawable drawable IMAGE-CLONE (+ dustX (* dustRadius 2)) dustY 2 dustCoordinates) ; save result to outputFolder (set! filename (string-append outputFolder DIR-SEPARATOR (car (gimp-image-get-name image)))) (gimp-file-save RUN-NONINTERACTIVE image drawable filename filename) (gimp-image-delete image) ) (set! filelist (cdr filelist)) ) ; remove just created Brush for not spam brush list (gimp-brush-delete "DustBrush") ) ) Paste it into the console. Now we have the script-fu-batch-dust-remove function in the console.
Now open our photos with dust, find the size of the dust particle using a brush (by moving the mouse over the dust particle and selecting the size of the brush so that it completely covers the dust particle). The coordinates of our cursor on the photo are written from the bottom to the bottom.
Write down the obtained coordinates and radius
Copy all the files that we want to fix in the folder. Copying everything is not worth it, I copied only those where the speck of dust is clearly striking, i.e. For example, on the background of a clear sky or the sea or other uniform texture. If you copy everything - even those where the dust particles are not visible due to the heterogeneity of the image in this place - then spoil these photos with unnecessary cloning.
Run the script in the console
(script-fu-batch-dust-remove "E:/toEdit/in" "E:/toEdit/out" 3186 682 15) And in the folder E: / toEdit / out we get all the files with the same names - but already without dust!
The result is achieved.
PS
After a series of experiments, I came to the conclusion that it is better to use the function not gimp-clone but gimp-heal. With her, the results are better, regardless of the image surrounding the dust. The parameters are exactly the same, only there is no IMAGE-CLONE
So the call in my script will be something like this.
(gimp-heal drawable drawable (+ dustX2 (* dustRadius2 2)) dustY2 2 dustCoordinates2) UPD1
Examples of the script with gimp-heal
Successful processing (diaphragm 22)
Before
After
Not entirely successful treatment (diaphragm 11)
Before
After (half the window now instead of a speck of dust)
Result at aperture 7.0
Before
After (it is clear that a small aura still remained, it would probably be necessary to increase the radius for this photo)
In most cases, the result as in the first or third picture is good, because specks of dust are much more striking when surrounded by a monotonous background, and they perfectly close on it. The script copes with its task - removes the clearly visible specks of dust, and for posting on the web album, such processing is enough. If you want to print something in high resolution, the photos will naturally be modified individually.
UPD2
In light of the fact that in the script I used the gimp-file-save method to save the results, the output files are smaller in size than the original ones. Those. It turns out gimp-file-save shakes JPEG in a different quality than the source files. If to whom it is critical - they can read about the file-jpeg-save procedures in the browser and use it instead of the simpler solution I proposed with gimp-file-save.
Source: https://habr.com/ru/post/179817/
All Articles