3 OS on one Nokia N9
Good day to all! I thought for a long time about what I can bring to the community. So, having installed 3 OS on my Nokia N9, and, having seen some interest in this, I decided to write about how I did it.
So, this post is about how to get Nokia N9 with Harmattan, NitDroid and Nemo Mobile without any special tambourine dances.
As always, the author of this topic is not responsible for the dead and crippled devices and nerves. All obvious things will not be explained.
Initially available : Nokia N9 64GB (with 16GB will be problematic) with standard partitions, a working Harmattan with activated developer mode, a computer with Linux (I use Ubuntu 12.04 LTS), a firmware file for your product code, a USB cable and complete determination.
Welcome : Linux skills and N9 tinkering experience.
Since Nokia does its best to abandon its heritage (to some extent without this holivar theme :)), the flasher will have to be taken from the Mirror . We swing from there a packet for the architecture. Installing a DEB package should not cause difficulties for a typical habrauser, so let's go straight to the next item.
')
If someone has not heard, then Ubiboot is a bootloader for Nokia N9, which allows you to download different operating systems and different kernels to them without flashing. A nice bonus is a completely touch-based interface. Branch on TMO .
To install Ubiboot, we need: Openmode-core (with special fixes), Ubiboot-core, menu and config file. All this can be found in my Dropbox .
UPD: Ubiboot is a live project and therefore it is better to take files from TMO or off. site.
For complete freedom of action, skip the Openmode core. Make sure you do not have passwords and / or PIN codes. Be prepared that after the firmware all your accounts will be reset.
In the terminal on behalf of the user, we write:
This will remove an unwelcome warranty loss warning.
On a computer with an experimental model connected in synchronization mode, we write:
After downloading the device as root in the terminal, we will write:
After downloading:
Let's create the boot folder in / home / user / MyDocs and put the menu file and config file into it, put the kernel that we just asked for for NitDroid and unpack the preinits.tar archive to the root into the / boot folder.
I gave my config file, but I think that anyone can edit it for themselves.
They put all the files into folders, checked, connect the test subject to the computer in synchronization mode and flash the ubiboot-kernel.
If everything is done correctly, then now you have a beautiful loader.
Turn off the phone, connect it to USB and wait for the appearance of scary green inscriptions on the screen. On the computer, back up the contents of the largest section (if you are paranoid, then backup everything). I have a lot of data, so copying takes ~ 30 minutes, we minimize the window and proceed to other operations that can be performed in parallel.
Go Here and take the latest release, download the largest file.
To begin with, make sure that the phone is well charged, since during all the operations described below there will be no charging. I hope everyone knows and understands about the total scaling of the phone. It is also desirable to protect the computer against oddities with electricity.
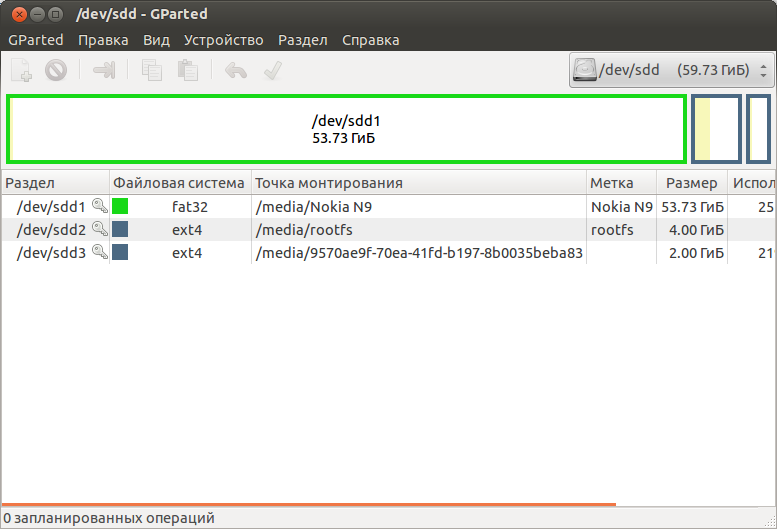
Open your favorite section editing program. I like gparted. We see approximately the following picture:
We unmount the largest partition (which we have already otbekapili and devastated) and begin to edit it. You must add a section similar to the second.
I edited it like this:
Click "OK" and go to drink tea for 10 minutes. It is better to remove children and the faint of heart at a safe distance from the computer.
After splitting, it looks like this: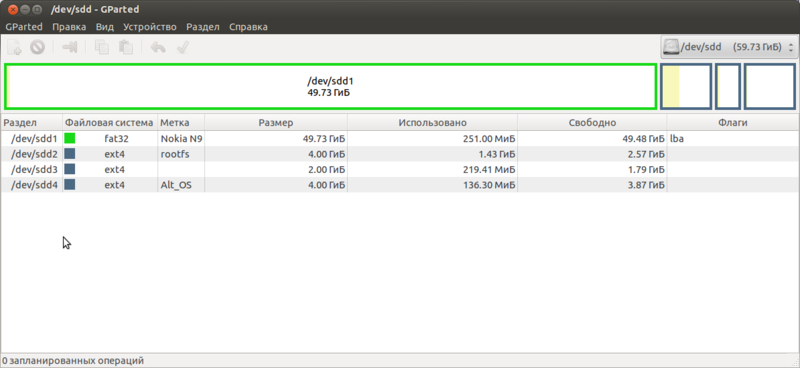
The most interesting part is the installation of Nemo. Perform on the computer
and then
Now we will unpack RootFS from Nemo in our freshly created section.
We are waiting for the completion of the process, it should take minutes 3.
Much has been written on this topic, so I will describe it briefly.
The only difference from a regular installation is that sillyboot is not installed. Image and fix files are required .
Now just reboot into each of the operating systems, be prepared that the first launch of each of them will be quite long.
Now you have your favorite martyr N9 with three OS on your hands. Happy picking!
PS: I wrote in the evening after a hard day, so I would appreciate any amendments and suggestions. Could not pick up the hub, please help.
So, this post is about how to get Nokia N9 with Harmattan, NitDroid and Nemo Mobile without any special tambourine dances.
As always, the author of this topic is not responsible for the dead and crippled devices and nerves. All obvious things will not be explained.
Initially available : Nokia N9 64GB (with 16GB will be problematic) with standard partitions, a working Harmattan with activated developer mode, a computer with Linux (I use Ubuntu 12.04 LTS), a firmware file for your product code, a USB cable and complete determination.
Welcome : Linux skills and N9 tinkering experience.
Install flasher.
Since Nokia does its best to abandon its heritage (to some extent without this holivar theme :)), the flasher will have to be taken from the Mirror . We swing from there a packet for the architecture. Installing a DEB package should not cause difficulties for a typical habrauser, so let's go straight to the next item.
')
Installing Ubiboot.
If someone has not heard, then Ubiboot is a bootloader for Nokia N9, which allows you to download different operating systems and different kernels to them without flashing. A nice bonus is a completely touch-based interface. Branch on TMO .
To install Ubiboot, we need: Openmode-core (with special fixes), Ubiboot-core, menu and config file. All this can be found in my Dropbox .
UPD: Ubiboot is a live project and therefore it is better to take files from TMO or off. site.
For complete freedom of action, skip the Openmode core. Make sure you do not have passwords and / or PIN codes. Be prepared that after the firmware all your accounts will be reset.
In the terminal on behalf of the user, we write:
disclaimer-cal remove View-openmodeThis will remove an unwelcome warranty loss warning.
On a computer with an experimental model connected in synchronization mode, we write:
sudo flasher -a <_> -k <openmode_kernel> --flash-only=kernel -f -RAfter downloading the device as root in the terminal, we will write:
rm -rf /home/user/.accountsrm -rf /home/user/.aegismkdir -p /root/sslcp -Rf /etc/ssl/certs/* /root/sslrm -rf /etc/aegisfs.dsync/sbin/rebootAfter downloading:
cp -Rf /root/ssl/* /etc/ssl/certsLet's create the boot folder in / home / user / MyDocs and put the menu file and config file into it, put the kernel that we just asked for for NitDroid and unpack the preinits.tar archive to the root into the / boot folder.
tar xvf /<__>/preinits.tar -C /I gave my config file, but I think that anyone can edit it for themselves.
They put all the files into folders, checked, connect the test subject to the computer in synchronization mode and flash the ubiboot-kernel.
sudo flasher -a <_> -k <ubiboot_kernel> --flash-only=kernel -f -R .If everything is done correctly, then now you have a beautiful loader.
Back up and repartition.
Turn off the phone, connect it to USB and wait for the appearance of scary green inscriptions on the screen. On the computer, back up the contents of the largest section (if you are paranoid, then backup everything). I have a lot of data, so copying takes ~ 30 minutes, we minimize the window and proceed to other operations that can be performed in parallel.
Go Here and take the latest release, download the largest file.
To begin with, make sure that the phone is well charged, since during all the operations described below there will be no charging. I hope everyone knows and understands about the total scaling of the phone. It is also desirable to protect the computer against oddities with electricity.
Open your favorite section editing program. I like gparted. We see approximately the following picture:
We unmount the largest partition (which we have already otbekapili and devastated) and begin to edit it. You must add a section similar to the second.
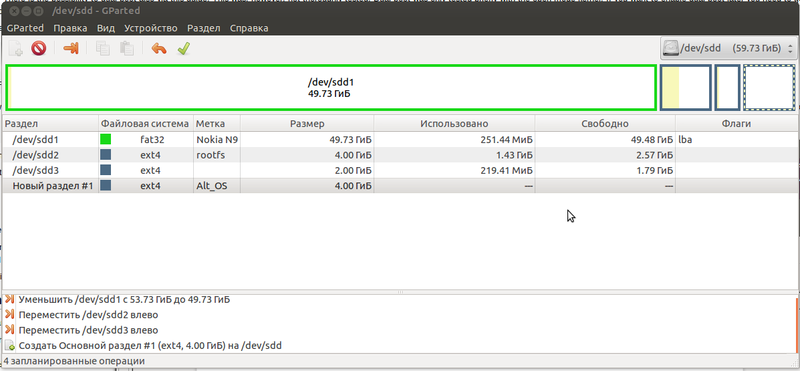
I edited it like this:
Click "OK" and go to drink tea for 10 minutes. It is better to remove children and the faint of heart at a safe distance from the computer.
After splitting, it looks like this:
Installing Nemo.
The most interesting part is the installation of Nemo. Perform on the computer
sudo mkdir -p /media/Alt_OS/and then
sudo mount /dev/sdX /media/Alt_OS/ , where / dev / sdX is our new partition. The designation can be viewed in the same GParted.Now we will unpack RootFS from Nemo in our freshly created section.
sudo tar --numeric-owner -xf <__> -C /media/Alt_OS/We are waiting for the completion of the process, it should take minutes 3.
Installing NItDroid.
Much has been written on this topic, so I will describe it briefly.
The only difference from a regular installation is that sillyboot is not installed. Image and fix files are required .
mkdir -p /home/nitdroidtar xjvf //nitdroid_n9_jellybean_alpha5.tar.bz2 -C /home/nitdroid/tar xjvf /<>/apps2sd_fix_alpha5.tar.bz2 -C /home/nitdroid/Almost over.
Now just reboot into each of the operating systems, be prepared that the first launch of each of them will be quite long.
Conclusion
Now you have your favorite martyr N9 with three OS on your hands. Happy picking!
PS: I wrote in the evening after a hard day, so I would appreciate any amendments and suggestions. Could not pick up the hub, please help.
Source: https://habr.com/ru/post/179649/
All Articles