Remove the starry sky with Emgu CV

Good day, Habr.
It just so happens that I have been interested in photography and astronomy for a long time. I like to shoot the starry sky. Since there is little light at night, in order to get something really beautiful you have to do quite a lot of exposure. But another problem comes up - due to the fact that the Earth rotates, the stars in the sky move. Accordingly, with relatively long exposures, the stars cease to be points, and begin to draw arcs. To compensate for this movement when photographing / observing deep-sky objects, there are devices - mount . Unfortunately, at the moment there is no possibility to buy a mount, so I decided to ask myself: is it possible to implement a similar effect programmatically and what will be the result?
')
Under the cut a lot of photos. All photos in my post, (almost all) are clickable and free-to-download.
Introduction
The problem with shooting stars is this - they move. At first glance it may seem that this movement is completely imperceptible, but even at relatively short exposures (20 ”+) the stars already cease to be points — short arcs begin to be seen, which they draw while moving across the sky.
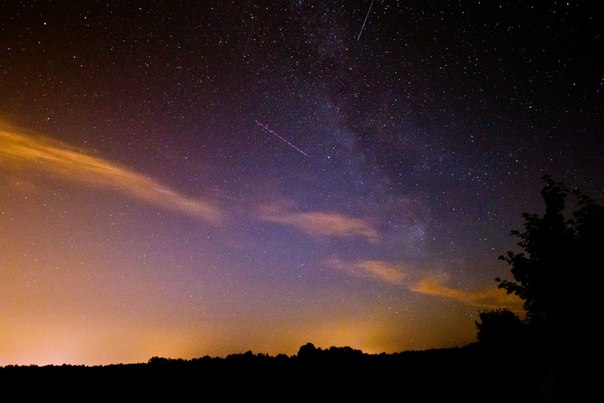
Exposure ~ 15 "
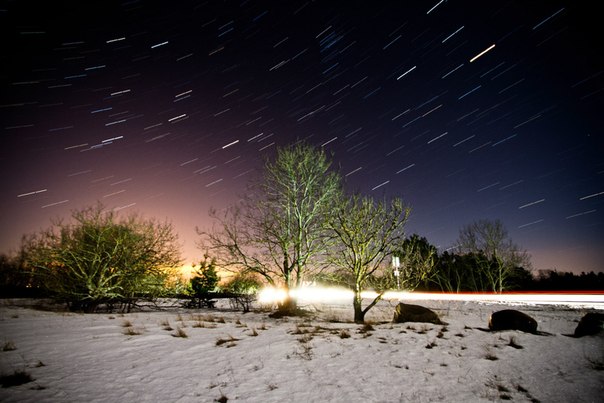
Exposure ~ 20 '
Theory
Earth rotates around its own axis. Relatively distant stars, this period is 86164.090530833 seconds .
Accordingly, knowing the shutter speed of the frame, it is possible to calculate by how many degrees all the stars in the frame have turned around the center. The idea is such that if you compensate for this rotation, turning the entire frame in the opposite direction by this value, then all the stars should remain in place.
The problem of finding a center around which everything revolves is not a problem. It is enough to find a polar star - the axis of rotation of the Earth passes very close to it.
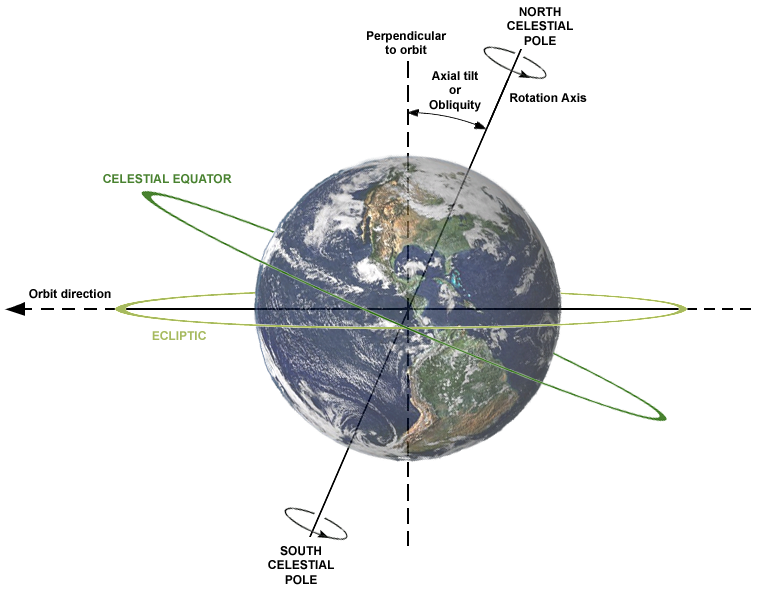
Celestial Pole - the same axis.
Implementation
To implement this idea, I decided to use Emgu CV - the wrapper of the OpenCV library for .NET.
I will not paint the entire program - I will only talk about the main methods.
If you put photos one on top of another, then in Photoshop I usually used Blending Mode: Lighten. Its essence is such that from the two images it is one, choosing the pixels with the greatest brightness. Ie, if there are two pixels in the two source images, then the resulting image will be the pixel that is brighter.
Emgu CV has already implemented this method.
public Image<TColor, TDepth> Max( Image<TColor, TDepth> img2 ) Mode 1: Adding images without rotation
There is nothing complicated here - just alternately overlay all the photos from the list one on another.
List<string> fileNames = (List<string>)filesList; // input Image<Bgr, Byte> image = new Image<Bgr, Byte>(fileNames.First()); // resulting foreach (string filename in fileNames) { Image<Bgr, Byte> nextImage = new Image<Bgr, byte>(filename); image = image.Max(nextImage); nextImage.Dispose(); pictureProcessed(this, new PictureProcessedEventArgs(image)); // updating image in imagebox } Why do you need this mode? Then, after the addition of photos, arcs are produced due to the movement of stars. It is very easy to find the center of rotation (polar star). Yes, and sometimes get some pretty interesting photos with traces.
Mode 2: Addition of Rotation Compensated Images
In this mode, everything becomes a bit more complicated. Initially, we need to calculate the angle of displacement of the star during the shooting. There was an idea to calculate it simply on the basis of an excerpt, but I understood that this may not be the most accurate. Therefore, we will pull out the time taken from the EXIF data photos.
Bitmap referencePic = new Bitmap(fileNames.First()); //loading first image byte[] timeTakenRaw = referencePic.GetPropertyItem(36867).Value; // EXIF DateTime taken string timeTaken = System.Text.Encoding.ASCII.GetString(timeTakenRaw, 0, timeTakenRaw.Length - 1); // array to string without last char (newline) DateTime referenceTime = DateTime.ParseExact(timeTaken, "yyyy:MM:d H:m:s", System.Globalization.CultureInfo.InvariantCulture); Now in order.
We need to determine the moment of the beginning of the shooting in order to start counting the displacement of the remaining frames from it.
Load the photo and get the PropertyItem ID: 36867 - the date and time of receiving the frame.
We convert the array of characters into a string (the last character is \ n, so we exclude it).
Got a time when shooting started.
For each subsequent photo, we will find the same and use the time difference to calculate the angle of rotation.
Everything is considered simple, knowing how many seconds it takes a complete revolution of the Earth .
double secondsShift = (dateTimeTaken - referenceTime).TotalSeconds; double rotationAngle = secondsShift / stellarDay * 360; Rotate the image will be an affine transformation , but for this we need to calculate the rotation matrix.
Fortunately, in Emgu CV this is all done for us.
RotationMatrix2D<double> rotationMatrix = new RotationMatrix2D<double>(rotationCenter, -rotationAngle, 1); //change rotationAngle sign for CW/CCW Having a matrix, you can apply an affine transformation to the current photo, and then add them as in the first mode.
using (Image<Bgr, Byte> imageToRotate = new Image<Bgr, Byte>(currentPic)) { referenceImage = referenceImage.Max(imageToRotate.WarpAffine<double>(rotationMatrix, Emgu.CV.CvEnum.INTER.CV_INTER_CUBIC, Emgu.CV.CvEnum.WARP.CV_WARP_FILL_OUTLIERS, background)); } Actually, that's all. For each photo, we perform these two methods, and see what happens.
Tests
Source Images:

27 pieces
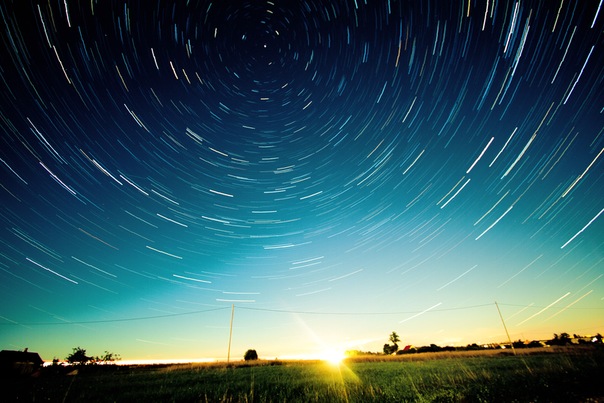
Test 1: Stack
Results overlay all photos into one.
Test 2: Rotate & Stack
Marked the center of rotation, and forward.
In the second test, a rather strange effect was obtained.
1. The earth is smeared - this is normal. Stars must be fixed.
2. The stars in the center remained in their places, that is, everything worked as it should.
3. Stars at the edges "floated"
Why did it happen? I have no idea! I suppose that due to the distortion of the lens, the trajectory of the stars ceased to be around - became an ellipse.
Exposure ~ 43 '
In this photo you can clearly see that the trajectory is different from the ideal circle - and this was all calculated for.
Equipment
Everything was shot on a Canon 7D with a Canon EF-S 10-22mm. This lens is not the best optical parameters - namely, distortion. Therefore, I blame him for the fact that everything did not turn out so smoothly. Next time I will try to correct the distortion and test it again.
Clear sky!
Github repository
Source: https://habr.com/ru/post/179541/
All Articles