Create a video library with PHPixie

After my previous post about choosing a light framework, I googled and saw that for some of them there is not a single Russian-language tutorial. So I decided to write a series of posts in order to fill this niche. I think it is worth starting with those that I stopped at the end of, and since quite a lot has already been written for Silex, this post will be devoted to PHPixie.
For those who have not read my comparison of frameworks, PHPixie is small and by my standards is a very fast framework with a modular structure, well implemented by DI, lack of statics and simple architecture.
On the official website, all the tutorials are written using the example of fairies, but I will try to be original and we will create a library of videos from Youtube. That is, we can add, delete and view the video. And on the way, we will learn to use the API of the YouTube itself to get meta information and tambneils.
')
Project creation
PHPixie can be installed either using Composer or by downloading the finished system snapshot from the site. Almost no difference, as snapshot is regularly updated and is a basic project with three libraries installed (core, db and orm). For simplicity, we will use the second method, link to snapshot here phpixie.com/phpixie.zip . The server must be configured on the / web / folder within the project. That's all, now we can go to our host and see a small greeting.
$ Pixie object
The $ pixie object is the implementation of the DI Container and Service Locator, something similar to the $ app in Silex. It is available as a controller controller and is passed to almost every constructor, $ pixie also contains factor methods for each class of the framework. Proper use of it allows you to completely avoid linking classes and therefore simplify testing. Unlike Silex, adding methods and transferring them to $ pixie happens only by extending the class. The base project already has an App \ Pixie class that inherits from PHPixie \ Pixie, and we can add our code to it in order to have access to it everywhere. It should be noted that this is not a singleton and it is necessary to pass it between classes explicitly, this approach was chosen to avoid any global state in the code, like the framework never uses static methods. Each module, for example, db or orm supplies its class with factor methods, these classes are written in our App \ Pixie in $ modules. Then we can request them as a property, for example, using $ pixie-> db-> query () and $ pixie-> orm-> get (), which introduces additional structuredness and makes it possible to avoid soup from the methods. In our case, we don’t need to change anything in App \ Pixie.
Database
We will use only one unpretentious plate for storing information about the video, here is its structure:
CREATE TABLE `videos` ( `id` INT(10) NOT NULL AUTO_INCREMENT, `video_id` VARCHAR(20) NOT NULL, `title` VARCHAR(255) NOT NULL, PRIMARY KEY (`id`) ); Now we register the connection settings to the database in /assets/config/db.php , for example:
return array( 'default' => array( 'user'=>'root', 'password' => '', 'driver' => 'PDO', 'connection'=>'mysql:host=localhost;dbname=videos' ) ); here, I think everything is quite trivial.
Model
Any MVC structure begins with a model, in our case it is only one, Video. Anyone familiar with Kohana will immediately feel at home, to create a model, simply expand the class \ PHPixie \ ORM \ Model :
namespace App\Model; class Video extends \PHPixie\ORM\Model{} Binding to the table by default occurs based on the class name. In our case, the way it is and do not need to change anything. Access to the model can be obtained using $ pixie. Brightest code examples:
// $video = $pixie->get('video'); $video->title = 'Test'; $video->save(); // $video = $pixie->get('video')->where('title','Test')->find(); // $videos = $pixie->get('video')->find_all(); Basic markup
In the basic project that we downloaded, there is a controller subtype, App \ Pixie class. His job is to render the main.php template available as per view $ view. Our controllers simply transfer different data to this template, including $ subview — the name of the sub-template to insert. I just really liked the fact that the logic of how the master pages and subpatterns work is not spelled out in the framework itself, but is put into the project itself, which allows you to remake it at your discretion. Our main.php will look something like this:
<!DOCTYPE html> <html> <head> <link href="//netdna.bootstrapcdn.com/twitter-bootstrap/2.3.0/css/bootstrap-combined.min.css" rel="stylesheet"/> </head> <body> <div class="container"> <div class="row"> <div class="offset3 span6"> <h2><a href="/">PHPixie Vids</a></h2> <!-- --> <form class="form-inline" method="post" action="/videos/add"> <input type="text" placeholder="Paste Link…" name="url"> <button type="submit" class="btn btn-primary">Add new</button> </form> </div> </div> <div class="row"> <!-- --> <?php include($subview.'.php'); ?> </div> </div> </body> </html> We have only two sub-templates: list.php (for the list of added videos) and view.php (for viewing the selected video). Here they are:
<!-- /assets/views/list.php --> <div class="offset3 span6"> <ul class="thumbnails"> <?php foreach($videos as $video):?> <li class="span3"> <a class="thumbnail" href="/videos/view/<?php echo $video->id; ?>"> <!-- --> <img src="http://img.youtube.com/vi/<?php echo $video->video_id;?>/0.jpg"> <div class="caption"> <h3><?php echo $video->title;?></h3> </div> </a> </li> <?php endforeach;?> </ul> </div> <div class="offset3 span6"> <!-- --> <iframe width="420" height="345" src="http://www.youtube.com/embed/<?php echo $video->video_id; ?>?rel=0&autoplay=1"></iframe> </div> Routing
I know that you were already waiting for the code itself, but before we go to the controller, we need to register it in /assets/config/routes.php. In fact, only one route is registered in the basic project and it looks like / controller / method / id , which basically suits us, but it would be very useful to change the default controller from Hello to our Videos.
return array( 'default' => array('(/<controller>(/<action>(/<id>)))', array( // 'controller' => 'Videos', 'action' => 'index' ) ), ); Controller
Since we need 3 pages in the controller there should be 3 methods. This is where we begin:
namespace App\Controller; class Videos extends \App\Page { public function action_index(){ $this->view->subview = 'list'; $this->view->videos = $this->pixie->orm->get('video')->find_all(); } public function action_add(){ $this->redirect('/'); // } public function action_view(){ $this->view->subview = 'view'; // id URL: /video/view/3 $id = $this->request->param('id'); $this->view->video = $this->pixie->orm->get('video') ->where('id', $id) ->find(); } } The tasks of selecting all and one video are trivial.
Consider now adding a new video. The video identifier in the YouTube link is passed to the 'v' parameter, for example www.youtube.com/watch?v=75nBenOWul0 , we can get it in many ways, but it seemed to me to be the most accurate using parse_url (), like this:
parse_str(parse_url( $url, PHP_URL_QUERY ), $vars ); $video_id = $vars['v']; You can get information about the video, in our case its name, using the API via the link youtube.com/get_video_info?video_id= <video id>. Using this knowledge, we can now add the missing action_add ():
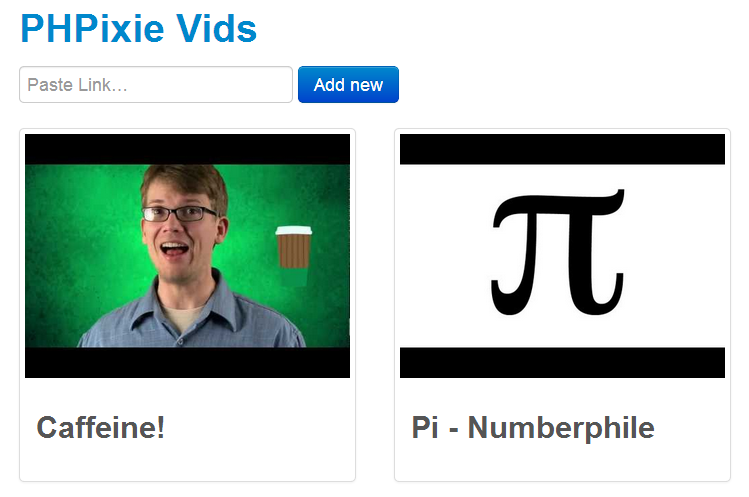
public function action_add(){ if($url = $this->request->post('url')){ parse_str(parse_url( $url, PHP_URL_QUERY ), $vars ); $video_id = $vars['v']; $response = file_get_contents("http://youtube.com/get_video_info?video_id=".$video_id); parse_str($response, $data); $video = $this->pixie->orm->get('video'); $video->title = $data['title']; $video->video_id = $video_id; $video->save(); } $this->redirect('/'); } And voila! Here is the way a screenshot of the result:
If you were expecting a more complex controller or configuration, they are not there, and the framework itself is almost negligible, this allows you to concentrate on writing your code instead of studying someone else.
I hope you liked the post, and another time we will learn to write on Lithium.
Source: https://habr.com/ru/post/178899/
All Articles