Time to connect the source. Introduction to Source Maps
In modern development, your code is very different from the code on the "combat" server (production) after compiling, minifying, merging, and various optimizations. This is where the source maps come into play, showing the exact match between the elements of the finished working project code and your development code. In this introductory tutorial, we will take a simple project and run it using various JavaScript compilers to see how the code maps work in a browser.
Codecards provide a language-independent way to show the correspondence between the working code and the source code (sources) that you wrote during development. When, after building a project, you look at the entire prepared array of codes, it will be very difficult to find a match for the section of the final code and its source lines. The code card stores these correspondences, so when we request, for example, the location of the error, it will show its exact location in the source file! This gives great benefit to the developers, because the code becomes readable and even debugged!
In this tutorial, we will compile a very simple piece of JS + SASS codes, and then view the source files in the browser using code cards. Download demo files - and get started!
Please note that at the time of writing, Chrome version 23 supports JS and SASS SourceMaps. Firefox will also receive support in the near future, as this topic is in its active development stage. With these reservations, let's see how to use code maps in the browser.
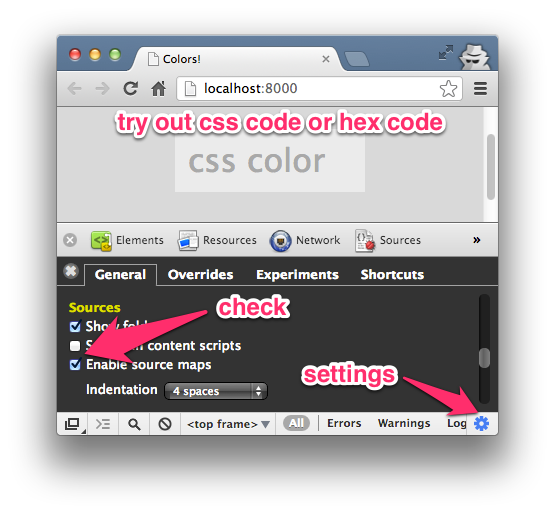
First of all, we need to enable support for mapping in the settings:
1) open the Chrome Developer Tools window: View -> Developer -> Developer Tools (F12);
2) click "Settings" in the lower right corner;
3) select “General” and “Enable source maps”.
Download the demo archive (link to translator examples checked at the time of translation) and open the “start” directory. The files and directory structure are pretty simple - a bit simple JavaScript in scripts / script.js. After opening the index.html script changes the background color of the page by entering the color code by the user.

Look at simple scripts in javascript, typeScript, and coffeeScript files.
Using different compilers, we will create an assembly and generate the appropriate code card files.
We will use 5 different ways of generating the compiled and minimized script together with the associated map. You can go through all the options or use only the compiler you know.
Options:
1. Closure Compiler .
2. GruntJS with JSMin .
3. Uglifyjs 2 .
4. CoffeeScript Redux .
5. TypeScript .
The Google Closure Compiler is a JavaScript optimization tool. It analyzes the code, removes unnecessary pieces, and the rest minimizes. It can also generate a source map.
Take the following steps to create an optimized version of the script:
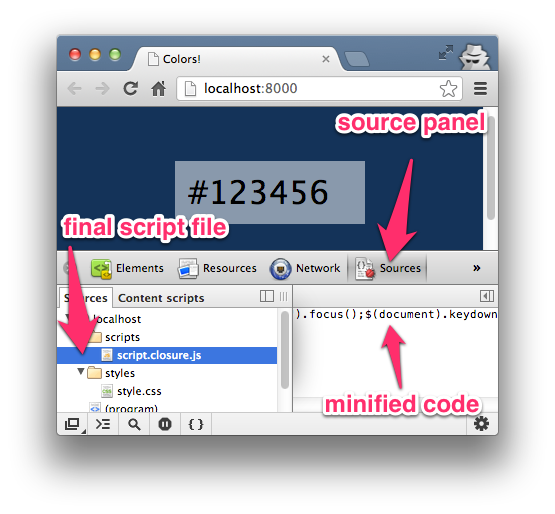
When we open
Note that the Closure Compiler uses 2 options -
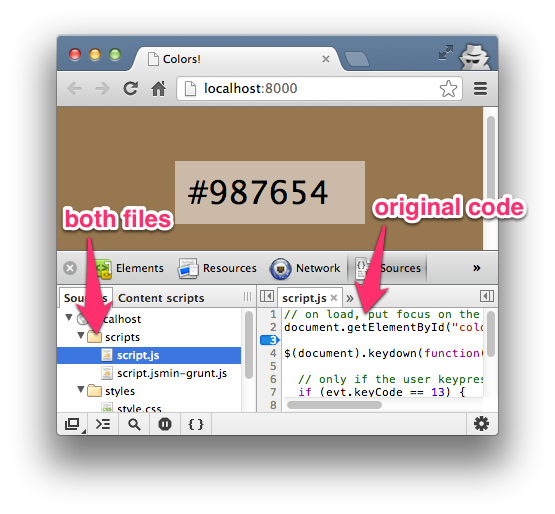
Now viewing the scripts in the browser through the developer panel will show both files - the original and optimized
Try debugging with breakpoints. Observed expressions and variables are not yet available when viewing sources. Let's hope that in the future they will appear!

If you are already using Grunt.js to build projects, then it is now useful for code cards from the JSMin program. The code will not only be minified, but a code map will also be created. (It should be remembered that the work of version 0.4 of
The steps show how to create an optimized version with the
1. Install
2. (For version 0.3.x). Install the grunt-jsmin-sourcemap plugin . This will create the
3. Edit the created
4. Return to the command line and run grunt:
This will execute the jsmin-sourcemap task as the default task formulated in the
5. Make sure that the source file is registered in the created Source Map script.jsmin-grunt.js.map file:
(Actually
6. Uncomment
With
UglifyJS2 is another JS compressor optimizer. As in the 2 previous cases, an optimized script file is created, the URL of the code card and the map file itself are added, containing correspondences between compressed and original JavaScript operators. To use, run in the "
1. Install the uglify-js module (the
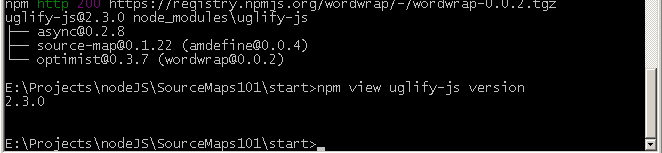
2. In the “
3. In
In the first 3 options, only 1 optimization step was required. For languages like CoffeeScript, you need 2 steps: from CoffeeScript to JavaScript, and then to optimized JS. Consider how to create a multi-level code card - from CoffeeScript and from the CoffeeScript Redux compiler (because the original Coffeescript did not support maps until version 1.6.1 - approx. Trans.) .
Navigate to the "
1. Install CoffeeScript with the -g global call option.
2. Compile
3. Install CoffeeScript Redux :
4. Create a mapping file
5. Make sure that at the very end of the
6. Make sure the
1. Finally, use UglifyJS to compress the JS and create a code card. This time the collector will accept a code card from CoffeeScript so that we can get to the source codes. Run the command in "
2. Ensure that the code map file has the correct link
... and the correct links to the source code of the form
TypeScript, like CoffeeScript, also requires 2 steps: TypeScript -> simple JavaScript -> minified JavaScript. Since the script uses the jQuery plugin, you will need 2 TypeScript files with the names
Change to the “scripts” directory in command line mode and execute:
The command will create a
As for CoffeweScript, the next step uses UglifyJS:
Make sure that the links in

In addition to JavaScript, Chrome currently supports SASS and SCSS for code maps. For SASS mapping, let's change some settings in Chrome and then compile SASS in CSS with debugging options.
1. Before changing any settings, please note that when you observe an item from the developer’s tools window, we will only see a link to CSS. This is not what is needed.

2. Go to chrome: // flags /.
3. Install “Enable Developer Tools experiments ” (in the Russian version of Chrome - “Enable experimental developer tools”).

In Windows:
4. Open

In Windows:
Settings (☰) -> Tools -> Developer Tools -> Settings (⏣ in the lower right corner) -> Experiments -> Support for Sass .

5. Compile SASS with these debugging options in the "
6. Ensure that the Developer Tools window is reopened and the page reloaded.
7. Now, when we check the element in Dev.Tools, we will see access to the SASS file.

In addition to simply viewing SASS, if LiveReload is running in the background, then when you change the SASS file, the page will also change.
Now - open the project in Firefox and see through Firebug. It will also be available to view the SASS file.

If we look at any
1. version : map version (usually 3).
2. file : the name of the output file.
3. sources : source file name.
4. names : characters used for matches.
5. mappings : match data.

Code cards are still under active development, but there are already some notable resources on the Web. Be sure to check out these links to find out more.
I hope that the practice of using multiple compilers has shown the potential of code cards. , , , .
(from the transl.) On the technology of working with compiled code in the browser (SourceMap) there was already a detailed article ( translation ) about a year ago. Now this technology is persistently winning its place in the sun. For example, then conversations about mapping compilations were only conducted, and now from version 1.6.1 support for creating map files has been obtained by the Coffeescript compiler. Jetbrains Webstorm 6.0 / Phpstorm (March 2013) introduced SourceMap support for working with code . Typescript has support since version 0.8.1 (November 2012). Everyone understands that the time of manual work with the “assembler” on the front end passes, everyone needs to know where the code for the legs grows. We are not even talking about the initial application of the minifix code fixes - they are supported in UglifyJS, Closure Compiler and GWT (at a minimum). Speech is about JS and CSS code compilers.
So recently (in January 2013) this large tutorial article appeared, explaining with examples how the code card technology works. Although the first article was also detailed, but it would not hurt to have the second one translated, it describes the same thing in other words and illustrations, and proceeds to practice - to examples.
To pass the threshold from ordinary knowledge to experience always constitutes a certain barrier. Using training files, in order to see the results of creating code card files, we will occasionally get a working environment on our computer to build our own projects - all the compilers and minifiers we knew about, but were afraid to use, will be assembled and will only write its code on one of the sugar languages of the frontend, which were exotic until recently.
')
Please note that if you use the new version of the Grunt 0.4+ collector, then it will need several other settings than described in the article. More information about the transition from 0.3.9 to 0.4x is available at habrahabr.ru/post/170937 .
The author used screenshots from Mas. For Chrome, they are very different in the settings of the browser from the Windows version, so in some places screenshots from the Russian version of Chrome in Windows are added.
For cross-browser development, it is preferable to be able to work in any of the main systems. If there are no questions with Linux and MacOS, then it is important to check how well all the examples work under Windows. In the process of translation, examples were checked and refined in the Windows XP environment and on modern (as of April 2013) versions of programs. As a result, in 2 out of 5 examples, the improvements were made, laid out in the translation article as comments and additions. (The author of the article sent a message about the modifications.) They will help bring the examples to reality - both in terms of supporting new versions (especially Grunt 0.4 and Coffeescript 1.6.1), and confidence in the performance of all functions on Windows.
The next feature is the archive on the author’s github. Due to the fact that there are paths longer than 260 characters, it is not fully disclosed in WinRar (but this does not prevent us from using start files for examples that have shortcuts and run all the examples with them). To view and unpack (out of curiosity) the entire archive, which contains the files installed after the execution of all the examples, you need to use 7zip or another archiver other than WinRar.
There are a lot of comments, comments and alterations (hereinafter, they will be highlighted in the format of “citing” for convenience of distinction.) Nevertheless, this is not a new article, but a translation, with comments and taking into account local and Cyrillic features. Because you have to pay tribute to the good and rare organization of a lot of work in relation to the popularization of new technology.
But, since both articles on this topic - translated a year ago and under consideration - are outdated (many statements that do not correspond to the current moment), this, so to speak, translation touches upon all the issues so that the article becomes a modern practical guide on how to do it. the status of tools and browsers for today.
What are source maps?
Codecards provide a language-independent way to show the correspondence between the working code and the source code (sources) that you wrote during development. When, after building a project, you look at the entire prepared array of codes, it will be very difficult to find a match for the section of the final code and its source lines. The code card stores these correspondences, so when we request, for example, the location of the error, it will show its exact location in the source file! This gives great benefit to the developers, because the code becomes readable and even debugged!
In this tutorial, we will compile a very simple piece of JS + SASS codes, and then view the source files in the browser using code cards. Download demo files - and get started!
Since the examples will work modern version of Grunt (0.4), it is recommended to download not examples of the author , but updated examples of the translator . They contain both start-up files, as well as the results of installations and the work of examples, so that you can check the correctness and success of your actions - note the translation. .
Browsers
Please note that at the time of writing, Chrome version 23 supports JS and SASS SourceMaps. Firefox will also receive support in the near future, as this topic is in its active development stage. With these reservations, let's see how to use code maps in the browser.
(approx. transl. :) In this article at the end there is an example of SourceMap support for SASS in Firefox + Firebug. In addition, new about Firefox: Future of Firefox DevTools (17 Mar 2013) or in translation :
“CoffeeScript support. To implement it, we made support for SourceMap. Nick Fitzgerald demonstrated a debugger version supporting SourceMap and CoffeeScript
Nick's job helps support the minification of CSS and JS files. ”
*) wiki.mozilla.org/DevTools/Features/SourceMap
Source Maps in Chrome
First of all, we need to enable support for mapping in the settings:
1) open the Chrome Developer Tools window: View -> Developer -> Developer Tools (F12);
2) click "Settings" in the lower right corner;
3) select “General” and “Enable source maps”.
For Windows (from transl.) :
1) configuration and control (in the upper right corner) (F12);
2) in the developer window - “Settings” in the lower right corner;
3) select “General” and “Enable source maps” in the “Sources” block.

Installation
Download the demo archive (link to translator examples checked at the time of translation) and open the “start” directory. The files and directory structure are pretty simple - a bit simple JavaScript in scripts / script.js. After opening the index.html script changes the background color of the page by entering the color code by the user.
/start ├── index.html ├── /scripts │ ├── jquery.d.ts │ ├── script.coffee.coffee │ ├── script.js │ └── script.typescript.ts └── /styles ├── style.css └── style.sass Look at simple scripts in javascript, typeScript, and coffeeScript files.
Using different compilers, we will create an assembly and generate the appropriate code card files.
We will use 5 different ways of generating the compiled and minimized script together with the associated map. You can go through all the options or use only the compiler you know.
Options:
1. Closure Compiler .
2. GruntJS with JSMin .
3. Uglifyjs 2 .
4. CoffeeScript Redux .
5. TypeScript .
After testing and refining the examples to the current versions of the programs, the park of examples was supplemented with two options.
2.a GruntJS (0.4.x) with JSMin .
4.a CoffeeScript - not Redux, but original, version 1.6.2 .
The first one describes in detail the installation of the new version, which is very different from the current version 0.3.x up to February 2013. In the second, the launch and testing of the mapping, which appeared from version 1.6.1 in Coffeescript in February 2013 (since September 2012, this role has been played by a clone - Coffeescript Redux.)
(from transl.) The very first acquaintance with the code and the proposed method of switching options causes embarrassment. No, the author has done a lot of work and provides amazing technology. The article is perfectly framed. But the user interface is unexpectedly lame. The way of switching options through writing and deleting comments contradicts the ideology of the automated assembly approach - everything should be as manageable as possible. Display options - too. Nothing prevents switching options via the URL of the page. Let's write a switch, which, depending on the option parameter, will load this or that script into the anchor during page load. This is not a dynamic one-page download, although it is not far from it, but it is already better than switching in code.var lHash = location.hash.substr(1).split('='); if(lHash && lHash.length ==2 && lHash[0] =='option') var optionName = lHash[1]; if(optionName && !parseInt(optionName)) optionName = {closure:1,jsmin:2,uglifyjs:3,coffeescript:4,typescript:5}[optionName.toLowerCase()]; console.log(optionName); optionName = optionName ||0; var loadScript; (loadScript = function(i){ var scr = document.createElement('SCRIPT'); scr.setAttribute('type', 'application/javascript'); scr.src ='scripts/script.' + ('|closure|jsmin-grunt|uglify|coffee.min|typescript.min'.split('|')[i]) +(i?'.':'') +'js'; document.getElementsByTagName('head')[0].appendChild(scr); })(optionName);
Now we got rid of a heap of comments in the code, the need to monitor them and switch. Adding an anchor # option = <number> or # option = <example_name> or the absence (or format error) of an anchor will cause the desired script to be executed from the options listed in scr.src. In the future, you can add your options under your own names.
And the switch of the background is somehow unfriendly - it requires sharpe before the code. The desire to use colors in verbal form is understandable, but few people are used to working with them. Let's correct:var colr = $("#color").val().toUpperCase() , cL = colr.length; for(var i in cL) if(cL[i] <'0'|| cL[i] >'9'&& cL[i] <'A'|| cL[i] >'F') // hex- break; document.body.style.backgroundColor = (colr.charAt[0] !='#' && i < cL ?'':'#') + colr;
Probably, it looks complicated at first sight, but does not cause rejection due to primitiveness. Otherwise, it turns out that we are using the latest assembly technologies, and are unable to express the friendly interface in the code. Later we will be able to formulate our wishes in a more perfect code, invent for our codes not such a primitive loadScript and anchor reader, write all this in a coffee script and store it in our build library. After all, we come to the assembly of projects from the desire to disagree on the compromises of primitivity and simply display the complex logic of abstractions.
Option 1: Closure Compiler
The Google Closure Compiler is a JavaScript optimization tool. It analyzes the code, removes unnecessary pieces, and the rest minimizes. It can also generate a source map.
Take the following steps to create an optimized version of the script:
- Download the latest Closure Compiler ;
- Put the file
compiler.jarin the directory with the scripts; - In the command line, go to the "
scripts/" directory and execute the command to create thescript.closure.jsfile that is optimized and ready for execution in production
java -jar compiler.jar --js script.js --js_output_file script.closure.js - Make sure that
index.htmlis associated with the created file by uncommenting “Option A.”
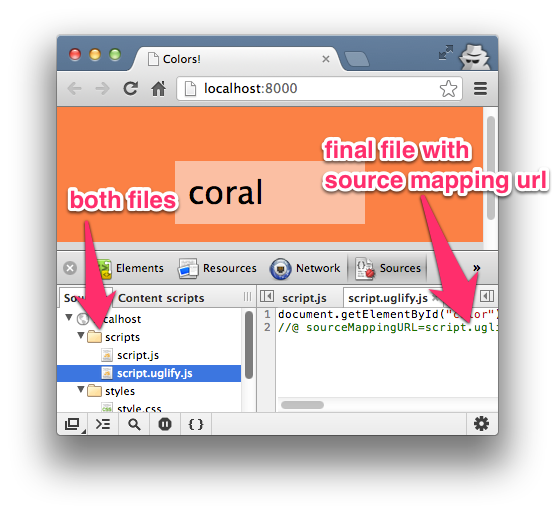
When we open
index.html in the browser and look at the Source panel in the developer’s tools, there is only a link to the optimized version of the script script.closure.js ; we have no way to link to the original code file with the desired indents. Now create a code map file by executing the following command in the scripts directory: java -jar compiler.jar --js script.js --create_source_map script.closure.js.map --source_map_format=V3 --js_output_file script.closure.js Note that the Closure Compiler uses 2 options -
--create_source_map and --source_map_format to create the map file script.closure.js.map with Source Map version 3. But this is not all. To see the effect, add the source URLs to the end of the compiled script.closure.js file script.closure.js that it contains location data for them. //@ sourceMappingURL=script.closure.js.map Now viewing the scripts in the browser through the developer panel will show both files - the original and optimized
script.closure.js . Although the browser uses an optimized file, the Source Map allows you to link it to the source code.Try debugging with breakpoints. Observed expressions and variables are not yet available when viewing sources. Let's hope that in the future they will appear!
Cyrillic users have the pleasure to notice another jamb, even two: one in the browser, the other in the compiler. The browser does not display UTF-8 characters in the mapped file:
The compiler is even worse: Cyrillic characters are considered an error, so they should be removed before compiling (if possible).

Option 2: GruntJS task for JSMin
If you are already using Grunt.js to build projects, then it is now useful for code cards from the JSMin program. The code will not only be minified, but a code map will also be created. (It should be remembered that the work of version 0.4 of
Grunt differs from that described in version 0.3 of the article. - note of the translation.)The steps show how to create an optimized version with the
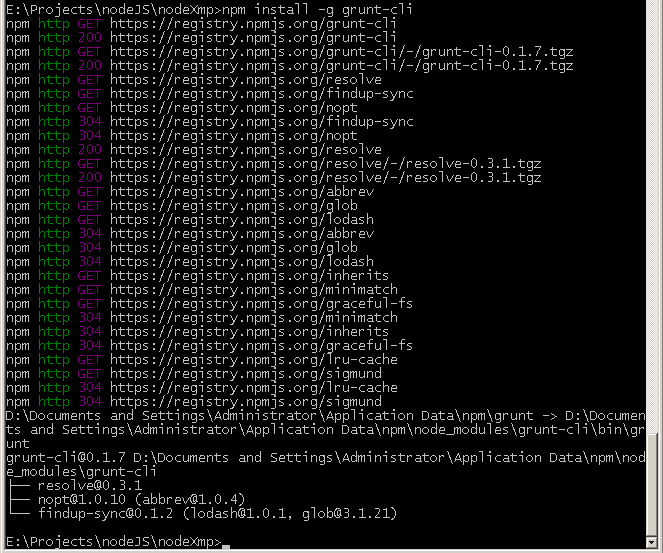
JSMin plugin using Grunt .1. Install
Grunt and run ( alternative fresh description ) in the nodeJS gruntfile called grunt.js , located in the root of the " start/ " directory. $ npm install -g grunt $ npm view grunt version npm http GET https://registry.npmjs.org/grunt npm http 200 https://registry.npmjs.org/grunt 0.3.17 $ grunt init:gruntfile How to work with Grunt 0.4.x
If you have an old version installed, but you want to upgrade it to 0.4.x, then the installation process will be different. First of all, remove the old version of Grunt 0.3.x (if it was installed as global).npm uninstall -g grunt
Let's take a closer look at setting up tasks in Grunt 0.4, since this will be one of the main build tools for a long time.
Now the Grunt module in the new version is divided into several modules - the core and plugins, in order to remove all application codes from the kernel. Several modules are involved in the installation.
Install the command line interface as a global grunt-cli module.npm install -g grunt-cli
To launch tasks in projects this is not enough - in each project you need to describe the tasks in the Gruntfile file. If earlier it was called grunt.js, then in the new version - Gruntfile.js or Gruntfile.coffee. The second required file in the project root is package.json with a list of dependencies used in npm (Node.js package manager).
In each task in the project folder a local grunt module is installed.Therefore, we will enter the “start /” folder on the command line and execute the specified command there. As in the 0.3.x version, the node_modules folder will appear and in it the grunt module folder.npm install grunt
Scattering the main code on projects is done with the aim of being able to run different versions of the search engine on one computer. grunt-cli is just a shell that runs a command in the desired project folder. ( gruntjs.com/getting-started )
Next, at the root of the project (“start /”) we prepareGruntfile.jsandpackage.json.package.jsonwill be associated with your project and it describes dependencies - the needs for assembly plugins. For our project we will write:{ "name": "colors", "version": "0.1.0", "devDependencies": { "grunt": "~0.4.1", "grunt-jsmin-sourcemap": "~1.5.6" } }
Instead of following clause 2 for version 0.3.x, you will need to performto pull up all dependencies fromnpm install grunt --save-devpackage.json.
2. (For version 0.3.x). Install the grunt-jsmin-sourcemap plugin . This will create the
node_modules/grunt-jsmin-sourcemap . $ npm install grunt-jsmin-sourcemap 3. Edit the created
grunt.js (for version 0.4 - create Gruntfile.js in "start /") so that it contains only the jsmin-sourcemap - we will proceed as simply as possible: module.exports = function(grunt) { grunt.loadNpmTasks('grunt-jsmin-sourcemap'); grunt.initConfig({ 'jsmin-sourcemap': { all: { src: ['scripts/script.js'], dest: 'scripts/script.jsmin-grunt.js', destMap: 'scripts/script.jsmin-grunt.js.map' } } }); grunt.registerTask('default', 'jsmin-sourcemap'); }; 4. Return to the command line and run grunt:
E:\Projects\nodeJS\SourceMaps101\start> grunt This will execute the jsmin-sourcemap task as the default task formulated in the
grunt.js file (or Gruntfile.js ) . In case of successful result: Running "jsmin-sourcemap:all" (jsmin-sourcemap) task Done, without errors. Next, we will add the execution results to the complete-ru directory in order to distinguish the author’s results from his own, which will be different mainly due to the new version of Grunt. This will help to verify your results with those verified on Windows when running the examples. - note of translation
5. Make sure that the source file is registered in the created Source Map script.jsmin-grunt.js.map file:
"sources":["script.js"] .(Actually
"sources":["scripts/script.js"] was registered there "sources":["scripts/script.js"] , so you should correct it with your hands. - comment perev.)6. Uncomment
Option B to attach the generated script.grunt-jsmin.js file to index.html , and open it in a browser.(It is enough to call the modified index-ru.html file with an anchor: localhost / index-ru. Html # option = jsmin . - comment.)
In this example, we also obtained the source file mapping - no wonder we were torn through the installer installation. Further it will be easier, the main tool is in our pocket.
As you can see, here we are seeing jigs as well, which then, if used, will have to correct the texts with server scripts and version after version to keep track of the fixes. Such is it - development with tools in the early stages of readiness, and at the same time, very demanded by the market.
With
Grunt and the jsmin-sourcemap the build process creates 2 files: an optimized script with a link to the mapping file at the end and the code map file itself. Similar to the previous version, you will need both files to view the source.Option 3: UglifyJS
UglifyJS2 is another JS compressor optimizer. As in the 2 previous cases, an optimized script file is created, the URL of the code card and the map file itself are added, containing correspondences between compressed and original JavaScript operators. To use, run in the "
start " directory:1. Install the uglify-js module (the
nocde_module/uglify-js directory nocde_module/uglify-js ): $ npm install uglify-js -g $ npm view uglify-js version 2.2.3 $ cd scripts/ 2. In the “
scripts ” directory, execute the command for creating an optimized version and map: uglifyjs --source-map script.uglify.js.map --output script.uglify.js script.js (This time - no shamanism hands, everything works.)
3. In
index.html uncomment the option "Option C".Option 4: CoffeeScript Redux
Since at the time of writing, the original Coffescript build by Jeremy Ashkenas did not support mapping, a mapping clone was used. In the version of Coffescript 1.6.1+ you can use the original language (which, however, does not reduce the other merits of the clone).
This clone, by the way, successfully collected $ 12,000 declared as a target on Kickstarter for further development.
In the first 3 options, only 1 optimization step was required. For languages like CoffeeScript, you need 2 steps: from CoffeeScript to JavaScript, and then to optimized JS. Consider how to create a multi-level code card - from CoffeeScript and from the CoffeeScript Redux compiler (because the original Coffeescript did not support maps until version 1.6.1 - approx. Trans.) .
Step 1: From CoffeeScript to Simple JavaScript
Navigate to the "
start " directory on the command line. In the next steps we will create a file of correspondences between the optimized and source files.1. Install CoffeeScript with the -g global call option.
2. Compile
script.coffee.coffee in plain JS: $ coffee -c scripts/script.coffee.coffee 3. Install CoffeeScript Redux :
$ git clone https://github.com/michaelficarra/CoffeeScriptRedux.git coffee-redux $ cd coffee-redux $ npm install $ make -j test $ cd .. 4. Create a mapping file
script.coffee.js.map , describing the correspondence between a simple JS and the original CoffeeScript. $ coffee-redux/bin/coffee --source-map -i scripts/script.coffee.coffee > scripts/script.coffee.js.map 5. Make sure that at the very end of the
script.coffee.js file is the URL of the code card: //@ sourceMappingURL=script.coffee.js.map 6. Make sure the
script.coffee.js.map file has the correct link to the file: "file":"script.coffee.coffee", and source file as "sources":["script.coffee.coffee"] Work with coffeescript
Instead of working with a clone of a coffee script, let's make an example with the original compiler.
Items 1 and 2 remain unchanged.
Point 3 - skip.
four.coffee -o script.c -cm script.coffee.coffee
("-cm" are the abbreviated parameters "--compile" and "--map".)
5. Shoals.
With the creation of the output file - just a couple of bugs. 1) the script.coffee.js file is not created — instead of it — script.js, overwriting the variant from the first examples. Therefore, we create a file in a separate directory (there is no way to create a file with a different name within the same command if we do not consider threads in the OS); 2) if there is no directory, a “left” empty directory "/ -p /" is created along with the required one.
To test the paths, it is worth running this intermediate result, which will look like the 6th example - uncompressed coffeescript, and check the correctness of the paths in it.
If we create a code map with one command (and not two separate), then at the end of the compiled file there is a comment likeIt turned out that Chrome reads a comment of this kind./* //@ sourceMappingURL=script.map */
And “file”: “script.js” and other paths in the code map did not need to be changed either. There is:"file": "script.js", "sourceRoot": "..", "sources": [ "script.coffee.coffee" ],
To run, they chose such a strange directory name, script.c, in advance so that it would fit well into the previously built script.var lHash = location.hash.substr(1).split('='); if(lHash && lHash.length ==2 && lHash[0] =='option') var optionName = lHash[1]; if(optionName && !parseInt(optionName)) optionName = {closure:1,jsmin:2,uglifyjs:3,coffeescript:4,typescript:5,'coff':6}[optionName.toLowerCase()]; console.log(optionName); optionName = optionName ||0; var loadScript; (loadScript = function(i){ var scr = document.createElement('SCRIPT'); scr.setAttribute('type', 'application/javascript'); scr.src ='scripts/script.'+ ('|closure|jsmin-grunt|uglify|coffee.min|typescript.min|c/script'.split('|')[i]) +(i?'.':'') +'js'; document.getElementsByTagName('head')[0].appendChild(scr); })(optionName);
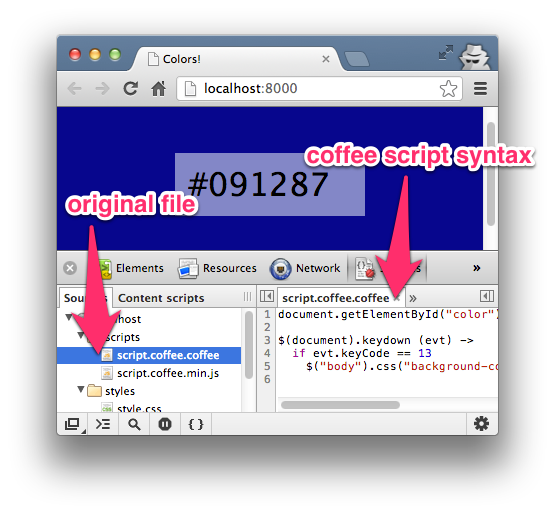
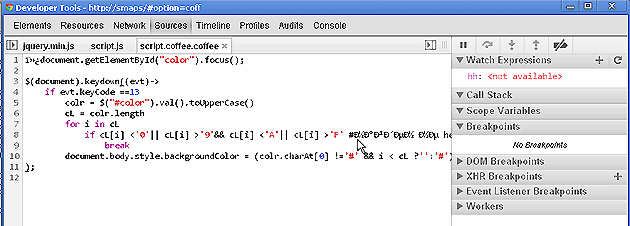
With parameter 6 orcoffscript will be read from thescripts/script.c/script.jspath. We see that everything works without patches, despite the creation of an intermediate file in the directory. Good job compiler author!
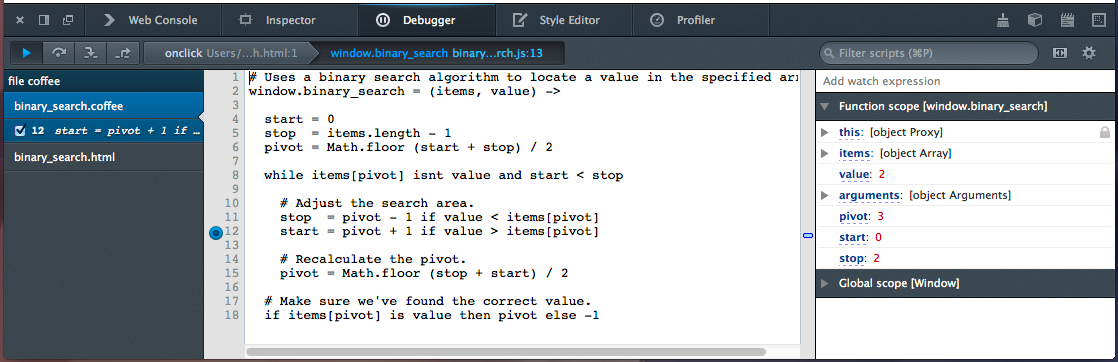
This is the coffeescript in Chrome debugging.
It is evident that Chrome still does not completely understand utf-8. Installationscr.setAttribute('charset', 'utf-8');also does not help.
Step 2: from simple JavaScript to minified JS
1. Finally, use UglifyJS to compress the JS and create a code card. This time the collector will accept a code card from CoffeeScript so that we can get to the source codes. Run the command in "
scripts ": $ cd scripts/ $ uglifyjs script.coffee.js -o script.coffee.min.js --source-map script.coffee.min.js.map --in-source-map script.coffee.js.map For our example branch, the command view isuglifyjs script.c/script.js -o script.coffee.min.js --source-map script.coffee.min.js.map --in-source-map script.c/script.map
2. Ensure that the code map file has the correct link
"file":"script.coffee.min.js" ... and the correct links to the source code of the form
"sources":["script.coffee.coffee"] We write in the address barhttp://localhost/#option=coffeescript
... And we see that something is wrong with the path in the file."sources":["script.coffee.coffee"]should work, but not work. But I managed to see the source file by writing (it took to rediscover the browser)"sources":["/scripts/script.coffee.coffee"]
Still, complicated paths with thescript.cdirectory had anscript.c, and the minifier in conjunction did not work as it was, had to be edited, and this edit looks more like a raw product hack.
Option 5: TypeScript
TypeScript, like CoffeeScript, also requires 2 steps: TypeScript -> simple JavaScript -> minified JavaScript. Since the script uses the jQuery plugin, you will need 2 TypeScript files with the names
script.typescript.ts and jquery.d.ts .Install Typescript:npm install -g typescript
Step 1: From TypeScript to Simple JavaScript
Change to the “scripts” directory in command line mode and execute:
$ tsc script.typescript.ts -sourcemap The command will create a
script.typescript.js file with a link at the end: //@ sourceMappingURL=script.typescript.js.map And in the same command, the script.typescript.js.map map file is created.Crhbgn complained about the inconsistency of some parameters for jQuery and for one in our code:/script.typescript.ts(7,8): The property 'keyCode' doesn’t exist for the value of type 'JQueryEventObject'
But he took the job; The file that is actually Javascript processed.
To see changes to the source code, you need to clear the browser cache.
Step 2: from simple JavaScript to minified JS
As for CoffeweScript, the next step uses UglifyJS:
$ uglifyjs script.typescript.js -o script.typescript.min.js --source-map script.typescript.min.js.map --in-source-map script.typescript.js.map Make sure that the links in
index.html point to the correct script file: scripts/script.typescript.min.js and open it in a browser.No errors related to the compiler and minifiers were noticed on this simple code. Source codes and mapping work without manual edits of service files.
Code Cards for SASS
In addition to JavaScript, Chrome currently supports SASS and SCSS for code maps. For SASS mapping, let's change some settings in Chrome and then compile SASS in CSS with debugging options.
1. Before changing any settings, please note that when you observe an item from the developer’s tools window, we will only see a link to CSS. This is not what is needed.
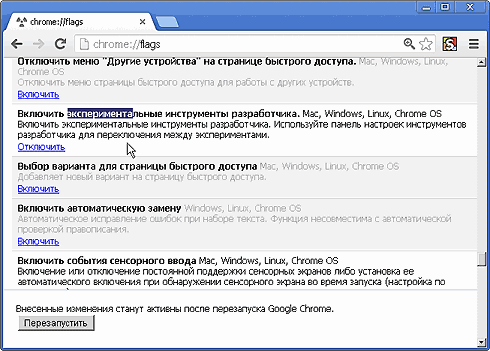
2. Go to chrome: // flags /.
3. Install “Enable Developer Tools experiments ” (in the Russian version of Chrome - “Enable experimental developer tools”).
In Windows:
4. Open
Dev Tools -> Setting -> Experiments -> Check “Support for SASS” .In Windows:
Settings (☰) -> Tools -> Developer Tools -> Settings (⏣ in the lower right corner) -> Experiments -> Support for Sass .
5. Compile SASS with these debugging options in the "
styles " directory on the command line. This will precede each rule set with @media -sass-debug-info $ cd styles/ $ sass --debug-info --watch style.sass:style.css 6. Ensure that the Developer Tools window is reopened and the page reloaded.
7. Now, when we check the element in Dev.Tools, we will see access to the SASS file.
In addition to simply viewing SASS, if LiveReload is running in the background, then when you change the SASS file, the page will also change.
Now - open the project in Firefox and see through Firebug. It will also be available to view the SASS file.
Code Card Information
If we look at any
*.map file, it will contain a mapping of information between the source file and the resulting one. The structure, as a rule, is contained in the JSON format according to the specification of version 3 cards. Usually, there are 5 properties:1. version : map version (usually 3).
2. file : the name of the output file.
3. sources : source file name.
4. names : characters used for matches.
5. mappings : match data.
Additional links
Code cards are still under active development, but there are already some notable resources on the Web. Be sure to check out these links to find out more.
- Introduction to JavaScript Source Maps by Ryan Seddon, HTML5 Rocks, March 21, 2012; Translation .
- The Breakpoint Episode 3: JavaScript Source Maps by the Google Developer Team
- The Breakpoint Episode 2: SASS Source Maps by the Google Developer Team
- Source Maps wiki on languages, tools, articles on Source Maps
- Multi Level Source Maps with CoffeeScript and TypeScript by Ryan Seddon
- Source Maps Version 3 proposal
Conclusion
I hope that the practice of using multiple compilers has shown the potential of code cards. , , , .
: Sayanee Basu, . Ruby . — .
, « » — . ; — nodeJS . , , , — , nodeJS. . , , - , , .
( , Firefox .)
? Coffeescript, . , 2 , , JS.
Grunt, , SASS — . , , , . , — , , , .
, , , nodeJS, - .
, Windows + nodeJS.
1) Using Source Maps with TypeScript , Aaron Powell, Oct 3 2012;
2) github.com/mozilla/source-map — This is a library to generate and consume the source map format .
3) Happy debugging with JavaScript source maps by James Allardice, 25 January 2013.
4) bower.io — Twitter.
5) kevinpelgrims.com/blog/2011/12/28/building-coffeescript-with-sublime-on-windows
6) sourcemap.litcoffee .
7) github.com/evanw/node-source-map-support
8) , (2013-05)

Source: https://habr.com/ru/post/178743/
All Articles