Automated testing of a web application (MS Unit Testing Framework + Selenium WebDriver C #). Part 1: Introduction
Introduction
All Buenos Dias! In my article I would like to briefly and simply tell you how to build an automated testing process for a web application from scratch. First of all, you need to properly prioritize and choose an acceptable price / quality ratio. We will immediately determine - it will not be a solution “on the knees” of the zoo scripts, which are often used in manual testing. At the same time, we will not spend much effort on designing our “framework” for automation. Our goal is to present the results of our hectic activity to the management as soon as possible, and the system should be:
- as simple as possible, so that even manual testing specialists can write tests
- flexible and expandable, since we cannot adequately assess the entire scope of work at this stage
- cross-platform (Selenium WebDriver C # supports Firefox, Chrome and IE)
In my example, I will use .NET (Microsoft Unit Testing Framework) and Selenium WebDriver C #.
Links
Part 1: Introduction
Part 2.1: Selenium API wrapper - Browser
Part 2.2: Selenium API wrapper - WebElement
Part 3: WebPages - describing pages
Part 4: Finally writing tests
Framework Publishing
')
Go
So, the first thing you need to select a number of test scenarios of high priority, but quite simple.
Next, create a new solution in the studio. It is quite logical to create 3 projects in it: tests, page description and utilities. These will be our three basic entities.
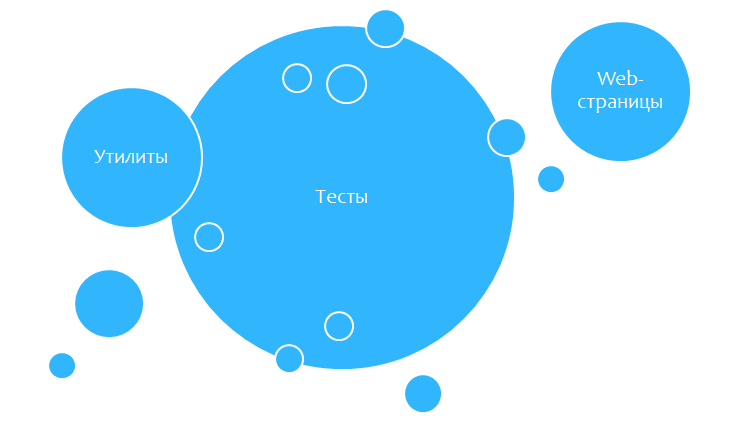
The scheme will be quite simple: the test works with the pages, asking for any data on it or performing any actions there. In the utilities, we will place the classes that will be responsible for working with the browser and web-elements on the pages via Selenium WebDriver. It is logical to write wrappers, since the Selenium WebDriver API has many drawbacks and may seem rather inconvenient. It is in these wrappers that we encapsulate (hide) all the specific and ugly code. For example, let's create the Browser and WebElement classes, which will provide the autotests developers with only the functionality they need. In the future, I would like to describe this process in a separate article, so I will not stop.
Tests
We will define what our tests will be. We will not reinvent the wheel - ideally, the test consists of 4 parts:
- input (test) data
- precondition, i.e. some state of the system in which we can perform the necessary checks
- interaction with the web application
- check - comparison of the expected result with that obtained. In the MS Unit Testing Framework, there is a separate Assert class for this.
It is important to ensure the atomicity of the tests - the test should check one logical operation and ideally have one single check. The advantages of this approach are as follows:
- reduction of time for analyzing test results
- You do not need to spend time on the implementation of large-scale logging (do not forget that MS Unit Testing Framework is able to collect all sorts of diagnostic information during the test, for example: call stack, event log, IntelliTrace, photo and video recording, code coverage analysis)
Description of the web pages of the tested product
What will be the descriptions of the pages?
First, these are descriptions of the elements with which we will work, i.e. a way to recognize them by id, class, name, xpath, etc. It’s not necessary to describe all the elements on the page at once, it’s a waste of time. Moreover, all these descriptions should be private and not go beyond the page class.
Secondly, the page will contain properties (getters) and methods by which tests can get information from the page, for example, the value of some text field.
And thirdly, the page will contain methods for performing actions on the page itself, for example, click on the button. It is important to note that the description of the page should not contain any logic and no checks! Checks must be in tests. And at the same time, there should not be any calls to the Selenium WebDriver API.
Utilities
In this project, at a minimum, there will be wrappers over the Selenium WebDriver API. Subsequently, this place will be a cluster of various helper'ov, utilities, extensions, etc. before their removal into separate entities and projects.
Conclusion and example
Thus, it is necessary to clearly distinguish the logic of our autotests, for this we have created three separate projects. I do not exclude that in the course of the project development other logical levels with their entities will appear, but the minimum will be like that.
Next, I will show one simple example and finish this article. If it turns out to be interesting, I will definitely write a continuation, where I will describe the details of the implementation of tests, pages and wrappers over the WebDriver API.
[TestClass] public class LogOnTests : TestsBase { [TestMethod] public void LogOnWithEmptyLogin() { #region TestData const string login = null; const string password = "password"; const string error = "Empty login!"; #endregion Browser.Open(...); LogOnPage.LogOn(login, password); Assert.AreEqual(error, LogOnPage.Error, "Error expected."); } } public static class LogOnPage { private static readonly WebElement LoginEdit = new WebElement().ById("Login"); private static readonly WebElement PasswordEdit = new WebElement().ById("Password"); private static readonly WebElement LogOnButton = new WebElement().ById("LogOn"); private static readonly WebElement LogOnValidationError = new WebElement().ById("LogOnValidation"); public static void LogOn(string login, string password) { LoginEdit.Text = login; PasswordEdit.Text = password; LogOnButton.Click(); } public static string Error { get { return LogOnValidationError.Text; } } } PS I remembered the old Russian saying: who gets up early, he debugs the tests.
Source: https://habr.com/ru/post/178321/
All Articles