Zyxel N4100 - Access Point ... with printer
Speak, tired of phone reviews? This Monday is something new.

Well, it's probably already clear that this is not an ordinary access point that distributes the Internet in an apartment for a laptop and a phone. No, of course, it can work in this form, but this is the same as hammering nails with a hard disk.
N4100 is a specialized solution for the organization of paid access to the Internet - hotspot. In fact, very cool and thought out to the smallest detail. You can apply such an access point in any places where there are people who need access to Internet cafes, pizzerias, restaurants, hotels, hotels, airports, meetings of a large number of people.
It is assumed that the access point is connected to the Internet, and the printer is connected to the access point. Moreover, they do not necessarily have to be connected directly - information to the printer is transmitted using standard protocols, and there can be routers or switches between the access point and the printer. Up to 10 pieces can be connected to one access point.
Well, of course, you can connect repeaters or individual access points to the router if you do not have enough coverage.
► piece of iron
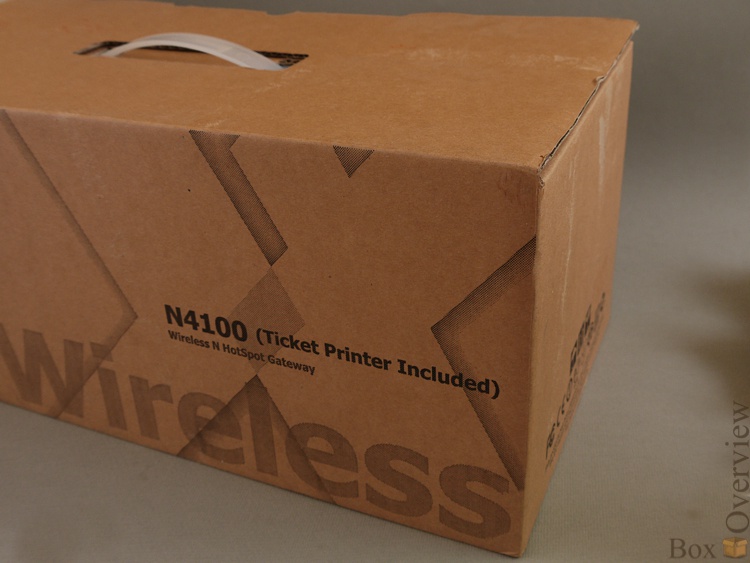
The access point came to me in such a big box, which did not even fit entirely into the frame:
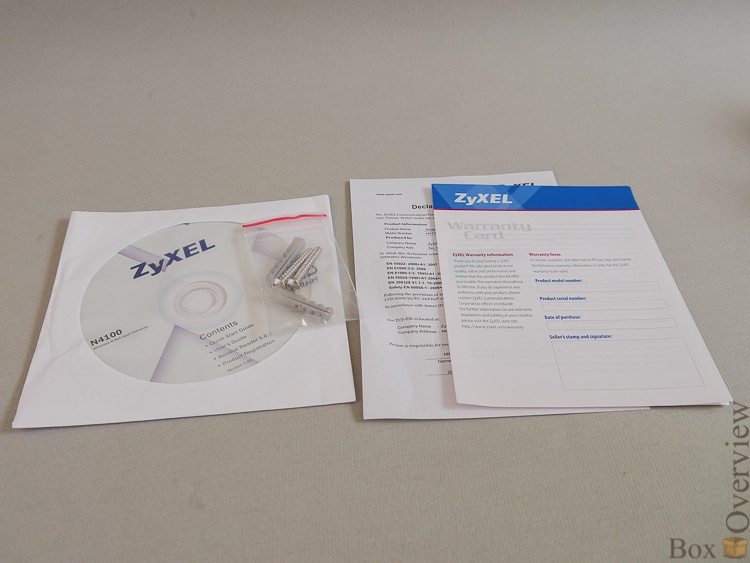
Included were: Disk, instructions and fasteners on the wall.
The manual has a section in Russian, which is good, but not much detailing the first setting and inclusion.
Stickers ^ _ ^
Two cables:

The access point itself:

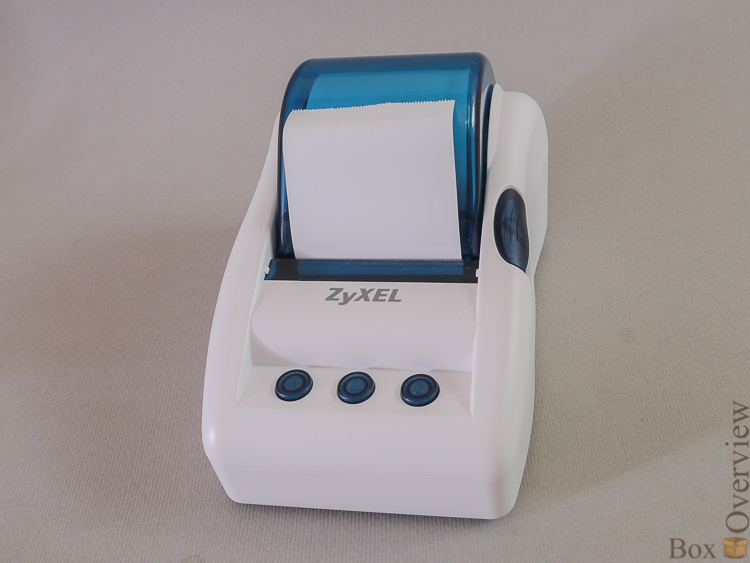
And a printer for her:
And two power supplies, of course. For printer, 5V:

And for the access point, at 12V:

By the way, the plugs are not the same - to burn the printer by plugging the wrong power supply into it will not work. It's nice that it is thought out.

The power supply unit for TD - with a replaceable plug, you will rarely meet such a solution:

But the printer has the usual one:

But, in any case, the main thing is that the plug be correct. And this is no problem.
The design of the access point is completely normal:

On the front panel there are power supply LEDs, system operation (lights up after booting), wireless network activity:
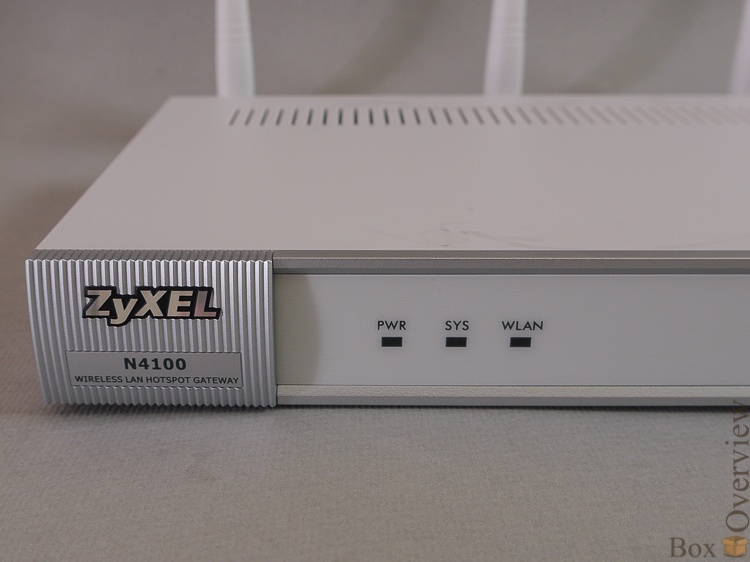
And the activity LEDs of the respective ports:

On the back of the access point - everything is also standard. Three antenna connectors:
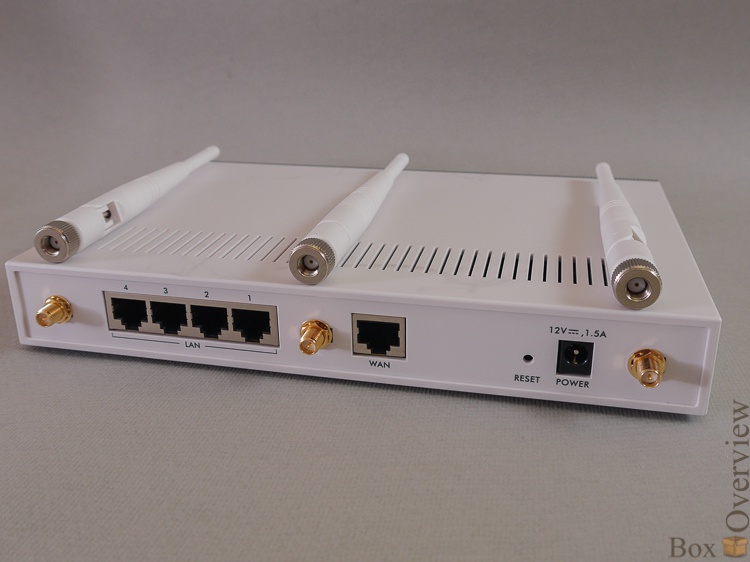
4 network ports (LAN) and one external network (WAN) port:

Reset button in the recess and power supply connector:

Below - grooves for mounting on the wall, rubber feet:
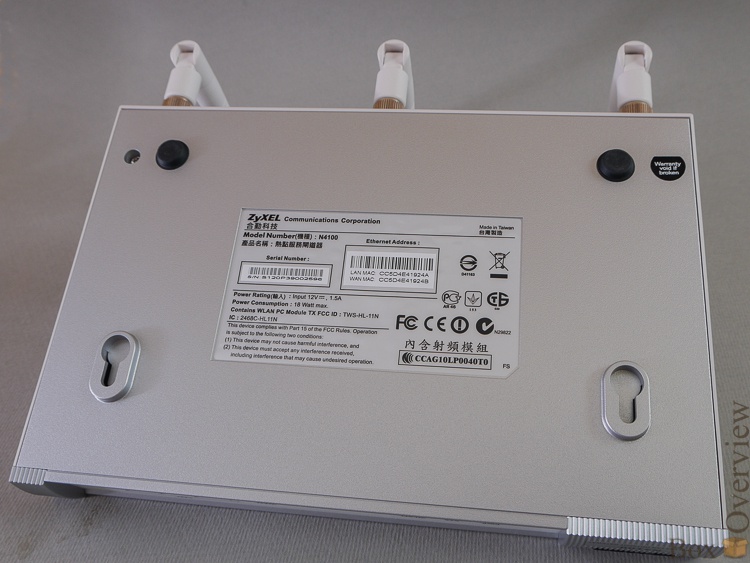
Well, the sticker, of course.

Go to the printer:
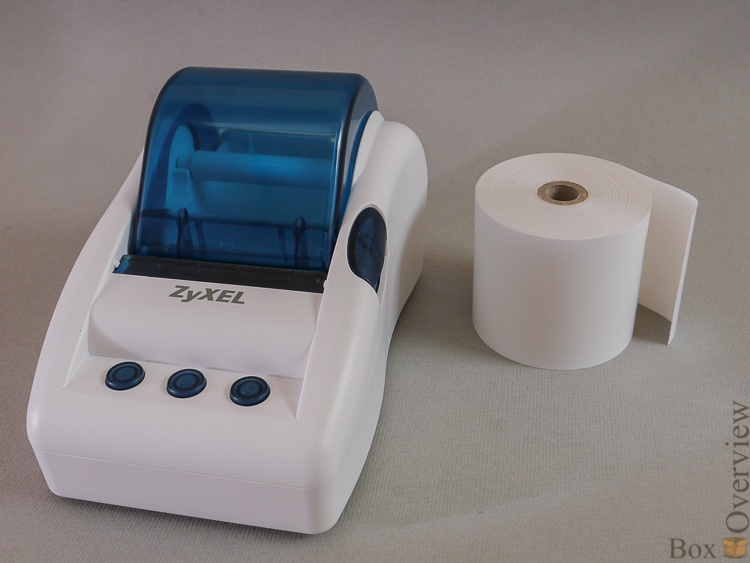
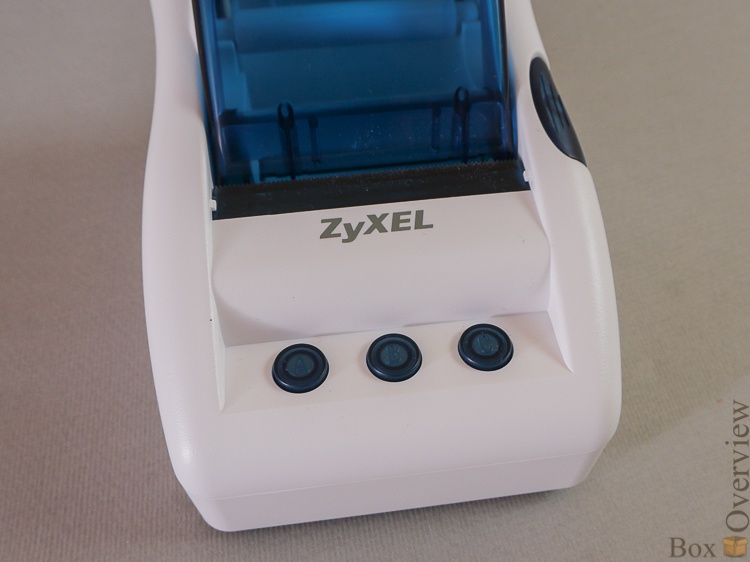
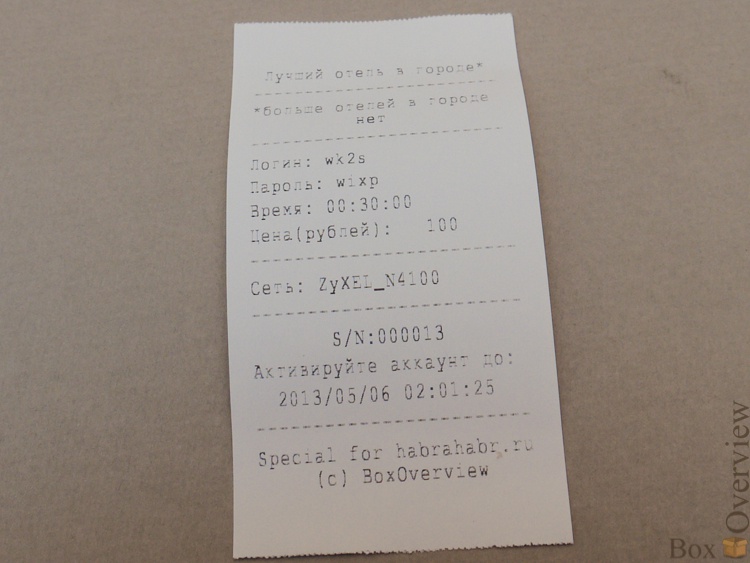
In front there are three buttons that can be assigned to different tariff plans in the configurator. Pressing a button on the printer automatically creates a user account with a predetermined Internet access time, and the printer immediately prints the login and password of this account.
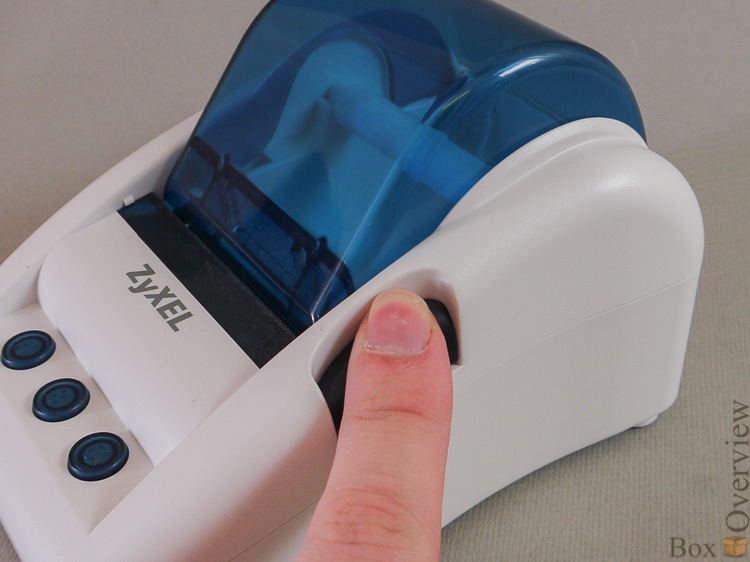
On the side of the printer - a button-latch to open the cover and change paper. The paper is the same as that used in cash registers, so that problems with its search will not arise.

Open the lid by pressing:
Inside the crossbar for a roll with paper:
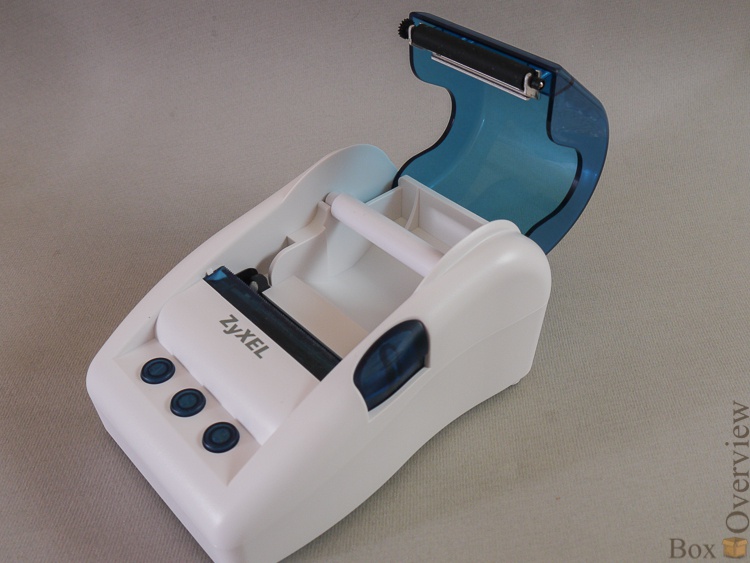
On a cover - the clamping roller:

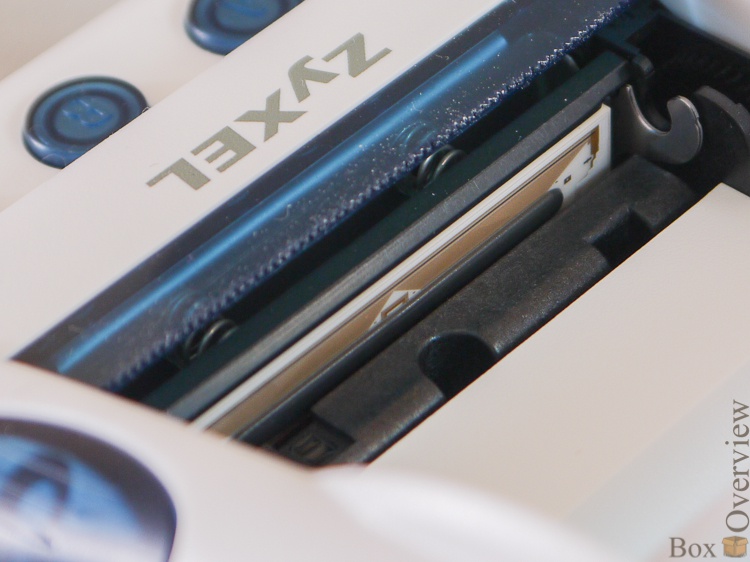
And in the depths - a printing node. A thin black stripe on a brown background is just a thermocouple to which the paper is pressed. Heating different parts of it and moving the paper you can print text.
We fill paper in the printer:

And just close the lid:
All for people. And then refilling the paper in a different cash register is more difficult than refilling the cartridge.
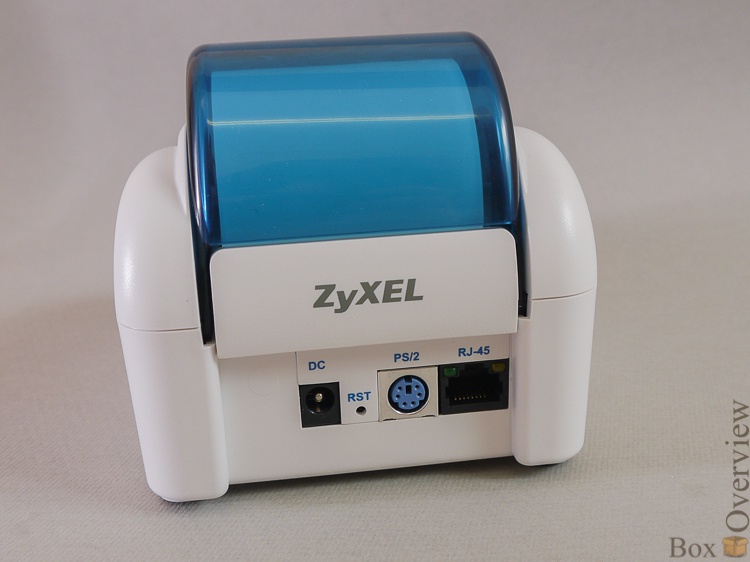
On the back of the printer are: power connector, reset button, keyboard connector, and 8P8C connector:
Below - vents and rubber feet:

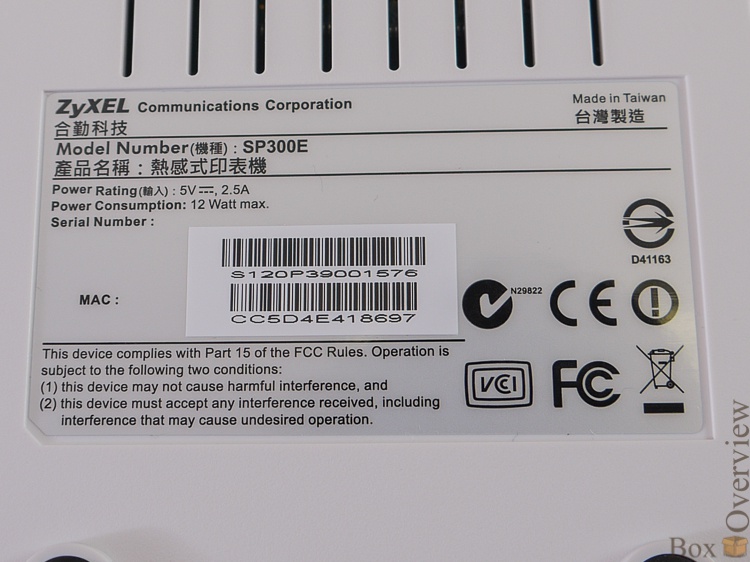
And a sticker with basic information:
A PS / 2 connector is needed for connecting an additional keyboard - in case you don’t have three built-in buttons.
')
► First start
I think that there should be no difficulties in connecting - the power supply units to the sockets, the printer to the access point with one cable, the second with the access point to the source of Internet equipment .
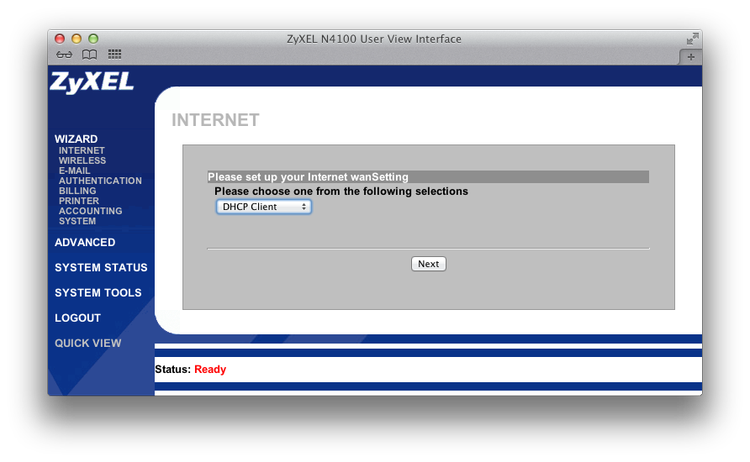
Connect the cable to the LAN port of the router, or to the ZyXEL WiFi network. Go to the address 192.168.1.1 (Yes, I did not even open the disk. I don’t have a drive at home either.) Log in (admin: 1234) and get into the setup wizard. Choose the type of Internet access:
Configure the parameters of the WiFi network:
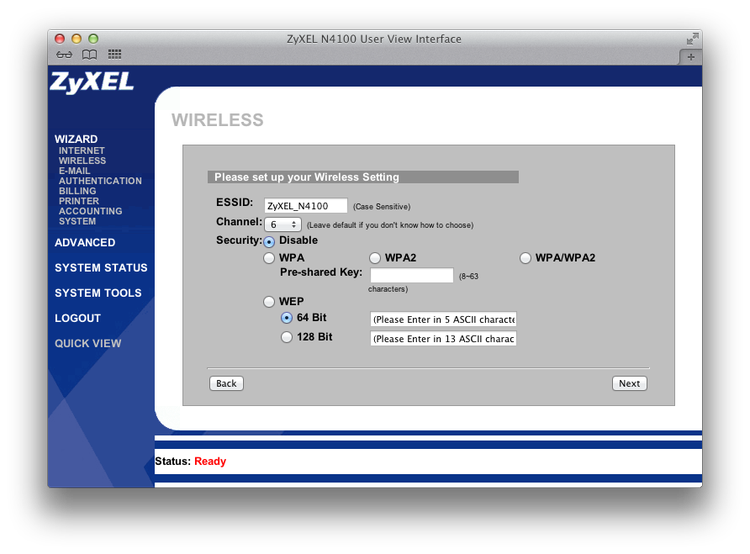
The network is open by default - the Internet is still under the password. You can configure encryption - then the printer will print on each check also the data for authorization in the network.
Then we will be asked about setting up redirects for SMTP:

And about whether to allow users to passwords, or you can all in a row:
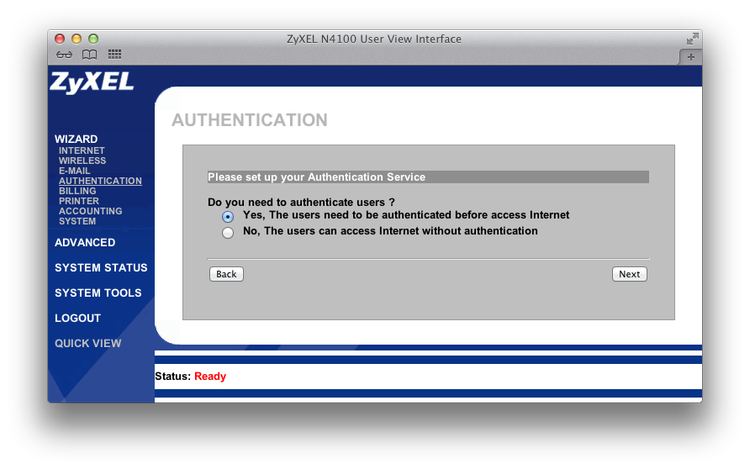
Of course, the answer is yes. Here you can configure three types of accounts created by selecting the time and cost for each:

Next we specify the address of the printer (by default it is 192.168.1.7, but it can be recognized by pressing the ABC buttons one after the other)

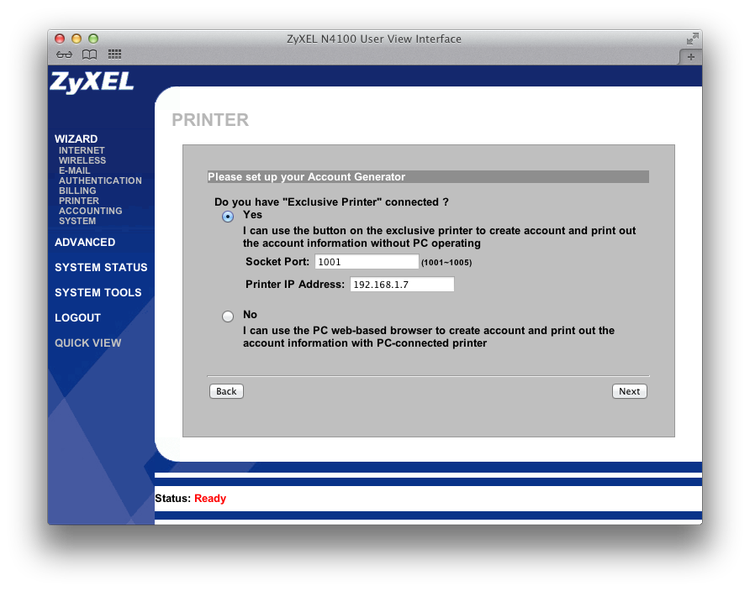
And we set which button corresponds to which tariff plan that was previously configured.

We change the login name and password so that users cannot get into the panel. And at will - we prohibit access to the panel to all addresses, except for one:
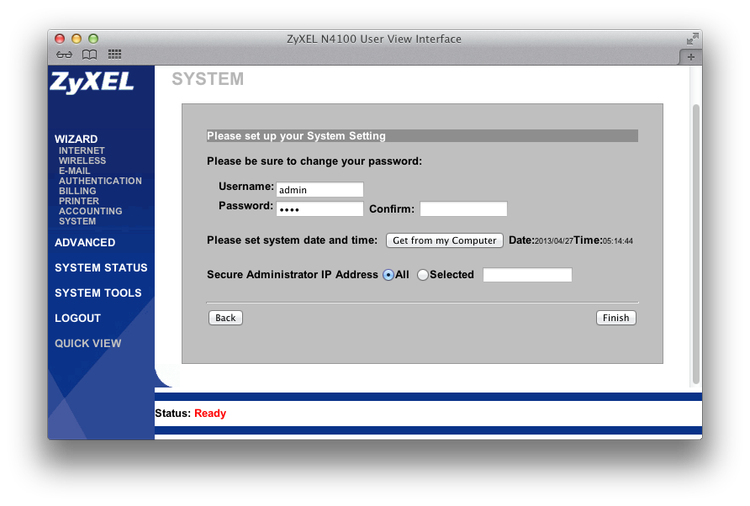
After this, the access point applies the settings and after reloading the page you can log in with a new login and password back.
And you can press a button on the printer and print your first account:

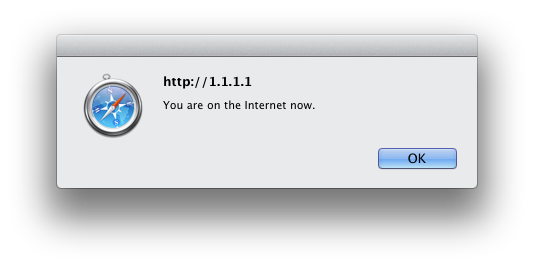
Now, if you connect to the access point and dial any external address you will not be allowed, and ask for the username and password:

Enter it from the check:
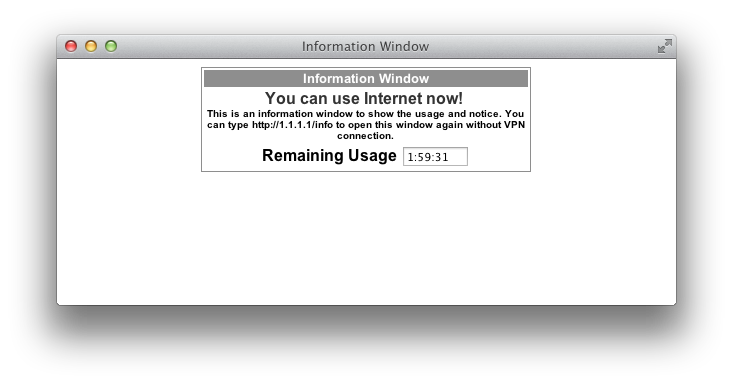
After entering the login and password we will be pleased with the window:
And in a separate window, information about the remaining time will open:
► Inside
Of course, any piece of iron that fell into my hands must be disassembled! Unscrew the two screws (one of them under the warranty label, but when did it stop me?)

Shift the cover and gain access to the bottom of the board:

There is nothing interesting about it - just a memory:

But on the back there are already:

An interesting design of light guides - in the form of prisms:
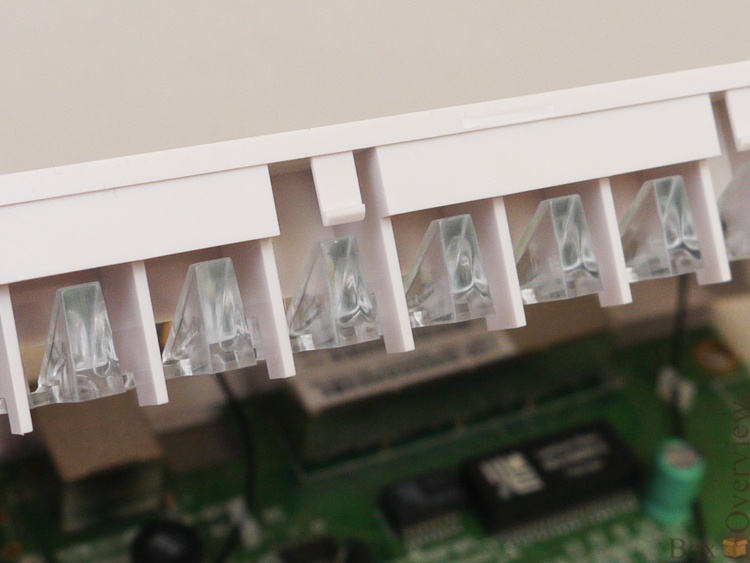
Even in those places where there are no LEDs. The LEDs themselves are also cool - bulging:

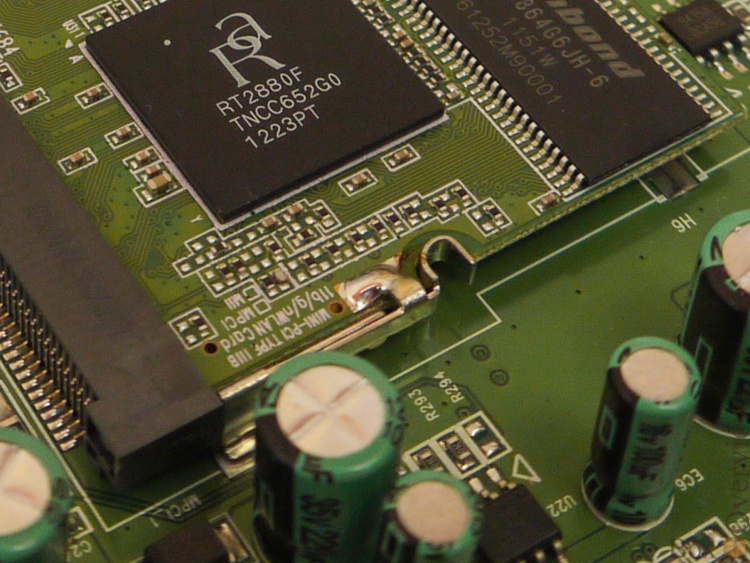
You can look at the Wifi module in a serious slot that looks like a PCI:

Here is its labeling:

Really PCI. Not only are the antenna connectors glued to it:

So he also soldered to the mounts:
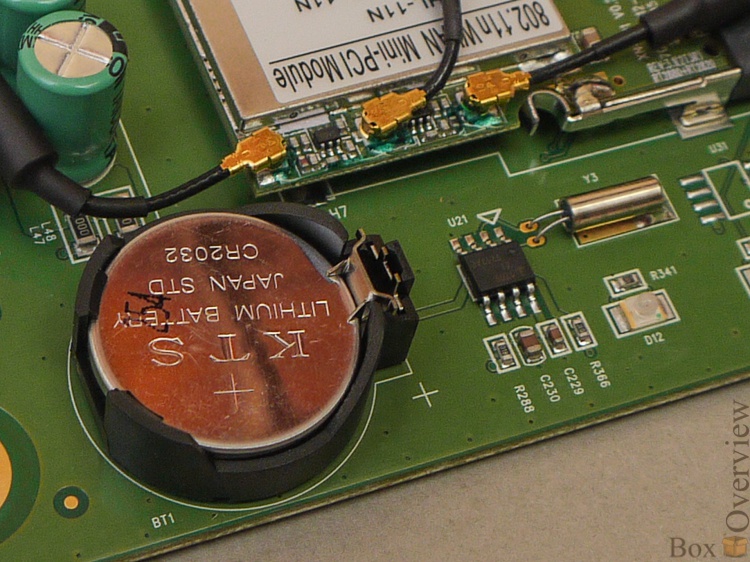
This is most likely an RTC, a module that deals only with counting time. Near the battery - so that the clock is not reset when you turn it off. And quartz watch - I think, it is clear for what.
And on top there are two unsoldered USB sockets. Interestingly, to get something to connect to them?

The processor heatsink is glued to it with some kind of hell glue, which I barely tore off:

And then he cleaned it off the controller for another half an hour to read its marking:
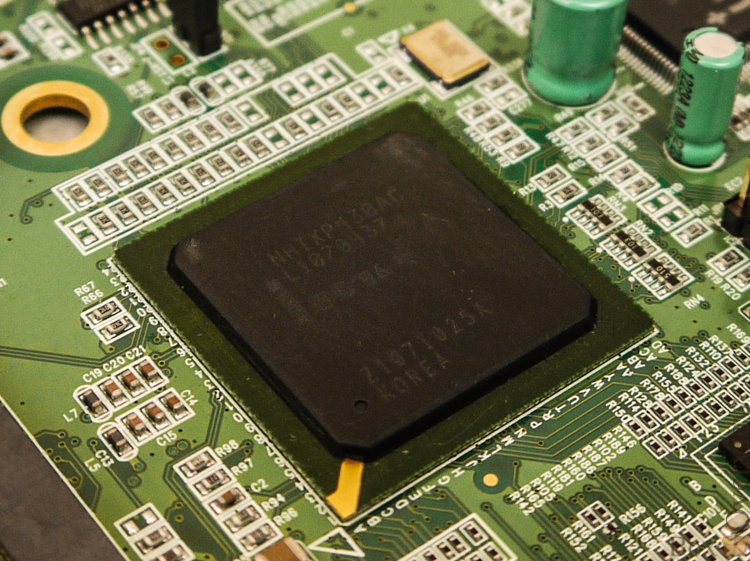
Wow. The NHIXP430AC is a 400MHz processor from Intel specifically designed for network applications. Cool.
► Price and links
At the moment, the average price for this access point is about 23 thousand rubles.
 Model on Yandex Market
 Official site
If you do not have an account on Habrahabr, you can read and comment on our articles on BoxOverview.com
Well, it's probably already clear that this is not an ordinary access point that distributes the Internet in an apartment for a laptop and a phone. No, of course, it can work in this form, but this is the same as hammering nails with a hard disk.
N4100 is a specialized solution for the organization of paid access to the Internet - hotspot. In fact, very cool and thought out to the smallest detail. You can apply such an access point in any places where there are people who need access to Internet cafes, pizzerias, restaurants, hotels, hotels, airports, meetings of a large number of people.
It is assumed that the access point is connected to the Internet, and the printer is connected to the access point. Moreover, they do not necessarily have to be connected directly - information to the printer is transmitted using standard protocols, and there can be routers or switches between the access point and the printer. Up to 10 pieces can be connected to one access point.
Well, of course, you can connect repeaters or individual access points to the router if you do not have enough coverage.
► piece of iron
The access point came to me in such a big box, which did not even fit entirely into the frame:Included were: Disk, instructions and fasteners on the wall.
The manual has a section in Russian, which is good, but not much detailing the first setting and inclusion.
Stickers ^ _ ^
Two cables:
The access point itself:
And a printer for her:
And two power supplies, of course. For printer, 5V:
And for the access point, at 12V:
By the way, the plugs are not the same - to burn the printer by plugging the wrong power supply into it will not work. It's nice that it is thought out.
The power supply unit for TD - with a replaceable plug, you will rarely meet such a solution:
But the printer has the usual one:
But, in any case, the main thing is that the plug be correct. And this is no problem.
The design of the access point is completely normal:
On the front panel there are power supply LEDs, system operation (lights up after booting), wireless network activity:
And the activity LEDs of the respective ports:
On the back of the access point - everything is also standard. Three antenna connectors:
4 network ports (LAN) and one external network (WAN) port:
Reset button in the recess and power supply connector:
Below - grooves for mounting on the wall, rubber feet:
Well, the sticker, of course.
Go to the printer:
In front there are three buttons that can be assigned to different tariff plans in the configurator. Pressing a button on the printer automatically creates a user account with a predetermined Internet access time, and the printer immediately prints the login and password of this account.
On the side of the printer - a button-latch to open the cover and change paper. The paper is the same as that used in cash registers, so that problems with its search will not arise.
Open the lid by pressing:
Inside the crossbar for a roll with paper:
On a cover - the clamping roller:
And in the depths - a printing node. A thin black stripe on a brown background is just a thermocouple to which the paper is pressed. Heating different parts of it and moving the paper you can print text.
We fill paper in the printer:
And just close the lid:
All for people. And then refilling the paper in a different cash register is more difficult than refilling the cartridge.
On the back of the printer are: power connector, reset button, keyboard connector, and 8P8C connector:
Below - vents and rubber feet:
And a sticker with basic information:
A PS / 2 connector is needed for connecting an additional keyboard - in case you don’t have three built-in buttons.
')
► First start
I think that there should be no difficulties in connecting - the power supply units to the sockets, the printer to the access point with one cable, the second with the access point to the source Connect the cable to the LAN port of the router, or to the ZyXEL WiFi network. Go to the address 192.168.1.1 (Yes, I did not even open the disk. I don’t have a drive at home either.) Log in (admin: 1234) and get into the setup wizard. Choose the type of Internet access:
Configure the parameters of the WiFi network:
The network is open by default - the Internet is still under the password. You can configure encryption - then the printer will print on each check also the data for authorization in the network.
Then we will be asked about setting up redirects for SMTP:
And about whether to allow users to passwords, or you can all in a row:
Of course, the answer is yes. Here you can configure three types of accounts created by selecting the time and cost for each:
Next we specify the address of the printer (by default it is 192.168.1.7, but it can be recognized by pressing the ABC buttons one after the other)
And we set which button corresponds to which tariff plan that was previously configured.
We change the login name and password so that users cannot get into the panel. And at will - we prohibit access to the panel to all addresses, except for one:
After this, the access point applies the settings and after reloading the page you can log in with a new login and password back.
And you can press a button on the printer and print your first account:
Now, if you connect to the access point and dial any external address you will not be allowed, and ask for the username and password:
Enter it from the check:
After entering the login and password we will be pleased with the window:
And in a separate window, information about the remaining time will open:
► Inside
Of course, any piece of iron that fell into my hands must be disassembled! Unscrew the two screws (one of them under the warranty label, but when did it stop me?)Shift the cover and gain access to the bottom of the board:
There is nothing interesting about it - just a memory:
But on the back there are already:
An interesting design of light guides - in the form of prisms:
Even in those places where there are no LEDs. The LEDs themselves are also cool - bulging:
You can look at the Wifi module in a serious slot that looks like a PCI:
Here is its labeling:
Really PCI. Not only are the antenna connectors glued to it:
So he also soldered to the mounts:
This is most likely an RTC, a module that deals only with counting time. Near the battery - so that the clock is not reset when you turn it off. And quartz watch - I think, it is clear for what.
And on top there are two unsoldered USB sockets. Interestingly, to get something to connect to them?
The processor heatsink is glued to it with some kind of hell glue, which I barely tore off:
And then he cleaned it off the controller for another half an hour to read its marking:
Wow. The NHIXP430AC is a 400MHz processor from Intel specifically designed for network applications. Cool.
► Price and links
At the moment, the average price for this access point is about 23 thousand rubles. Model on Yandex Market Official siteIf you do not have an account on Habrahabr, you can read and comment on our articles on BoxOverview.com
Source: https://habr.com/ru/post/178033/
All Articles