Working with Group Policy Preferences: Managing INI Files
 Setting up installed software products is a rather tedious procedure. And if we take into account the fact that in most organizations, identical settings should not be installed on one machine, but at least among several employees of one department, then if you configure applications using the graphical interface, this whole process can take a long time. Given this moment, you can immediately come to the conclusion that it would be desirable to try to automate the process of setting up programs so that you can centrally manage the configurations of your users' applications.
By and large, there are several methods that can be used to customize software without having to use the user interface. Such methods include the formation of scripts to automate certain tasks by means of a scripting language, such as Windows PowerShell or AutoIT, and the subsequent distribution of such scripts by means of group policy. In addition, if software products generate certain parameters in the system registry of operating systems, you can centrally predetermine such settings using the corresponding Group Policy preference item. In the end, some programs can use configuration files to store their settings, by changing which you can make some changes in the configuration of such products.
Today we will dwell on the last method described above. In other words, from the material of this article you will learn about what INI files are, how they can affect the setting of programs, and also, of course, I will tell about the centralized setting of INI files. But first things first.
What are ini files?
 INI, they are also Initialization-files, designed to store the configuration data of some components of Windows operating systems, as well as third-party applications. Such files were created in the first versions of Windows operating systems, but after some time, or more precisely, in 1995, with the advent of Windows 95, they slowly began to force out the registry, and now they are used almost exclusively in third-party applications. who are in no hurry to change the way configuration data is stored.
In fact, there is no official specification of the format of this file on the Internet, or it is simply very difficult to find it. But here you can not worry too much, because the structure of INI-files is so simple and intuitive that even regular users who not even understood programming languages, but who never even understood HTML, can manually create and configure such files. .
These configuration files consist of so-called sections, inside which are the parameters themselves, called properties. Such files can contain both blank lines, which are conveniently used to make INI files readable, or semicolon comments, and even section headers, enclosed in square brackets. It is more than obvious that in such configuration files one cannot use several different properties with the same name, but I believe that for a long time no one has made such trivial errors. It should also be noted that with a backslash you can combine several lines, and they will be processed as one whole line.
Here, in principle, there’s nothing more to talk about configuration INI files, so we’ll move on to the practical part of this article. Before we start setting up such files, it will be correct if the files themselves are considered. You will also be told about how they change after making changes using the software settings dialog boxes. As an example, take the well-known browser Opera.
Localization of program settings changes using INI files
First of all, you should download this software and install it. I will not describe this, as the procedure is more than obvious. Now, before we begin to change something, open the folder in which the configuration files of this program are located. I think those who use this default browser know that the file operaprefs.ini is located in the % Userprofile% \ AppData \ Roaming \ Opera \ Opera folder. And by the way, this file can also be configured using a special configuration page that can be accessed directly from the browser - this is opera: config page. As you can see in the following illustration, there are many options available for customization. Before making any changes, I suggest backing up this file to a separate backup folder.
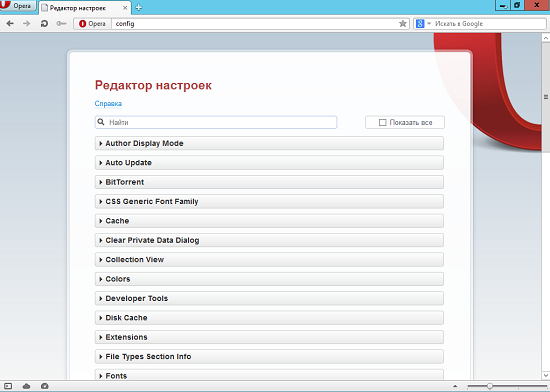
Fig. 1. A page with browser configuration parameters
Now we will look at how you can configure this browser in organizations. Of course, I hope that Opera is not your default browser, but if you are not so lucky, now you will learn how you can effectively configure this browser.
Solely as a test, we will change several properties from the User Prefs section. Suppose, for example, this is the “Chat Room Splitter” property with a value of 80 , not 100, the checkbox on the “Click to Minimize” option is selected , and the folder with cookies, that is, the “Cookies Directory” property, is changed to “% Userprofile % \ AppData \ Roaming \ Opera \ Opera \ Cookies ” . Three parameters with different values, I think, will be more than enough.
Open the modified configuration INI file, move to the [User Prefs] section and find the changed properties. As you can see in the following illustration, the Chat Room Splitter property is now set to 80, the Click to Minimize property has a value of 1, and the Cookies Directory property now has {SmallPreferences} Cookies as a folder.
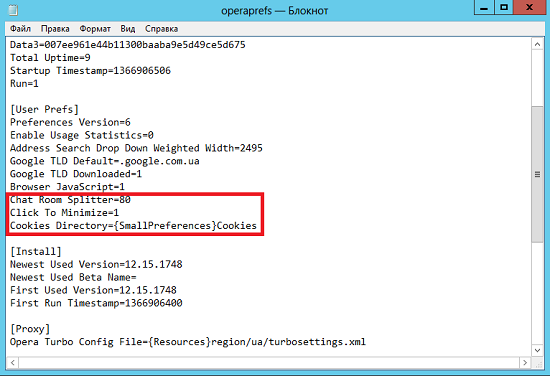
Fig. 2. Modified ini-file
Replace the modified file with the file that was backed up, and proceed to configuring the INI files using the Group Policy Preferences functionality.
Group preference node "INI-files"
The client-side extension “INI-files” allows you to add new properties to INI- sections or INF-files. In addition, you can also replace existing properties, delete properties themselves, sections, or in general the INI files themselves. Now we will simply replace the values of some properties.
The preference element of INI files is subject to change in both the user configuration and the computer configuration, so here, when designing your GPOs, before creating the preference elements, be sure to consider whether the INI file should be changed only by the logged-in user or the same INI files must be configured before logging in. In addition, it should be noted that the gpprefcl.dll library is responsible for this client side extension, and the GUID {74EE6C03-5363-4554-B161-627540339CAB} is associated with this CSE.
In the following procedure, you will learn how the same three parameters of the operaprefs.ini configuration file can be changed using group policy functionality, or more precisely, using the appropriate preference item. So, in order to centrally change the property values of the current configuration file, you need to perform the following steps:
- First of all, in the Group Policy Management snap-in , we create a group-policy object that will be called Opera INI-files Preferences and will be responsible only for the settings of the INI file of this browser, immediately linking the object itself to the entire domain (the changes, however, to be made only in the user configuration, but for simplicity it will be done this way now), well, after that we will open the group policy management editor.
- Consequently, being in the Windows Configuration node of the user’s configuration, we select the INI files node ( INI files ), and then, as can be seen from the following illustration, from the context menu, as usual, select the Create command, and then “ .ini file ” ( “Ini file” ):
')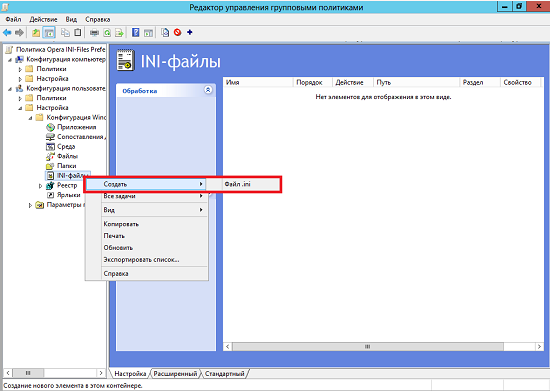
Fig. 3. Creating a Group Policy Preference Element "INI File" - Since some values of already existing properties will only be modified, it suffices to dwell on the “Update” action ( Update ). In the text box “File Path” you should specify the exact path and name of the file itself. In our case, as already known, this is C: \ Users \ Administrator \ AppData \ Roaming \ Opera \ Opera \ operaprefs.ini . But after all, if you think about it, not every user has a profile with the name “Administrator” , therefore, so that you don’t have any problems using this preference item, I recommend that you use variables. Be sure to note that when using Group Policy preferences, you cannot use common variables. Consequently, it is necessary to take advantage of the possibilities of preferences. There is a variable such as% LogonUser% that substitutes the name of the logged-in user in the string. It is for this reason that our preference items need to be created in the user configuration node. In general, we should have the following value: C: \ Users \% LogonUser% \ AppData \ Roaming \ Opera \ Opera \ operaprefs.ini . Since we want to change the values of the three properties in the User Prefs section known to us, we need to specify it in the “ Section Name ” text field, that is, “ Section name ”, without square brackets. Go to the property itself: in the corresponding text box, you should specify the value " Chat Room Splitter ", since it is this property that needs to be changed. Well, in the text box “ Property Value ” , which originally goes as “ Property Value ”, we indicate our new value, that is, 80 . The properties dialog box for this preference item can be seen below:
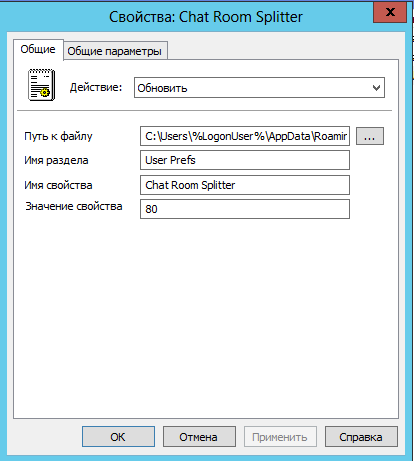
Fig. 4. Properties dialog box preference item ini-file - Since the GPO is tied to the entire domain, this preference item will be applied to each company computer. Well, if Opera is not installed on all computers, then just users on computers with the distribution of the GPO will in vain create an unnecessary file. This should not be, and this can be avoided by targeting the element level. In the targeting editor dialog box, select the File Match item from the Match Type drop-down list, that is, the Match type , select the File exists type , and then in In the corresponding text box, localize the file with the settings of this browser, that is, the file operaprefs.ini . That's only if you select a file using the appropriate dialog box, be sure to pay attention to the % LogonUser% in the text field with paths instead of the current user account. Otherwise, a file will be searched for the account you specified, which in almost all cases will result in an error. The targeting editor dialog box is shown in the following illustration:

Fig. 5. Targeting editor dialog
It remains to create two more preference elements with the same targeting at the element level to change the two remaining parameters. I.e:
- In the first preference item, the property name should be Click to Minimize , and its value should be 1;
- In the second preference item, the property name is Cookies Directory , and the value is {SmallPreferences} Cookies .
Ultimately, the Group Policy Management Editor window should look like the one shown in the sixth illustration of this article:

Fig. 6. Group Policy Management Editor after creating all preference items
Now we can check if we were able to change the existing INI file of the opera. To do this, update the policy settings using the gpupdate utility, and then locate the desired configuration file. As you can see in the last illustration of this article, the file is changed, and it defines the values that were specified in the corresponding elements of group policy preferences:
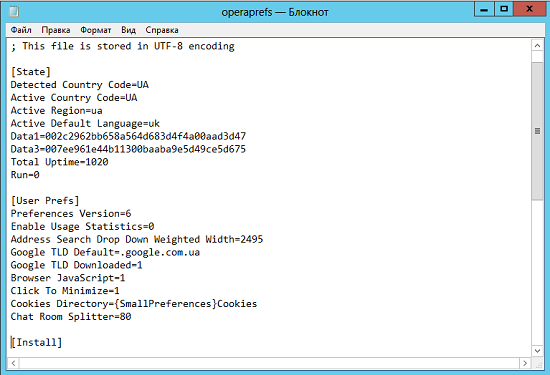
Fig. 7. Modified operaprefs.ini file
Conclusion
In this article, you learned about what the INI configuration files are for and why. In the example with the Opera browser, the settings were changed using one of these files. But the most important thing that was discussed in the current article is that you learned about such an interesting element of Group Policy preferences as “ INI files” . In the accompanying example, the modification of three properties of an existing configuration file was considered.
The most important thing when working with configuration INI files is that you always keep the original version of such files before editing the latter in case you overdo it with configuration changes. A rollback is always easier and more painless than a complete reinstallation of software :)
Source: https://habr.com/ru/post/178027/
All Articles