Google tasks for Ubuntu Touch

After the news about adding Ubuntu Touch applications to the distribution, and Qt 5 for Android decided to see what the Ubuntu SDK is and write a simple application. The choice fell on google tasks, now the application is authorized by oauth and receives tasks from the selected list. Application code is available on github. Familiarity with QML will greatly simplify the understanding of the above code, some links are collected on this page.
Installation
Currently, packages for Ubuntu ranging from 12.04 are officially available .
After installation, Qt Creator will be available with additional Ubuntu development tools and a set of components for the interface. Initial acquaintance recommend starting with an example on the site.
I created a new Qt Quick 2 Application project for more flexibility. You can copy the code from the example into main.qml and run the application. The output in the QQmlComponent console : Component is not ready is a small bug , but the SDK is still in the preview status.
Authorization
To work with the API, you must register the application in the console . Detailed description in Step 2: Register Your Application
We will need to show the user the application authorization page and get the token. QML has been around for a long time and I took the code from the qml-google-tasks project as a basis . Authorization is implemented by two files GoogleOAuth.qml - GUI and google_oauth.js - logic.
Modify GoogleOAuth.qml to work with QtQuick 2 and integrate with Ubuntu components.
Code
import QtQuick 2.0 import QtWebKit 3.0 import Ubuntu.Components 0.1 import "google_oauth.js" as OAuth Page { id: google_oauth title: i18n.tr("Login") anchors.fill: parent property string oauth_link: "https://accounts.google.com/o/oauth2/auth?" + "client_id=" + OAuth.client_id + "&redirect_uri=" + OAuth.redirect_uri + "&response_type=code" + "&scope=https://www.googleapis.com/auth/tasks" + "&access_type=offline" + "&approval_prompt=force" property bool authorized: accessToken != "" property string accessToken: "" property string refreshToken: "" signal loginDone(); onAccessTokenChanged: { console.log('onAccessTokenChanged'); if(accessToken != ''){ console.log("accessToken = ", accessToken) loginDone(); } } function login(){ loginView.url = oauth_link } function refreshAccessToken(refresh_token){ OAuth.refreshAccessToken(refresh_token) } Flickable { id: web_view_window property bool loading: false anchors.fill: parent WebView { id: loginView anchors.fill: parent onUrlChanged: OAuth.urlChanged(url) } } } In google_oauth.js, we change client_id client_secret and redirect_uri to those received in the console.
Check the work, we can slightly change the code GoogleOAuth.qml :
Code
import QtQuick 2.0 import QtWebKit 3.0 import Ubuntu.Components 0.1 import "google_oauth.js" as OAuth Page { id: google_oauth title: i18n.tr("Login") anchors.fill: parent property string oauth_link: "https://accounts.google.com/o/oauth2/auth?" + "client_id=" + OAuth.client_id + "&redirect_uri=" + OAuth.redirect_uri + "&response_type=code" + "&scope=https://www.googleapis.com/auth/tasks" + "&access_type=offline" + "&approval_prompt=force" property bool authorized: accessToken != "" property string accessToken: "" property string refreshToken: "" signal loginDone(); onAccessTokenChanged: { console.log('onAccessTokenChanged'); if(accessToken != ''){ console.log("accessToken = ", accessToken) loginDone(); } } function login(){ loginView.url = oauth_link } function refreshAccessToken(refresh_token){ OAuth.refreshAccessToken(refresh_token) } Flickable { id: web_view_window property bool loading: false //anchors.fill: parent // width: 800 height: 800 WebView { id: loginView anchors.fill: parent onUrlChanged: OAuth.urlChanged(url) } } // Component.onCompleted: { console.log("onCompleted") login() } } and running the GoogleOAuth.qml file with the qmlscene utility (In Qt Creator, available in the menu: Tools > External > Qt Quick > Qt Quick 2 Preview , it launches the currently open file)
After logging in, the following lines should appear in the log:
onAccessTokenChanged
accessToken = xxxx.xxxxxxxxxxxxxxxxxxxxxxxx
')
Navigation
Structurally, the interface is a MainView with a Page set , similar to fragments in android. For simplicity, the Page I did in separate files, in main.qml left PageStack, responsible for navigation between pages, and code for switching pages.
Code
import QtQuick 2.0 import Ubuntu.Components 0.1 import "tasks_data_manager.js" as TasksDataManager MainView { objectName: "mainView" applicationName: "UTasks" id: root width: units.gu(60) height: units.gu(80) PageStack { id: pageStack Component.onCompleted: push(taskLists) // TaskLists { id: taskLists visible: false onItemClicked: { var item = taskLists.curItem console.log("onItemClicked: ", item) tasks.title = item["title"] TasksDataManager.getMyTasks(item["id"]) pageStack.push(tasks) } } // Tasks { id: tasks visible: false } // GoogleOAuth { id: google_oauth visible: false onLoginDone: { pageStack.clear() pageStack.push(taskLists) console.log("Login Done") //tasks.refreshToken = refreshToken settings.setValueFor("accessToken", accessToken) settings.setValueFor("refreshToken", refreshToken) TasksDataManager.getMyTaskLists() } } } // Component.onCompleted: { console.log("onCompleted") if (settings.getValueFor("refreshToken") === "") { pageStack.push(google_oauth) console.log("google_oauth") google_oauth.login() } else { pageStack.push(taskLists) google_oauth.refreshAccessToken(settings.getValueFor("refreshToken")) } } } 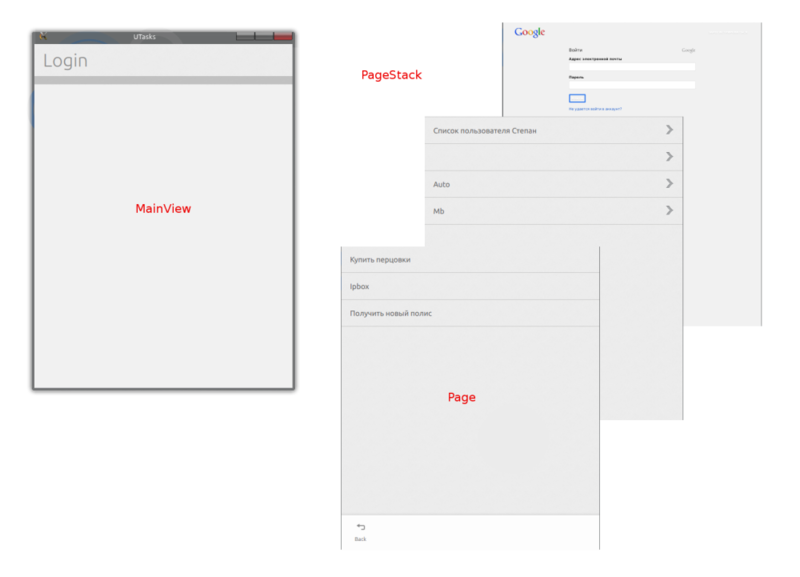
Preservation
In order not to request authorization from the user each time it is necessary to save the token. In QML 2, working with SQLite is available, but for the sake of a single line I did not want to use SQL. I wrote a small with ++ class TasksSettings - a wrapper over QSettings . To work from QML with objects from ++, you must mark the called methods as Q_INVOKABLE and add the object to the context:
viewer.rootContext()->setContextProperty("settings", &settings); After that, in QML, you can use getValueFor methods to get and setValueFor to set values:
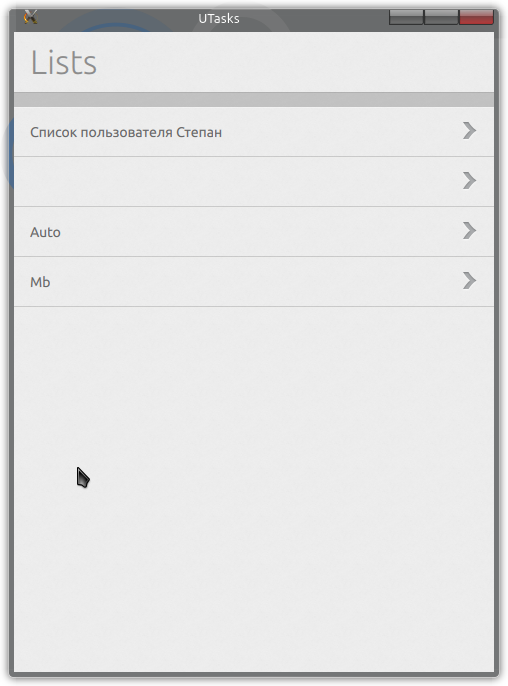
settings.setValueFor("refreshToken", refreshToken) if (settings.getValueFor("refreshToken") === "") { Task Lists
Interface - TaskLists.qml .
Simple ListView using Ubuntu's ListItems
Code
import QtQuick 2.0 import QtQuick.XmlListModel 2.0 import Ubuntu.Components 0.1 import Ubuntu.Components.ListItems 0.1 import Ubuntu.Components.Popups 0.1 Page { id: taskLists title: i18n.tr("Lists") anchors.fill: parent ListModel { id: taskListsModel ListElement { title: "My" } } Flickable { id: flickable anchors.fill: parent ListView {// id: taskListsView model: taskListsModel anchors.fill: parent delegate: Standard { text: title // progression: true // onClicked: { console.log("index: ", index); taskListsView.currentIndex = index curItem = taskListsModel.get(index) itemClicked() } } } } } The logic is implemented in tasks_data_manager.js , we need the function getMyTaskLists () . Change onload content to
taskLists.itemsList = result["items"]; In TaskLists.qml we add the list of elements and process its change:
property variant itemsList; signal itemClicked(); onItemsListChanged: { taskListsModel.clear() if(itemsList === undefined) return for(var i = 0; i < itemsList.length; ++i) { console.log("append:", itemsList[i]["title"], itemsList[i]["id"]); var item = itemsList[i] taskListsModel.append( item ); // } } And at the end we add a handler for clicking on the list item.
property variant curItem; onClicked: { console.log("index: ", index); taskListsView.currentIndex = index curItem = taskListsModel.get(index) itemClicked() } In main.qml, we implement a switch to the list when the item is clicked.
onItemClicked: { var item = taskLists.curItem console.log("onItemClicked: ", item) tasks.title = item["title"] TasksDataManager.getMyTasks(item["id"]) pageStack.push(tasks) } Downloading the task list is done in the same way as loading lists. The code can be viewed in the repository.
Screenshots from the desktop version: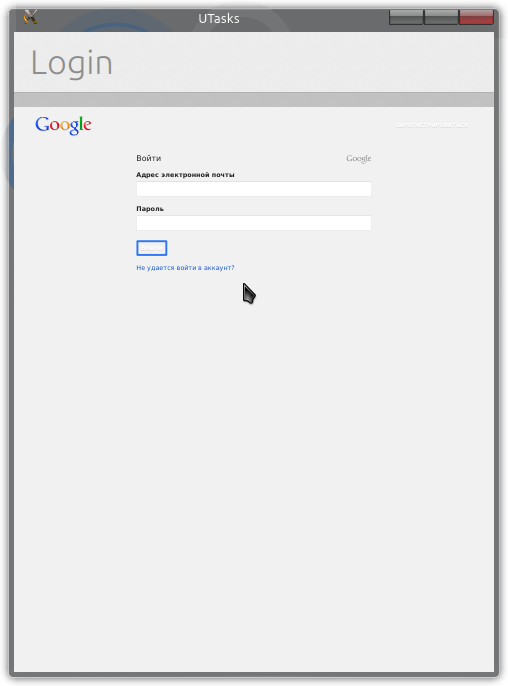

To be continued…
Source: https://habr.com/ru/post/177971/
All Articles