My Boot Camp - wherever I want, I put it there
Historically, my MacBookPro Mid 2010 simultaneously had three axes: Mountain Lion (10.8.3), Lion (10.7), and Snow Leopard (10.6). Everything would be fine if for MacOS there were 3ds Max and the utility for creating various textures of The Compressonator, and the old Toshiba laptop that saved me in such situations did not retire as a motherboard. It was necessary to create a partition Boot Camp, so much so that did not fly the rest of the system.
I had a Windows image under VMWare, but for some reason in MacOS 10.8 it dramatically slows down (compared to the same 10.7 or 10.6). As a result, I decided that 10.6 is unlikely to come in handy, and the Boot Camp partition with Windows will just be in its place. But theclumsy Makakovskaya disk utility did not think so.
I completely cleared the section with Snow Leopard, but when I tried to remove it, the disk utility gave me an error from the “Too small size of changes ...” series. The plus section was only 30Gb, and I needed at least 50Gb. It does not matter, we open the terminal and see where we have what kind of disks:
Next, I combined Mac OS Lion and Snow Leopard with one command:
And then I split the combined section into two, the size I need:
')
Partition splitting completed:
To be honest, I'm not sure that what I did next with the partition tables was necessary. I would be glad to see the amendments in the comments.
As you can see, the MBR is not aware of our disks; I corrected this with the following commands:
After all the manipulations, we check the correspondence of the tables through Partition Inspector:
It looks almost the same. The Mac OS X Boot partition (this is Recovery) is not needed in the MBR, only real disks. Details of this techniquecan be found here . Please note that the partition size is counted as end-start + 1.
At this point, you should have a bootable DVD with Windows installation. At first, I tried to install from a bootable USB flash drive created in Windows 7, but I was constantly given "No bootable device - insert boot disk and press any key ...". With the DVD, everything went smoothly. When selecting a partition, I selected my FAT32 partition and reformatted it in NTFS. Winda was installed successfully.
Utility "Assistant Boot Camp" at first I did not even offer to download the driver on the USB flash drive. Even after making changes to the plist (see the MacBookPro Mid 2010 is not supported by default), the drivers didn’t go further than half. Do not worry, from here, download the appropriate pkg to your Mac, install it anywhere, go to the folder where you installed it, find WindowsSupport.dmg, mount this dmg image and copy the contents of the image to a USB flash drive or directly to the Windows partition (because in MacOS 10.8 you created the section with Windows is visible and available for recording). Next boot under Windows and run the driver installation.
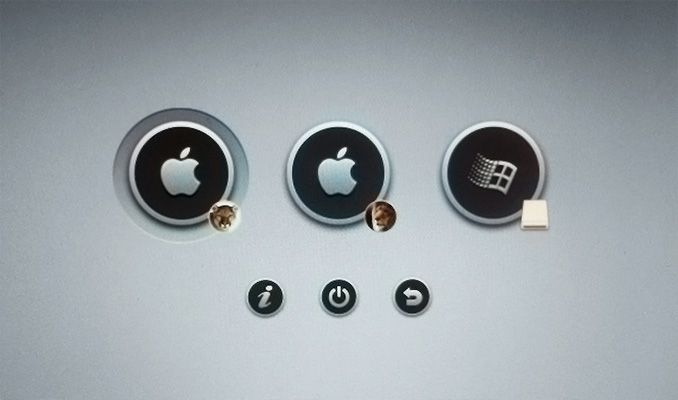
Like the picture of poppy loading at the beginning of the article? Download the wonderful rEFIt stuff and a set of icons based on the templates found on the Internet. After installing rEFIt, you may need to reload the poppy a couple of times, for some reason it only worked for me on the 2nd time. You can also push him with the commands:
To install the icon set, unzip the set in the / efi / refit folder with replacement. You can also configure rEFIt by picking up the refit.conf file, for example, set the default axis start timer or add a terminal call to the boot screen.
Disclaimer
Everything that you do, especially with sections and partition tables - you do at your own peril and risk. I was scared, but I did! As a result, I learned how to change the size of the disks as I want, not to be afraid of the names of GPT and MBR, I have a beautiful and comfortable poppy loading and, most importantly, I can safely go on a trip to the May holidays, taking only one laptop with everything I need. Happy upcoming holidays!
Update
I had a Windows image under VMWare, but for some reason in MacOS 10.8 it dramatically slows down (compared to the same 10.7 or 10.6). As a result, I decided that 10.6 is unlikely to come in handy, and the Boot Camp partition with Windows will just be in its place. But the
Change sections
I completely cleared the section with Snow Leopard, but when I tried to remove it, the disk utility gave me an error from the “Too small size of changes ...” series. The plus section was only 30Gb, and I needed at least 50Gb. It does not matter, we open the terminal and see where we have what kind of disks:
diskutil list /dev/disk0 #: TYPE NAME SIZE IDENTIFIER 0: GUID_partition_scheme *500.1 GB disk0 1: EFI 209.7 MB disk0s1 2: Apple_HFS Mountain Lion 249.9 GB disk0s2 3: Apple_Boot Recovery HD 650.0 MB disk0s3 4: Apple_HFS Mac OS Lion 220.0 GB disk0s4 5: Apple_HFS Snow Leopard 30.0 GB disk0s5 Next, I combined Mac OS Lion and Snow Leopard with one command:
diskutil mergePartitions "Journaled HFS+" "Mac OS Lion" disk0s4 disk0s5 The format is: diskutil mergePartitions "<partition format>" "<new merged partition name>" <first partition> <second partition>And then I split the combined section into two, the size I need:
diskutil resizeVolume disk0s4 200G MS-DOS Windows 50G Command format: diskutil resizeVolume <partition ID> <size after change> <second partition format> <second partition name> <second partition size>')
Partition splitting completed:
diskutil list /dev/disk0 #: TYPE NAME SIZE IDENTIFIER 0: GUID_partition_scheme *500.1 GB disk0 1: EFI 209.7 MB disk0s1 2: Apple_HFS Mountain Lion 249.9 GB disk0s2 3: Apple_Boot Recovery HD 650.0 MB disk0s3 4: Apple_HFS Mac OS Lion 200.0 GB disk0s4 5: Microsoft Basic Data Windows 50.0 GB disk0s5 GPT and MBR partition tables
Update : It turned out that synchronizing GPT and MBR is necessary. If your GPT has 4e or fewer sections, you can do it with rEFIt Tools right on the boot screen with one click. If a partition with Windows 5 or more, then you need to prescribe the MBR manually ignoring the Recovery partitions (Mac OS X Boot), so that the mandatory EFI System, the real Mac partitions and the Windows partition should fit.So, after downloading the wonderful rEFIt utility and running Partition Inspector, which comes with the bundle, I saw the following picture:
Current GPT partition table: # Start LBA End LBA Type 1 40 409639 EFI System (FAT) 2 409640 488428743 Mac OS X HFS+ 3 488690888 489960431 Mac OS X Boot 4 489960432 880585431 Mac OS X HFS+ 5 880848896 976773119 Basic Data Current MBR partition table: # A Start LBA End LBA Type 1 1 976773119 ee EFI Protective As you can see, the MBR is not aware of our disks; I corrected this with the following commands:
sudo fdisk -e /dev/disk0 edit 1 // , 1 39 ee // , EFI Protective "ee" n // n 1 // 39 // edit 2 af n 409640 488019104 edit 3 af n 489960432 390625000 edit 7 07 n 880848896 95924224 write // y // After all the manipulations, we check the correspondence of the tables through Partition Inspector:
Current GPT partition table: # Start LBA End LBA Type 1 40 409639 EFI System (FAT) 2 409640 488428743 Mac OS X HFS+ 3 488690888 489960431 Mac OS X Boot 4 489960432 880585431 Mac OS X HFS+ 5 880848896 976773119 Basic Data Current MBR partition table: # A Start LBA End LBA Type 1 1 39 ee EFI Protective 2 409640 488428743 af Mac OS X HFS+ 3 489960432 880585431 af Mac OS X HFS+ 4 * 880848896 976773119 07 NTFS/HPFS It looks almost the same. The Mac OS X Boot partition (this is Recovery) is not needed in the MBR, only real disks. Details of this technique
Install Windows
At this point, you should have a bootable DVD with Windows installation. At first, I tried to install from a bootable USB flash drive created in Windows 7, but I was constantly given "No bootable device - insert boot disk and press any key ...". With the DVD, everything went smoothly. When selecting a partition, I selected my FAT32 partition and reformatted it in NTFS. Winda was installed successfully.
Boot Camp Driver Installation
Utility "Assistant Boot Camp" at first I did not even offer to download the driver on the USB flash drive. Even after making changes to the plist (see the MacBookPro Mid 2010 is not supported by default), the drivers didn’t go further than half. Do not worry, from here, download the appropriate pkg to your Mac, install it anywhere, go to the folder where you installed it, find WindowsSupport.dmg, mount this dmg image and copy the contents of the image to a USB flash drive or directly to the Windows partition (because in MacOS 10.8 you created the section with Windows is visible and available for recording). Next boot under Windows and run the driver installation.
Induce beauty
Like the picture of poppy loading at the beginning of the article? Download the wonderful rEFIt stuff and a set of icons based on the templates found on the Internet. After installing rEFIt, you may need to reload the poppy a couple of times, for some reason it only worked for me on the 2nd time. You can also push him with the commands:
cd /efi/refit ./enable.sh To install the icon set, unzip the set in the / efi / refit folder with replacement. You can also configure rEFIt by picking up the refit.conf file, for example, set the default axis start timer or add a terminal call to the boot screen.
Disclaimer
Everything that you do, especially with sections and partition tables - you do at your own peril and risk. I was scared, but I did! As a result, I learned how to change the size of the disks as I want, not to be afraid of the names of GPT and MBR, I have a beautiful and comfortable poppy loading and, most importantly, I can safely go on a trip to the May holidays, taking only one laptop with everything I need. Happy upcoming holidays!
Update
- I strongly recommend that before starting all the procedures, save the partition table information, which is issued by the Partition Inspector. Windows can wipe all the tables or you can accidentally “hit the elbow” by accident (the best thing is not on the same computer, so that, if anything, you can boot from the disk and manually restore everything).
- Put rEFIt before installing Windows.
- Do not delete the “EFI Protective” section from the MBR. According to the information on the rEFIt page , this section tells GRUB that you do not need to overwrite the GPT table. It is also reported that “EFI Protective” should start with LBA 1.
Source: https://habr.com/ru/post/177915/
All Articles