Cobalt Qube 2 - rare server
Good day!
I got into the hands of another ancient piece of iron (and maybe not very ancient - only 13 years have passed since its birth), and I would like to tell about it to the Habrasoobshchestvo.
Meet the Cobalt Qube 2.

')
Cobalt Qube 2 is a server manufactured by Cobalt Networks Inc. (subsequently purchased by Sun Microsystems). It received its name for the cobalt-blue color of the hull and its cubic shape. In the not very distant two thousand year, this kid (his height does not exceed 20 cm) successfully performed the functions of a mail and file server, a web server and a server of discussion groups, and could also index and archive documents located on his hard disk. And, as you have already guessed, a modified Red Hat Linux OS was installed on the Cobalt Qube 2 server. And to manage and configure used a fairly convenient and intuitive web interface.
The price of the Cobalt Qube 2 server at the start of sales was $ 2,500.
Cobalt Qube 2 Server Specification:
64Bit MIPS RISC CPU QED RM5231-250Q (250MHz) processor
Chipset: Galileo GT-64111
PCI-ISA Bridge / ATA Controller: Via VT821C586 (Apollo VP)
The amount of RAM 1x16MB RAM (EDO 3.3V, SIMM-Modul 72 Pin)
Maximum memory capacity: 256MB (2x128 SIMM)
Ultra-ATA 10.2GB Hard Drive (Seagate ST310212A)
Maximum hard disk size (BIOS limit): 30GB
2 network interfaces DECchip DC21142 10 / 100baseTX-FDX
Control panel with LCD display
1 high speed serial port (SubD9)
1 PCI slot
External power supply 12V, 3A
Dimensions: 18.4 cm x 18.4 cm x 19.7 cm
Weight: 2.8kg
Power supply: 100-240V, 50 / 60Hz
Power Consumption: 25W
Appearance.
The Cobalt Qube 2 server case is made of cobalt blue plastic. The case dimensions are 18.4 cm X 18.4 cm X 19.7 cm, and its weight is 2.8 kg.
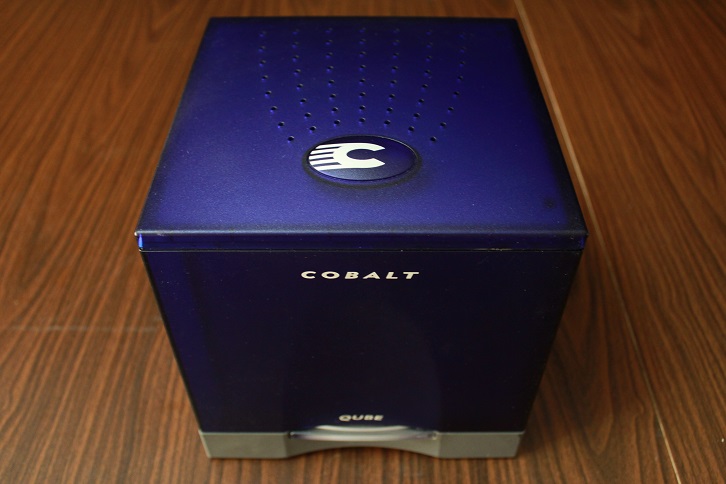
On the front side of the case there is a power indicator light, which is lit in a pleasant green color.
The left and right wall of the case is not remarkable, but on the back wall are all the controls and interfaces.
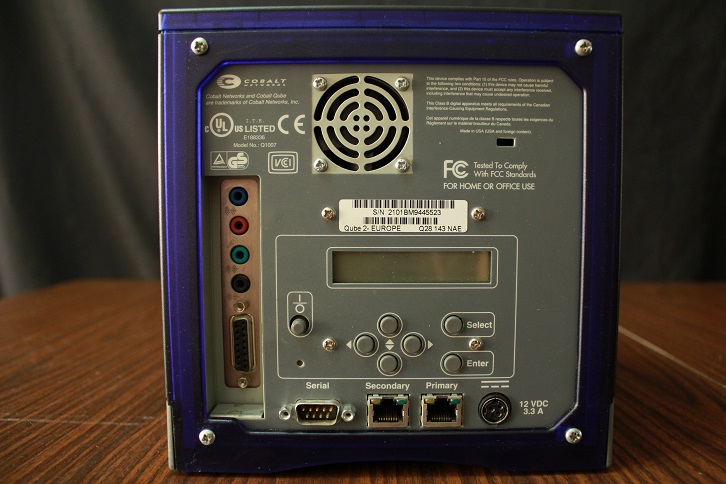
To the right of the PCI slot (in which I installed the audio card) there is a console connector, two network interfaces (Primary and Secondary) and a power supply connector. In the center is the LCD display and control buttons. The power button is located next door. And above the console port there is a small hole, where another button is hidden - the service button. With it, you can enable or disable the console, as well as reset the password. The fan located above does not need to be introduced.
Interior view.
To look under the hood of the Cobalt Qube 2 server, you need to unscrew the four screws on the back of the case.
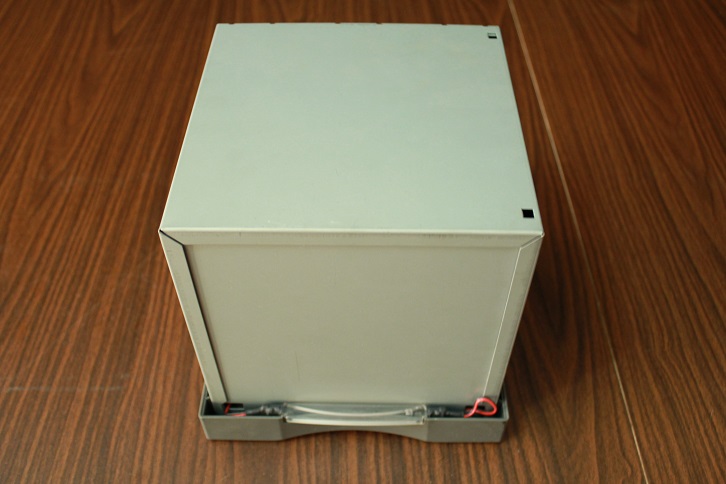
Carefully removing the plastic, we see another cube, this time an iron one. Two more screws are located on the bottom of the case - unscrew them and remove the plastic bottom.
In order to remove the metal casing, it is necessary to unscrew two more screws on the left and right wall.
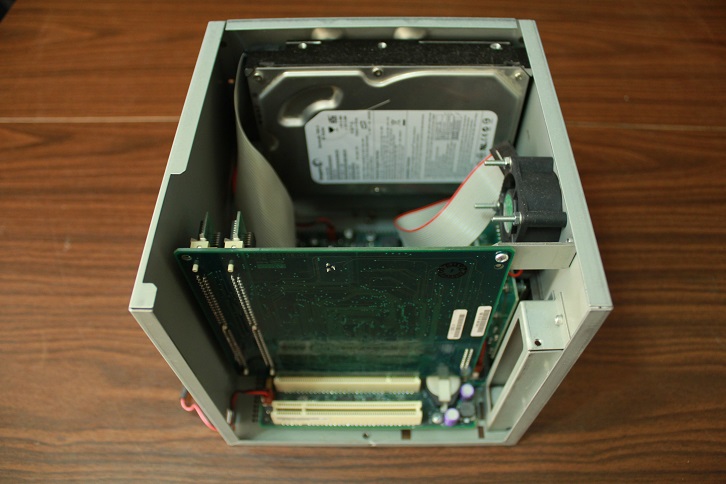
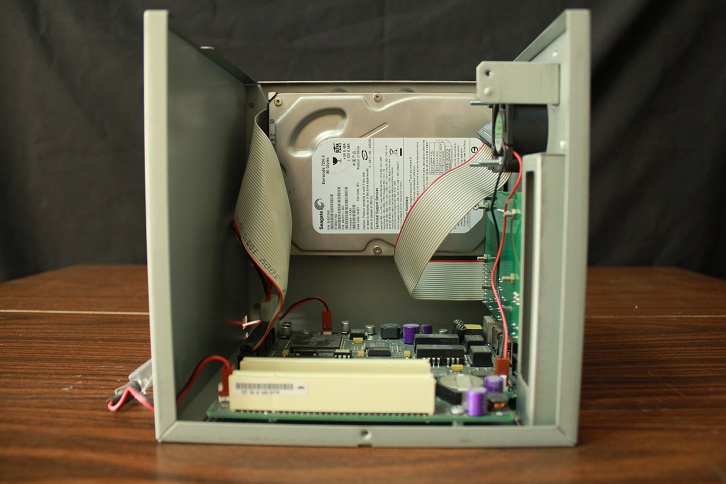
So, to our look the inner world of the Cobalt Qube 2 server appeared.
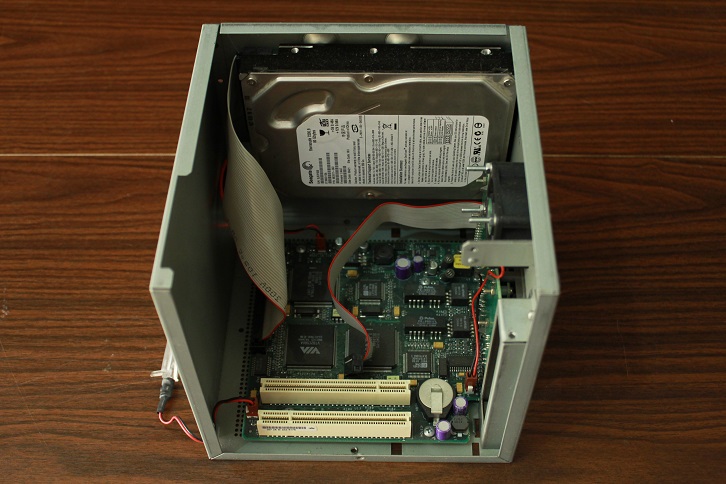
Inside, everything is neat and beautiful.
The hard drive is attached to one of the walls with four screws.
They also have to unscrew in order to change the hard drive to a more capacious. By the way, in my copy of the Cobalt Qube 2, instead of the complete HDD for 10GB, a hard disk with a capacity of only 4GB was installed. Apparently, the previous owner of the server had a penchant for minimalism.
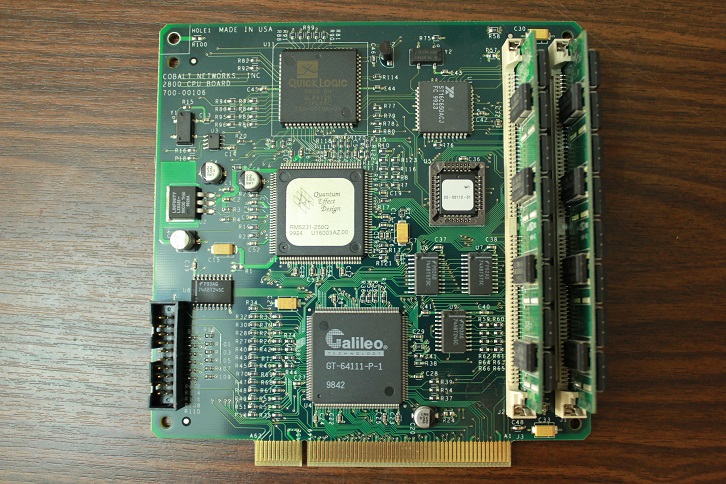
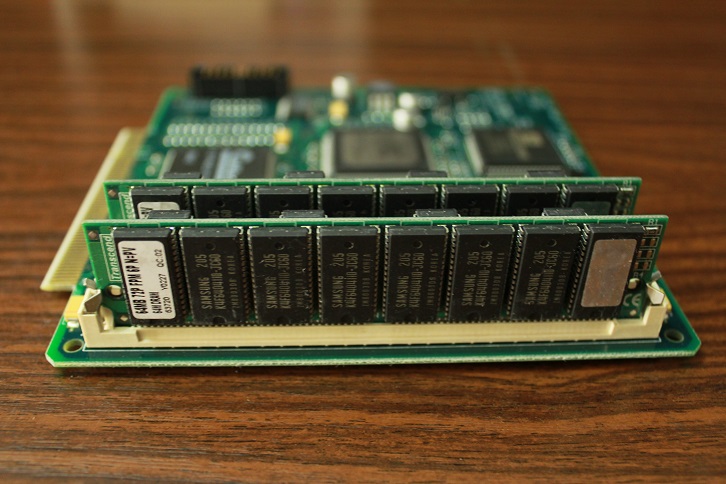
To replace the RAM, you must remove the daughter board, unscrewing one screw and removing it from the slot.

And this is what the main board looks like.
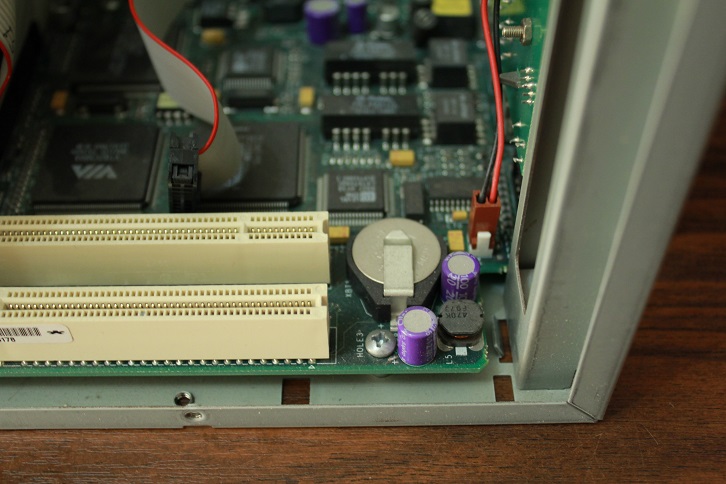
Now you can replace the battery.
In older versions of the BIOS, there was a limit on the maximum hard disk capacity, which was only 30GB. However, the latest BIOS firmware supports larger disks. Some Cobalt Qube 2 owners successfully installed a 120GB hard drive, but I only had 80GB HDD at my disposal, which later took its place inside the server.
With RAM, everything turned out to be much more complicated. Initially, the Cobalt Qube 2 server had 16MB SIMM 72 pin in the first slot. In the second (free) slot, the strip chosen at random was inserted, after which the server began to feel bad. As it turned out, if you install several memory bars of different sizes, the largest of them must be installed in the first slot.
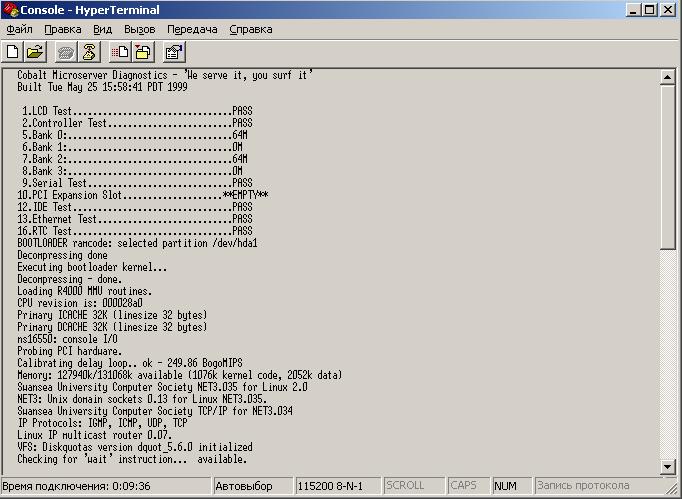
It is noteworthy that there are only two memory slots, and the system during the passage of POST reports the presence of four memory banks. To see the server boot process, you need to connect to its console with a null modem cable, specifying the following connection parameters in the terminal: speed 115200 bps, 8 data bits, 1 stop bit, without parity.
The maximum amount of Cobalt Qube 2 RAM can be 256MB (two SIMM bars of 128MB each), but I did not manage to find a RAM of this size. Two 64MB SIMM bars were purchased, and the total memory capacity was 128MB, which, in general, is not bad either.
Now you can return to Cobalt Qube 2 a native hard disk with the operating system Red Hat Linux, and get acquainted with its web interface.
Web interface.
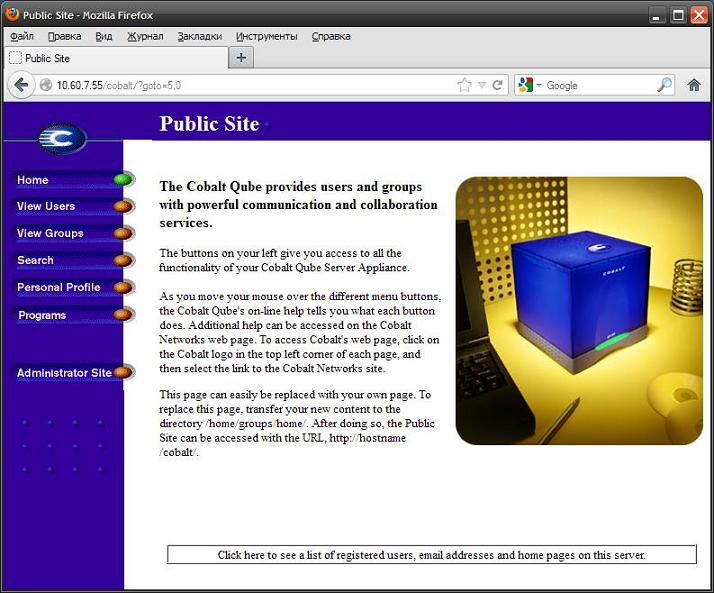
To configure and manage the Cobalt Qube 2 server, a web interface is used, which can be accessed by IP address or server name on the network. After passing the authorization, we will get to the so-called Public Site, where you can view a list of users and groups, use the search for documents stored on the server and edit the user profile.
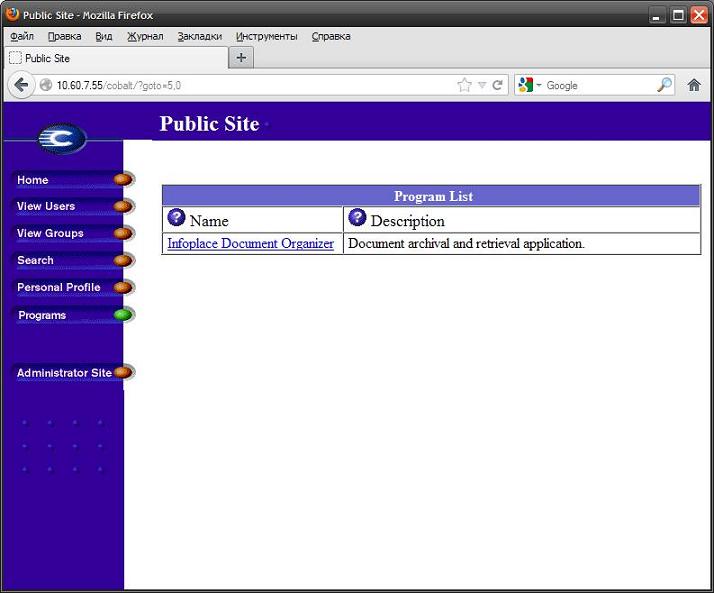
The Programs menu displays a list of user-accessible programs installed on the server.
In order to change the settings or add a user, you must go to the Administrator Site section.
The administrator can create and delete users and groups, as well as create a mailing list.
Network interface configuration is available in the Network section.
In the Control Panel section, you can configure installed services and services.

The Maintenance section provides data backup, program installation, and server reboot and shutdown functions.
In the System Status section you can find information about the memory in use, free space on the hard disk, processor utilization and network status.
Section Service Status allows you to monitor the status of running services and services.
And the oval icon with the letter C displays server configuration information.
Installing Debian.
The functionality of the Cobalt Qube 2 server is pleasantly striking. The Cobalt Cube can be turned into a NAS for storing music, or into a small file dump, or into a web server for the homepage of the name of a loved one ...
Stop! And how is he doing with security from hacker attacks? No way! Support for this product has long been discontinued, so the software installed in the Cobalt Qube 2 is outdated and is replete with security holes.
The only correct solution to this problem is to install some fresh * nix or * bsd distribution. Because of the habit, my choice fell on Debian, even though the installation of NetBSD on Cobalt Qube 2 is much easier.
So, let's proceed to the installation.
First of all, you need to make sure that the Cobalt Qube 2 has enough RAM to install Debian OS - 48MB or more. Internet access is also required.
Since the Cobalt Qube 2 does not have a CD-reading device, the server will be loaded and the OS installed over the network. To do this, we need a computer (hereinafter - a server) on which you need to install the NFS and DHCP services. In my case, the server role will be performed by a laptop with Debian 6.0.7 on board.
Install the necessary packages on the server:
Open the file
Naturally, instead of the value 192.168.1.0, your subnet address must be specified.
Next, set up a DHCP server. Open the file
Do not forget to change the
If there is another DHCP server on your local network (for example, on a router), you need to temporarily disable it.
Now you need to download the necessary files for installing Debian:
Restart the DHCP and NFS services to apply the changes:
Now everything is ready to install Debian. We connect the Cobalt Qube 2 to the local network where our configured DHCP server and NFS are running, turn on the Cube and immediately put it into the network boot mode. To do this, you must simultaneously (and most importantly quickly) press the “left” and “right” buttons on the control panel immediately after turning on the power of the Cobalt Cuba.
The line " Net booting " should appear on the LCD screen, otherwise you should turn off the Cobalt Qube 2 and try to put it into network boot mode again.
As a result of these manipulations, we should see the boot menu. If the boot menu does not appear, check that the Cobalt Qube 2 is correctly connected to the local network - use only the Cube network interface (Primary or Secondary), the MAC address of which we registered in the DHCP server settings.
In the boot menu, select the item " Network (NFS) " with the arrow buttons and press Enter. Network download has begun.
If you received the message " Unit Boot Failed " during the boot process, you need to turn off the Cobalt Qube 2 and perform the network boot procedure again.
Now we decide on how we will control the OS installation. There are two options to choose from - installation via SSH and using a console session.
In my opinion, using SSH is much more convenient, so I chose the first installation option. Confirm your choice by pressing the Enter button.
With the help of any SSH client, we connect to the Cobalt Cube using the IP address, using an
Installing the Debian operating system on the Cobalt Qube 2 is no different from the standard one.
When selecting components for installation, do not forget to choose an SSH server, otherwise you will have to interact with the Cobalt Cube after installing the OS via the console. You can also install a web server and file server, slightly expanding the functionality of Cobalt Qube 2.
It should be borne in mind that the amount of RAM of the Cobalt Cuba is extremely limited, so you should install only those components that you really need.
After the OS installation is completed, you can go to the Cobalt Qube 2 via SSH and configure the necessary services to your taste.
Installing Webmin.
As you remember, initially the Cobalt Cube had a fairly user-friendly graphical interface, which is no longer there. Install Webmin to fix this misunderstanding.
If the system swears at unsatisfied dependencies, install them
Be patient - Webmin installation takes several minutes, during which time it may seem like the server has hung. After successful installation, you can log in to the server using the web interface located at
where
For authorization, use the
As you can see, using Webmin to manage Cobalt Qube 2 server is much easier and more pleasant.
After installing Debian on the Cobalt Qube 2 server, there is about 80 MB of free RAM and about 70 GB on the hard disk. This is quite enough for the Cobalt Cube to become a file bin, mail server or web server for a simple home site.
I got into the hands of another ancient piece of iron (and maybe not very ancient - only 13 years have passed since its birth), and I would like to tell about it to the Habrasoobshchestvo.
Meet the Cobalt Qube 2.
')
Cobalt Qube 2 is a server manufactured by Cobalt Networks Inc. (subsequently purchased by Sun Microsystems). It received its name for the cobalt-blue color of the hull and its cubic shape. In the not very distant two thousand year, this kid (his height does not exceed 20 cm) successfully performed the functions of a mail and file server, a web server and a server of discussion groups, and could also index and archive documents located on his hard disk. And, as you have already guessed, a modified Red Hat Linux OS was installed on the Cobalt Qube 2 server. And to manage and configure used a fairly convenient and intuitive web interface.
The price of the Cobalt Qube 2 server at the start of sales was $ 2,500.
Cobalt Qube 2 Server Specification:
64Bit MIPS RISC CPU QED RM5231-250Q (250MHz) processor
Chipset: Galileo GT-64111
PCI-ISA Bridge / ATA Controller: Via VT821C586 (Apollo VP)
The amount of RAM 1x16MB RAM (EDO 3.3V, SIMM-Modul 72 Pin)
Maximum memory capacity: 256MB (2x128 SIMM)
Ultra-ATA 10.2GB Hard Drive (Seagate ST310212A)
Maximum hard disk size (BIOS limit): 30GB
2 network interfaces DECchip DC21142 10 / 100baseTX-FDX
Control panel with LCD display
1 high speed serial port (SubD9)
1 PCI slot
External power supply 12V, 3A
Dimensions: 18.4 cm x 18.4 cm x 19.7 cm
Weight: 2.8kg
Power supply: 100-240V, 50 / 60Hz
Power Consumption: 25W
Appearance.
The Cobalt Qube 2 server case is made of cobalt blue plastic. The case dimensions are 18.4 cm X 18.4 cm X 19.7 cm, and its weight is 2.8 kg.
On the front side of the case there is a power indicator light, which is lit in a pleasant green color.
The left and right wall of the case is not remarkable, but on the back wall are all the controls and interfaces.
To the right of the PCI slot (in which I installed the audio card) there is a console connector, two network interfaces (Primary and Secondary) and a power supply connector. In the center is the LCD display and control buttons. The power button is located next door. And above the console port there is a small hole, where another button is hidden - the service button. With it, you can enable or disable the console, as well as reset the password. The fan located above does not need to be introduced.
Interior view.
To look under the hood of the Cobalt Qube 2 server, you need to unscrew the four screws on the back of the case.
Carefully removing the plastic, we see another cube, this time an iron one. Two more screws are located on the bottom of the case - unscrew them and remove the plastic bottom.
In order to remove the metal casing, it is necessary to unscrew two more screws on the left and right wall.
So, to our look the inner world of the Cobalt Qube 2 server appeared.
Inside, everything is neat and beautiful.
The hard drive is attached to one of the walls with four screws.
They also have to unscrew in order to change the hard drive to a more capacious. By the way, in my copy of the Cobalt Qube 2, instead of the complete HDD for 10GB, a hard disk with a capacity of only 4GB was installed. Apparently, the previous owner of the server had a penchant for minimalism.
To replace the RAM, you must remove the daughter board, unscrewing one screw and removing it from the slot.
And this is what the main board looks like.
Now you can replace the battery.
In older versions of the BIOS, there was a limit on the maximum hard disk capacity, which was only 30GB. However, the latest BIOS firmware supports larger disks. Some Cobalt Qube 2 owners successfully installed a 120GB hard drive, but I only had 80GB HDD at my disposal, which later took its place inside the server.
With RAM, everything turned out to be much more complicated. Initially, the Cobalt Qube 2 server had 16MB SIMM 72 pin in the first slot. In the second (free) slot, the strip chosen at random was inserted, after which the server began to feel bad. As it turned out, if you install several memory bars of different sizes, the largest of them must be installed in the first slot.
It is noteworthy that there are only two memory slots, and the system during the passage of POST reports the presence of four memory banks. To see the server boot process, you need to connect to its console with a null modem cable, specifying the following connection parameters in the terminal: speed 115200 bps, 8 data bits, 1 stop bit, without parity.
The maximum amount of Cobalt Qube 2 RAM can be 256MB (two SIMM bars of 128MB each), but I did not manage to find a RAM of this size. Two 64MB SIMM bars were purchased, and the total memory capacity was 128MB, which, in general, is not bad either.
Now you can return to Cobalt Qube 2 a native hard disk with the operating system Red Hat Linux, and get acquainted with its web interface.
Web interface.
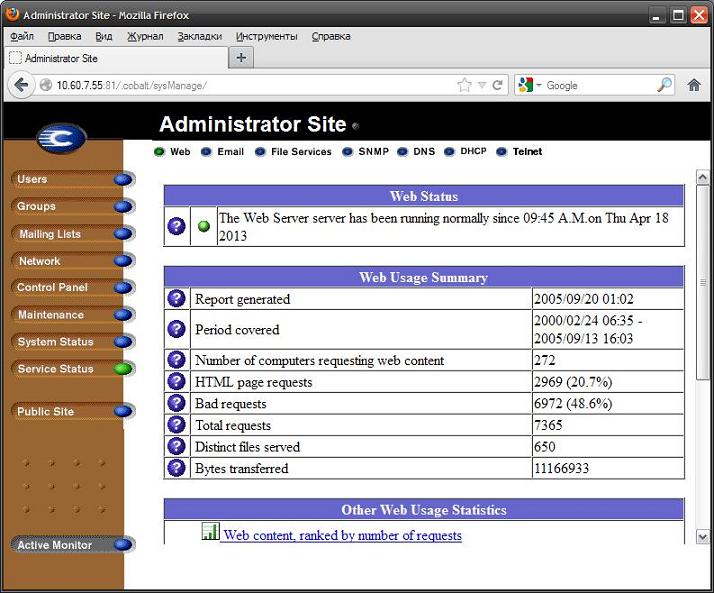
To configure and manage the Cobalt Qube 2 server, a web interface is used, which can be accessed by IP address or server name on the network. After passing the authorization, we will get to the so-called Public Site, where you can view a list of users and groups, use the search for documents stored on the server and edit the user profile.
The Programs menu displays a list of user-accessible programs installed on the server.
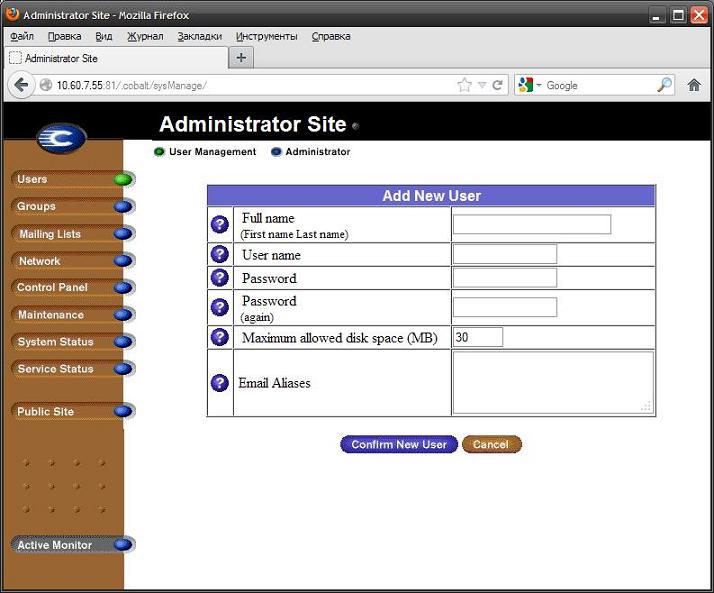
In order to change the settings or add a user, you must go to the Administrator Site section.
The administrator can create and delete users and groups, as well as create a mailing list.
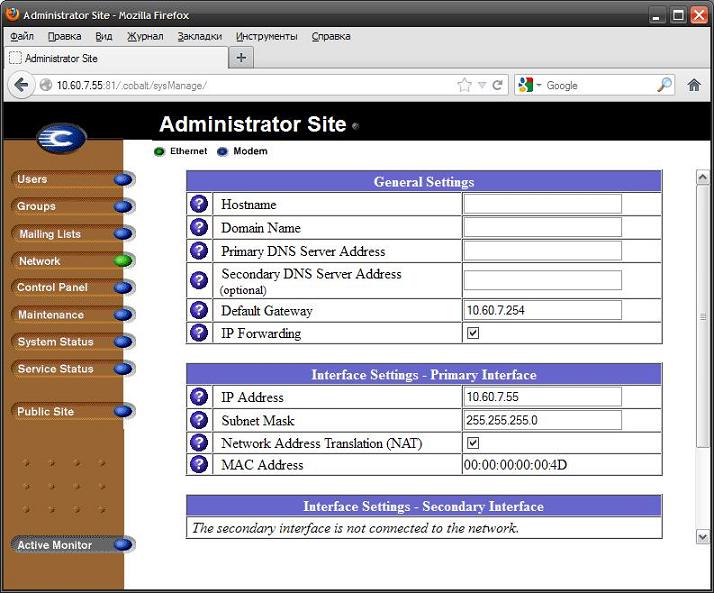
Network interface configuration is available in the Network section.
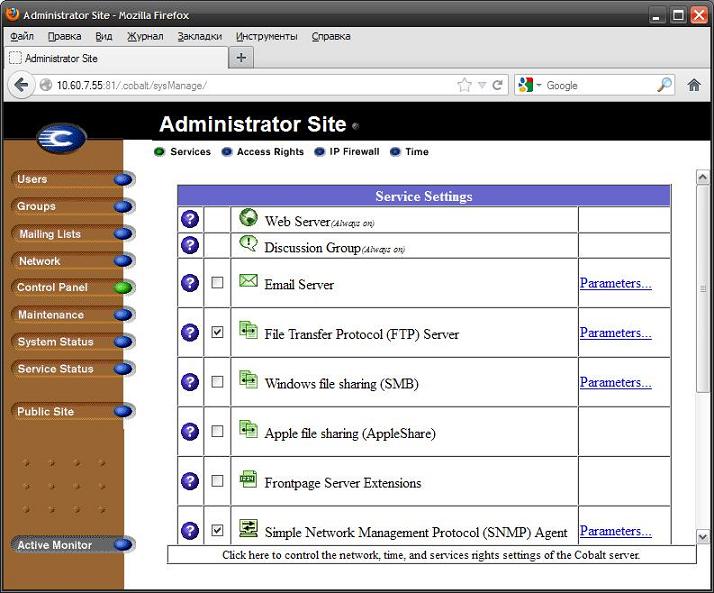
In the Control Panel section, you can configure installed services and services.
The Maintenance section provides data backup, program installation, and server reboot and shutdown functions.
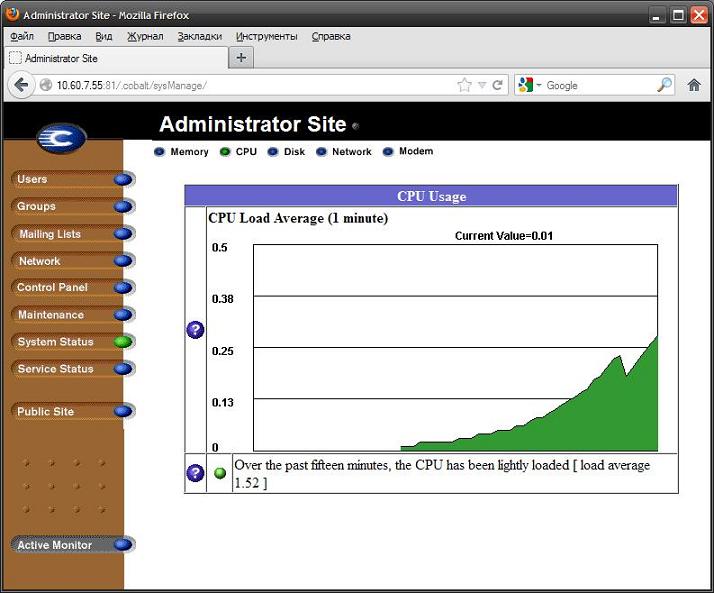
In the System Status section you can find information about the memory in use, free space on the hard disk, processor utilization and network status.
Section Service Status allows you to monitor the status of running services and services.
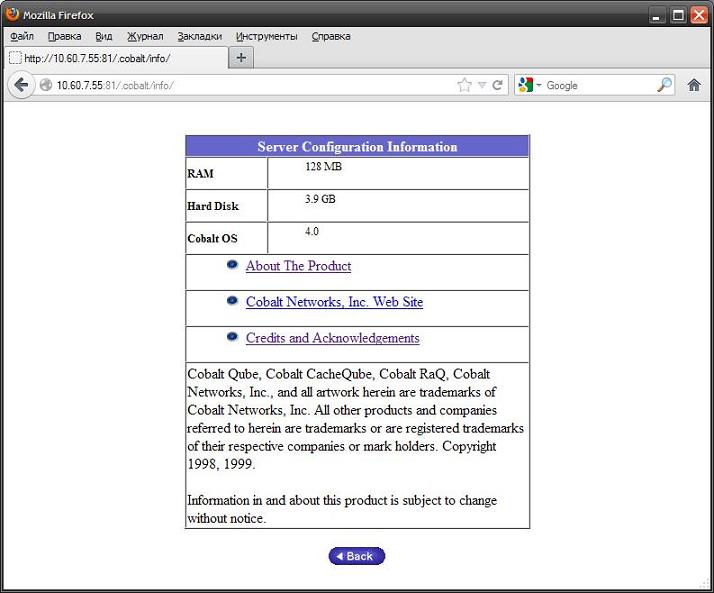
And the oval icon with the letter C displays server configuration information.
Installing Debian.
The functionality of the Cobalt Qube 2 server is pleasantly striking. The Cobalt Cube can be turned into a NAS for storing music, or into a small file dump, or into a web server for the homepage of the name of a loved one ...
Stop! And how is he doing with security from hacker attacks? No way! Support for this product has long been discontinued, so the software installed in the Cobalt Qube 2 is outdated and is replete with security holes.
The only correct solution to this problem is to install some fresh * nix or * bsd distribution. Because of the habit, my choice fell on Debian, even though the installation of NetBSD on Cobalt Qube 2 is much easier.
So, let's proceed to the installation.
First of all, you need to make sure that the Cobalt Qube 2 has enough RAM to install Debian OS - 48MB or more. Internet access is also required.
Since the Cobalt Qube 2 does not have a CD-reading device, the server will be loaded and the OS installed over the network. To do this, we need a computer (hereinafter - a server) on which you need to install the NFS and DHCP services. In my case, the server role will be performed by a laptop with Debian 6.0.7 on board.
Install the necessary packages on the server:
apt-get install nfs-kernel-serverapt-get install isc-dhcp-serverOpen the file
/etc/exports and append a line to it/nfsroot 192.168.1.0/255.255.255.0(ro,fsid=0,sync,no_subtree_check)Naturally, instead of the value 192.168.1.0, your subnet address must be specified.
Next, set up a DHCP server. Open the file
/etc/dhcp/dhcpd.conf and add something similar to these lines to it:option domain-name-servers 192.168.1.1;subnet 192.168.1.0 netmask 255.255.255.0 {range 192.168.1.10 192.168.1.100;}host cobalt {hardware ethernet 00:10:e0:0:be:5e;fixed-address 192.168.1.67;option routers 192.168.1.1;next-server 192.168.1.1;option root-path "/nfsroot";filename "default.colo";option host-name "cobalt";}Do not forget to change the
domain-name-servers, subnet, netmask, range option routers to the values corresponding to your local network. The hardware ethernet parameter should contain the Cobalt Qube 2 server MAC address (if the native hard disk is still alive, the MAC address can be viewed in the admin panel). The fixed-address parameter sets the static IP address of your Cobalt Qube 2, and the next-server parameter contains the IP address of the NFS server.If there is another DHCP server on your local network (for example, on a router), you need to temporarily disable it.
Now you need to download the necessary files for installing Debian:
cd $HOMEwget ftp.ru.debian.org/debian/dists/stable/main/installer-mipsel/current/images/cobalt/nfsroot.tar.gzcd /tar -xzvf ~/nfsroot.tar.gzRestart the DHCP and NFS services to apply the changes:
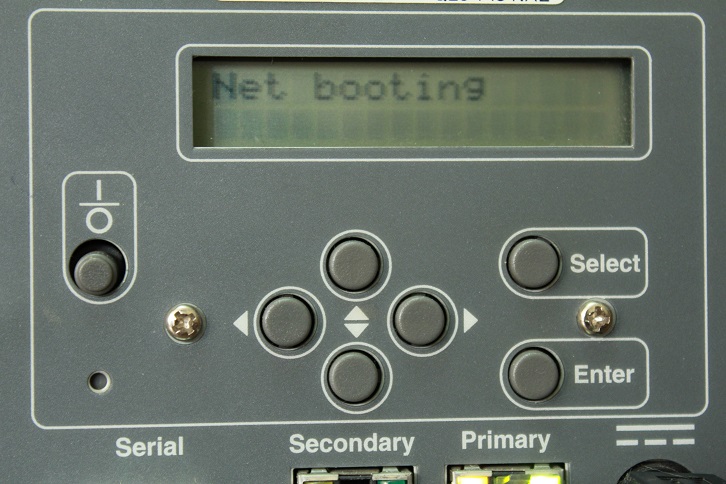
/etc/init.d/nfs-kernel-server restart/etc/init.d/isc-dhcp-server restartNow everything is ready to install Debian. We connect the Cobalt Qube 2 to the local network where our configured DHCP server and NFS are running, turn on the Cube and immediately put it into the network boot mode. To do this, you must simultaneously (and most importantly quickly) press the “left” and “right” buttons on the control panel immediately after turning on the power of the Cobalt Cuba.
The line " Net booting " should appear on the LCD screen, otherwise you should turn off the Cobalt Qube 2 and try to put it into network boot mode again.
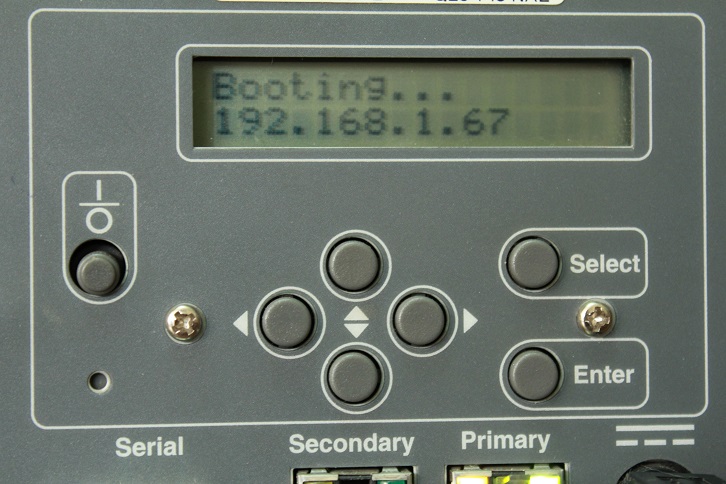
As a result of these manipulations, we should see the boot menu. If the boot menu does not appear, check that the Cobalt Qube 2 is correctly connected to the local network - use only the Cube network interface (Primary or Secondary), the MAC address of which we registered in the DHCP server settings.
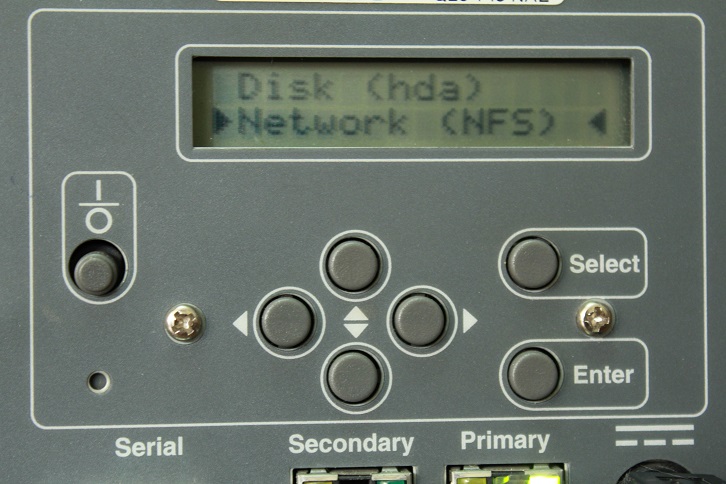
In the boot menu, select the item " Network (NFS) " with the arrow buttons and press Enter. Network download has begun.
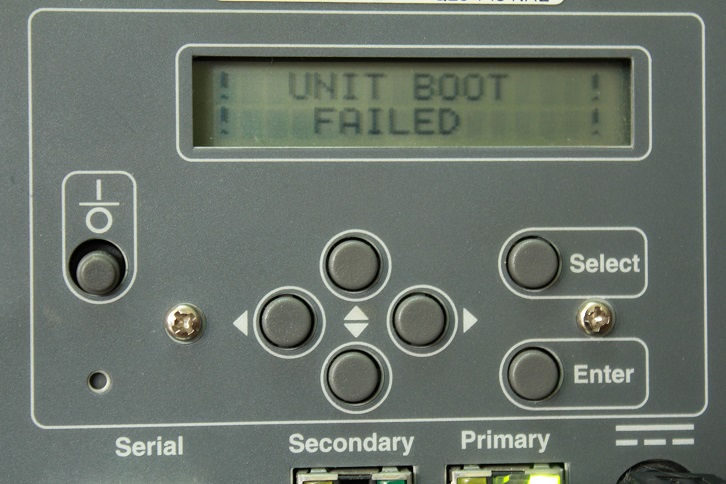
If you received the message " Unit Boot Failed " during the boot process, you need to turn off the Cobalt Qube 2 and perform the network boot procedure again.
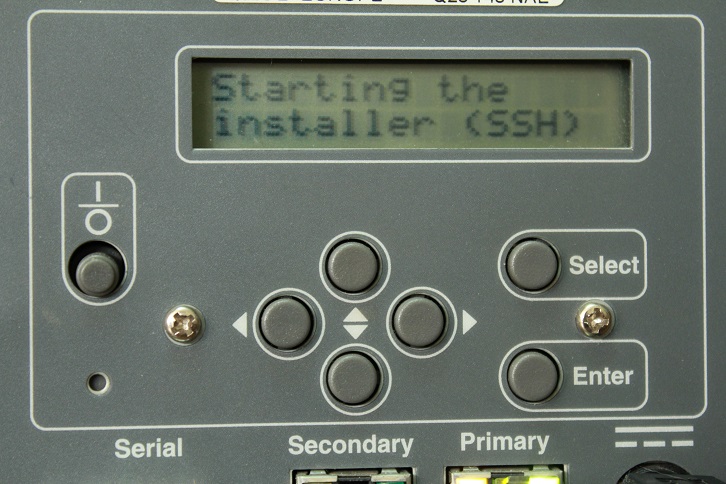
Now we decide on how we will control the OS installation. There are two options to choose from - installation via SSH and using a console session.
In my opinion, using SSH is much more convenient, so I chose the first installation option. Confirm your choice by pressing the Enter button.
With the help of any SSH client, we connect to the Cobalt Cube using the IP address, using an
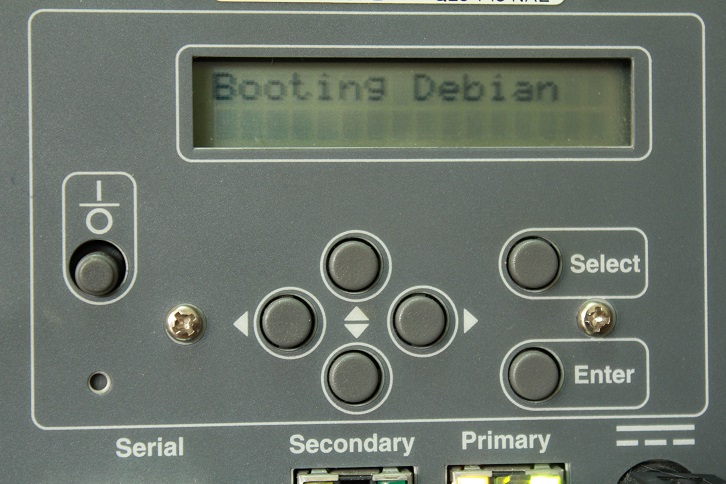
installer login for authorization. Password and IP address are displayed on the LCD of your Cobalt Qube 2.Installing the Debian operating system on the Cobalt Qube 2 is no different from the standard one.
When selecting components for installation, do not forget to choose an SSH server, otherwise you will have to interact with the Cobalt Cube after installing the OS via the console. You can also install a web server and file server, slightly expanding the functionality of Cobalt Qube 2.
It should be borne in mind that the amount of RAM of the Cobalt Cuba is extremely limited, so you should install only those components that you really need.
After the OS installation is completed, you can go to the Cobalt Qube 2 via SSH and configure the necessary services to your taste.
Installing Webmin.
As you remember, initially the Cobalt Cube had a fairly user-friendly graphical interface, which is no longer there. Install Webmin to fix this misunderstanding.
wget prdownloads.sourceforge.net/webadmin/webmin_1.620_all.debdpkg --install webmin_1.620_all.debIf the system swears at unsatisfied dependencies, install them
apt-get install perl libnet-ssleay-perl openssl libauthen-pam-perl libpam-runtime libio-pty-perl apt-show-versions pythonBe patient - Webmin installation takes several minutes, during which time it may seem like the server has hung. After successful installation, you can log in to the server using the web interface located at
yourserver:10000/where
yourserver is the name or IP address of your Cobalt Cuba.For authorization, use the
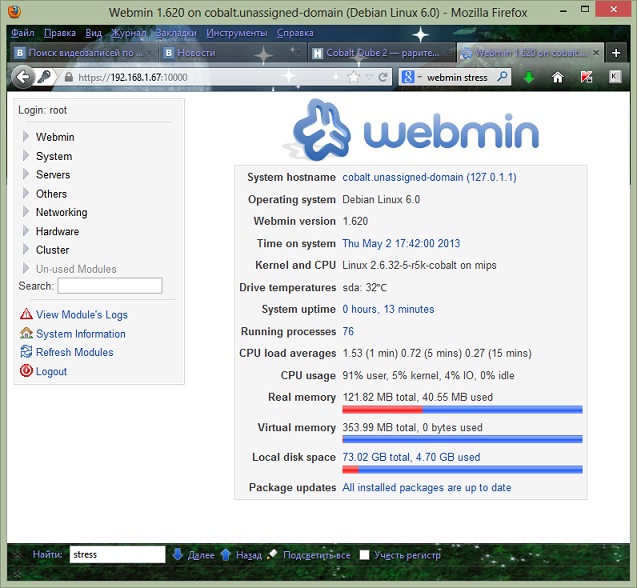
root account and the current root password (we set it when installing Debian).As you can see, using Webmin to manage Cobalt Qube 2 server is much easier and more pleasant.
After installing Debian on the Cobalt Qube 2 server, there is about 80 MB of free RAM and about 70 GB on the hard disk. This is quite enough for the Cobalt Cube to become a file bin, mail server or web server for a simple home site.
Source: https://habr.com/ru/post/177137/
All Articles