Deploying a Mac OS Workstation Management Infrastructure with Parallels Management Add-on for SCCM 2007/2012
Hello, readers of this post. I want to share a little experience that I was fortunate enough to get at work. At one time, the task was set to establish order in the network, namely to rein in the users of MAC OS and impose at least some of the corporate policies of our wonderful company on them. After investigating the problem, many deficiencies of such systems were revealed. For normal implementation, it was necessary to purchase a huge amount of equipment and licenses, while there were a lot of flaws in these systems (in order not to make advertisements and anti-advertising I don’t want to name these products).
And now a product that quite satisfies us began to emerge - Parallels Management Addon forMS SCCM 2007/2012. When he was presented to us by the developers of the company, he was at the stage of strict secrecy and very early testing (I work in the integrator and we sometimes come across similar products)
Suppose the infrastructure has already deployed SCCM (in my case SCCM 2007) We will not affect its sweep and setting. Let me just say the implicit settings that are necessary for the operation of our system.
- anonymous access via HTTPS must be enabled in the Distribution point properties

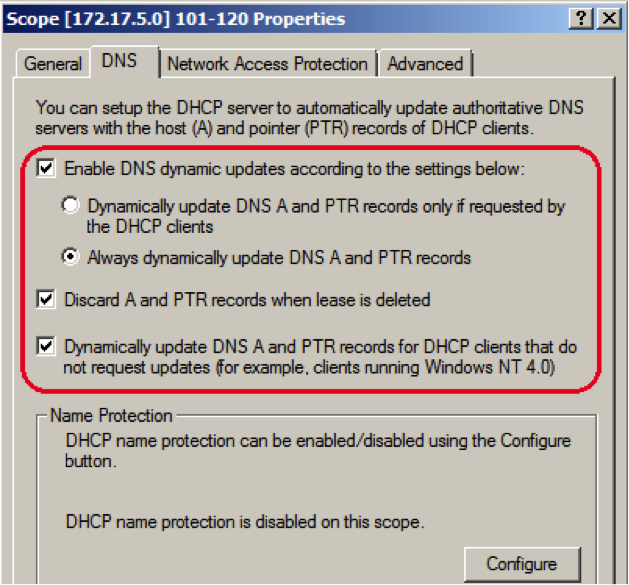
- in the DNS properties on the DHCP server in the subnets in which the clients are located, it is necessary to include:
a) Always dynamically update DNS A and PTR records.
b) Dynamic DNS update and PTR records for DHCP clients that do not require updating.
')
The operation of the service is as follows:
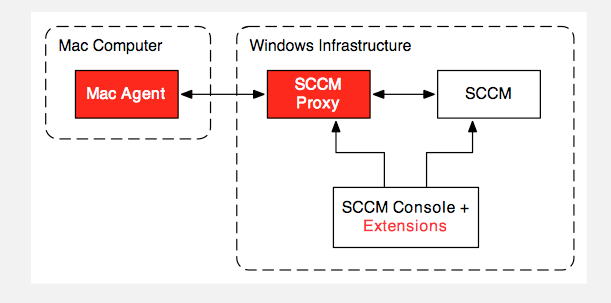
We have SCCM and a proxy through which this SCCM communicates with MAC OS clients (in my case it’s 2 separate servers, but nothing prevents you from installing the product on the server with SCCM), as well as console add-ons that add new features to the SCCM console.
I had a build for the developer, and it was not tied to licensing, so the installation may be slightly different from the purchased version, but I think not much.
- double click on PMA-version_number.exe on the server intended to play the role of proxy (the OS on the server can be either Win server 2008 R2-2012) click on further next-ready.
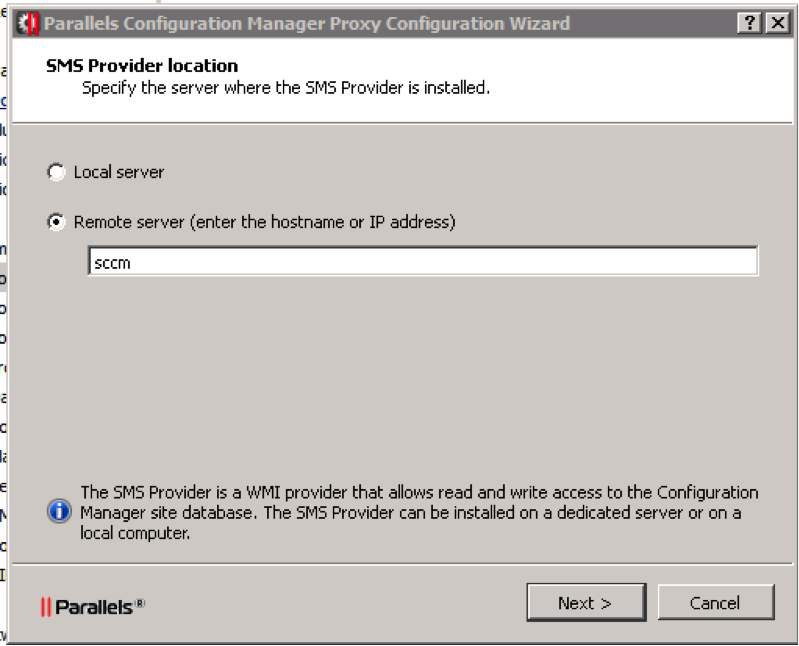
- run the Configuration Utility, located at the following address: C: \\ Program Files (x86) \ Parallels \ Parallels Management Add-on for SCCM

- enter the name / ip address of the SCCM server or indicate that SCCM is on the same computer
- in the next window, the username / password of a user who has administrator rights to SCCM itself is entered (since I do not know how to use Photoshop and cannot wipe users in this window I will not attach the screen).
- On the computer from which the control will be performed, it is necessary to start the installation of console extension from the same installer (on the screenshot, a check mark will be active if the console is installed)

Is done.
We have 3 methods to add client computers to the system.
- manually install the software (the agent is located at your_proxy_hostname@yourdomainname.ru : 8001 / files / pma_agent.dmg)
the distribution kit itself is in dmg (it is very simple to install it further on and on and on)

After the agent is installed, there will be a window asking you to enter the PROXY hostname for SCCM
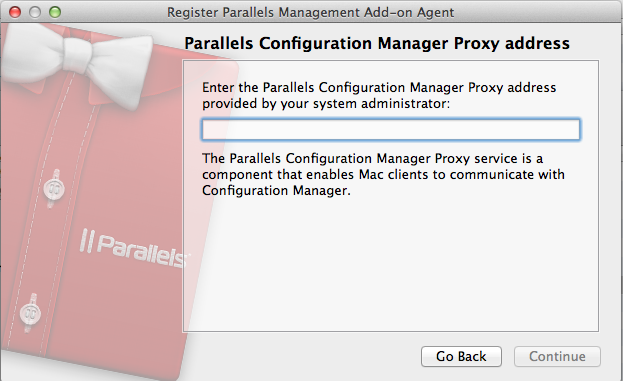
Enter the address - and it is ready, on the client computer, you do not need to enter anything else.
- Autodiscovery. If you have installed console extension, then an additional Parallels Management Add-on item will appear in the console.
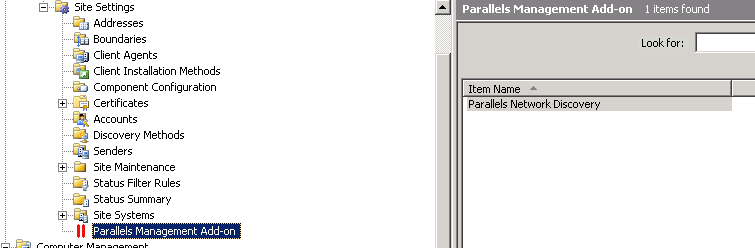
Choose it and see the Parallels Network Diskovery option. Double click and see the following window:
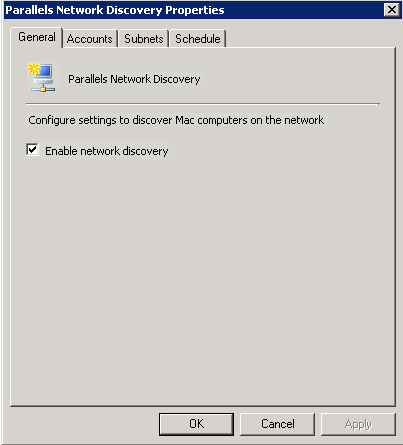
In this window we can turn on the discovery itself, configure its schedule and subnets in which the discovery will be produced. in the option Accounts, we can enter a local administrator account on clients (or several) under which the agent will be installed. Of course, the disadvantage is that we need to know the administrator of the poppy and moreover, each client should have SSH access enabled. This method is only useful if our Macs are in the domain and the account of one of the admin domains is a guarantied local administrator on each computer. Also, we will need to manually enable SSH access for each poppy. For me, this method was extremely inconvenient, since we were eager to introduce poppies into our domain (we did not see the point). therefore, we used the 1st method of installing agents. By the way, if you don’t enter any data into the Accounts, then the discovery will work all the same, but with a different use for us: The discovery utility itself will search for all poppies on the network (nmap is used there and will add them to the All Mac OS Systems collection as a system unmanagment. This is useful if we want to find out how many poppies we have in our network, without our politicians. I’ll say right away that it adds not all poppies in this way, there is a small chance that it will be quite a Windows computer, and if the poppy name does not resolve to the DNS, it will get there just ip address, and if this poppy is in a wi-fi network then he will most likely receive another ip address in the next discovery, and will again be added to the collection under another ip address.)
- Well, the third way is to pour the Macs on the deploy server deployed agent already installed. (I will not describe the methods as information about this sea on the Internet)
Next, we start working with poppies, just as if they were computers running windows. There are just some reservations.
We will automatically create a collection of All Mac OS Systems in which all our customers will be. On this collection, we can roll deploy virtually any software, Sktiptov, Pol. how to do this is described in great detail in the admin guid which will be automatically installed on a computer with a proxy. I just describe the most delicious.
- Software installation. We create any package in Software Distribution as well as for windows computers, but the difference is only in the executable command. There are 3 main mac os scripts, namely PKG, DMG with APP, DMG with pkg and these 3 main commands for installation
PKG - installer -pkg 'Install.pkg' -target /
DMG -: JavaForOSX.dmg / JavaForOSX.pkg ::
APP -: Skype.dmg / Skype.app: / Applications:
Option 1 installs Install.pkg with default settings.
Option 2 will mount the dmg image into the system and launch the installation of JavaForOSX.pkg with the same command as in the first option
Option 3 will mount the image into the dmg system and copy Skype.app into the Applications folder
These commands are entered when creating the programs distribution, in the option command line.

- Execution of any script. I needed to make settings that I simply don’t have in the profile manager from the apple company, namely the proxy server values in the system and its exceptions. and here's how to get out of this problem.
Create a script, say a.sh. We write the following lines there:
networksetup -setsecurewebproxy ethernet proxy.company.ru 8000
networksetup -setsecurewebproxy Wi-Fi proxy.company.ru 8000
networksetup -setwebproxy ethernet proxy.company.ru 8000
networksetup -setwebproxy Wi-Fi proxy.company.ru 8000
networksetup-setproxybypassdomains ethernet * .local 169.254 / 16 127. * 10. * 192.168. * 172.
systemsetup -settimezone Europe / Moscow
Copy this file to SCCM and create a software distribution package from it. We set the command to install chmod + x a.sh && sh a.sh and this is what we get at the output: we run a script on the Mac, which we configure in the system on the Wi-Fi and ethernet proxy interfaces with exceptions * .local 169.254 / 16 127 . * 10. * 192.168. * 172. and sets the time zone on all computers! Really cool?
- Apply a profile on the user's computer: One of the most important features of this system is the ability to apply profiles on Macs (for those who do not know this kind of policy) To do this, go here - Site Database / Computer Management / Desired Configuration Management / Configuration Items. Right click on Configuration Items and from the pop-up menu select Create Parallels Configuration Item. In the window that appears
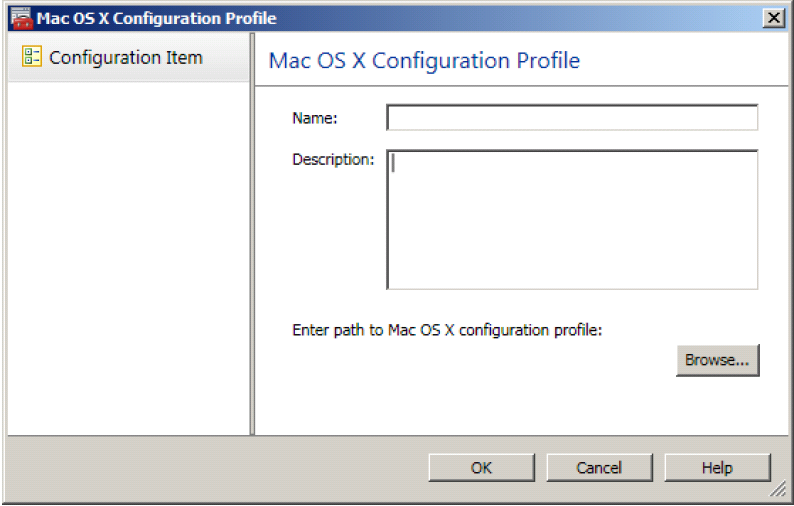
Specify the name, note, and select the profile itself, created in the profile manager on the mac os server. After creating a profile, we apply it to any collection as a baseline and that's it, now this profile will be applied to poppies.
- Another very important and unique feature has the product: This is the use of disk encryption through FileVault. The process there is very long and very well described in the product documentation, so I will not describe it. But believe me, practically no analogue possesses such a possibility.
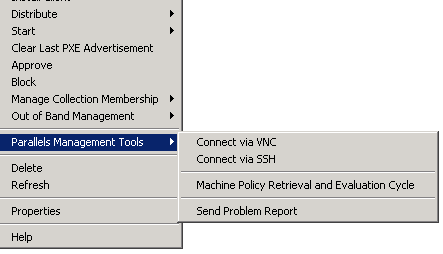
- We can connect to any client via ssh / vnc directly from the console. To do this, we need to right-click on the desired client and select the appropriate menu item from the pop-up window
We use this solution in our infrastructure, which I advise you. We expand password complexity policies and the path for the corporate update server through profiles, time zone settings and proxy servers via scripts, installing ms office, Symantec antivirus, java, citrix, Parallels Desktop via software distribution, Making the hard disk encrypted via disired configuration management.
Thanks for attention. If you have any questions, write in the comments, I will try to answer.
And now a product that quite satisfies us began to emerge - Parallels Management Addon forMS SCCM 2007/2012. When he was presented to us by the developers of the company, he was at the stage of strict secrecy and very early testing (I work in the integrator and we sometimes come across similar products)
Infrastructure preparation
Suppose the infrastructure has already deployed SCCM (in my case SCCM 2007) We will not affect its sweep and setting. Let me just say the implicit settings that are necessary for the operation of our system.
- anonymous access via HTTPS must be enabled in the Distribution point properties
- in the DNS properties on the DHCP server in the subnets in which the clients are located, it is necessary to include:
a) Always dynamically update DNS A and PTR records.
b) Dynamic DNS update and PTR records for DHCP clients that do not require updating.
')
The operation of the service is as follows:
We have SCCM and a proxy through which this SCCM communicates with MAC OS clients (in my case it’s 2 separate servers, but nothing prevents you from installing the product on the server with SCCM), as well as console add-ons that add new features to the SCCM console.
Installation
I had a build for the developer, and it was not tied to licensing, so the installation may be slightly different from the purchased version, but I think not much.
- double click on PMA-version_number.exe on the server intended to play the role of proxy (the OS on the server can be either Win server 2008 R2-2012) click on further next-ready.
- run the Configuration Utility, located at the following address: C: \\ Program Files (x86) \ Parallels \ Parallels Management Add-on for SCCM
- enter the name / ip address of the SCCM server or indicate that SCCM is on the same computer
- in the next window, the username / password of a user who has administrator rights to SCCM itself is entered (since I do not know how to use Photoshop and cannot wipe users in this window I will not attach the screen).
- On the computer from which the control will be performed, it is necessary to start the installation of console extension from the same installer (on the screenshot, a check mark will be active if the console is installed)
Is done.
Adding client computers
We have 3 methods to add client computers to the system.
- manually install the software (the agent is located at your_proxy_hostname@yourdomainname.ru : 8001 / files / pma_agent.dmg)
the distribution kit itself is in dmg (it is very simple to install it further on and on and on)
After the agent is installed, there will be a window asking you to enter the PROXY hostname for SCCM
Enter the address - and it is ready, on the client computer, you do not need to enter anything else.
- Autodiscovery. If you have installed console extension, then an additional Parallels Management Add-on item will appear in the console.
Choose it and see the Parallels Network Diskovery option. Double click and see the following window:
In this window we can turn on the discovery itself, configure its schedule and subnets in which the discovery will be produced. in the option Accounts, we can enter a local administrator account on clients (or several) under which the agent will be installed. Of course, the disadvantage is that we need to know the administrator of the poppy and moreover, each client should have SSH access enabled. This method is only useful if our Macs are in the domain and the account of one of the admin domains is a guarantied local administrator on each computer. Also, we will need to manually enable SSH access for each poppy. For me, this method was extremely inconvenient, since we were eager to introduce poppies into our domain (we did not see the point). therefore, we used the 1st method of installing agents. By the way, if you don’t enter any data into the Accounts, then the discovery will work all the same, but with a different use for us: The discovery utility itself will search for all poppies on the network (nmap is used there and will add them to the All Mac OS Systems collection as a system unmanagment. This is useful if we want to find out how many poppies we have in our network, without our politicians. I’ll say right away that it adds not all poppies in this way, there is a small chance that it will be quite a Windows computer, and if the poppy name does not resolve to the DNS, it will get there just ip address, and if this poppy is in a wi-fi network then he will most likely receive another ip address in the next discovery, and will again be added to the collection under another ip address.)
- Well, the third way is to pour the Macs on the deploy server deployed agent already installed. (I will not describe the methods as information about this sea on the Internet)
What's next?
Next, we start working with poppies, just as if they were computers running windows. There are just some reservations.
We will automatically create a collection of All Mac OS Systems in which all our customers will be. On this collection, we can roll deploy virtually any software, Sktiptov, Pol. how to do this is described in great detail in the admin guid which will be automatically installed on a computer with a proxy. I just describe the most delicious.
- Software installation. We create any package in Software Distribution as well as for windows computers, but the difference is only in the executable command. There are 3 main mac os scripts, namely PKG, DMG with APP, DMG with pkg and these 3 main commands for installation
PKG - installer -pkg 'Install.pkg' -target /
DMG -: JavaForOSX.dmg / JavaForOSX.pkg ::
APP -: Skype.dmg / Skype.app: / Applications:
Option 1 installs Install.pkg with default settings.
Option 2 will mount the dmg image into the system and launch the installation of JavaForOSX.pkg with the same command as in the first option
Option 3 will mount the image into the dmg system and copy Skype.app into the Applications folder
These commands are entered when creating the programs distribution, in the option command line.
- Execution of any script. I needed to make settings that I simply don’t have in the profile manager from the apple company, namely the proxy server values in the system and its exceptions. and here's how to get out of this problem.
Create a script, say a.sh. We write the following lines there:
networksetup -setsecurewebproxy ethernet proxy.company.ru 8000
networksetup -setsecurewebproxy Wi-Fi proxy.company.ru 8000
networksetup -setwebproxy ethernet proxy.company.ru 8000
networksetup -setwebproxy Wi-Fi proxy.company.ru 8000
networksetup-setproxybypassdomains ethernet * .local 169.254 / 16 127. * 10. * 192.168. * 172.
systemsetup -settimezone Europe / Moscow
Copy this file to SCCM and create a software distribution package from it. We set the command to install chmod + x a.sh && sh a.sh and this is what we get at the output: we run a script on the Mac, which we configure in the system on the Wi-Fi and ethernet proxy interfaces with exceptions * .local 169.254 / 16 127 . * 10. * 192.168. * 172. and sets the time zone on all computers! Really cool?
- Apply a profile on the user's computer: One of the most important features of this system is the ability to apply profiles on Macs (for those who do not know this kind of policy) To do this, go here - Site Database / Computer Management / Desired Configuration Management / Configuration Items. Right click on Configuration Items and from the pop-up menu select Create Parallels Configuration Item. In the window that appears
Specify the name, note, and select the profile itself, created in the profile manager on the mac os server. After creating a profile, we apply it to any collection as a baseline and that's it, now this profile will be applied to poppies.
- Another very important and unique feature has the product: This is the use of disk encryption through FileVault. The process there is very long and very well described in the product documentation, so I will not describe it. But believe me, practically no analogue possesses such a possibility.
- We can connect to any client via ssh / vnc directly from the console. To do this, we need to right-click on the desired client and select the appropriate menu item from the pop-up window
Total
We use this solution in our infrastructure, which I advise you. We expand password complexity policies and the path for the corporate update server through profiles, time zone settings and proxy servers via scripts, installing ms office, Symantec antivirus, java, citrix, Parallels Desktop via software distribution, Making the hard disk encrypted via disired configuration management.
Thanks for attention. If you have any questions, write in the comments, I will try to answer.
Source: https://habr.com/ru/post/177065/
All Articles