We send a thick client through an SSL tunnel with encryption according to GOST
Hi, Habrovchane! 
Today we want to talk about the benefits of SSL VPN technology and the practice of working with Stonesoft SSL gateway. The article will describe the configuration of this solution for forwarding a thick client (for example, well-known 1C Accounting) via the HTTPS protocol using GOST encryption algorithms. This will allow our beloved chief accountant to remotely work with 1C base on an encrypted channel directly from the dacha, for us to quickly connect a couple of hundreds of small offices scattered throughout the country to the system, and our organization to fulfill the requirements of legislation to protect personal data.
The article describes how to securely publish client-server applications via the Web, guided by which, you can organize remote access to almost any corporate resource.
So let's see how SSL VPN can make our lives easier and save time and nerves. I see no sense in describing technology, so as not to bother the advanced reader with dry technical information. Refresh your SSL VPN knowledge here . We will focus on the practice of use and think about what SSL VPN is so good compared to the classic IPSec VPN.
')
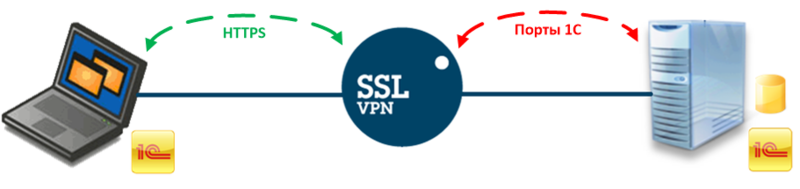
The essence of SSL VPN technology is as follows: the client connects to port 443 to the gateway, which in turn initiates a connection to the remote server (in our case, it is 1C), as a proxy server.
First, it is convenient. You can organize access to any service / resource from any user device from any place where there is Internet. No need to install any VPN clients, configure them, as in the case of using IPSec VPN, just enter the address in the browser, authenticate and work. The user will be able to get remote access to the corporate resource even through public or guest Wi-Fi, since Port 443 is open in almost all networks.
Secondly, it is simple. Just for everyone. You do not have to explain to theaunt-accountant user that in order to gain access to some resource, he needs to find the VPN client icon in the tray, right-click on it, select the gateway address from the list, click "Connect", enter the login and password (hello again ipsec VPN). Just for administrators, because No need to give the user a working laptop for travel with an installed and configured VPN client, antivirus, and other corporate software.
Thirdly, it is safe. There are many security mechanisms that an SSL VPN gateway can apply to a client. The two main mechanisms are authentication and encryption. You can choose various methods and means of authentication: by login / password, RADIUS, certificates, one-time passwords, integration with Active Directory and many others, depending on the SSL VPN solution chosen.
Encryption is also for every taste, it all depends on the vendor. For example, Stonesoft SSL, which we consider in this article, offers us to choose from the following algorithms: AES, DES, 3DES, RC2, RC4 and, in the version for Russia, GOST 28147-89, which is very pleasing to our state. regulators. Since we live in Russia and do not violate the laws, the availability of this product’s certificates of compliance with the FSTEC and the Federal Security Service allows us to significantly expand its scope.
You can also highlight such interesting security mechanisms as checking the user's end device for compliance with the security policy and removing session traces after the end of the connection (cookies, URL history, cache data, and temporary files).
The task is the following: to organize secure access to the server via HTTPS using GOST encryption from the laptop of an accountant who likes to relax and work in the country. In fact, we will prokidyvat thick client 1C, which works on "their" ports (1540 TCP, 1560-1591 TCP), through port 443 TCP.
Below are two options for connecting via an SSL VPN gateway:
To implement these scenarios, a stand was assembled in the laboratory:

DOE stands for emulation of work via the Internet: only port 443 TCP is open on the external interface

and configured NAT on the SSL VPN gateway interface.
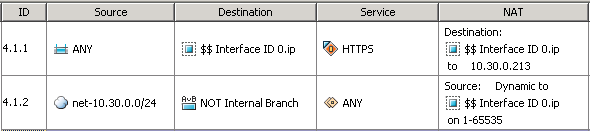
As can be seen from the scheme and rules on the ME, there is no access from the outside to the 1C server (safety first!).
I will not describe the process of installing the firmware with GOST support for the SSL VPN gateway and its initial configuration, all this can be found on the Internet and in the guides . So let's agree that we have a clean Stonesoft SSL with installed crypto libraries of CrytoPro CSP, generated keys, imported certificates of the gateway and a trusted Certification Authority.
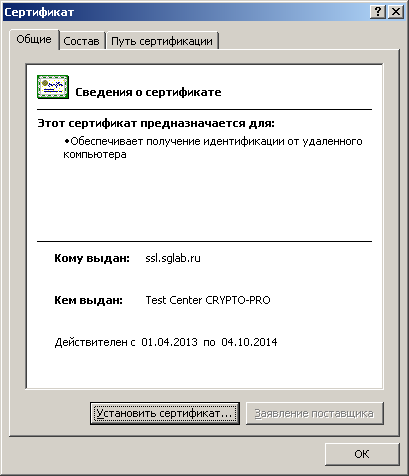
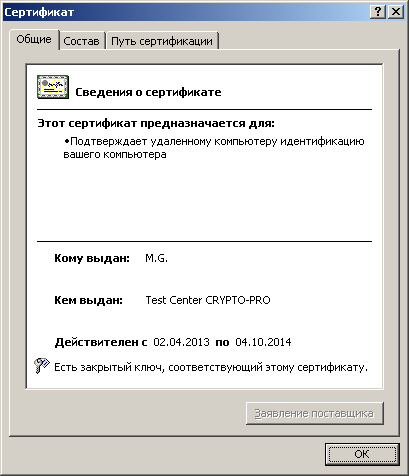
Below are the Stonesoft SSL Gateway and User Certificates issued on the Test Trust Center.
SSL VPN Gateway Certificate:

User certificate:
Configuring an SSL VPN gateway can be divided into the following steps:
Below is a detailed description of the settings with screenshots.
First, configure user authentication. We chose the following scheme: authentication by certificates issued only by a trusted CA without being tied to any user repository. Those. if the user has a certificate issued by a CA that the gateway considers trusted, then the user can authenticate. So, go to https://10.30.0.213:8443/ and get to the administration console of the Stonesoft SSL gateway.
Go to the tab Manage System - Authentication Methods .

Add a new method - click Add Authentication Method ... , select the type User Certificate , set the name to the method and select the CA that will be used for this type of authentication.
By default, not any user can be authenticated, but only the one whose account is known to the gateway. For our scheme, we need to add a new attribute for the created authentication method: click Add Extended Property ... , select the attribute Allow user, and set the value of the attribute to true .
That's all, the new authentication method is ready, to apply the changes click the Publish button. This is probably the most important button when working with Stonesoft SSL, do not forget to press it every time you change something.

Now you need to publish the resource so that it is available to the user on the application portal of the SSL VPN gateway. First, we will consider Option # 1: the 1C client connects to the 1C server and works with the database in the DBMS.
The process of creating and publishing a resource can be described as follows:
Go to the Manage Resource Access - Tunnel Resources tab, click Add Tunnel Resource Host ... Fill in the resource name, IP address and ports through which we want to access the 1C server.

Now you need to create an item in the application portal. Go to the Manage Resource Access - Tunnel Sets tab, click Add Tunnel Set and fill in the name, select the icon that will be visible to the user (you can choose from ready-made ones or load your own), in the Link Text field we write the text that will be displayed under the icon.
In the next step, we need to specify the SSL VPN gateway, what traffic to wrap in SSL, for this we add a dynamic tunnel, for which we click Add Dynamic Tunnel to the Set ... and from the drop-down list in the Resource field select the host with the 1C server. All other fields are filled in automatically in accordance with the properties of the resource that we have selected.
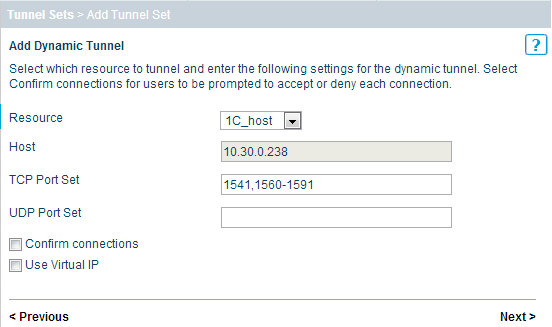
Now the most crucial moment is to correctly write the command that will be executed on the client PC, automatically launching the 1C client with the required connection settings to the server. In my case, it looks like this: "C: \ Program Files \ 1cv8 \ 8.3.1.531 \ bin \ 1cv8c.exe" /Sray10.30.0.238\1c " . It is worth remembering that if there are several users, then all the path to the executable file should be the same. If for some reason this is not possible, then you can leave the Startup Command field empty, then the 1C client will have to be started manually and all parameters must be specified after opening the resource on the application portal.

After all the actions done, click Publish.
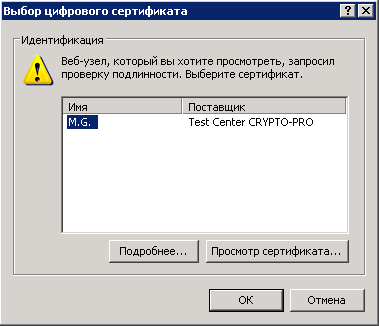
Now we can check what happened with us. We launch the browser, write in the address bar https://ssl.sglab.ru/ and see the window with the choice of certificate.
After authentication, we get to the application portal.

We press on 1C and we see how the Access Client is loaded, the command that we wrote in the Tunnel Set properties is launched and eventually the 1C: Enterprise client starts and connects to the server.
At the time of connection, you can view the logs on the ME and make sure that everything works through HTTPS.

Now we will configure another script - the user clicks on the 1C icon on the application portal and gets access to the folder with the base on the 1C server.
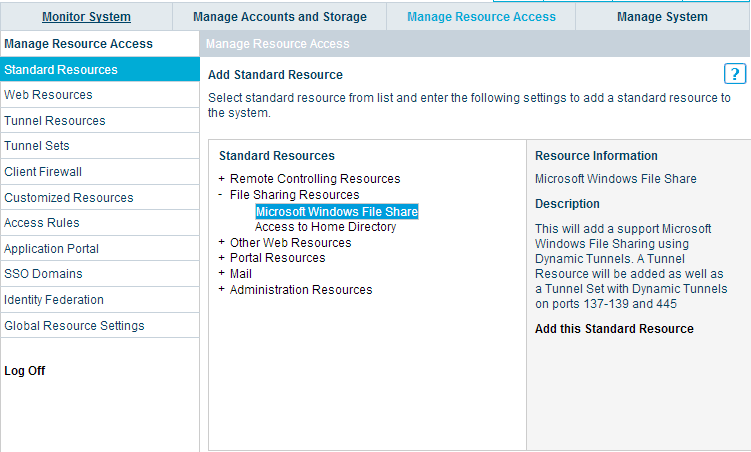
Go to the administration console of the gateway, go to the tab Manage Resource Access - Standard Resources - File Sharing Resources - Microsoft Windows File Share and click Add this Standard Resource .
Fill in the name of the resource, the IP address of the 1C server, the name of the folder with the database that is shared, select the icon for the application portal and write the display name.
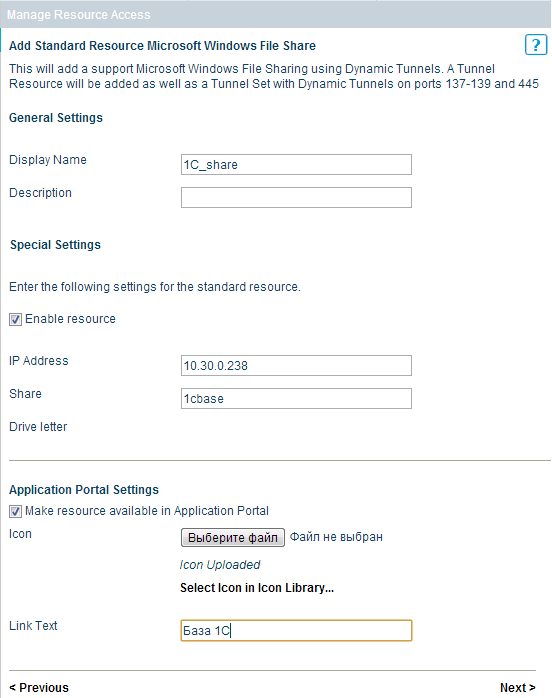
Actually, everything. Do not forget to post changes on the portal.
Now from the client PC, we go again to https://ssl.sglab.ru/ and click on the created Base 1C icon.

Then we see the folder with the base 1C.
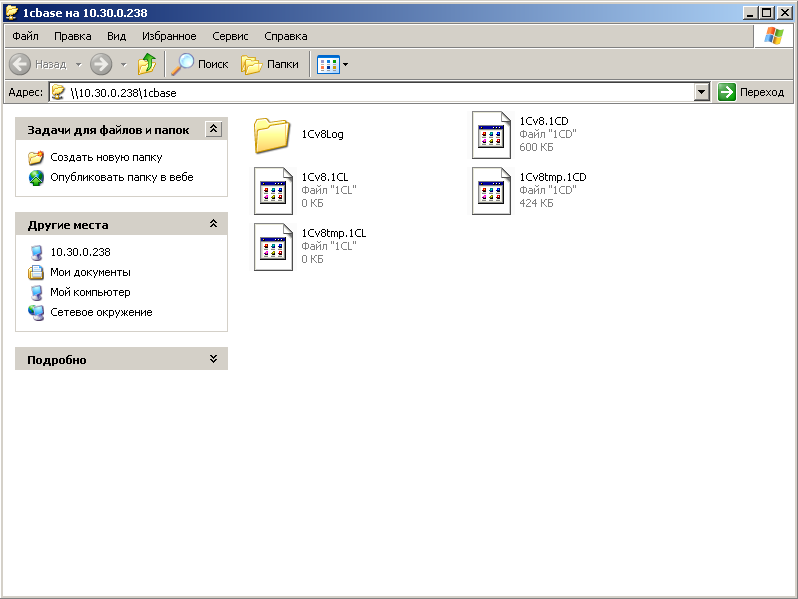
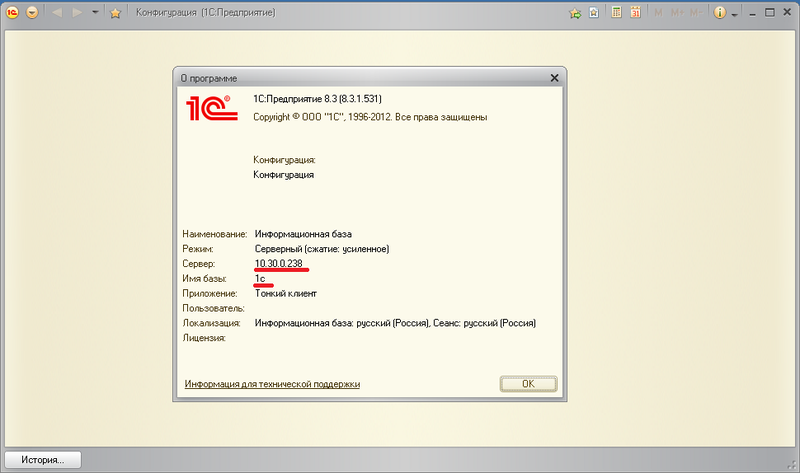
Then everything is simple and clear - we add a new information base in the 1C client, specify the path \\ 10.30.0.238 \ 1cbase and work with it over a secure channel via HTTPS.
Thus, we configured the SSL VPN gateway to work remotely with the 1C server in two versions via an encrypted channel using GOST algorithms and allowed our users to work safely with corporate resources through thick clients.
This is not all that Stonesoft SSL VPN is capable of. This configuration will be easy to “tune” to fit your needs.
We hope this article will be useful to you. In the future, we plan to continue to share our experience in the field of information security with haberdashers. We will be glad to questions and wishes in the comments.
Thank you all for your attention!
newmaxidrom
Today we want to talk about the benefits of SSL VPN technology and the practice of working with Stonesoft SSL gateway. The article will describe the configuration of this solution for forwarding a thick client (for example, well-known 1C Accounting) via the HTTPS protocol using GOST encryption algorithms. This will allow our beloved chief accountant to remotely work with 1C base on an encrypted channel directly from the dacha, for us to quickly connect a couple of hundreds of small offices scattered throughout the country to the system, and our organization to fulfill the requirements of legislation to protect personal data.
The article describes how to securely publish client-server applications via the Web, guided by which, you can organize remote access to almost any corporate resource.
What is SSL VPN?
So let's see how SSL VPN can make our lives easier and save time and nerves. I see no sense in describing technology, so as not to bother the advanced reader with dry technical information. Refresh your SSL VPN knowledge here . We will focus on the practice of use and think about what SSL VPN is so good compared to the classic IPSec VPN.
')
The essence of SSL VPN technology is as follows: the client connects to port 443 to the gateway, which in turn initiates a connection to the remote server (in our case, it is 1C), as a proxy server.
First, it is convenient. You can organize access to any service / resource from any user device from any place where there is Internet. No need to install any VPN clients, configure them, as in the case of using IPSec VPN, just enter the address in the browser, authenticate and work. The user will be able to get remote access to the corporate resource even through public or guest Wi-Fi, since Port 443 is open in almost all networks.
Secondly, it is simple. Just for everyone. You do not have to explain to the
Thirdly, it is safe. There are many security mechanisms that an SSL VPN gateway can apply to a client. The two main mechanisms are authentication and encryption. You can choose various methods and means of authentication: by login / password, RADIUS, certificates, one-time passwords, integration with Active Directory and many others, depending on the SSL VPN solution chosen.
Encryption is also for every taste, it all depends on the vendor. For example, Stonesoft SSL, which we consider in this article, offers us to choose from the following algorithms: AES, DES, 3DES, RC2, RC4 and, in the version for Russia, GOST 28147-89, which is very pleasing to our state. regulators. Since we live in Russia and do not violate the laws, the availability of this product’s certificates of compliance with the FSTEC and the Federal Security Service allows us to significantly expand its scope.
You can also highlight such interesting security mechanisms as checking the user's end device for compliance with the security policy and removing session traces after the end of the connection (cookies, URL history, cache data, and temporary files).
What we have and what we want
The task is the following: to organize secure access to the server via HTTPS using GOST encryption from the laptop of an accountant who likes to relax and work in the country. In fact, we will prokidyvat thick client 1C, which works on "their" ports (1540 TCP, 1560-1591 TCP), through port 443 TCP.
Below are two options for connecting via an SSL VPN gateway:
- The 1C client works with the 1C server on ports 1540 TCP, 1560-1591 TCP, the base 1C is stored in a DBMS installed on the same server
- The 1C client works directly with the database, which is located in the shared folder.
To implement these scenarios, a stand was assembled in the laboratory:
- 1C Server: Windows Server 2008 R2 x64, MS SQL 2008 R2 Express, 1C 8.3.1.531
- Client: Windows XP SP2, 1C 8.3.1.531 client, CryptoPro CSP 3.6
- Firewall (ME): Stonesoft FW / VPN 5.4.3.9685
- SSL VPN gateway: Stonesoft SSL 1.5.200.2002 kc1 GOST, available to the client at https://ssl.sglab.ru/
- Verification Center: CryptoPro Test Center
DOE stands for emulation of work via the Internet: only port 443 TCP is open on the external interface
and configured NAT on the SSL VPN gateway interface.
As can be seen from the scheme and rules on the ME, there is no access from the outside to the 1C server (safety first!).
Configuring SSL VPN
I will not describe the process of installing the firmware with GOST support for the SSL VPN gateway and its initial configuration, all this can be found on the Internet and in the guides . So let's agree that we have a clean Stonesoft SSL with installed crypto libraries of CrytoPro CSP, generated keys, imported certificates of the gateway and a trusted Certification Authority.
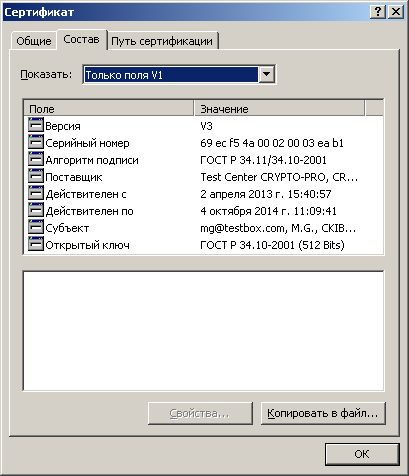
Below are the Stonesoft SSL Gateway and User Certificates issued on the Test Trust Center.
SSL VPN Gateway Certificate:
User certificate:
Configuring an SSL VPN gateway can be divided into the following steps:
- Configure user authentication
- Publish resources on the SSL VPN gateway application portal
- Option number 1: 1C client works with 1C server on ports 1540 TCP, 1560-1591 TCP
- Creating a tunnel resource
- Creating an object in the application portal
- Option number 2: 1C client works directly with the database, which is located in a shared folder
- Creating a standard resource
- Option number 1: 1C client works with 1C server on ports 1540 TCP, 1560-1591 TCP
Below is a detailed description of the settings with screenshots.
Configure user authentication
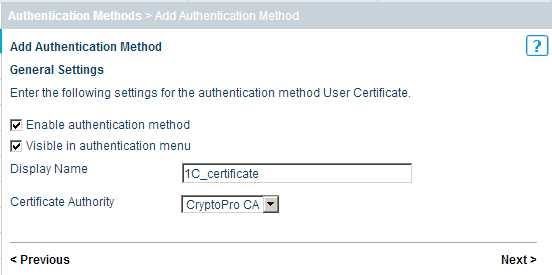
First, configure user authentication. We chose the following scheme: authentication by certificates issued only by a trusted CA without being tied to any user repository. Those. if the user has a certificate issued by a CA that the gateway considers trusted, then the user can authenticate. So, go to https://10.30.0.213:8443/ and get to the administration console of the Stonesoft SSL gateway.
Go to the tab Manage System - Authentication Methods .
Add a new method - click Add Authentication Method ... , select the type User Certificate , set the name to the method and select the CA that will be used for this type of authentication.
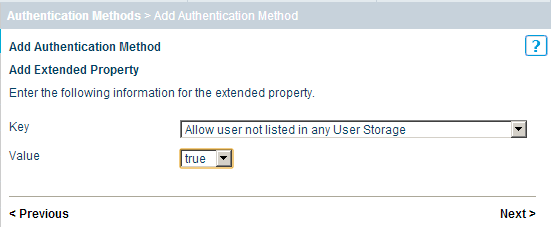
By default, not any user can be authenticated, but only the one whose account is known to the gateway. For our scheme, we need to add a new attribute for the created authentication method: click Add Extended Property ... , select the attribute Allow user, and set the value of the attribute to true .
That's all, the new authentication method is ready, to apply the changes click the Publish button. This is probably the most important button when working with Stonesoft SSL, do not forget to press it every time you change something.
Publication of the resource. Option number 1
Now you need to publish the resource so that it is available to the user on the application portal of the SSL VPN gateway. First, we will consider Option # 1: the 1C client connects to the 1C server and works with the database in the DBMS.
The process of creating and publishing a resource can be described as follows:
- Creating a host (in our case it is a 1C server)
- Creating a link in the SSL VPN gateway application portal
Go to the Manage Resource Access - Tunnel Resources tab, click Add Tunnel Resource Host ... Fill in the resource name, IP address and ports through which we want to access the 1C server.
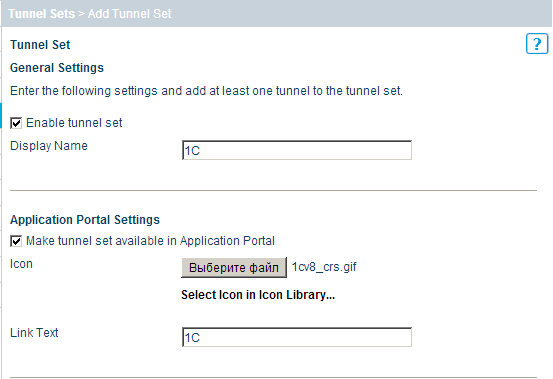
Now you need to create an item in the application portal. Go to the Manage Resource Access - Tunnel Sets tab, click Add Tunnel Set and fill in the name, select the icon that will be visible to the user (you can choose from ready-made ones or load your own), in the Link Text field we write the text that will be displayed under the icon.
In the next step, we need to specify the SSL VPN gateway, what traffic to wrap in SSL, for this we add a dynamic tunnel, for which we click Add Dynamic Tunnel to the Set ... and from the drop-down list in the Resource field select the host with the 1C server. All other fields are filled in automatically in accordance with the properties of the resource that we have selected.
Now the most crucial moment is to correctly write the command that will be executed on the client PC, automatically launching the 1C client with the required connection settings to the server. In my case, it looks like this: "C: \ Program Files \ 1cv8 \ 8.3.1.531 \ bin \ 1cv8c.exe" /Sray10.30.0.238\1c " . It is worth remembering that if there are several users, then all the path to the executable file should be the same. If for some reason this is not possible, then you can leave the Startup Command field empty, then the 1C client will have to be started manually and all parameters must be specified after opening the resource on the application portal.
After all the actions done, click Publish.
Now we can check what happened with us. We launch the browser, write in the address bar https://ssl.sglab.ru/ and see the window with the choice of certificate.
After authentication, we get to the application portal.
We press on 1C and we see how the Access Client is loaded, the command that we wrote in the Tunnel Set properties is launched and eventually the 1C: Enterprise client starts and connects to the server.
At the time of connection, you can view the logs on the ME and make sure that everything works through HTTPS.
Publication of the resource. Option number 2
Now we will configure another script - the user clicks on the 1C icon on the application portal and gets access to the folder with the base on the 1C server.
Go to the administration console of the gateway, go to the tab Manage Resource Access - Standard Resources - File Sharing Resources - Microsoft Windows File Share and click Add this Standard Resource .
Fill in the name of the resource, the IP address of the 1C server, the name of the folder with the database that is shared, select the icon for the application portal and write the display name.
Actually, everything. Do not forget to post changes on the portal.
Now from the client PC, we go again to https://ssl.sglab.ru/ and click on the created Base 1C icon.
Then we see the folder with the base 1C.
Then everything is simple and clear - we add a new information base in the 1C client, specify the path \\ 10.30.0.238 \ 1cbase and work with it over a secure channel via HTTPS.
Conclusion
Thus, we configured the SSL VPN gateway to work remotely with the 1C server in two versions via an encrypted channel using GOST algorithms and allowed our users to work safely with corporate resources through thick clients.
This is not all that Stonesoft SSL VPN is capable of. This configuration will be easy to “tune” to fit your needs.
We hope this article will be useful to you. In the future, we plan to continue to share our experience in the field of information security with haberdashers. We will be glad to questions and wishes in the comments.
Thank you all for your attention!
newmaxidrom
Source: https://habr.com/ru/post/176887/
All Articles