We write toy OS on C #
Introduction
Hello, habrasoobschestvo! I do not know whether this topic will be useful to anyone, but I hope that you will learn something new here. The purpose of this article is to introduce habrayuzerov with the project COSMOS and show how you can implement your own OS, tailored to your needs. Who cares - I ask under the cat.
Meet COSMOS
This is what Wikipedia tells us:
Cosmos is a backronym for the C # Open Source Managed Operating System (Rus. "Managed operating system with open source code in C #"). Cosmos is not currently seeking to become a full-fledged operating system, but rather a set of tools that allow other developers to easily create their own operating systems, or, as one project manager said, act as a “Lego-type operating system.” It also functions as an abstraction layer that hides much of the work of the internal hardware.Cosmos is a constructor that allows you to completely escape from low-level programming and write in pure C #.
What do we need?
First of all, we need Microsoft Visual Studio 2010, preferably Pro. If you are using the Express version, you will need to install Microsoft Visual Studio Shell. Download all this stuff:
We also need to download and install the Cosmos User Kit itself . In addition, we need any virtual machine to test our operating system. I personally use QEMU and Virtual Box.
')
Begin to code
We uncover Visual Studio, click "Create a project ..." and see this window:

Select Cosmos C # Library and click OK, then a window will open with
standard code
Here we will write the logic of our operating system. For your OS to work correctly, you must select the Release configuration for each project! Otherwise, it simply will not work.using System; using System.Collections.Generic; using System.Text; using Sys = Cosmos.System; namespace CSharpKernel1 { public class Kernel : Sys.Kernel { protected override void BeforeRun() { Console.WriteLine("Cosmos booted successfully. Type a line of text to get it echoed back."); } protected override void Run() { Console.Write("Input: "); var input = Console.ReadLine(); Console.Write("Text typed: "); Console.WriteLine(input); } } } We will not need the standard code, so feel free to cut it out! Now let's start writing the code directly. I almost forgot to mention that the code can use any .NET Framework library objects that Cosmos supports (either by translating the object into machine code, or each of its parts). It can also invoke any library built into Cosmos. First, let's deal with the Kernel class.
Kernel
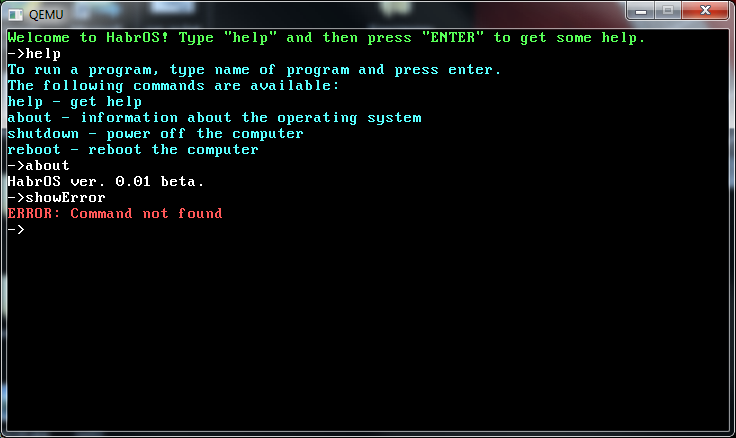
using System; using System.Collections.Generic; using System.Text; using Sys = Cosmos.System; namespace CSharpKernel1 { public class Kernel : Sys.Kernel { protected override void BeforeRun() /* . . */ { Console.ForegroundColor = ConsoleColor.Green; // - Console.WriteLine("Welcome to HabrOS! Type \"help\" and then press \"ENTER\" to get some help."); // Console.ForegroundColor = ConsoleColor.White; // - , . ! Console.ResetColor() ! } protected override void Run() // , . { } } } This, so to speak, is the framework of our OS. Now add to the project the class CommandPrompt, which will be responsible for entering and executing commands.
CommandPrompt
using System; using System.Collections.Generic; using System.Linq; using System.Text; namespace ScorpionOS { class CommandPrompt { public static void Read() { // Console.Write("->"); String ln = Console.ReadLine(); // ln switch (ln) { case "help": // Console.ForegroundColor = ConsoleColor.Cyan; // - Console.WriteLine("To run a program, type name of program and press enter."); Console.WriteLine("The following commands are available:"); Console.WriteLine("help - get help\nabout - information about the operating system\nshutdown - power off the computer\nreboot - reboot the computer"); Console.ForegroundColor = ConsoleColor.White; // break; case "about": // Console.WriteLine("HabrOS ver. 0.01 beta."); break; case "shutdown": // Cosmos.Sys.Plugs.Deboot.ShutDown(); break; case "reboot": // Cosmos.Sys.Plugs.Deboot.Reboot(); break; default: // Console.ForegroundColor = ConsoleColor.Red; //, Console.WriteLine("ERROR: Command not found"); Console.ForegroundColor = ConsoleColor.White; break; } } } } For this class to work correctly, we need to add a link to the Cosmos.Sys.Plugs.dll library. It is located here: From: \ cosmosUserKit \\ Build \ VSIP.
Well, the very least remains: add the call to the CommandPrompt.Read () method to the Run () method of the Kernel class:
Run ()
protected override void Run() { CommandPrompt.Read(); // } That's all. We implemented the simplest OS commands, now it remains only to compile our project and run it on a virtual machine.
To do this, click Build-> build solution, save our project and open Visual Studio 2010 Shell. Click create project and see this window:

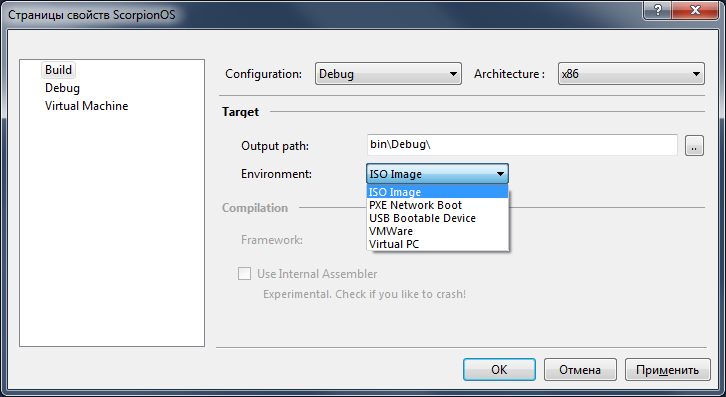
Create a Cosmos Project, and in References add a link to the .dll - the file resulting from the construction of the project. This dll is located in our first project \ bin \ debug folder. IMPORTANT! If you do not have VMWarePlayer or Workstation installed, then open the project properties and select ISO Image, as shown below:
After this, we also press to build the solution, we wait, since the construction is performed for a relatively long time, and after successful construction we close the Visual Studio Shell, without forgetting to save the project. As a result, in the folder of the second project \ bin \ debug we will find the .iso file. It can be written to disk or flash drive and load our OS on real hardware. You can run our OS in a virtual machine and enjoy the result :)
Total
That's all! I hope you learned something new by reading this article. I will try to answer all your questions in the comments, if something is unclear.
Source: https://habr.com/ru/post/176815/
All Articles