QML application integration with web resources
Hello, dear habrazhitel! I want to tell how to integrate the program in the newfangled QML language with web resources.
QML itself is a declarative JavaScript-like programming language that is included in the Qt framework. Qt developers are serious and promote it as the main interface creation tool. Moreover, a lot of things can be done without resorting to C ++ at all, including the ability to work with web servers.
Web technologies are increasingly penetrating our lives, we often use various web resources. It is not always convenient to launch a browser for this, sometimes a separate client application is much more convenient, as the number of clients for various social networks, for example, on mobile platforms, speaks eloquently.
')
Given that Qt 5.1, the alpha version of which came out last week, includes initial support for Android and iOS, this topic may be of particular interest to those who are eyeing Qt or are actively mastering it. In this article I will tell you how to organize work with web resources from a QML application using the example of the VKontakte API.
Just in case, I note that I am considering the latest stable version of Qt 5.0.2. In earlier versions of some features may not be.
Surely, many of the readers have heard about such technology as AJAX (Asynchronous JavaScript And XML). It allows you to send asynchronous requests to the server and update the page content without reloading it. In modern browsers there are various tools for this, XMLHttpRequest is one of them. Since QML is a JavaScript-like language and the JavaScript environment is similar to browser-based, XMLHttpRequest is also present. Further in the text I will also write down its name in abbreviated form - XHR.
Actually, what is it and what does it give us? It is a tool for asynchronous (synchronous also supported in browsers) HTTP requests. Despite its name, it allows you to transfer data not only in XML format, although it was originally designed specifically for this. The implementation in the QML engine supports the following HTTP requests: GET, POST, HEAD, PUT and DELETE. Basically, we will use the first two.
A distinctive feature of the XHR implementation in QML is that requests can be sent to any host, there are no such restrictions as in the browser.
The process of working with XHR is as follows.
1. Create an XHR object:
2. Initialize the object, specifying the type of the request (also known as the HTTP method), the address and, if necessary, the request parameters [1] that need to be sent to the server:
The first parameter is the request type, the second is the URL. For a GET request, the parameters must be passed here, separating them from the address with a '?'. Parameters are separated by '&'.
For a POST request, you need to specify the content type. If we pass the data to the request parameters, this is done as follows:
3. Set the handler to change the status of the request. In most cases, we just have to wait until the request is completed and then process the result or errors. At the end of the request, the readyState parameter will be equal to XMLHttpRequest.DONE (for details, see values in [2] ).
Our anonymous function will call each time the readyState property changes. We are interested in the completion of the request, after which we check whether it was successful. To do this, we check the code of its status with the code of successful completion (200). HTTP is a text protocol and in addition to numeric code values, a text description is also transmitted, so you can compare the statusText property with the string corresponding to this status, in this case, the “OK” string:
In case of an error, status and statusText will contain the code and text description of the HTTP status codes (for example, 404 and “Not Found”, respectively).
4. Send the request.
In the case of POST, here you need to pass the request parameters:
In the query parameters, you can pass not all characters. Therefore, both the parameter and the value should be encoded and, if necessary, decoded respectively by special functions - encodeURIComponent () and decodeURIComponent (). Usage example:
It is recommended that the encoded string be further processed and replaced with the sequence "% 20" (i.e., the encoded space) with the '+' character. Before decoding, respectively, do the opposite.
Typically, request parameters are passed simple type values. You can pass an array, but the syntax is somewhat muddy. For example, sending a params array of two values would look like this:
If you get it, you can even pass objects as values (!), But this may not be entirely reliable, in the sense that on the receiving side it can turn into an array :)
Using POST requests we can transmit data not only by the parameters of the request but also in the body of the request. For example, you can send data in JSON format. To do this, you need to set the correct Content-Type and Content Size (Content-Length). An example of sending such a request:
Here JSON is a global object available in QML that provides tools for working with this format [3] .
In fact, the format in which we can transfer data is determined by the server. If he accepts JSON - fine, JSON helmet. Expects that the data will come in the request parameters - so it should be sent.
Now that we have studied the necessary theoretical information, we will begin to practice and work with VKontakte.
To begin, consider a simple example with methods that do not require authorization and other unnecessary gestures. Getting a list of friends falls into this category. We will write a simple program that, when it starts, sends an XHR to receive a list of friends and after receiving it, displaying the names of users and their avatars.
Most of the code is the display interface and it makes no sense to describe it specifically. I note only that if a JavaScript object or an array is used as a model, then modelData is used instead of model to get the data to the model.
The most interesting part here is working with the server. To access the VK API there is a special address: api.vk.com/method . We add the name of the method to the received address (the list of methods can be found in [4] ), in our case it is the friends.get method. To this address you need to send a POST or GET request with the necessary parameters. The answer will come in JSON format. We need to pass the user ID in the uid parameter. Also, in the fields parameter, we will also pass photo_medium to get a photo and so that it is not of the smallest size.
Below the actual source code. The userId in main is the user ID.
I made a conclusion in the console that will come in response, it is convenient if there is a desire to play with this example.
By running the program, if a valid ID was specified, we will get something like this:
The biggest difficulty here is precisely in working with XHR. Let's try to figure it out and simplify the code a bit.
There are two difficulties with working with XHR.
1. When transmitting data by request parameters, this request must be compiled. In case these parameters can change, then most likely in the code there will be many operations sticking query parameters from pieces. In addition, you need to remember that it would be nice to encode the keys and values using the encodeURIComponent, as I already wrote above. In total, the code that forms these parameters can be cumbersome and not very clear. It would be much more convenient to use the object in which the corresponding fields are set as parameters.
I wrote a small JavaScript library that converts an object into request parameters, encodes everything, in general, produces a ready-made string that can be sent immediately. There is also a function that decodes the request parameters and creates an object from them (but it only supports simple types, an array or an object does not parse the parameters, however, it is unlikely to be necessary). You can get it here: github.com/krnekit/qml-utils/blob/master/qml/URLQuery.js .
2. Depending on the type of request, you need to send data differently, and you may also need to set additional headers. I have written a library that simplifies sending XHR by providing a single interface. It can send data in any format, for this you can pass a content type to the parameter, by default the same “application / x-www-form-urlencoded” is considered, it is worth remembering that data of another type cannot be transmitted using a GET request in this case, you will need to use POST. Content-Length is also automatically calculated and installed. Accepts the request type, URL, callback function (optional), which will be called when the request is completed, and the data type (optional). The function returns the request object itself or null in case of an error. You can get it here: github.com/krnekit/qml-utils/blob/master/qml/XHR.js
Using the two library data I simplified the previous example. I will not give all the code here, we will consider only what has changed.
At the beginning of the file we include the libraries (in this example, the library files are in the same directory as the qml file):
We import libraries and set namespaces for them, through which we will access functions from libraries.
The function that sends the XHR now looks like this:
First, we define an object with request parameters. Then the callback function that will be called when the request is completed. The function receives the request itself as a parameter. And then we send the request itself, converting the object with the parameters using the serializeParams function.
As a result, the code size, one might say, has not changed, but it has become much more structured and understandable.
I will use these functions in the future to make the code easier. If they are useful to someone, you can take and use the MIT license.
Not all methods work without authorization, so most likely we will need to log in. As a result, we should get a so-called. Authorization Token, which we will then transmit in requests to VKontakte. In order for us to log in, you need to create an application in VK. You can do it here: vk.com/editapp?act=create . Select the type of Standalone application. Then we will pass its ID with one of the request parameters.
Since we are doing a standalone application, there are two methods of authorization, both of them have their own problems, so you need to choose the least evil :)
1. Direct authorization. An HTTP request is sent with login details to a specific address. In response, data will come in JSON format containing a token or error description.
Benefits:
Disadvantages:
2. Authorization of OAuth. Implemented as follows. In the program you need to embed a browser in which the user will be shown a special login page. After authorization, a redirect to another page will occur and the current URL will contain a token or error description. VKontakte this method is positioned as the main.
Benefits:
The disadvantages, however, are also significant.
Of course, I asked for the possibility of direct authorization to be included, but at first, VKontakte support slowly asked me, why did I need it, and then I squeezed full access :( So let's consider it purely theoretically. It would look something like this:
At the beginning we form the parameters, in them I, for example, indicated that access to the user's audio recordings is required (the scope parameter). Then the callback function, which, in case of an error, writes to the console, and if successful, saves the token and then requests to the API may go further.
Just in case, leave a link to the documentation: vk.com/dev/auth_direct .
For this type of authorization, we need to show the user a webpage login. QtQuick has a WebView component that allows you to embed a QML browser in the WebKit engine into an application. After the user is authorized, the URL in the browser will change and, in case of successful authorization, will contain the token in the request parameters or the description of the error in the anchor [5] .
In order not to be bothered with parsing this URL, we use the parseParams function from URLQuery. You can pass the entire URL to it at once, we will get an object with parameters at the output.
The following describes the component that implements this functionality.
LoginWindow.qml:
We display this component in a separate window. After calling the login () method, the login page will be loaded.
After authorization will be made to the transition to the URL in which the address will be oauth.vk.com/blank.html , and then through the '?' or '#' will be the result. With the permissions parameter we set the permissions we need. If we specify something there, then when logging in through our widget, the user will see a dialog giving access rights to the application.
In order to understand when we went to the right address, we set the onLoadingChanged handler. It takes a loadRequest object, from which we get all the information we need. It is called several times and we are interested in the situation either when an error occurred, in which case we send the corresponding signal, or when the necessary page is loaded. In this case, we check if the token came to us and, if so, send a signal about successful authorization, otherwise an error message.
Well, now consider the program itself, which uses this widget. The program in case of successful authorization sets the status of the user to "test". The user ID is set by the userId property in main.
After loading we will see the login window. After login it is hidden and a request is sent to the server to change the user status. After that, the program writes the result to the console and ends.
After we have logged in, we no longer need to request a token if we didn’t need any additional access rights or its lifetime has not expired (it is returned to us along with the token, in case of successful authorization).
I'll tell you a little story from my experience, not connected with VKontakte, but connected with XHR.
Somehow my colleague had the task to receive and process in XML data in QML.
QtQuick has a special type of XmlListModel that can be pulled from the network, parsed, and presented as an XML model file. He needs to specify an XPath type query, according to which the model will be populated. The problem was that the XML file contained not only the elements that had to be selected and placed in the model, but also some additional information that also needed to be obtained.
There are several methods of solution. You can use two XmlListModel objects, but this is an unambiguous crutch, and besides, I didn’t want the XML file to be pumped twice (and it will be checked). You can implement this functionality using Qt, which contains as many as many variants of parsers, but there was a desire to solve the problem in pure QML.
Since XMLHttpRequest was originally designed to work with XML, it has the means to work with XML. Accordingly, you can get and parse XML using its means and select the necessary information. Then you can transfer the same XML to an XmlListModel (there you can transfer not only the URI, but also the contents of the XML file).
So, despite the fact that now XMLHttpRequest is used for anything, you should not forget what it was created for and what tools are there for working with XML.
QML contains many tools available for JavaScript in the browser. XMLHttpRequest allows you to send HTTP requests and thus ensure the integration of the application in QML with web resources. Using XHR makes it possible in many cases to do without using C ++ to exchange data with the server and thereby simplify development.
QML itself is a declarative JavaScript-like programming language that is included in the Qt framework. Qt developers are serious and promote it as the main interface creation tool. Moreover, a lot of things can be done without resorting to C ++ at all, including the ability to work with web servers.
Web technologies are increasingly penetrating our lives, we often use various web resources. It is not always convenient to launch a browser for this, sometimes a separate client application is much more convenient, as the number of clients for various social networks, for example, on mobile platforms, speaks eloquently.
')
Given that Qt 5.1, the alpha version of which came out last week, includes initial support for Android and iOS, this topic may be of particular interest to those who are eyeing Qt or are actively mastering it. In this article I will tell you how to organize work with web resources from a QML application using the example of the VKontakte API.
Just in case, I note that I am considering the latest stable version of Qt 5.0.2. In earlier versions of some features may not be.
What is XMLHttpRequest and why is it needed?
Surely, many of the readers have heard about such technology as AJAX (Asynchronous JavaScript And XML). It allows you to send asynchronous requests to the server and update the page content without reloading it. In modern browsers there are various tools for this, XMLHttpRequest is one of them. Since QML is a JavaScript-like language and the JavaScript environment is similar to browser-based, XMLHttpRequest is also present. Further in the text I will also write down its name in abbreviated form - XHR.
Actually, what is it and what does it give us? It is a tool for asynchronous (synchronous also supported in browsers) HTTP requests. Despite its name, it allows you to transfer data not only in XML format, although it was originally designed specifically for this. The implementation in the QML engine supports the following HTTP requests: GET, POST, HEAD, PUT and DELETE. Basically, we will use the first two.
A distinctive feature of the XHR implementation in QML is that requests can be sent to any host, there are no such restrictions as in the browser.
XMLHttpRequest procedure
The process of working with XHR is as follows.
1. Create an XHR object:
var request = new XMLHttpRequest() 2. Initialize the object, specifying the type of the request (also known as the HTTP method), the address and, if necessary, the request parameters [1] that need to be sent to the server:
request.open('GET', 'http://site.com?param1=value1¶m2=value2') The first parameter is the request type, the second is the URL. For a GET request, the parameters must be passed here, separating them from the address with a '?'. Parameters are separated by '&'.
For a POST request, you need to specify the content type. If we pass the data to the request parameters, this is done as follows:
request.setRequestHeader('Content-Type', 'application/x-www-form-urlencoded') 3. Set the handler to change the status of the request. In most cases, we just have to wait until the request is completed and then process the result or errors. At the end of the request, the readyState parameter will be equal to XMLHttpRequest.DONE (for details, see values in [2] ).
request.onreadystatechange = function () { if (request.readyState === XMLHttpRequest.DONE) { if (request.status === 200) { console.log(request.responseText) } else { console.log("HTTP request failed", request.status) } } } Our anonymous function will call each time the readyState property changes. We are interested in the completion of the request, after which we check whether it was successful. To do this, we check the code of its status with the code of successful completion (200). HTTP is a text protocol and in addition to numeric code values, a text description is also transmitted, so you can compare the statusText property with the string corresponding to this status, in this case, the “OK” string:
if (request.statusText === 'OK') In case of an error, status and statusText will contain the code and text description of the HTTP status codes (for example, 404 and “Not Found”, respectively).
4. Send the request.
request.send() In the case of POST, here you need to pass the request parameters:
request.send('param1=value1¶m2=value2') In the query parameters, you can pass not all characters. Therefore, both the parameter and the value should be encoded and, if necessary, decoded respectively by special functions - encodeURIComponent () and decodeURIComponent (). Usage example:
request.send('%1=%2'.arg(encodeURIComponent(param)).arg(encodeURIComponent(value))) It is recommended that the encoded string be further processed and replaced with the sequence "% 20" (i.e., the encoded space) with the '+' character. Before decoding, respectively, do the opposite.
Typically, request parameters are passed simple type values. You can pass an array, but the syntax is somewhat muddy. For example, sending a params array of two values would look like this:
request.send('params[]=value1¶ms[]=value2') If you get it, you can even pass objects as values (!), But this may not be entirely reliable, in the sense that on the receiving side it can turn into an array :)
Using POST requests we can transmit data not only by the parameters of the request but also in the body of the request. For example, you can send data in JSON format. To do this, you need to set the correct Content-Type and Content Size (Content-Length). An example of sending such a request:
request.setRequestHeader('Content-Type', 'application/json') var params = { param1: value1, param2: value2 } var data = JSON.stringify(params) request.setRequestHeader('Content-Length', data.length) request.send(data) Here JSON is a global object available in QML that provides tools for working with this format [3] .
In fact, the format in which we can transfer data is determined by the server. If he accepts JSON - fine, JSON helmet. Expects that the data will come in the request parameters - so it should be sent.
Now that we have studied the necessary theoretical information, we will begin to practice and work with VKontakte.
Retrieving and displaying friends list
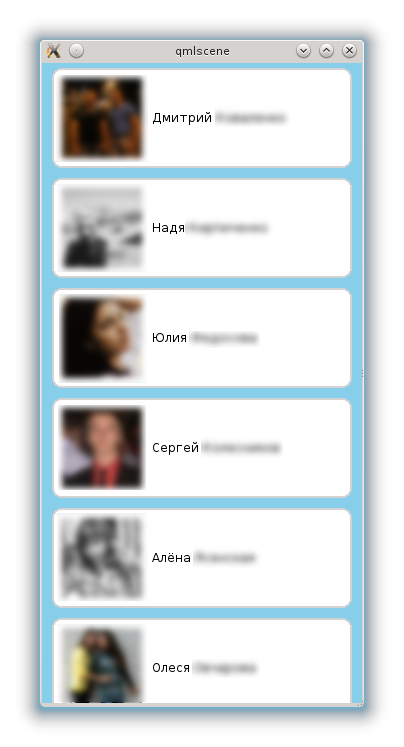
To begin, consider a simple example with methods that do not require authorization and other unnecessary gestures. Getting a list of friends falls into this category. We will write a simple program that, when it starts, sends an XHR to receive a list of friends and after receiving it, displaying the names of users and their avatars.
Most of the code is the display interface and it makes no sense to describe it specifically. I note only that if a JavaScript object or an array is used as a model, then modelData is used instead of model to get the data to the model.
The most interesting part here is working with the server. To access the VK API there is a special address: api.vk.com/method . We add the name of the method to the received address (the list of methods can be found in [4] ), in our case it is the friends.get method. To this address you need to send a POST or GET request with the necessary parameters. The answer will come in JSON format. We need to pass the user ID in the uid parameter. Also, in the fields parameter, we will also pass photo_medium to get a photo and so that it is not of the smallest size.
Below the actual source code. The userId in main is the user ID.
import QtQuick 2.0 Rectangle { id: main property int userId: XXX property var friends width: 320 height: 640 color: 'skyblue' function getFriends() { var request = new XMLHttpRequest() request.open('POST', 'https://api.vk.com/method/friends.get') request.onreadystatechange = function() { if (request.readyState === XMLHttpRequest.DONE) { if (request.status && request.status === 200) { console.log("response", request.responseText) var result = JSON.parse(request.responseText) main.friends = result.response } else { console.log("HTTP:", request.status, request.statusText) } } } request.setRequestHeader('Content-Type', 'application/x-www-form-urlencoded') request.send('fields=photo_medium&uid=%1'.arg(main.userId)) } ListView { id: view anchors.margins: 10 anchors.fill: parent model: friends spacing: 10 delegate: Rectangle { width: view.width height: 100 anchors.horizontalCenter: parent.horizontalCenter color: 'white' border { color: 'lightgray' width: 2 } radius: 10 Row { anchors.margins: 10 anchors.fill: parent spacing: 10 Image { id: image height: parent.height fillMode: Image.PreserveAspectFit source: modelData['photo_medium'] } Text { width: parent.width - image.width - parent.spacing anchors.verticalCenter: parent.verticalCenter elide: Text.ElideRight renderType: Text.NativeRendering text: "%1 %2".arg(modelData['first_name']).arg(modelData['last_name']) } } } } Component.onCompleted: { getFriends() } } I made a conclusion in the console that will come in response, it is convenient if there is a desire to play with this example.
By running the program, if a valid ID was specified, we will get something like this:
The biggest difficulty here is precisely in working with XHR. Let's try to figure it out and simplify the code a bit.
Simplify XMLHttpRequest
There are two difficulties with working with XHR.
1. When transmitting data by request parameters, this request must be compiled. In case these parameters can change, then most likely in the code there will be many operations sticking query parameters from pieces. In addition, you need to remember that it would be nice to encode the keys and values using the encodeURIComponent, as I already wrote above. In total, the code that forms these parameters can be cumbersome and not very clear. It would be much more convenient to use the object in which the corresponding fields are set as parameters.
I wrote a small JavaScript library that converts an object into request parameters, encodes everything, in general, produces a ready-made string that can be sent immediately. There is also a function that decodes the request parameters and creates an object from them (but it only supports simple types, an array or an object does not parse the parameters, however, it is unlikely to be necessary). You can get it here: github.com/krnekit/qml-utils/blob/master/qml/URLQuery.js .
2. Depending on the type of request, you need to send data differently, and you may also need to set additional headers. I have written a library that simplifies sending XHR by providing a single interface. It can send data in any format, for this you can pass a content type to the parameter, by default the same “application / x-www-form-urlencoded” is considered, it is worth remembering that data of another type cannot be transmitted using a GET request in this case, you will need to use POST. Content-Length is also automatically calculated and installed. Accepts the request type, URL, callback function (optional), which will be called when the request is completed, and the data type (optional). The function returns the request object itself or null in case of an error. You can get it here: github.com/krnekit/qml-utils/blob/master/qml/XHR.js
Using the two library data I simplified the previous example. I will not give all the code here, we will consider only what has changed.
At the beginning of the file we include the libraries (in this example, the library files are in the same directory as the qml file):
import 'URLQuery.js' as URLQuery import 'XHR.js' as XHR We import libraries and set namespaces for them, through which we will access functions from libraries.
The function that sends the XHR now looks like this:
function getFriends() { var params = { fields: 'photo_medium', uid: main.userId } function callback(request) { if (request.status && request.status === 200) { console.log("response", request.responseText) var result = JSON.parse(request.responseText) main.friends = result.response } else { console.log("HTTP:", request.status, request.statusText) } } XHR.sendXHR('POST', 'https://api.vk.com/method/friends.get', callback, URLQuery.serializeParams(params)) } First, we define an object with request parameters. Then the callback function that will be called when the request is completed. The function receives the request itself as a parameter. And then we send the request itself, converting the object with the parameters using the serializeParams function.
As a result, the code size, one might say, has not changed, but it has become much more structured and understandable.
I will use these functions in the future to make the code easier. If they are useful to someone, you can take and use the MIT license.
Log in to VKontakte from QML
Not all methods work without authorization, so most likely we will need to log in. As a result, we should get a so-called. Authorization Token, which we will then transmit in requests to VKontakte. In order for us to log in, you need to create an application in VK. You can do it here: vk.com/editapp?act=create . Select the type of Standalone application. Then we will pass its ID with one of the request parameters.
1. Authorization methods
Since we are doing a standalone application, there are two methods of authorization, both of them have their own problems, so you need to choose the least evil :)
1. Direct authorization. An HTTP request is sent with login details to a specific address. In response, data will come in JSON format containing a token or error description.
Benefits:
- Simplicity.
Disadvantages:
- It is necessary to transfer the secret code of the application (you may even have to be stitched into the program), respectively, there is a risk of its leakage.
- This method will only work for trusted applications. When creating a new application, it will be unavailable and you need to write it in support.
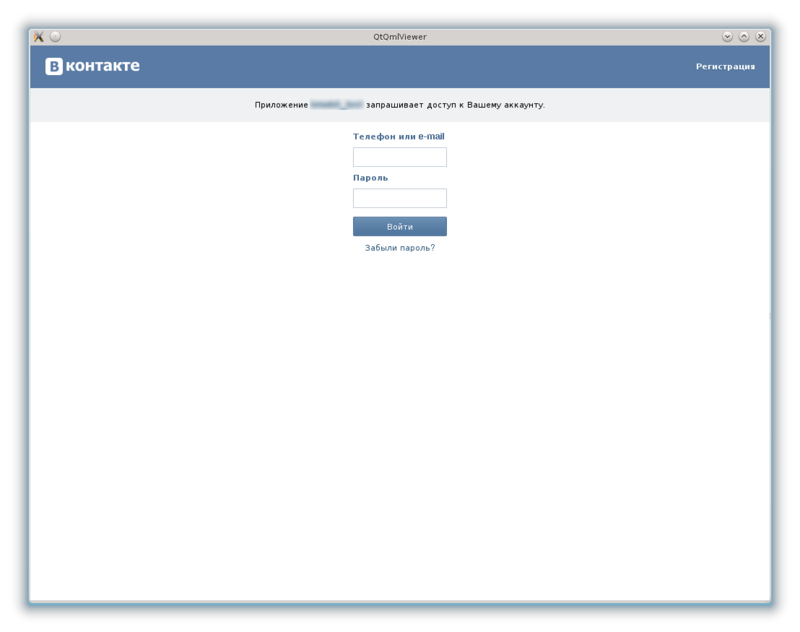
2. Authorization of OAuth. Implemented as follows. In the program you need to embed a browser in which the user will be shown a special login page. After authorization, a redirect to another page will occur and the current URL will contain a token or error description. VKontakte this method is positioned as the main.
Benefits:
- The main and very significant advantage is that it works for all applications and for applications that are not allowed direct authorization, it is generally the only way.
- No need to pass a secret key.
- OAuth is a standard and you can also log in to Facebook, for example.
The disadvantages, however, are also significant.
- You need to open a VK page, which means either try to embed it in the program window or open it in a separate window.
- As we open the page, we need a browser. Respectively, it is necessary to drag QtWebkit and all that it pulls along with itself, which is why the program will add weight.
- It will be necessary to intercept events of changing the URL of the embedded browser, parse this URL and select parameters from it, which is somewhat more complicated than XHR.
2. Direct authorization
Of course, I asked for the possibility of direct authorization to be included, but at first, VKontakte support slowly asked me, why did I need it, and then I squeezed full access :( So let's consider it purely theoretically. It would look something like this:
function login() { var params = { grant_type: 'password', client_id: 123456, client_secret: 'XXX', username: 'XXX', password: 'XXX', scope: 'audio' } function callback(request) { if (request.status && request.status === 200) { console.log("response", request.responseText) var result = JSON.parse(request.responseText) if (result.error) { console.log("Error:", result.error, result.error_description) } else { main.authToken = result.auth_token // Now do requests with this token } } else { console.log("HTTP:", request.status, request.statusText) } } XHR.sendXHR('POST', 'https://oauth.vk.com/token', callback, URLQuery.serializeParams(params)) } At the beginning we form the parameters, in them I, for example, indicated that access to the user's audio recordings is required (the scope parameter). Then the callback function, which, in case of an error, writes to the console, and if successful, saves the token and then requests to the API may go further.
Just in case, leave a link to the documentation: vk.com/dev/auth_direct .
3. Authorization through OAuth.
For this type of authorization, we need to show the user a webpage login. QtQuick has a WebView component that allows you to embed a QML browser in the WebKit engine into an application. After the user is authorized, the URL in the browser will change and, in case of successful authorization, will contain the token in the request parameters or the description of the error in the anchor [5] .
In order not to be bothered with parsing this URL, we use the parseParams function from URLQuery. You can pass the entire URL to it at once, we will get an object with parameters at the output.
The following describes the component that implements this functionality.
LoginWindow.qml:
import QtQuick 2.0 import QtQuick.Window 2.0 import QtWebKit 3.0 import "URLQuery.js" as URLQuery Window { id: loginWindow property string applicationId property string permissions property var finishRegExp: /^https:\/\/oauth.vk.com\/blank.html/ signal succeeded(string token) signal failed(string error) function login() { var params = { client_id: applicationId, display: 'popup', response_type: 'token', redirect_uri: 'http://oauth.vk.com/blank.html' } if (permissions) { params['scope'] = permissions } webView.url = "https://oauth.vk.com/authorize?%1".arg(URLQuery.serializeParams(params)) } width: 1024 height: 768 WebView { id: webView anchors.fill: parent onLoadingChanged: { console.log(loadRequest.url.toString()) if (loadRequest.status === WebView.LoadFailedStatus) { loginWindow.failed("Loading error:", loadRequest.errorDomain, loadRequest.errorCode, loadRequest.errorString) return } else if (loadRequest.status === WebView.LoadStartedStatus) { return } if (!finishRegExp.test(loadRequest.url.toString())) { return } var result = URLQuery.parseParams(loadRequest.url.toString()) if (!result) { loginWindow.failed("Wrong responce from server", loadRequest.url.toString()) return } if (result.error) { loginWindow.failed("Error", result.error, result.error_description) return } if (!result.access_token) { loginWindow.failed("Access token absent", loadRequest.url.toString()) return } succeeded(result.access_token) return } } } We display this component in a separate window. After calling the login () method, the login page will be loaded.
After authorization will be made to the transition to the URL in which the address will be oauth.vk.com/blank.html , and then through the '?' or '#' will be the result. With the permissions parameter we set the permissions we need. If we specify something there, then when logging in through our widget, the user will see a dialog giving access rights to the application.
In order to understand when we went to the right address, we set the onLoadingChanged handler. It takes a loadRequest object, from which we get all the information we need. It is called several times and we are interested in the situation either when an error occurred, in which case we send the corresponding signal, or when the necessary page is loaded. In this case, we check if the token came to us and, if so, send a signal about successful authorization, otherwise an error message.
Well, now consider the program itself, which uses this widget. The program in case of successful authorization sets the status of the user to "test". The user ID is set by the userId property in main.
import QtQuick 2.0 import 'URLQuery.js' as URLQuery import 'XHR.js' as XHR Rectangle { id: main property int userId: XXX property var authToken width: 640 height: 320 function processLoginSuccess(token) { loginWindow.visible = false authToken = token setStatus() } function setStatus() { var params = { access_token: main.authToken, text: 'test' } function callback(request) { if (request.status == 200) { console.log('result', request.responseText) var result = JSON.parse(request.responseText) if (result.error) { console.log('Error:', result.error.error_code,result.error.error_msg) } else { console.log('Success') } } else { console.log('HTTP:', request.status, request.statusText) } Qt.quit() } XHR.sendXHR('POST', 'https://api.vk.com/method/status.set', callback, URLQuery.serializeParams(params)) } LoginWindow { id: loginWindow applicationId: XXX permissions: 'status' visible: false onSucceeded: processLoginSuccess(token) onFailed: { console.log('Login failed', error) Qt.quit() } } Component.onCompleted: { loginWindow.visible = true loginWindow.login() } } After loading we will see the login window. After login it is hidden and a request is sent to the server to change the user status. After that, the program writes the result to the console and ends.
After we have logged in, we no longer need to request a token if we didn’t need any additional access rights or its lifetime has not expired (it is returned to us along with the token, in case of successful authorization).
What else can you use XMLHttpRequest
I'll tell you a little story from my experience, not connected with VKontakte, but connected with XHR.
Somehow my colleague had the task to receive and process in XML data in QML.
QtQuick has a special type of XmlListModel that can be pulled from the network, parsed, and presented as an XML model file. He needs to specify an XPath type query, according to which the model will be populated. The problem was that the XML file contained not only the elements that had to be selected and placed in the model, but also some additional information that also needed to be obtained.
There are several methods of solution. You can use two XmlListModel objects, but this is an unambiguous crutch, and besides, I didn’t want the XML file to be pumped twice (and it will be checked). You can implement this functionality using Qt, which contains as many as many variants of parsers, but there was a desire to solve the problem in pure QML.
Since XMLHttpRequest was originally designed to work with XML, it has the means to work with XML. Accordingly, you can get and parse XML using its means and select the necessary information. Then you can transfer the same XML to an XmlListModel (there you can transfer not only the URI, but also the contents of the XML file).
So, despite the fact that now XMLHttpRequest is used for anything, you should not forget what it was created for and what tools are there for working with XML.
Small summary
QML contains many tools available for JavaScript in the browser. XMLHttpRequest allows you to send HTTP requests and thus ensure the integration of the application in QML with web resources. Using XHR makes it possible in many cases to do without using C ++ to exchange data with the server and thereby simplify development.
Source: https://habr.com/ru/post/176665/
All Articles